

Channel Deployment Guide
Detailed guide for connecting your AI employee to Telegram or Lark.
Supported Channels
| Channel | Status | Best For |
|---|---|---|
| Telegram | Available | International users, personal use |
| Lark (Feishu) | Available | Domestic teams, enterprise use |
| WeCom (企业微信) | Available | Domestic enterprise users |
| DingTalk (钉钉) | Available | Domestic teams, no public callback needed |
| Available | International business users | |
| WhatsApp Business (Official API) | Available | International business, official Cloud API |
| Discord | Available | Developer/community scenarios |
| Slack | Available | European/US enterprise users |
| Microsoft Teams | Available | Enterprise teams, Microsoft 365 organizations |
| Zalo (Official) | Available | Vietnam users, personal & business use |
| Zalo Personal (Unofficial) | Available | Vietnam users, personal Zalo account (unofficial) |
| LINE | Available | Japan / Taiwan / Thailand users, personal & business use |
Tip: You can connect multiple channels simultaneously. Your AI employee responds across all connected channels. Pro plan supports Telegram + Lark dual-channel access.
Prerequisites
| Item | Description |
|---|---|
| OpenMax Account | Registered and paid/trial active |
| Channel Account | Your Telegram or Lark platform account |
| ~10 minutes | Time to complete deployment |
You do NOT need:
- Any servers or technical infrastructure
- Any coding skills
- API keys or developer accounts
- Any technical knowledge
Option A: Telegram Deployment (Recommended for international users)
Estimated time: 5-8 minutes
Step 1: Create a Telegram Bot
- Open Telegram, search for @BotFather (official bot manager)
- Send
/newbotcommand - Enter your Bot display name (e.g.,
My OpenMax AI) - Enter your Bot username (must end with
bot, e.g.,my_openmax_ai_bot) - BotFather returns a Bot Token (format:
110201543:AAHdqTcvCH1vGWJxfSeofSAs0K5PALDsaw) - Copy and save this Token — you'll need it next
Important: The Bot Token is your bot's unique credential. Do not share it with others.
Step 2: Connect in OpenMax Dashboard
- Log into OpenMax Dashboard
- Open the Channels page and find the Telegram card
- Paste the Bot Token from Step 1
- Click Connect
- System automatically validates the Token and completes connection
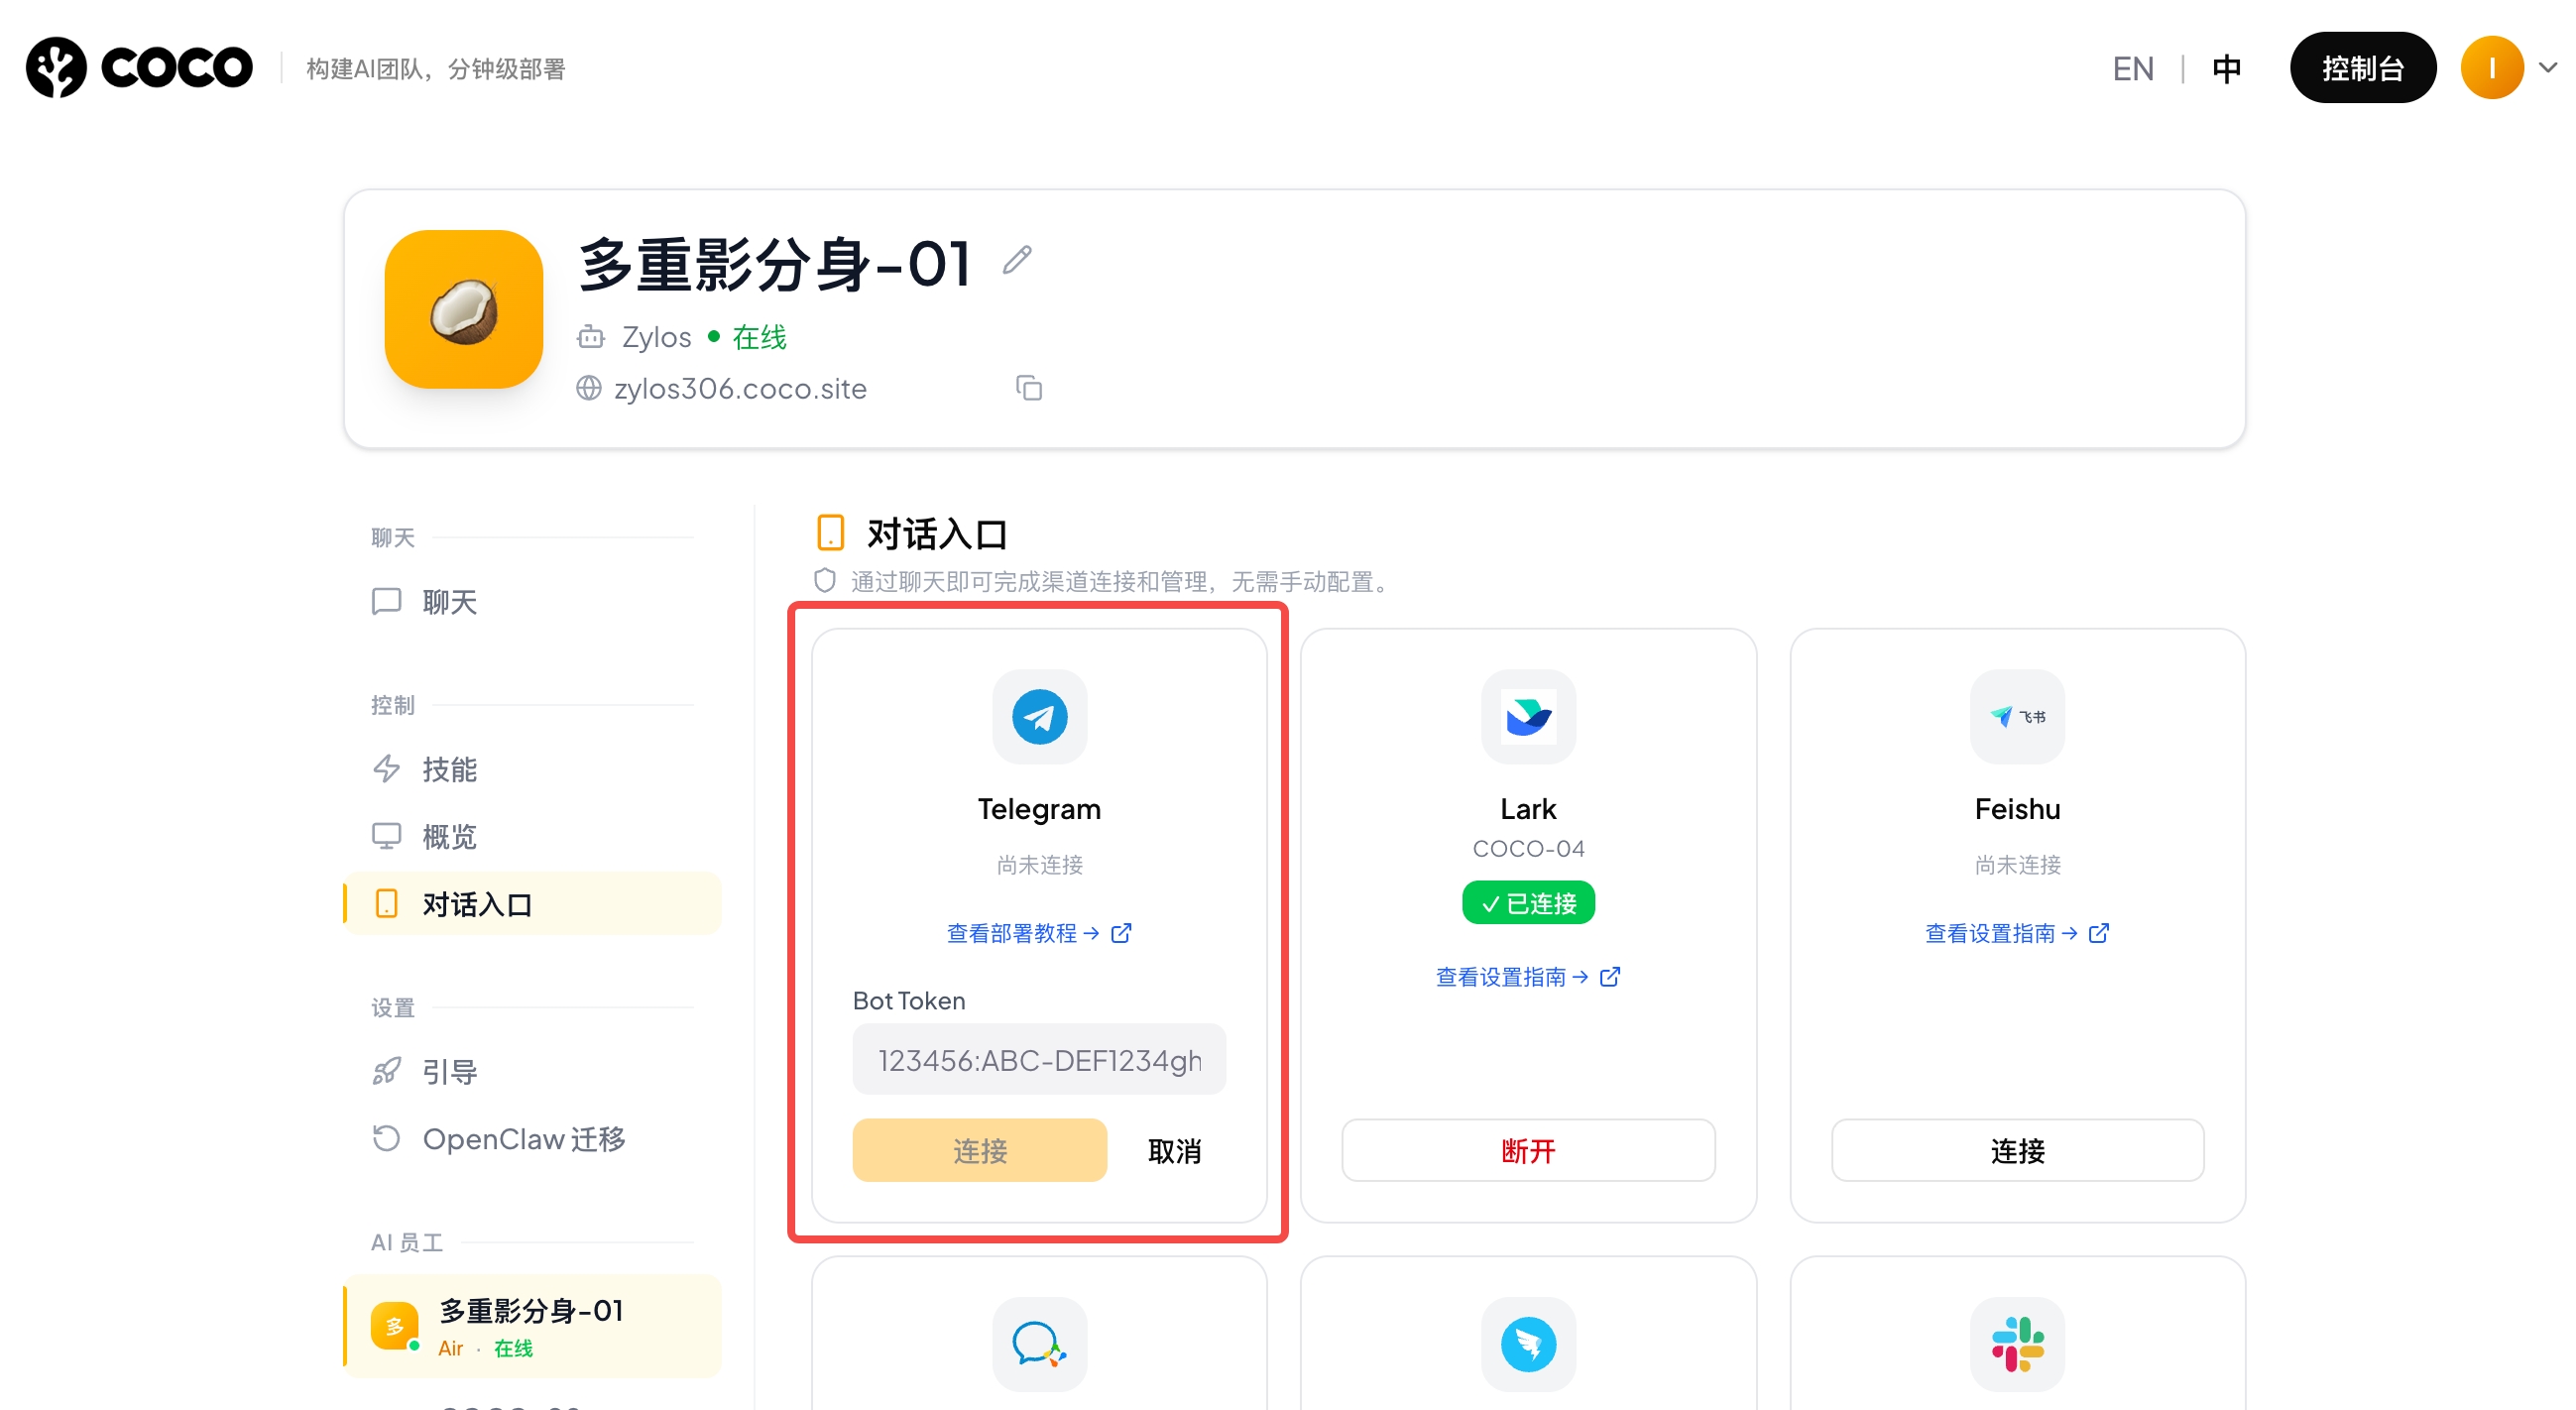
Step 3: Start Using
- In Telegram, search for your Bot username (e.g.,
@my_openmax_ai_bot) - Click Start or send
/start - Send any message — AI employee responds immediately
- Deployment complete!
Tip: Telegram is the simplest deployment. No admin permissions needed, no extra configuration. Recommended for first-time users.
Telegram FAQ
| Issue | Solution |
|---|---|
| Bot not responding | Check if Token is correct, verify connection status in Dashboard |
| Slow responses | Check network connection. Telegram requires stable internet |
| Want multi-user access | Add Bot to a Telegram group. All group members can interact with AI |
| Want to switch Bot | Disconnect old one in Dashboard, create new Bot and reconnect |
Option B: Lark / Feishu Deployment
Estimated time: 8-15 minutes
Note: Adding a self-built app (Bot) in Lark/Feishu requires enterprise admin approval. If you don't want to set up an enterprise Bot right away, you can first create a Lark personal account (international) or Feishu personal account (domestic). You can create and use Bots in your personal workspace without admin approval.
Lark (international) and Feishu (domestic China) have slightly different interfaces. Choose the guide that matches your platform:
Lark Deployment (Recommended for international teams)
Lark offers two deployment options — choose the one that fits your needs:
- Option 1: Smart Agent Quick Deploy (Recommended) — 1-2 minutes, system auto-configures permissions and events, suitable for most users
- Option 2: Custom App Deploy — requires manual permission configuration, event subscription, and version publishing, suitable for advanced users who need fine-grained control
Option 1: Smart Agent Quick Deploy (Recommended)
Estimated time: 1-2 minutes | System auto-configures permissions and event subscriptions — just create a Smart Agent and fill in credentials to complete deployment.
Step 1: Access Lark Open Platform
- Visit Lark Open Platform
- Log in with your Lark account
- Click Developer Backend in the top-right corner
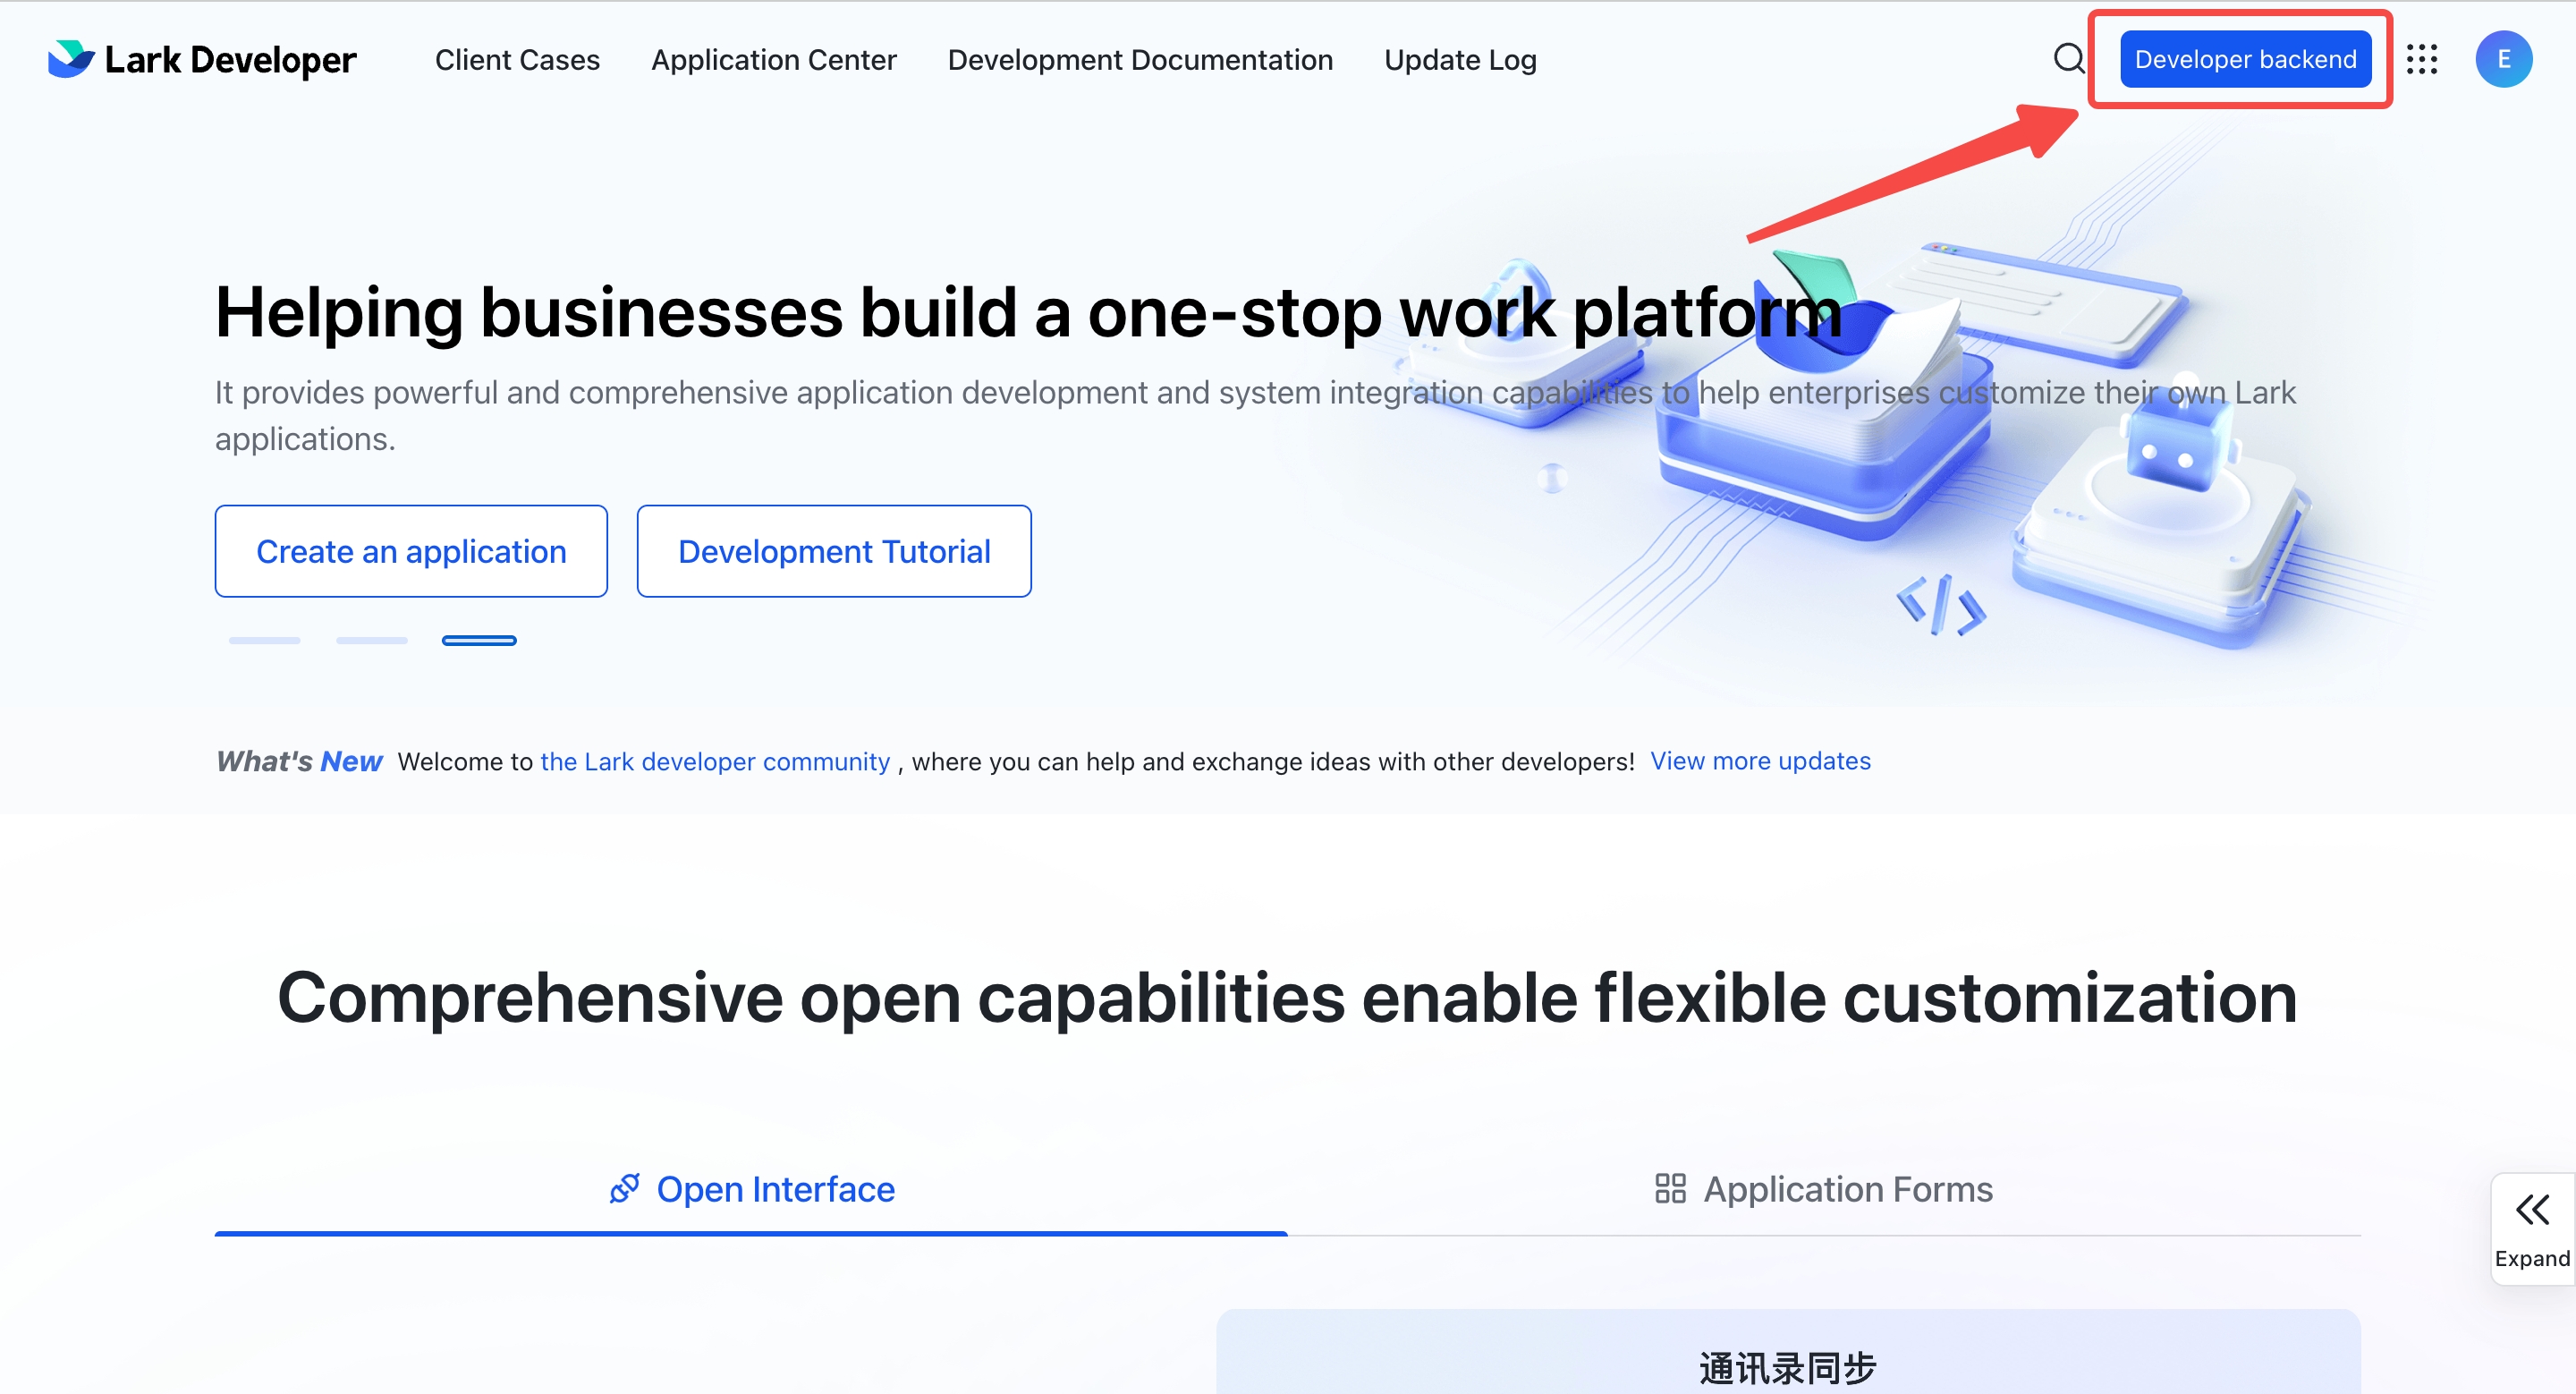
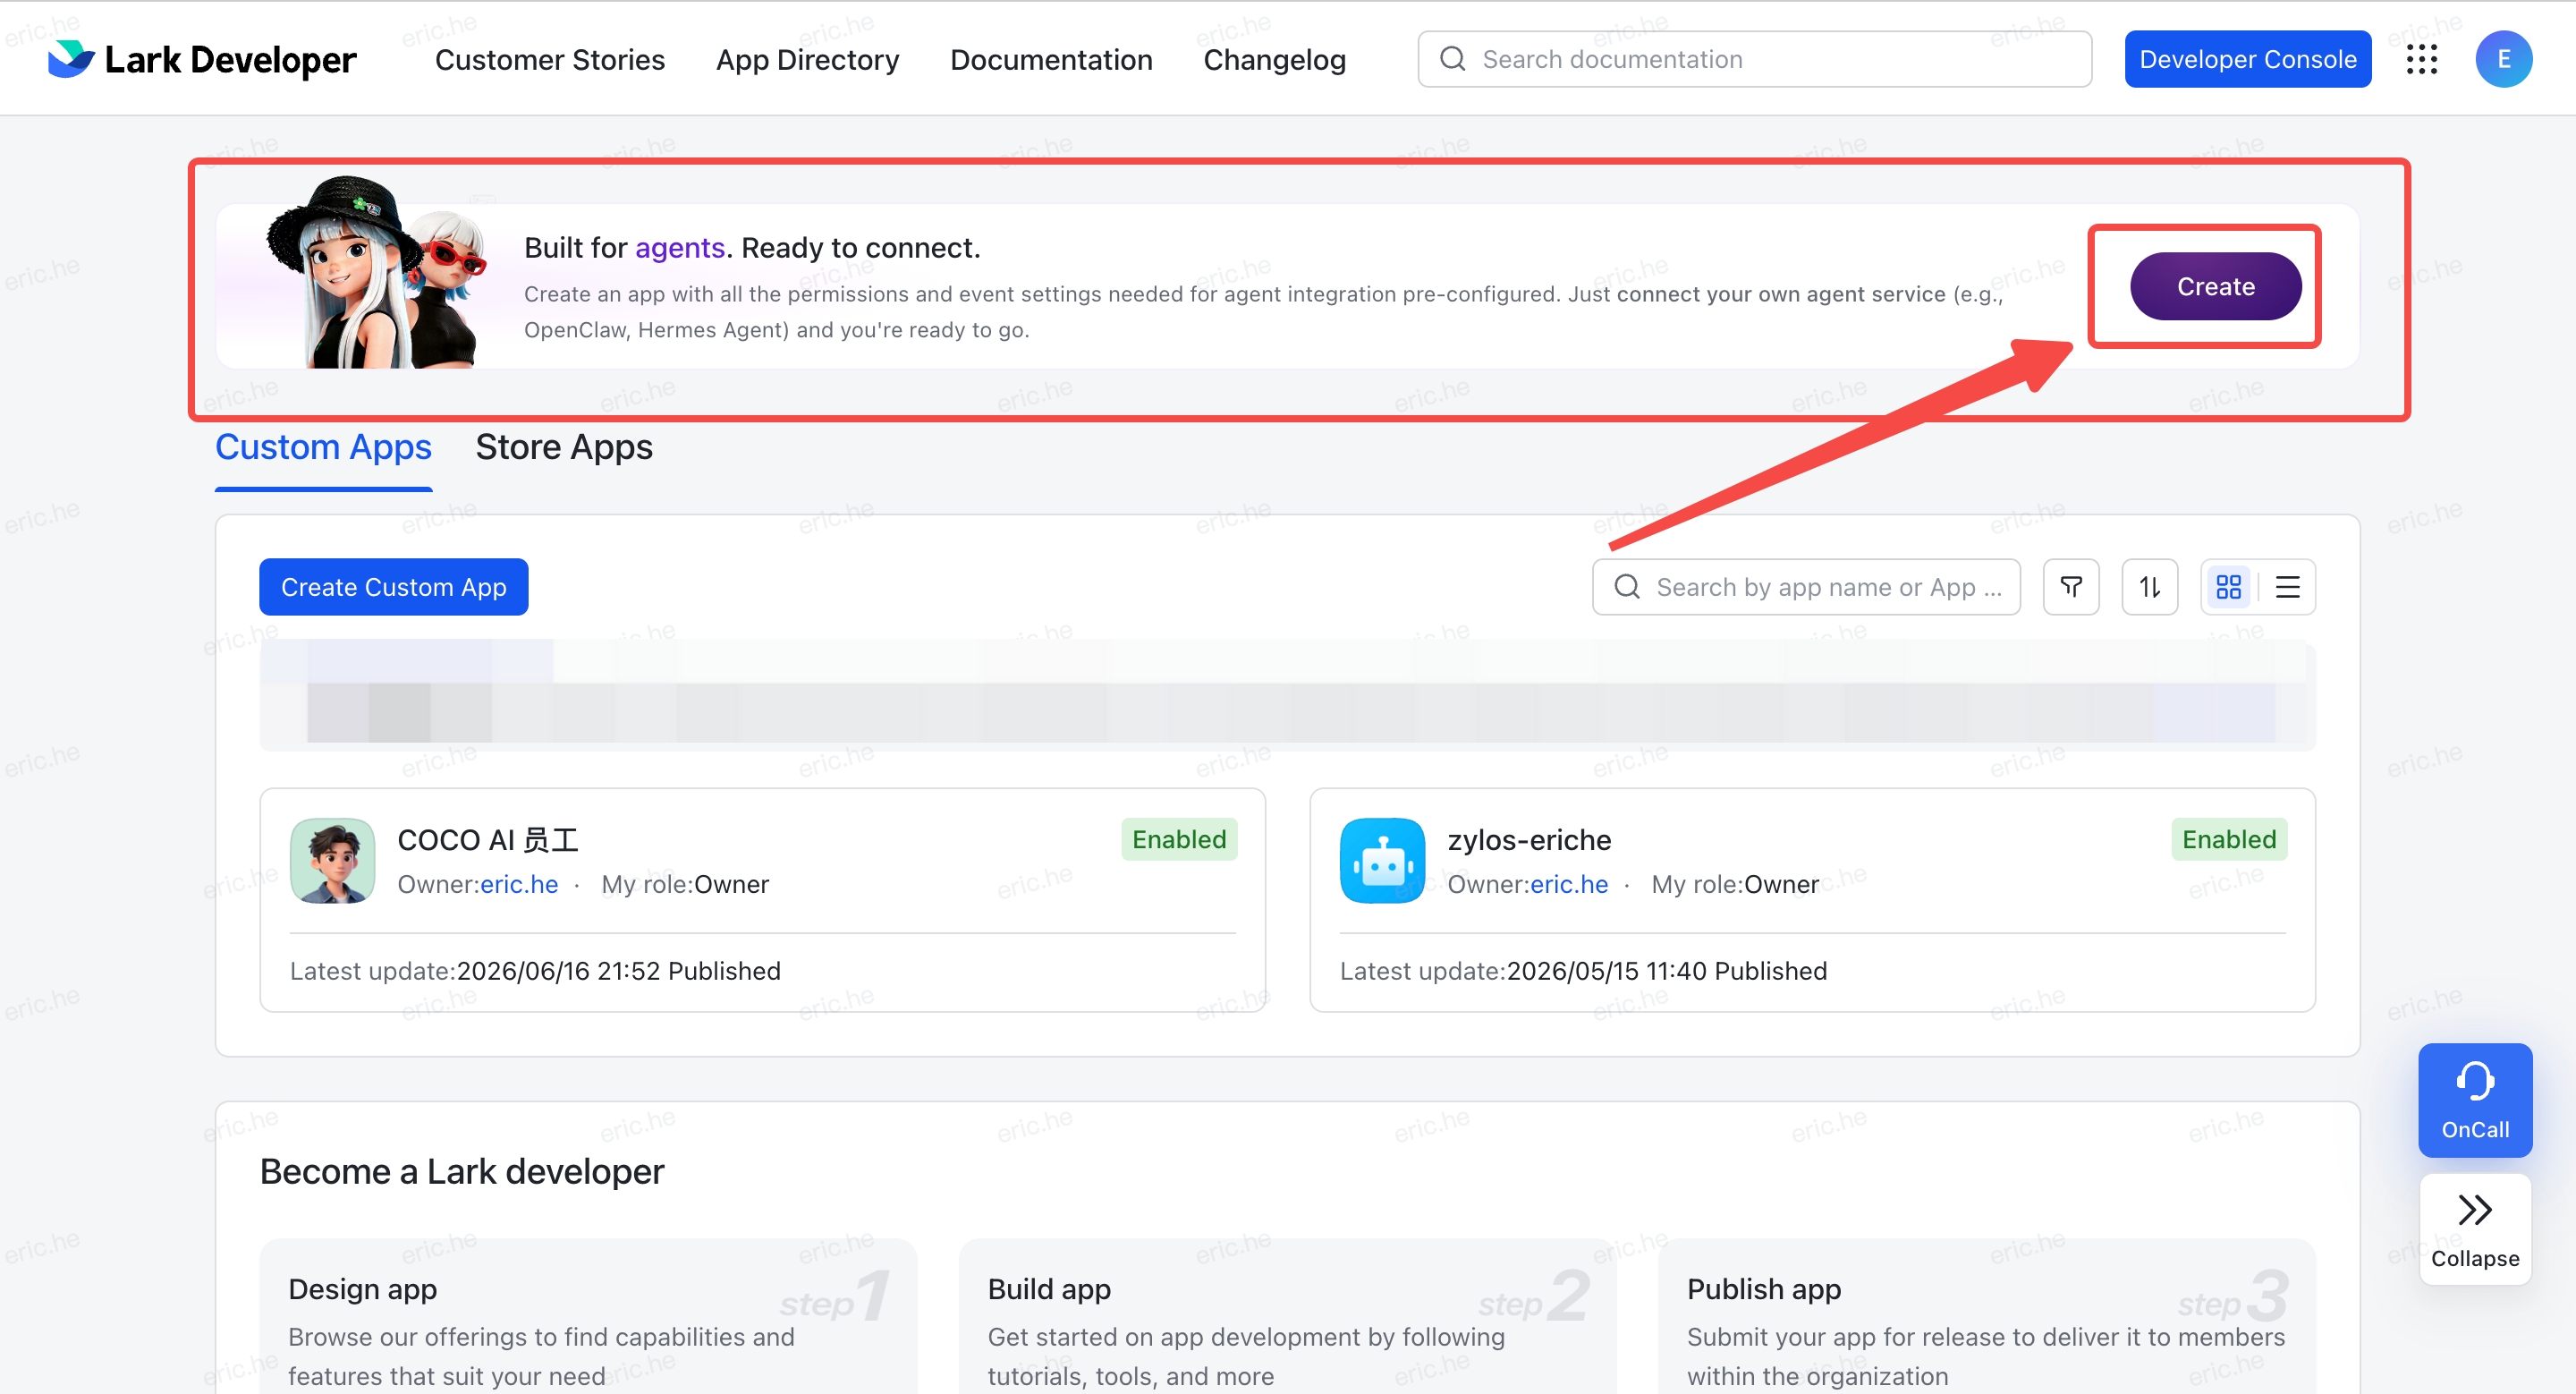
Step 2: Click "Create Now" to Create a Lark Smart Agent App
In the Developer Backend, find the Create Lark Smart Agent App banner at the top and click Create Now on the right side.
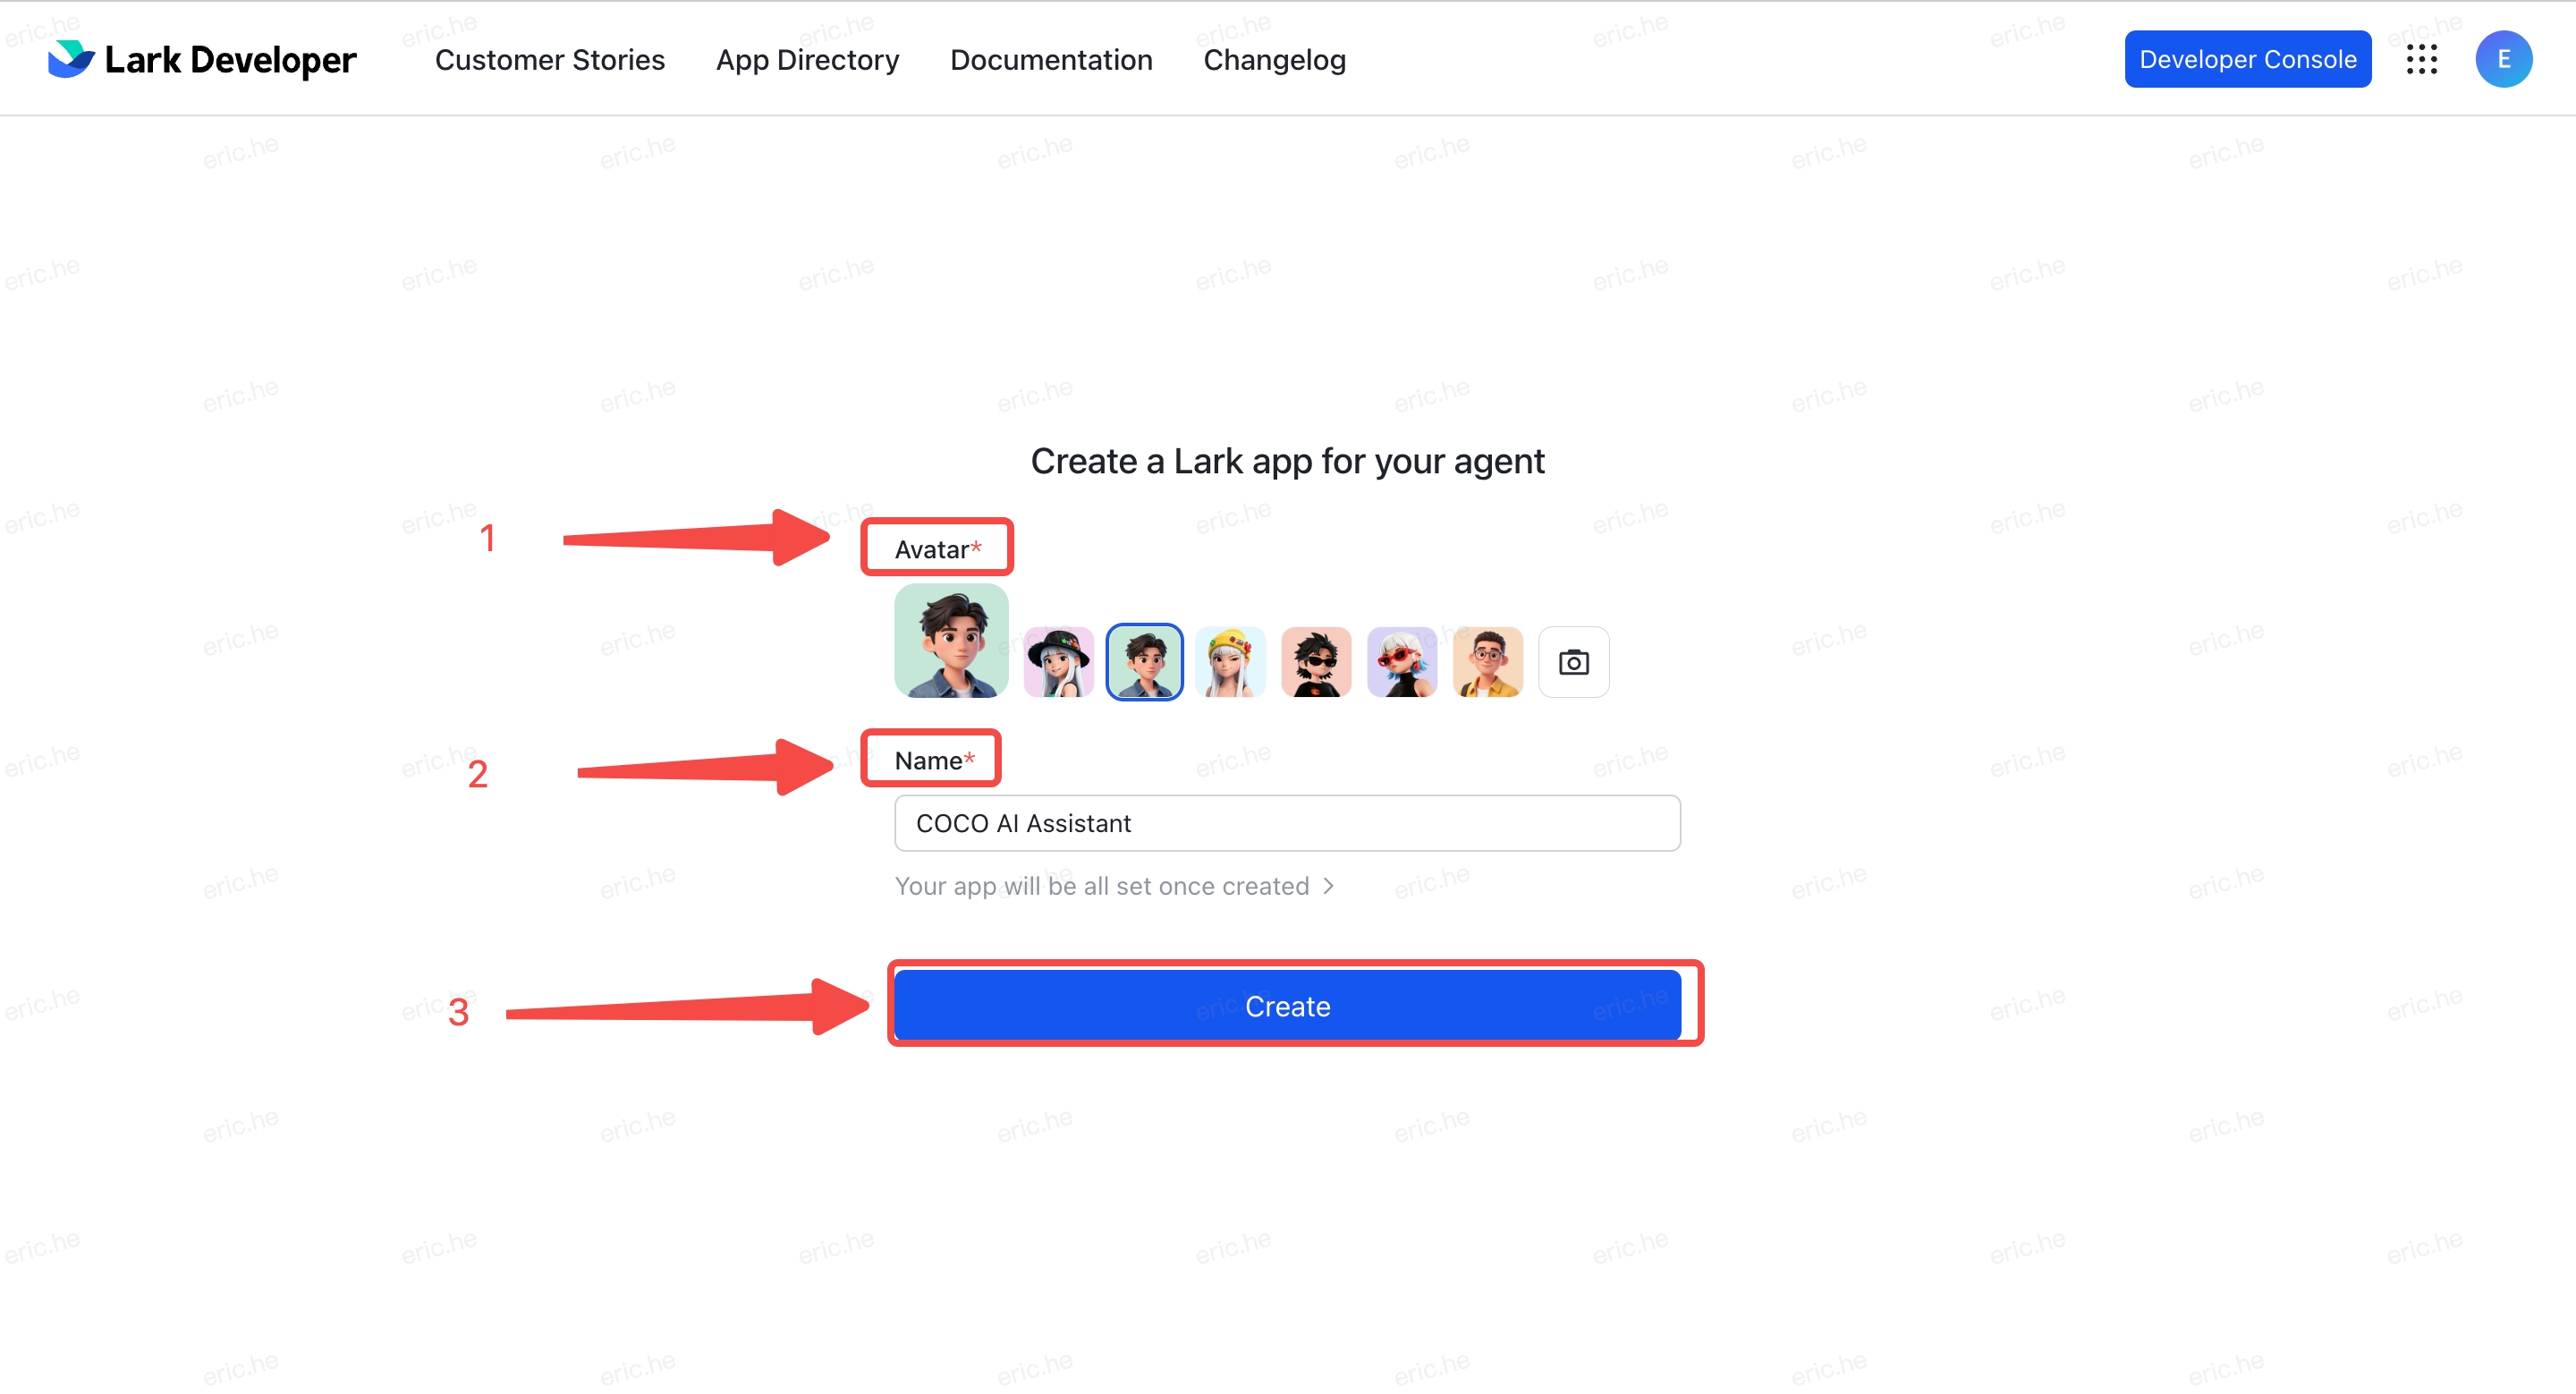
Step 3: Fill in Information and Create
- Choose your preferred avatar
- Fill in the name (e.g.,
OpenMax AI Employee) - Click Create Now
Enterprise account note: After creation, if you are using an enterprise Lark account, the enterprise admin must approve the app in the Lark Admin Console before it becomes active. If you are using a personal account, this step is not needed.
Step 4: Fill in Credentials in OpenMax Dashboard and Deploy
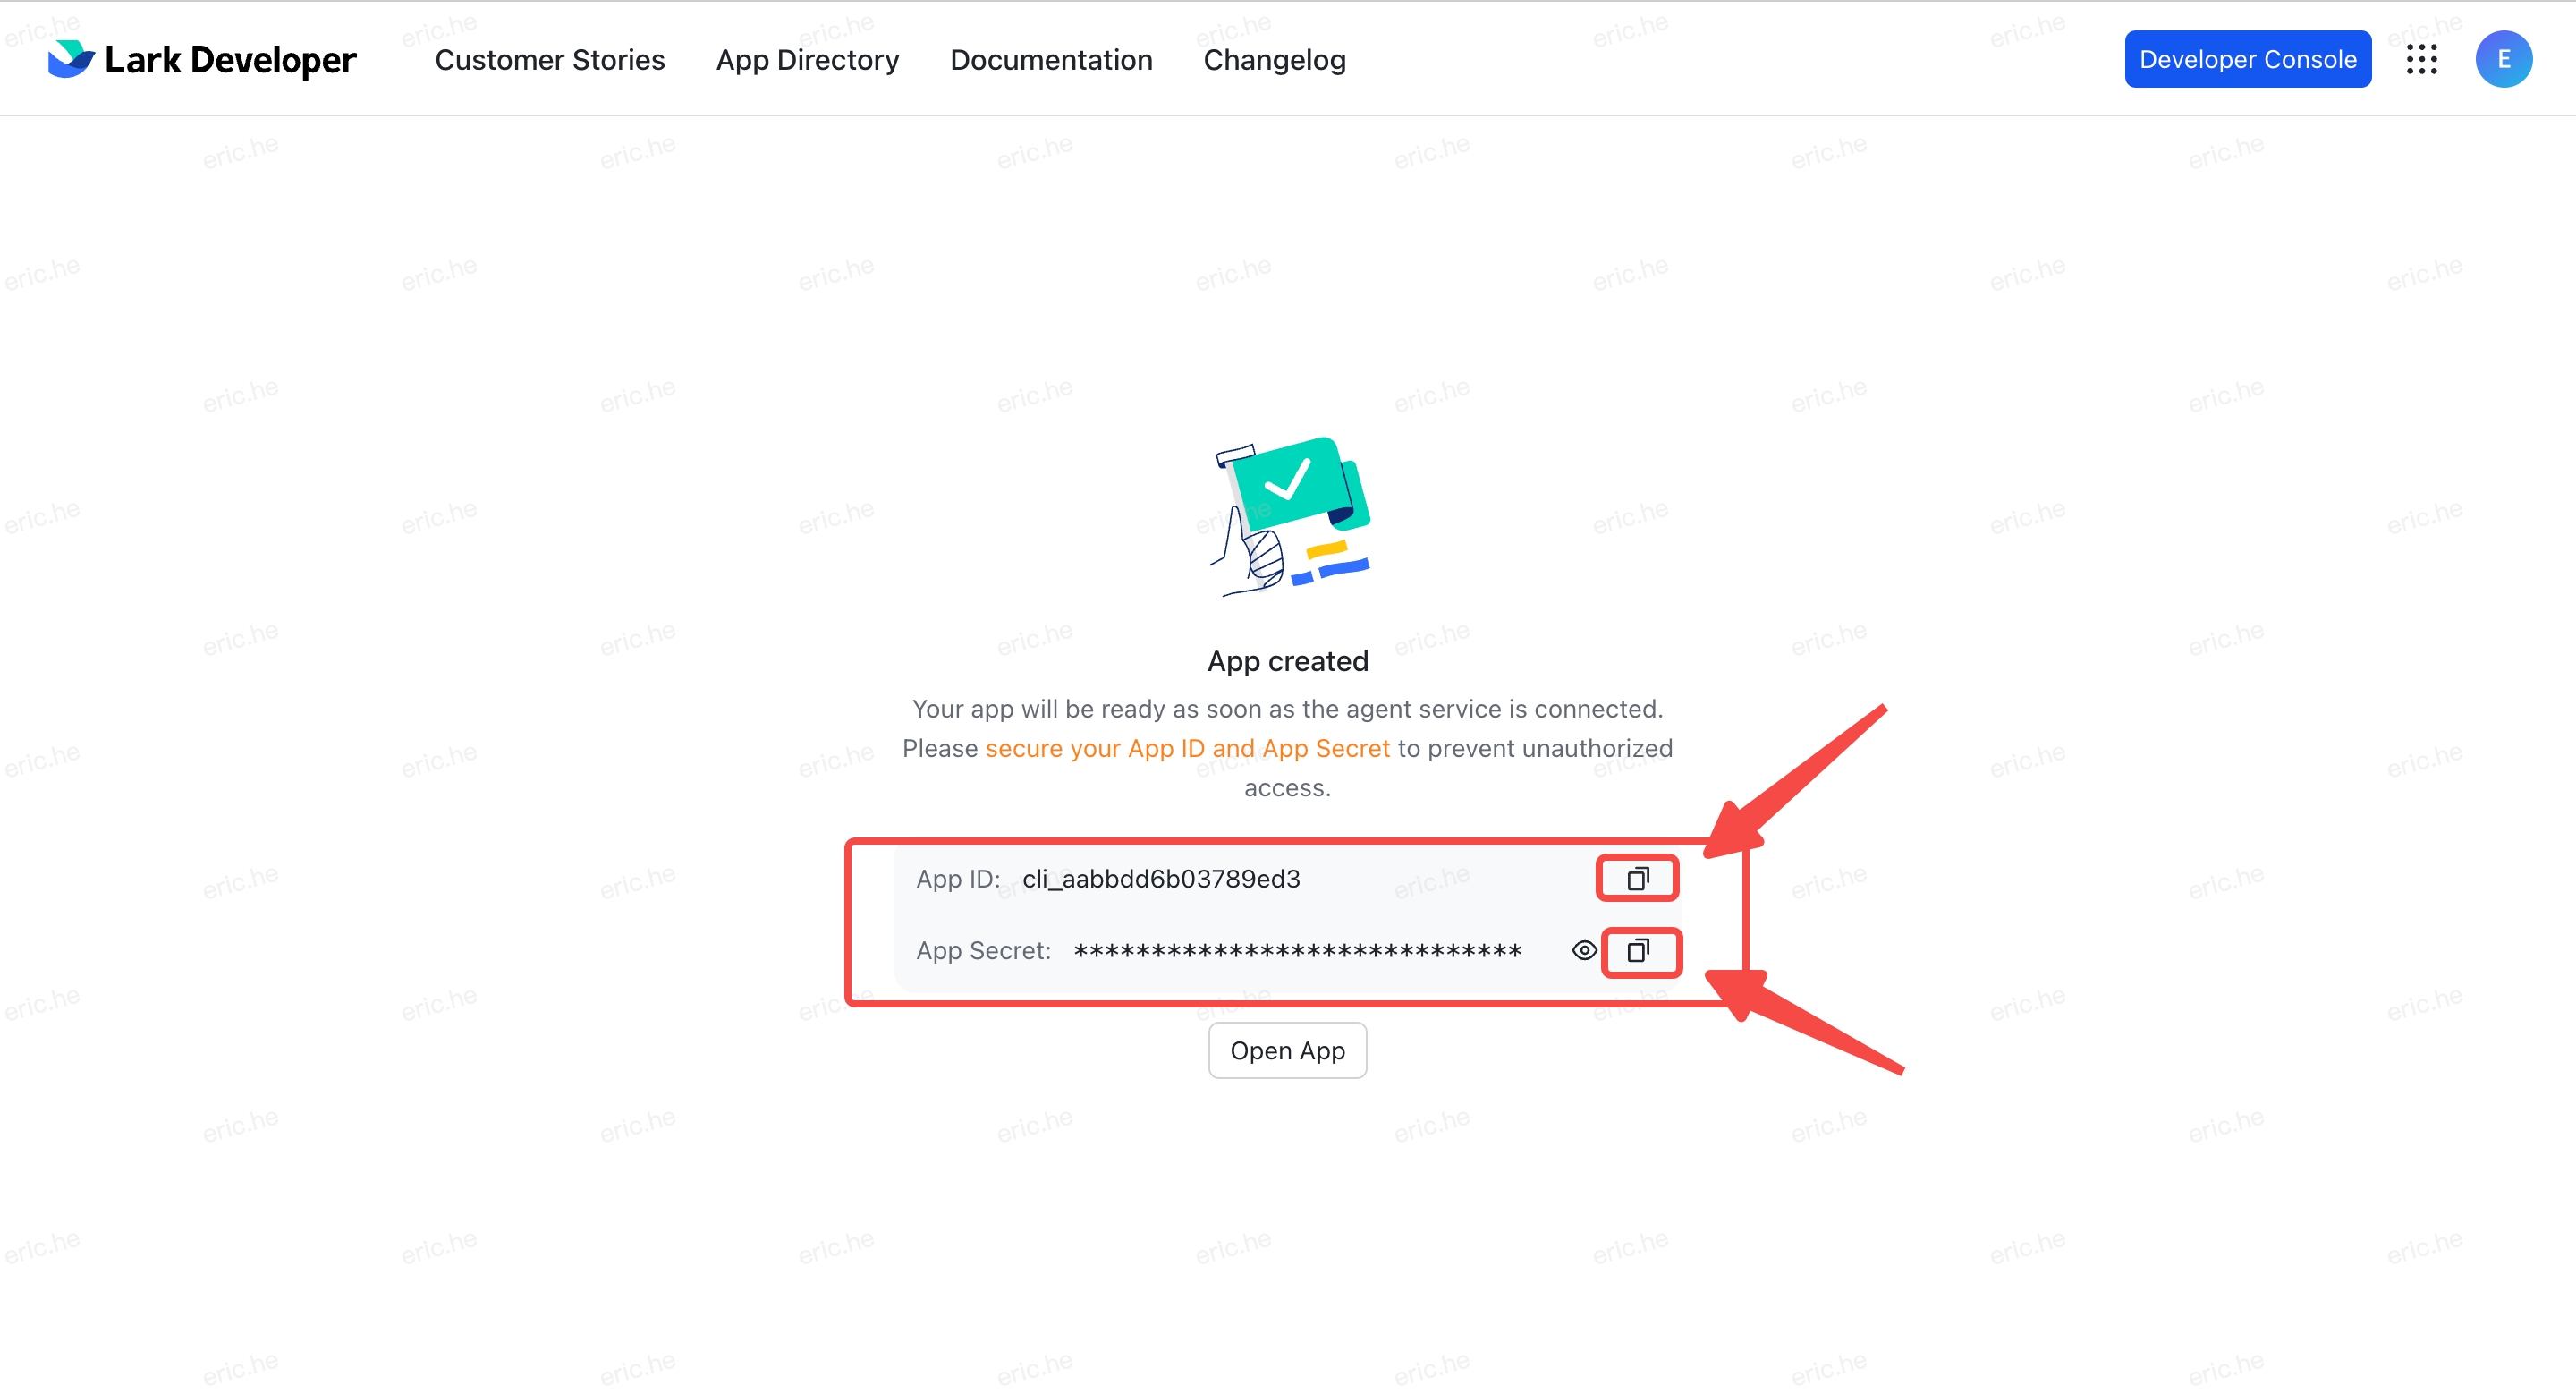
- After the Smart Agent is created, you will see the App Created page — copy the App ID and App Secret
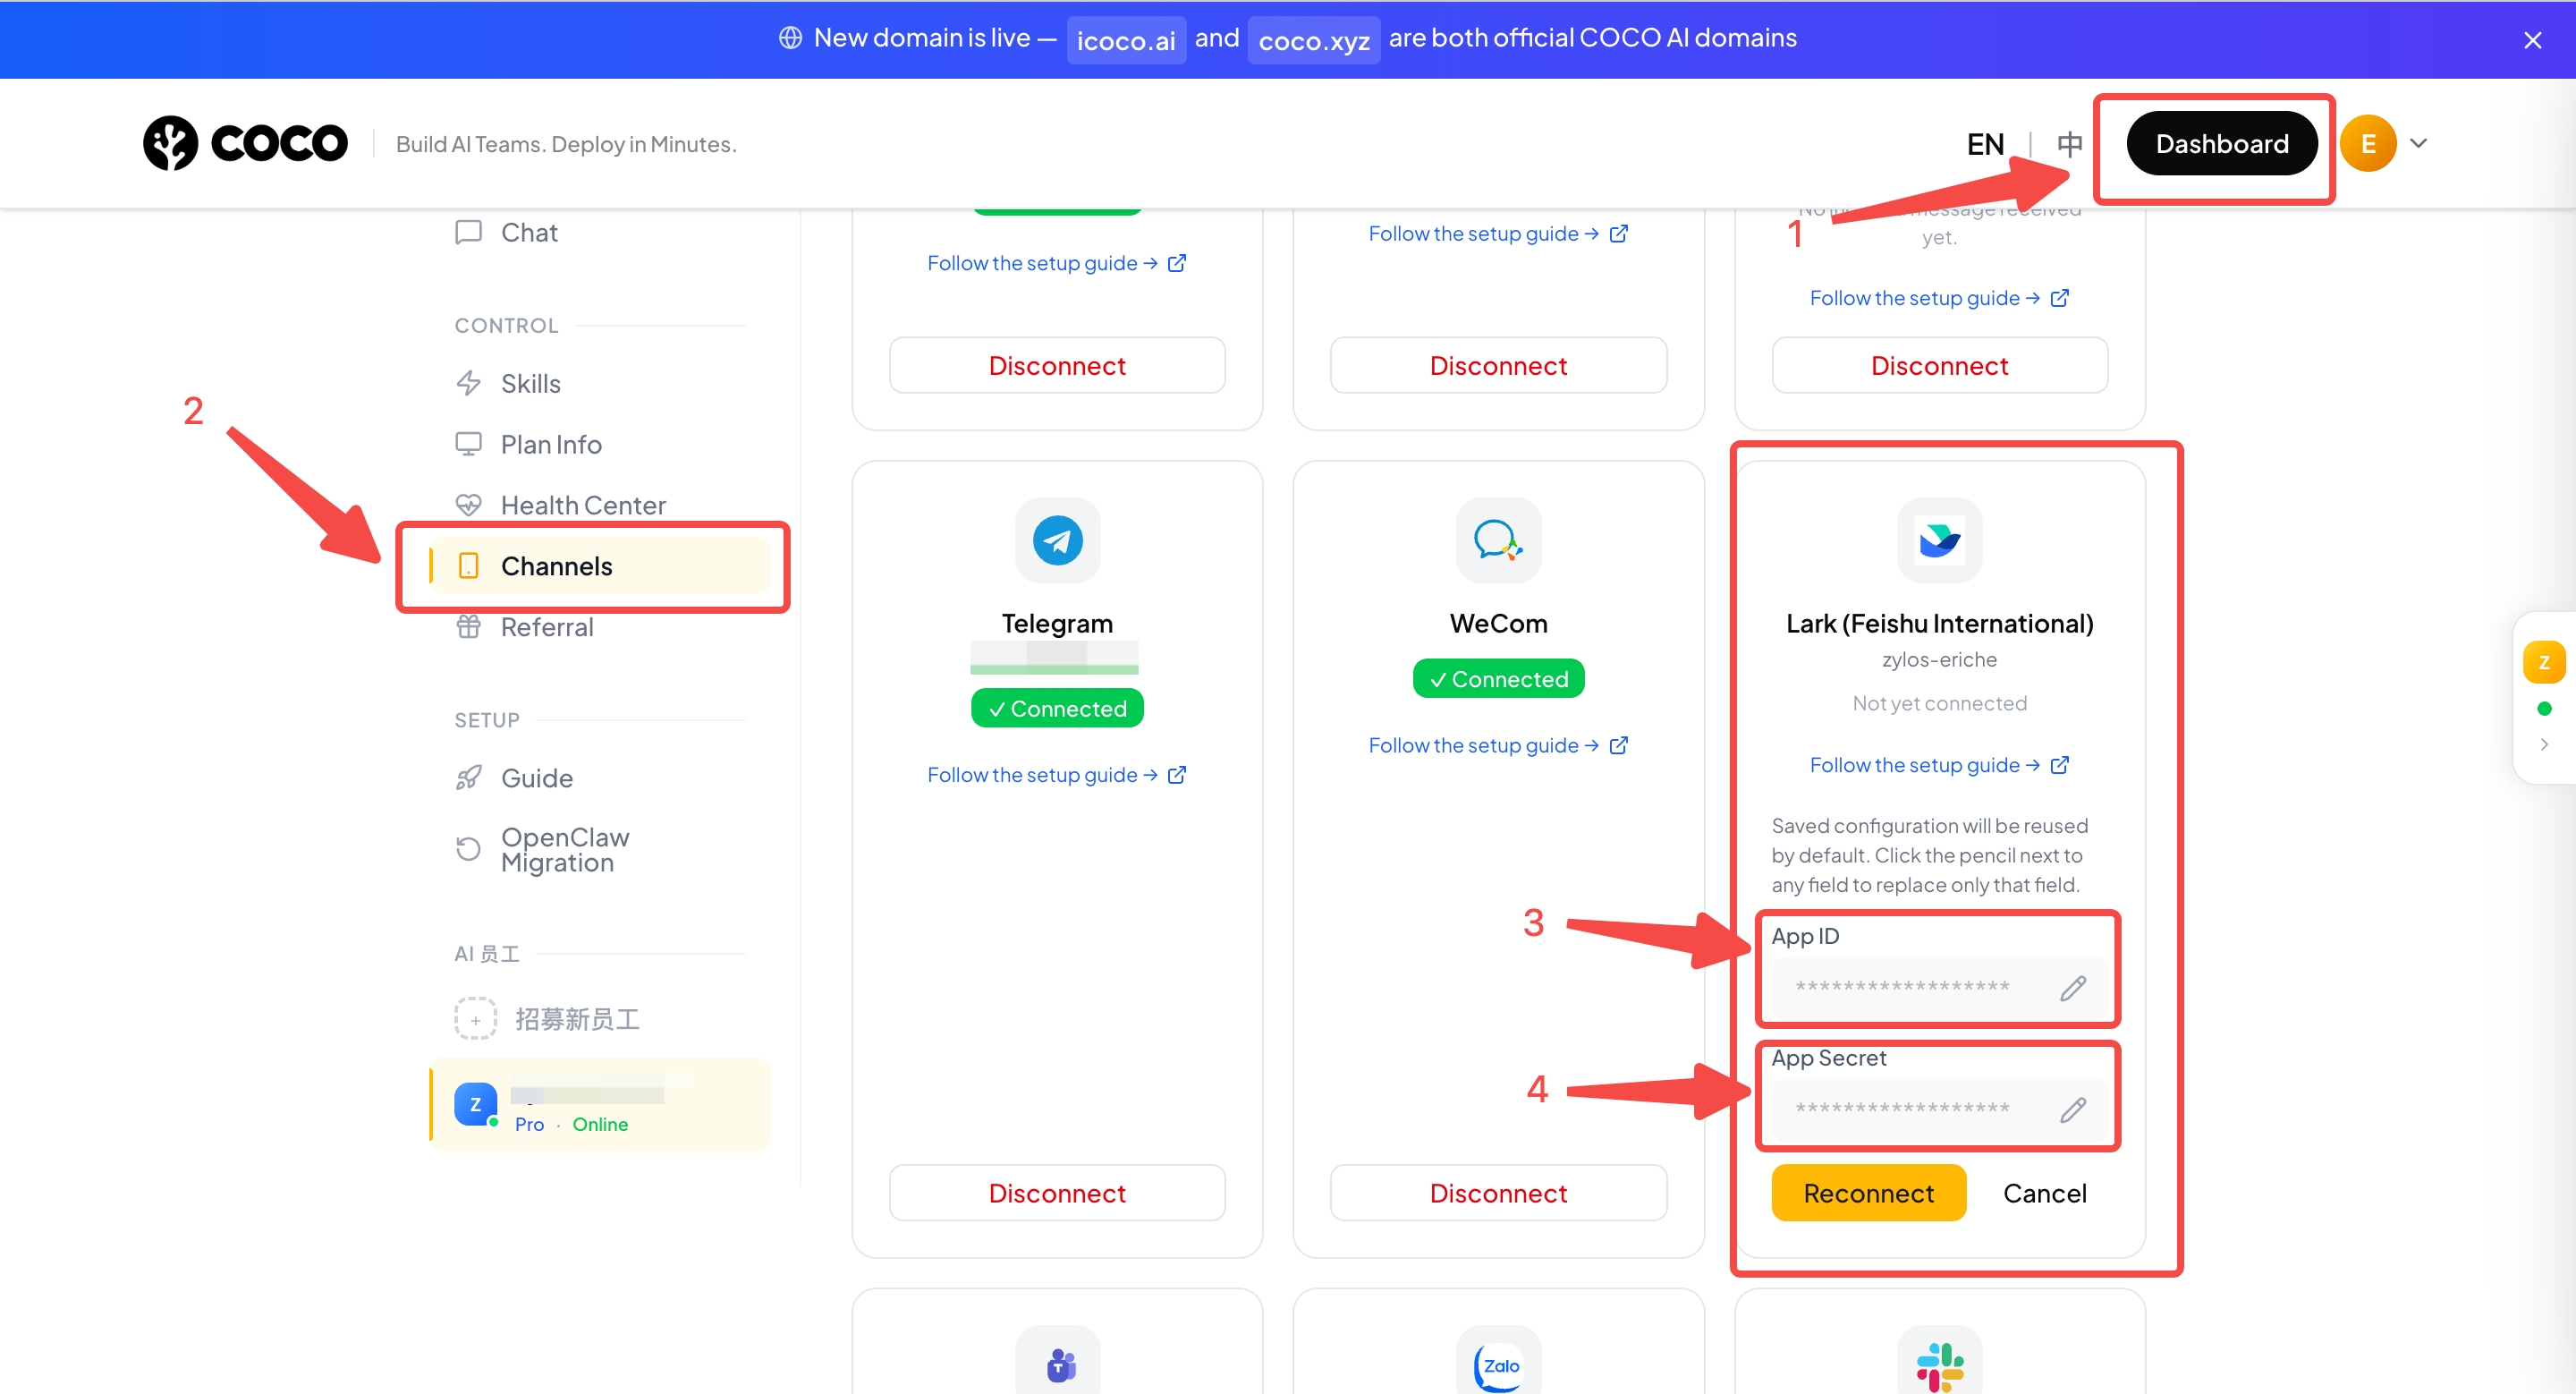
- Log into OpenMax Dashboard, click Channels on the left sidebar, select Lark, fill in the App ID and App Secret, then click Connect — the system will automatically deploy your AI employee (typically takes 2-3 minutes)
Step 5: Add Required Permissions for Group Chats
The permissions granted automatically at creation only cover basic messaging. For your AI employee to work properly in group chats and display real user names, manually enable the following 4 scopes:
- Back in the Lark Developer Backend, open your app and go to Permissions & Scopes
- Search for each scope ID below and click Enable:
| Scope | Purpose | If missing |
|---|---|---|
im:message.group_msg | Receive group messages and respond to @mentions | Bot cannot see group messages |
im:chat:readonly | Read group info and member lists | Names show as ID fragments (e.g. c08f09) |
contact:user.base:readonly | Resolve user IDs to real names | User names are unreadable |
contact:user.employee_id:readonly | Match users by employee ID | Users cannot be identified by employee ID |
- For each scope, set the data permission scope to All — if it is limited to specific groups, the bot will not work in groups outside that list
- If your organization requires approval for permission changes, publish a new app version for them to take effect (if the bot still reports 403 errors, check Version Management & Release)
Step 6: Search for Bot and Start Chatting
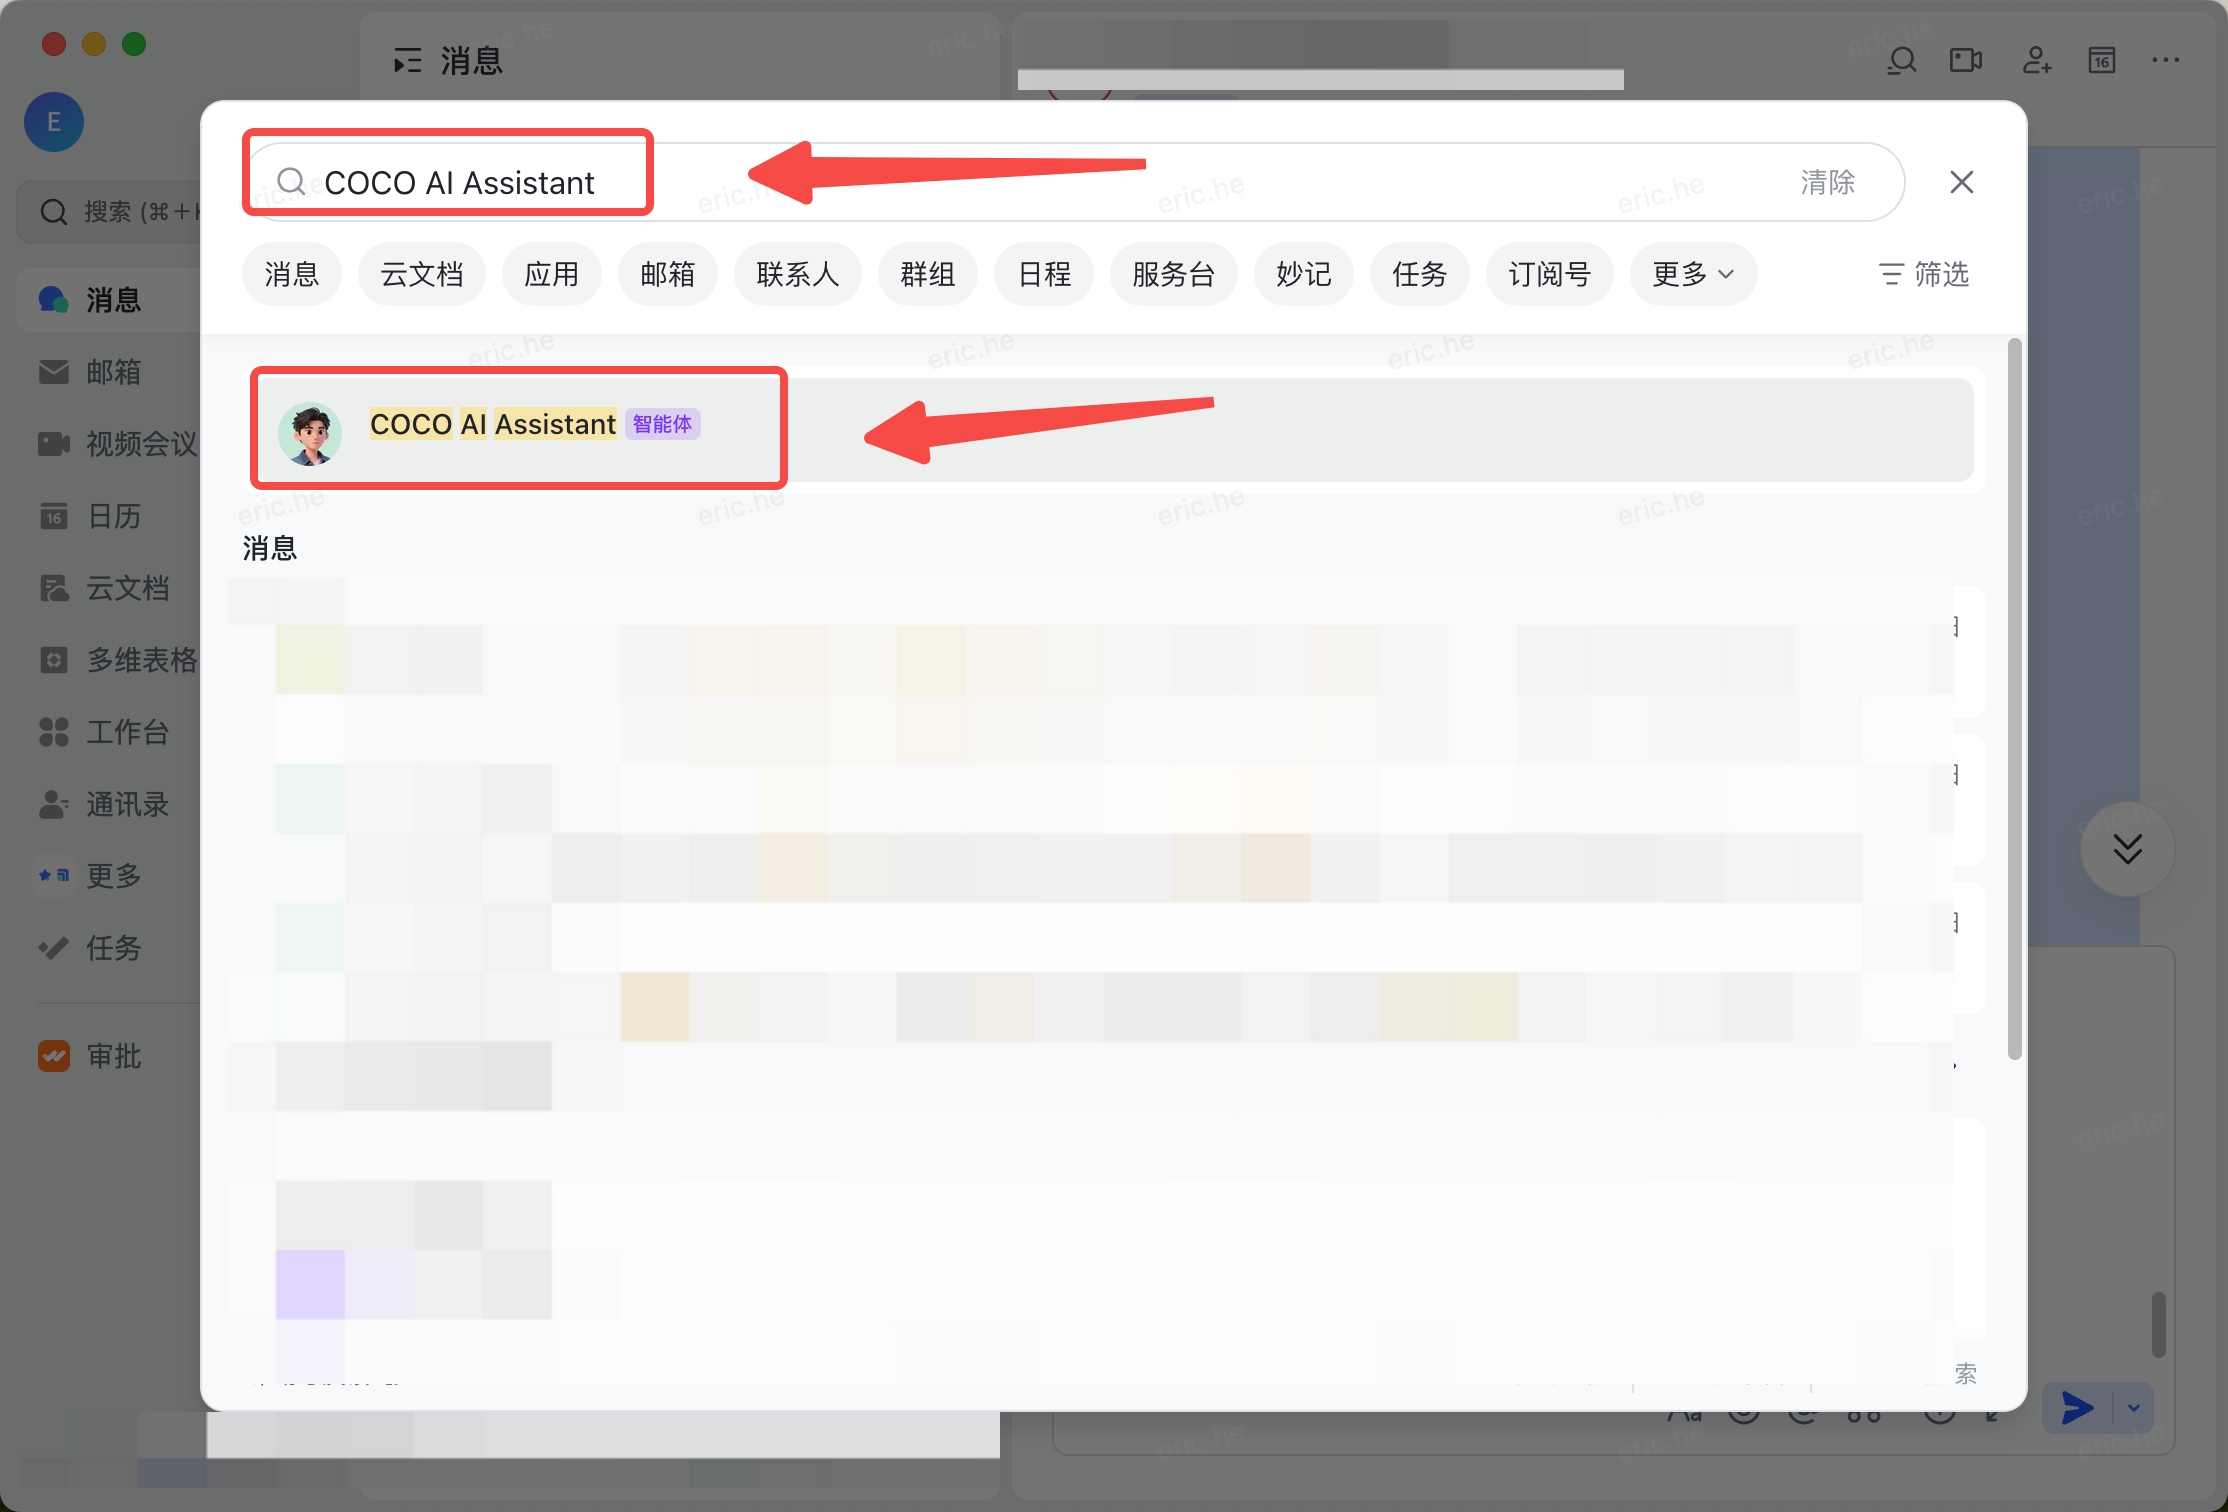
Once connected, search for the bot name you just set up in the Lark client, confirm the bot has been created, and click to start chatting.
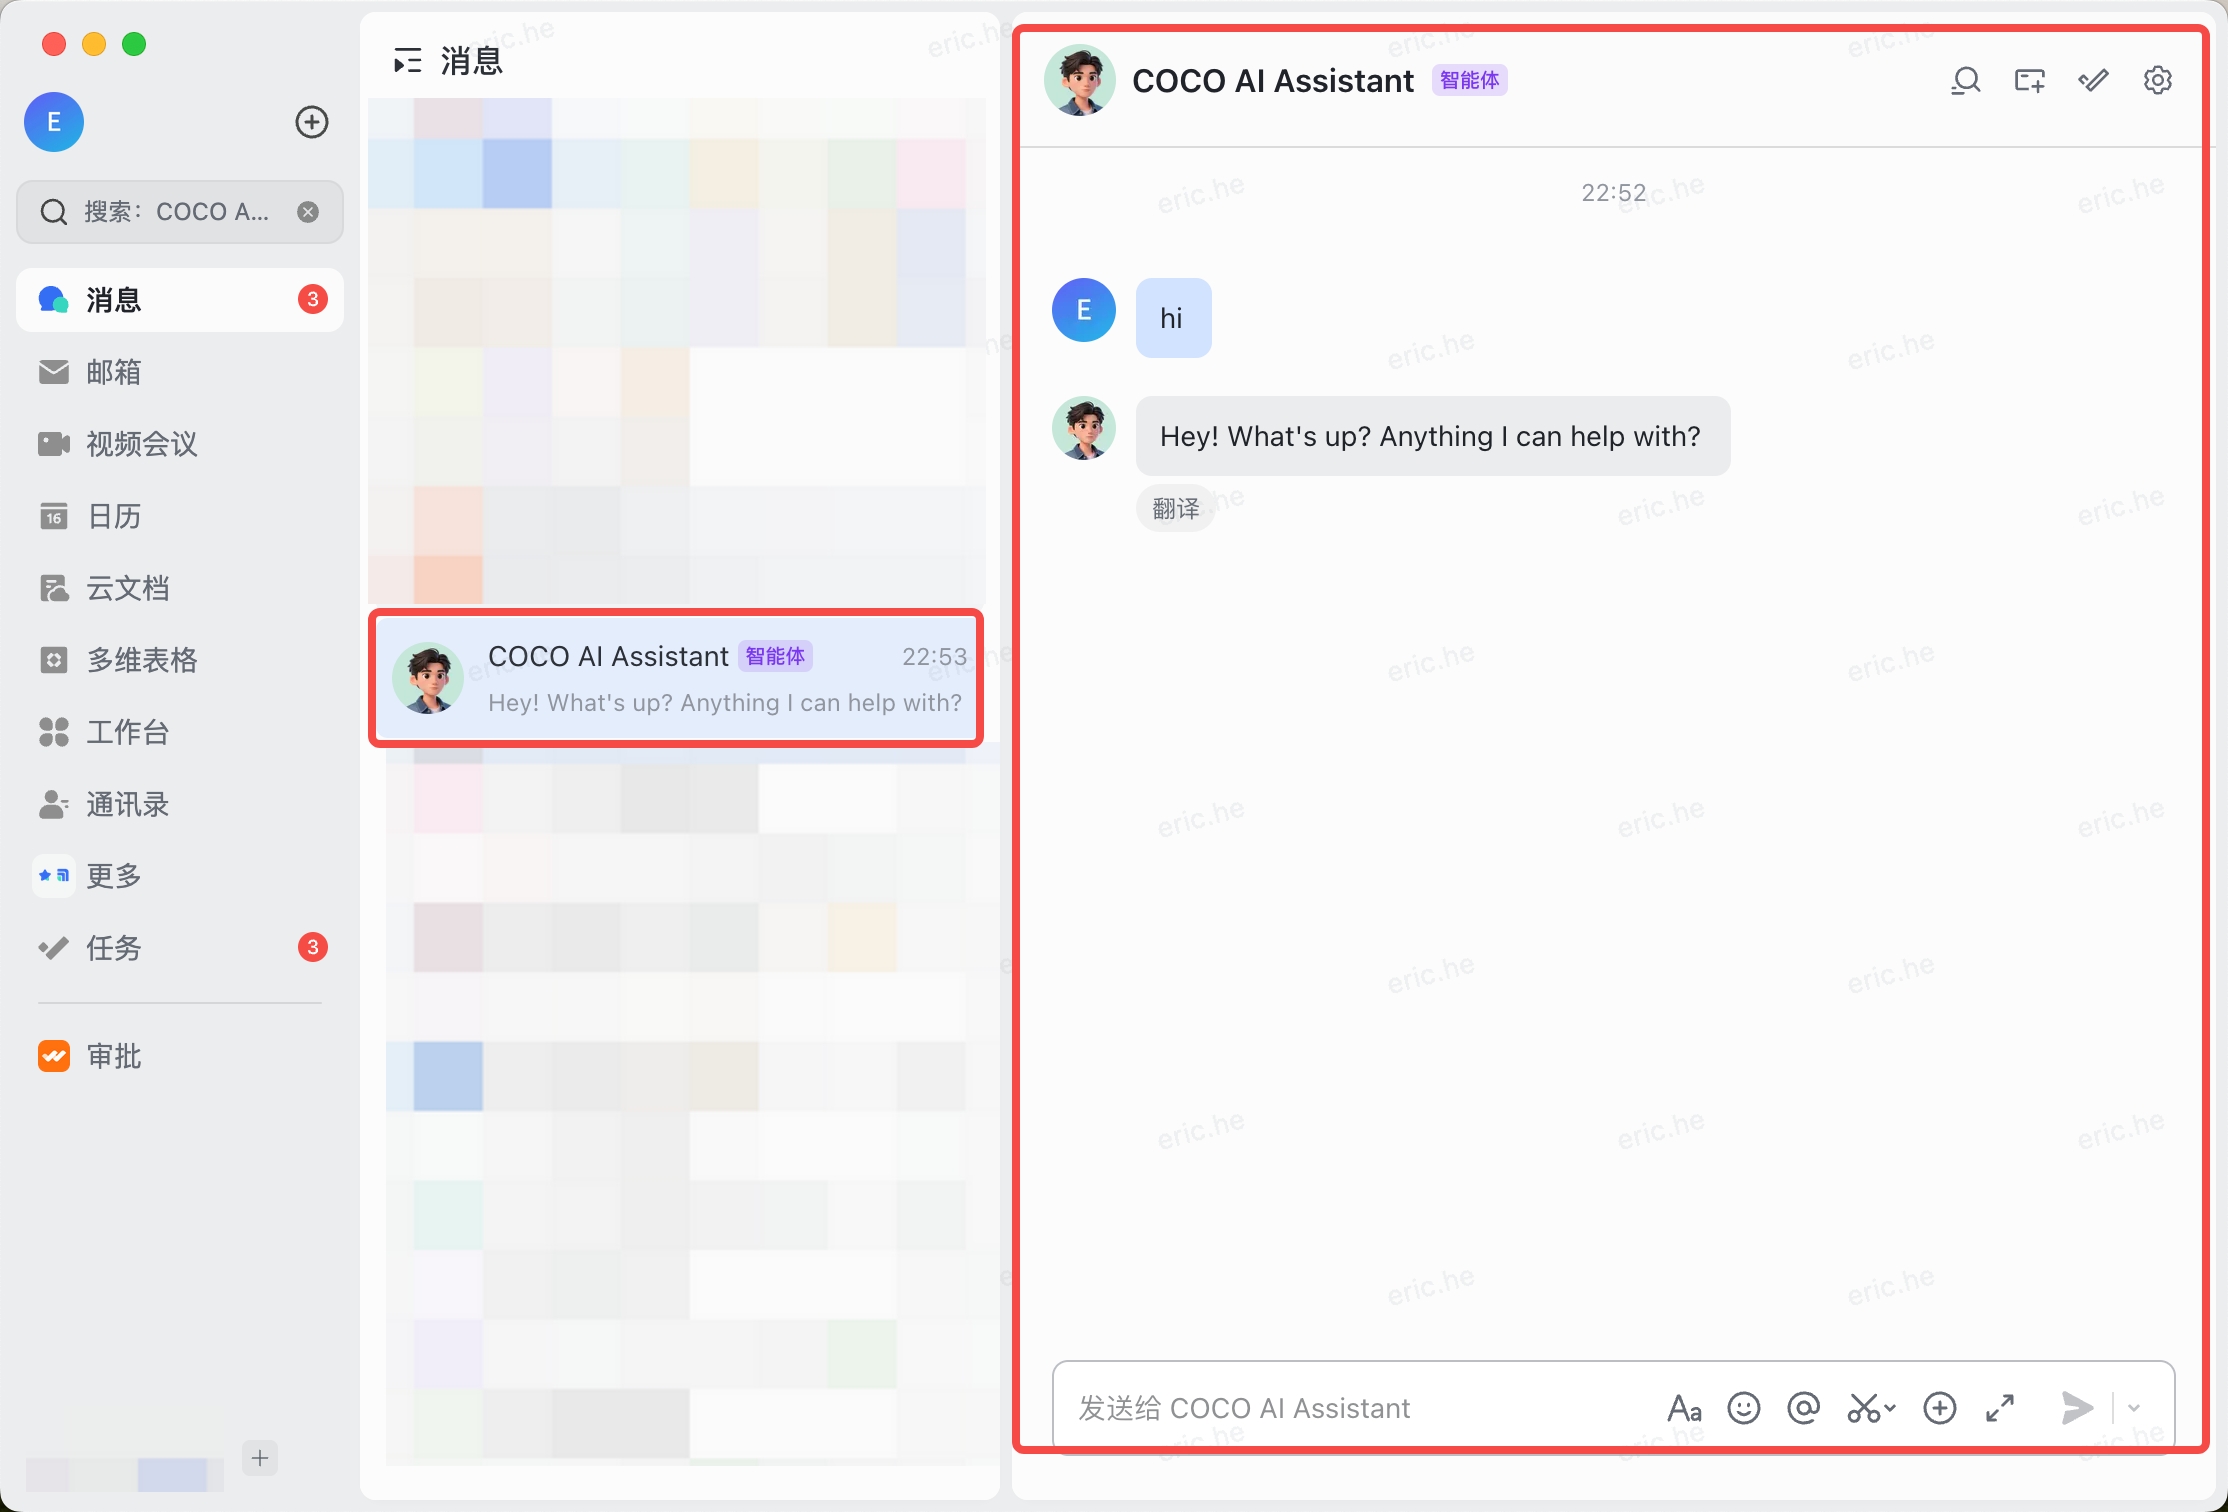
Deployment complete! Your AI employee is now online. You can chat with it directly or add it to group chats.
Option 2: Custom App Deploy (Full Configuration)
Estimated time: 8-15 minutes | Manually create a custom app and configure permissions, event subscriptions, and version publishing step by step. Suitable for advanced users who need fine-grained control.
WebSocket long connection (Recommended): Simplest configuration — only App ID and App Secret needed, no Webhook URL or verification required.
Step 1: Access Lark Open Platform
- Visit Lark Open Platform
- Log in with your Lark account
- Click Developer Backend in the top-right corner
Step 2: Create a Custom App
- In the Developer Backend, click Create Custom App
- Enter app name (e.g.,
OpenMax AI Employee) and description - Click Create to finish
Tip: Enterprise admin permissions are required. If you're not an admin, contact your IT department or use a Lark personal account first.
Step 3: Add Bot Capability
In the app management page, go to Add Capabilities in the left sidebar, find the Bot card, and click "Configure" or "+ Add". After adding, a Bot menu item will appear in the left sidebar.
Important: You must add the Bot capability first before configuring messaging-related permissions (e.g.,
im:message.group_at_msg:readonly). Otherwise the permission checkbox will be disabled.
After adding, go to Credentials & Basic Info in the left sidebar and note down:
- App ID
- App Secret
Step 4: Configure Permissions
In the app management page, go to Permissions & Scopes. Click Batch Import/Export Permissions, paste the following JSON, and import all permissions at once:
{
  "scopes": {
    "tenant": [
      "contact:contact.base:readonly",
      "contact:user.base:readonly",
      "im:app_feed_card:write",
      "im:chat",
      "im:chat.announcement:read",
      "im:chat.announcement:write_only",
      "im:chat.chat_pins:read",
      "im:chat.chat_pins:write_only",
      "im:chat.collab_plugins:read",
      "im:chat.collab_plugins:write_only",
      "im:chat.labels",
      "im:chat.managers:write_only",
      "im:chat.members:bot_access",
      "im:chat.members:read",
      "im:chat.members:write_only",
      "im:chat.menu_tree:read",
      "im:chat.menu_tree:write_only",
      "im:chat.moderation:read",
      "im:chat.tabs:read",
      "im:chat.tabs:write_only",
      "im:chat.top_notice:write_only",
      "im:chat.widgets:read",
      "im:chat.widgets:write_only",
      "im:chat:create",
      "im:chat:delete",
      "im:chat:moderation:write_only",
      "im:chat:operate_as_owner",
      "im:chat:read",
      "im:chat:readonly",
      "im:chat:update",
      "im:datasync.feed_card.time_sensitive:write",
      "im:message",
      "im:message.group_at_msg:readonly",
      "im:message.group_msg",
      "im:message.group_msg:readonly",
      "im:message.p2p_msg:readonly",
      "im:message.pins:read",
      "im:message.pins:write_only",
      "im:message.reactions:read",
      "im:message.reactions:write_only",
      "im:message.urgent",
      "im:message.urgent:phone",
      "im:message.urgent:sms",
      "im:message:readonly",
      "im:message:recall",
      "im:message:send_as_bot",
      "im:message:send_multi_depts",
      "im:message:send_sys_msg",
      "im:message:update",
      "im:resource",
      "im:url_preview.update",
      "im:user_agent:read"
    ],
    "user": []
  }
}
Scope overview: The scopes above cover contacts (read), chat management (full), messaging (send/receive/recall/pin/react), group @mention listening, urgent messages, file resources, and feed cards. The
im:message:send_multi_deptsscope replaces the olderim:message:send_multi_usersname used in previous versions of the platform. The Feishu (domestic China) version uses a slightly smaller scope set — see the Feishu section for details.
Step 5: Configure Event Subscription
Return to the Lark Developer Backend, go to Events & Callbacks
Under subscription mode, select Receive events through persistent connection
Click Add Events and subscribe to:
im.message.receive_v1— Receive messages (required)im.chat.member.bot.added_v1— Bot added to group (optional)
Click Save
Tip: With persistent connection mode, no Request URL is needed — events are received automatically via WebSocket.
Step 6: Create Version and Publish
- In the Lark Developer Backend, go to Version Management & Publishing
- Click Create Version
- Enter version number (e.g.,
1.0.0) and update description - Confirm app capabilities and permissions, click Save
- In the confirmation dialog, click Confirm Publish
Admin Approval: After publishing a Lark custom app, the enterprise admin must approve it in the Lark Admin Console before the app becomes active. If you're using a personal account, this step is not needed.
Step 7: Connect in OpenMax Dashboard and Deploy
- Log into OpenMax Dashboard
- Go to the channel configuration page, select Lark
- Enter the following credentials:
| Field | Source |
|---|---|
| App ID | Lark Open Platform → Credentials & Basic Info |
| App Secret | Lark Open Platform → Credentials & Basic Info |
- Click Connect — the system will automatically deploy your AI employee (typically takes 2-3 minutes)
Tip: With WebSocket long connection, only App ID and App Secret are needed — no Verification Token, Encrypt Key, or Webhook URL required.
Step 8: Enable Bot and Add to Groups
- In Lark Open Platform, go to Bot menu, confirm bot functionality is enabled
- Open Lark client
- Create or enter a group
- Group Settings → Bots → Add Bot → Search for your app name
- Confirm addition
- @mention your bot in the group and send a message
- AI employee responds → Deployment complete!
Also works in private chat: Search for your app name in Lark and start a direct conversation.
Feishu Deployment (Recommended for domestic China teams)
Feishu offers two deployment options — choose the one that fits your needs:
- Option 1: Smart Agent Quick Deploy (Recommended) — 1-2 minutes, system auto-configures permissions and events, suitable for most users
- Option 2: Custom App Deploy — requires manual permission configuration, event subscription, and version publishing, suitable for advanced users who need fine-grained control
Option 1: Smart Agent Quick Deploy (Recommended)
Estimated time: 1-2 minutes | System auto-configures permissions and event subscriptions — just create a Smart Agent and fill in credentials to complete deployment.
Step 1: Access Feishu Open Platform
- Visit Feishu Open Platform
- Log in with your Feishu account
- Click Developer Backend in the top-right corner
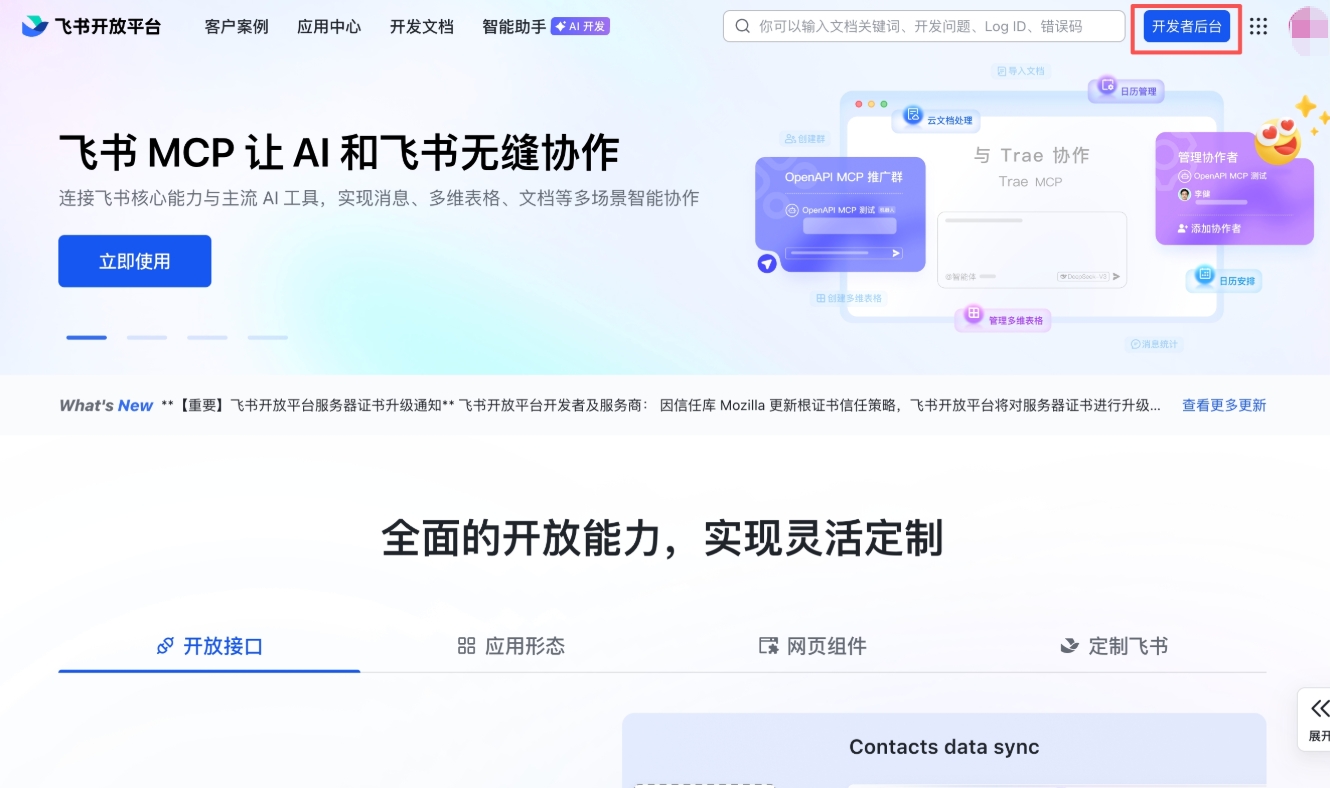
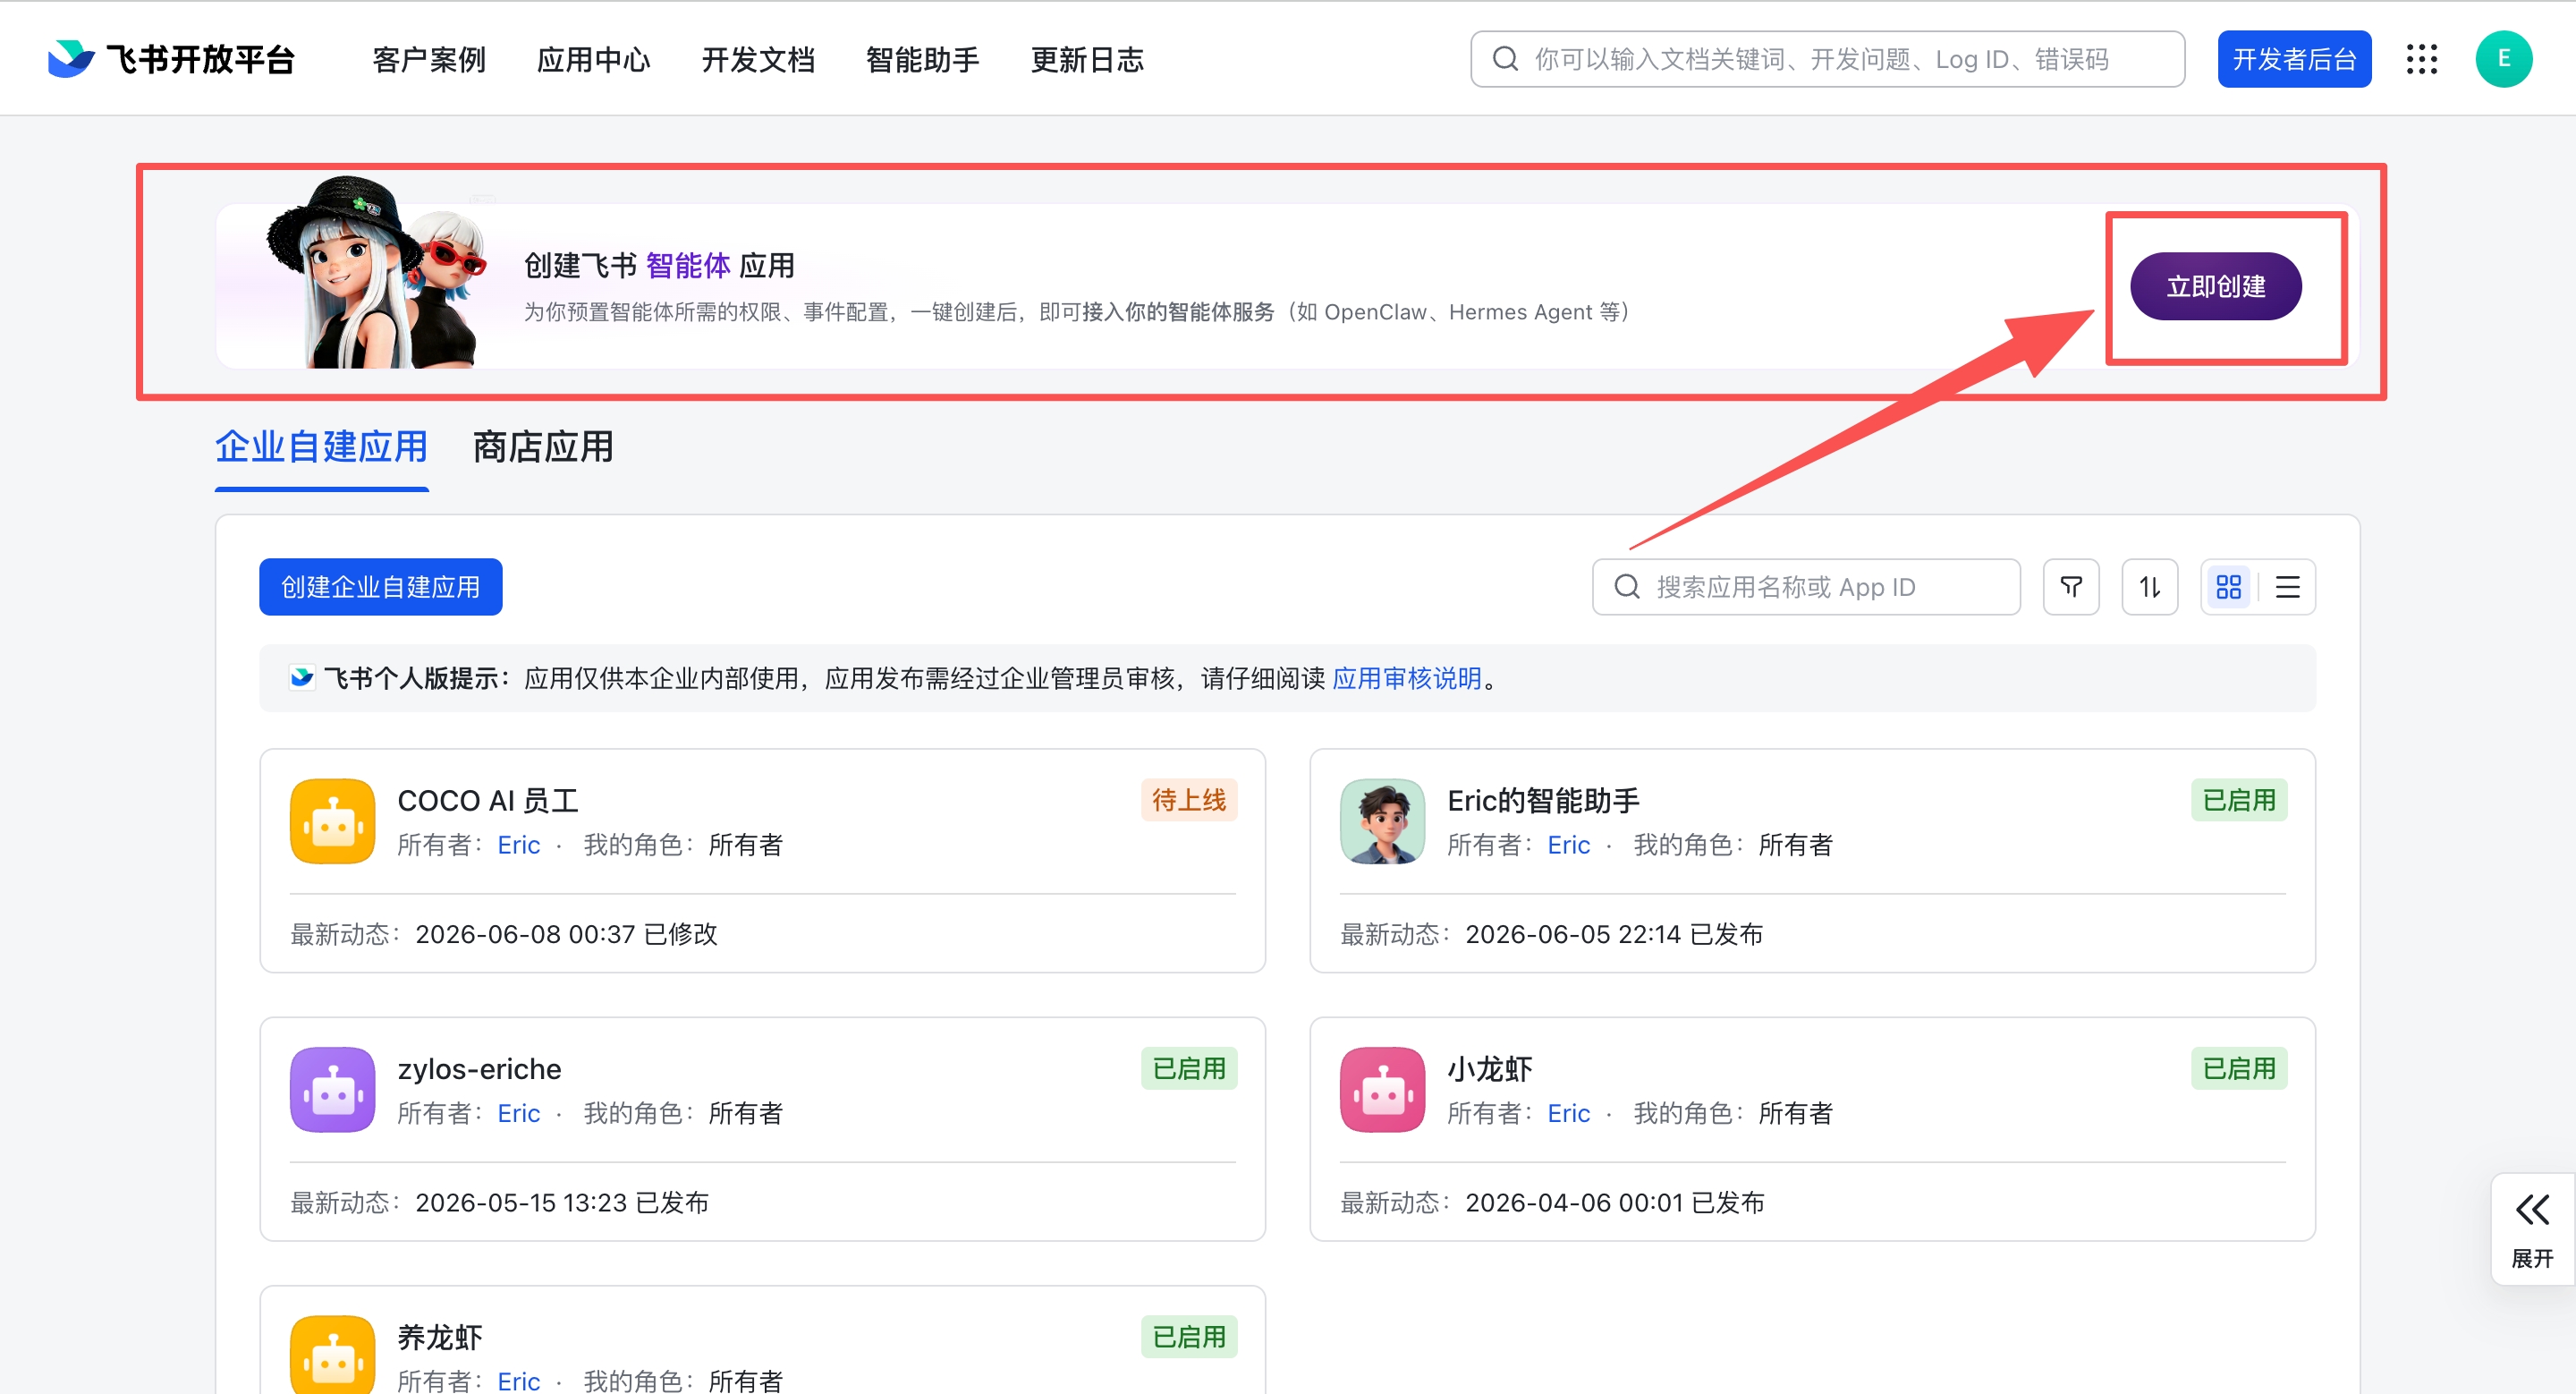
Step 2: Click "Create Now" to Create a Feishu Smart Agent App
In the Developer Backend, find the Create Feishu Smart Agent App banner at the top and click Create Now on the right side.
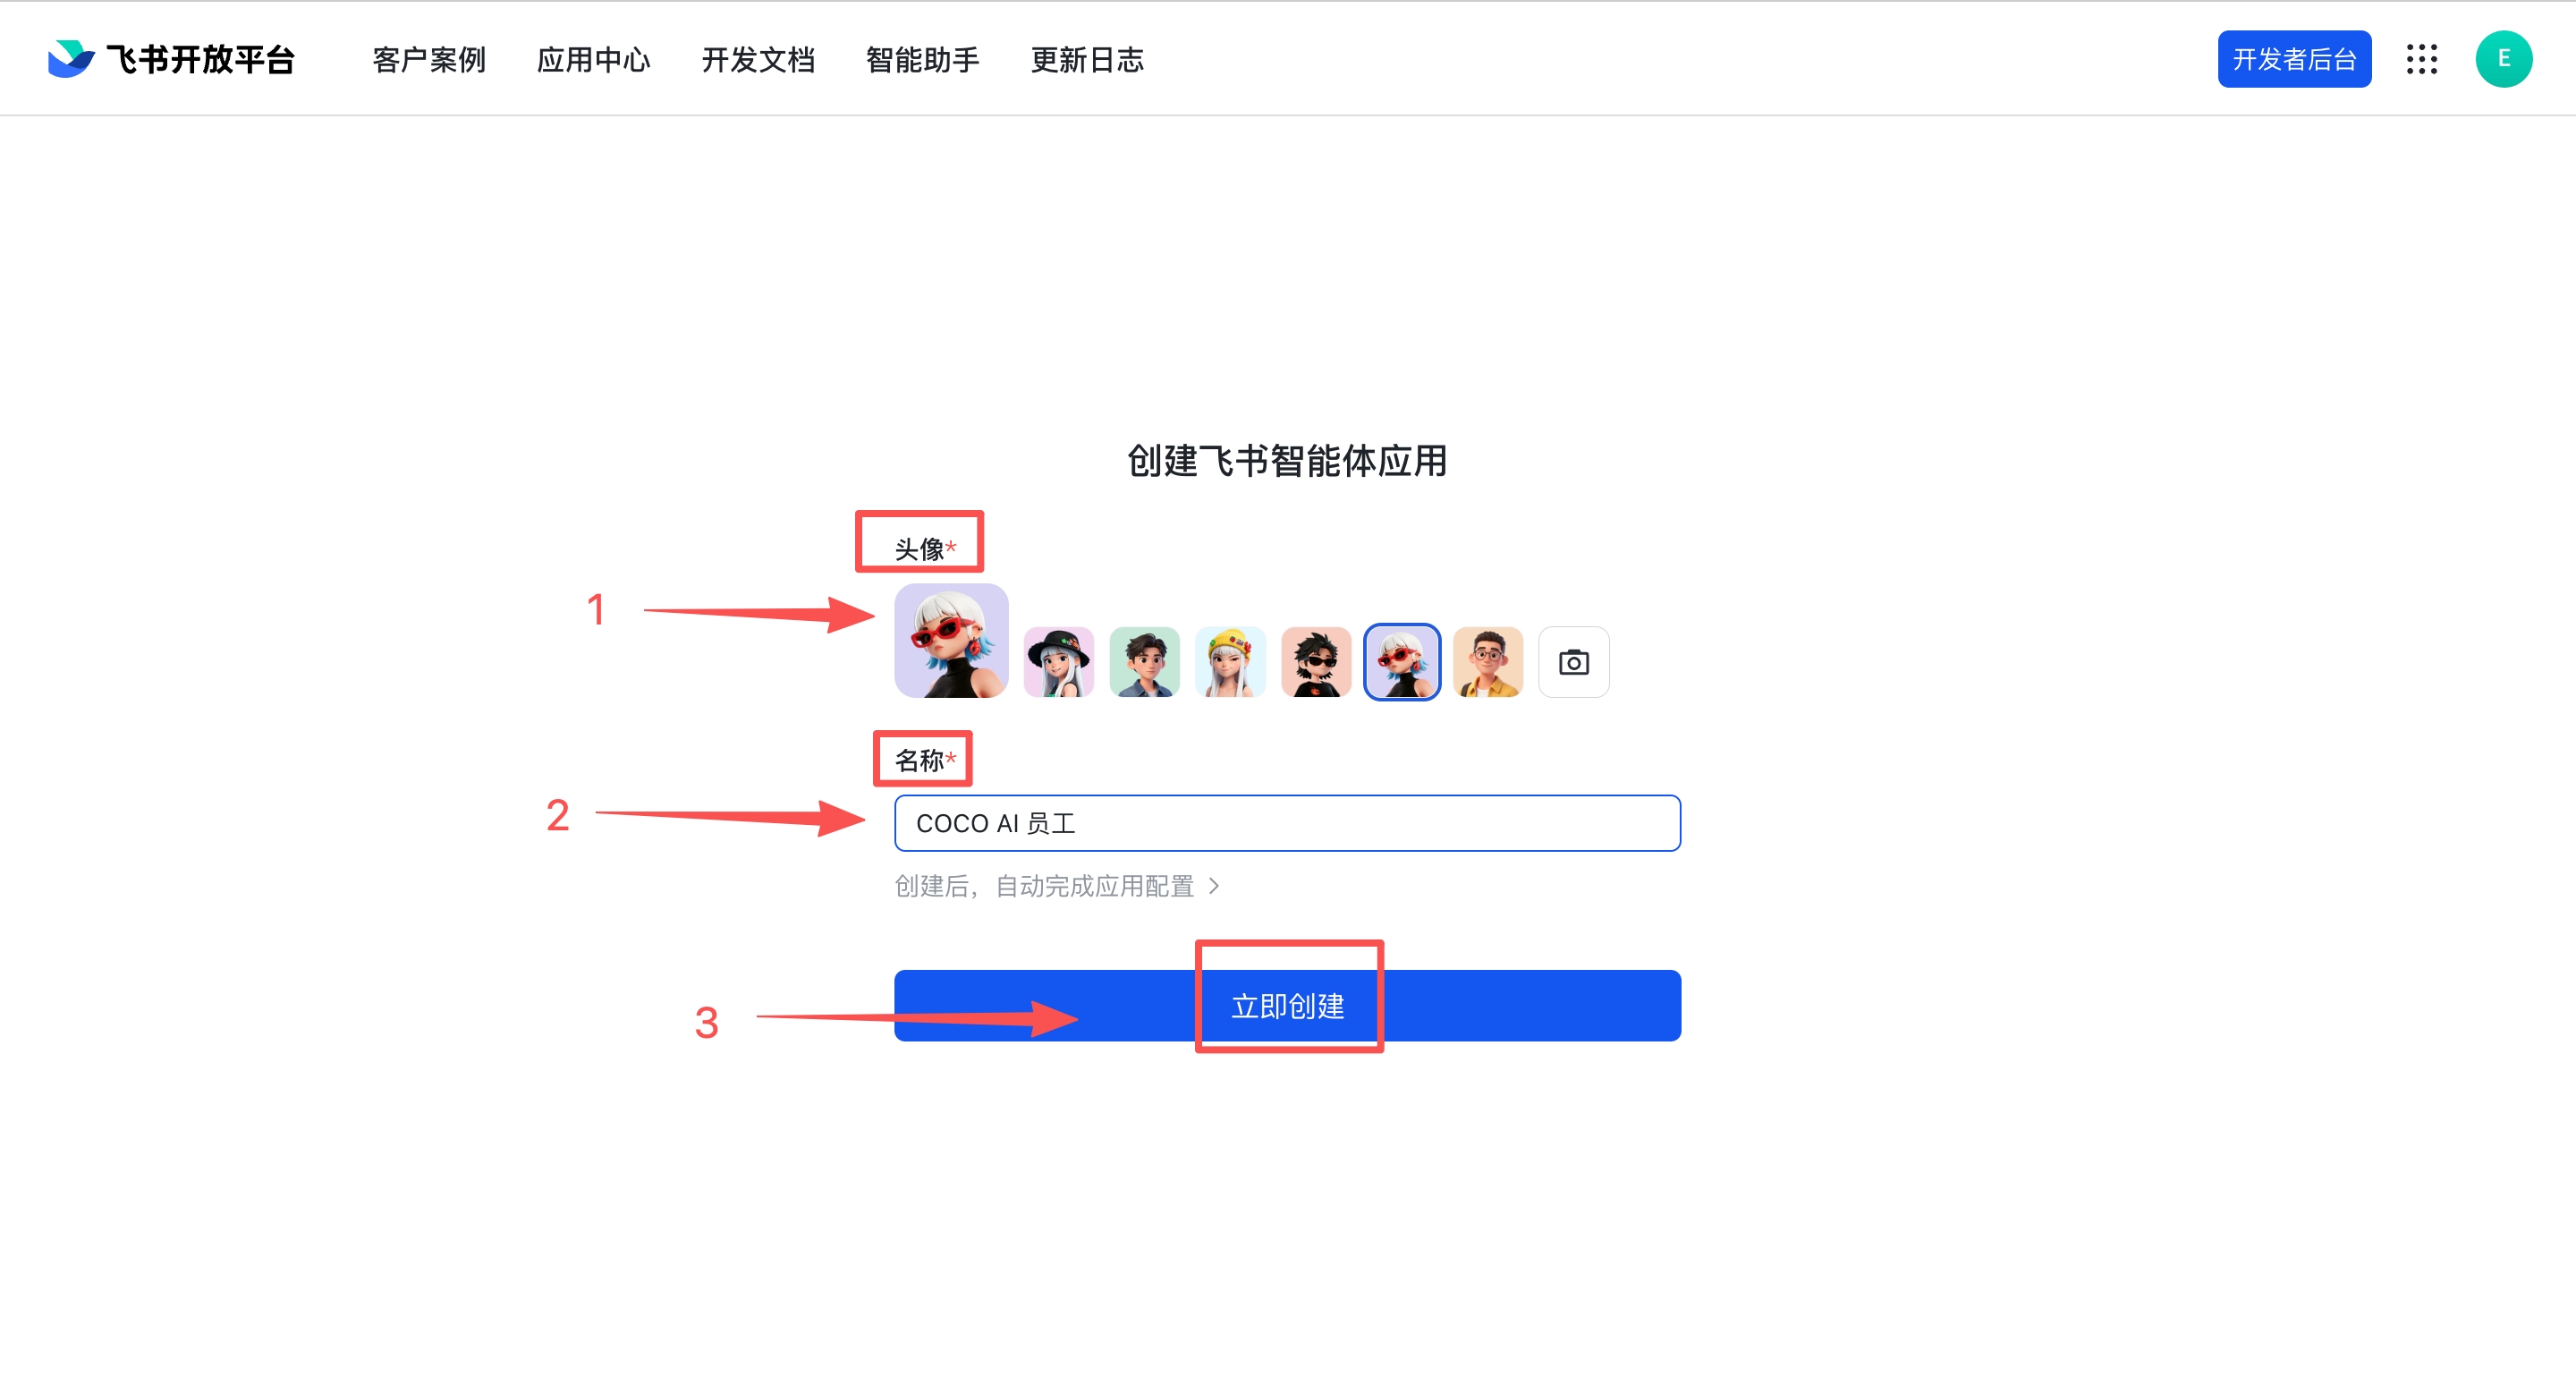
Step 3: Fill in Information and Create
- Choose your preferred avatar
- Fill in the name (e.g.,
OpenMax AI Employee) - Click Create Now
Enterprise account note: After creation, if you are using an enterprise Feishu account, the enterprise admin must approve the app in the Feishu Admin Console before it becomes active. If you are using a personal account, this step is not needed.
Step 4: Fill in Credentials in OpenMax Dashboard and Deploy
- Log into OpenMax Dashboard
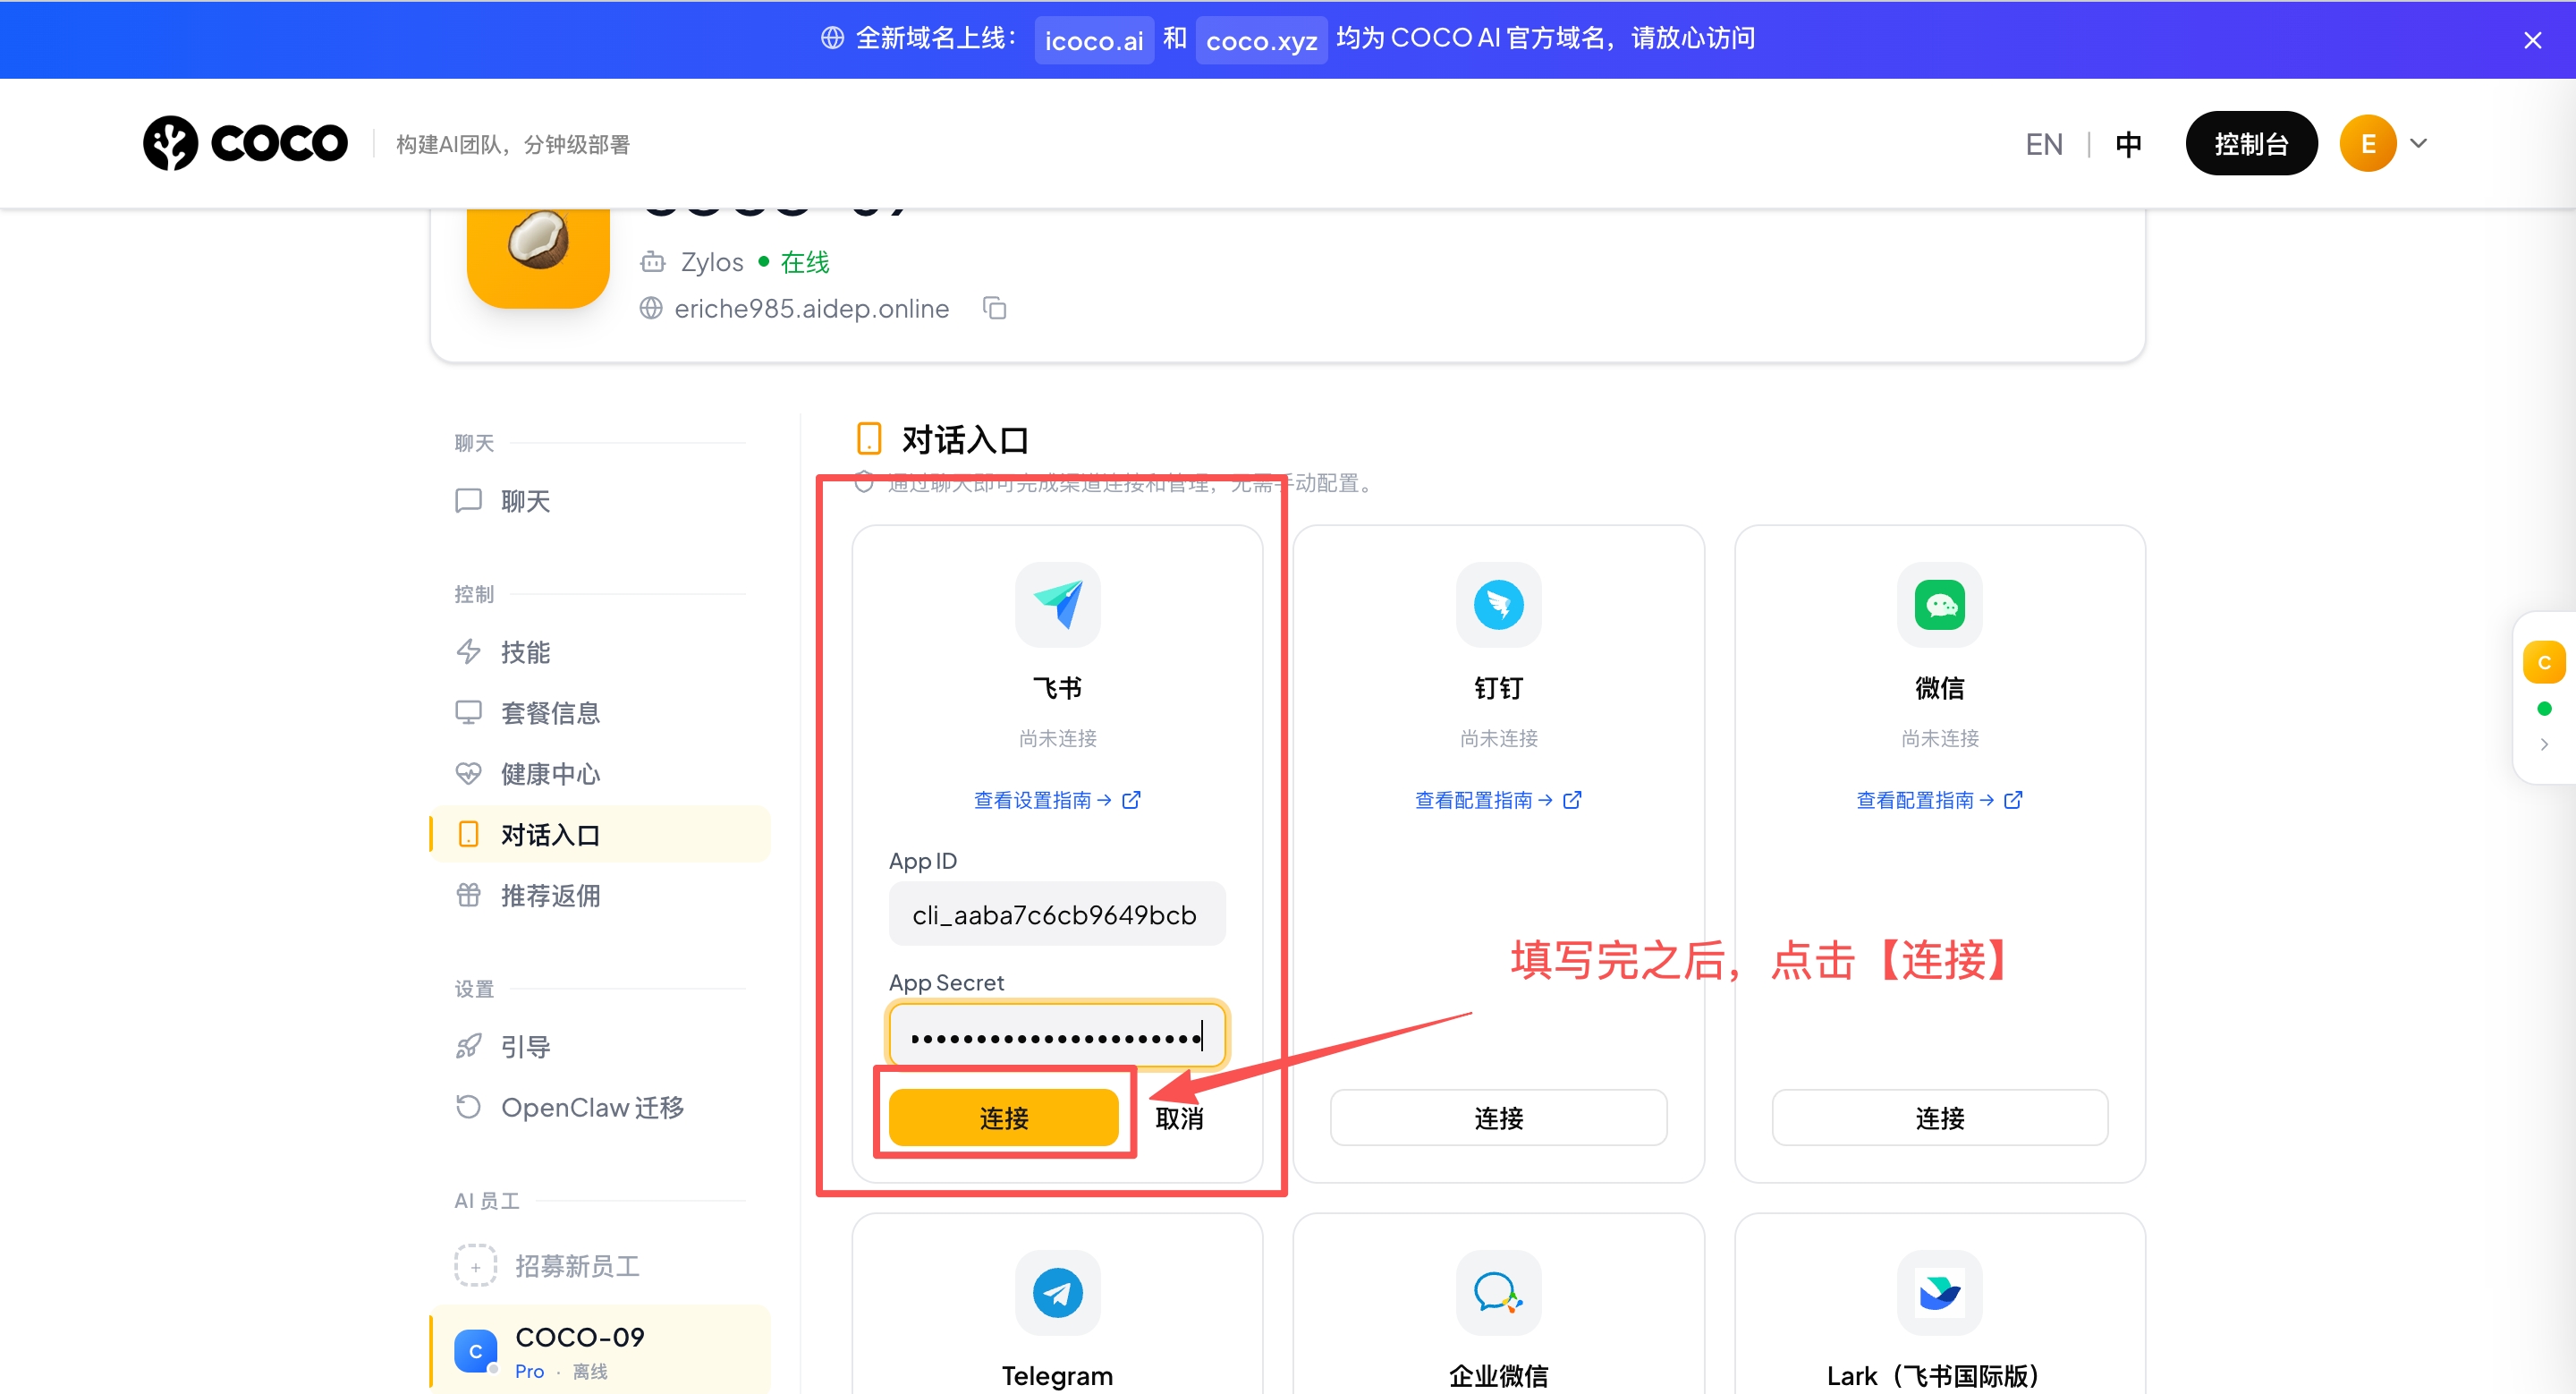
- Click Channels on the left sidebar, select Feishu
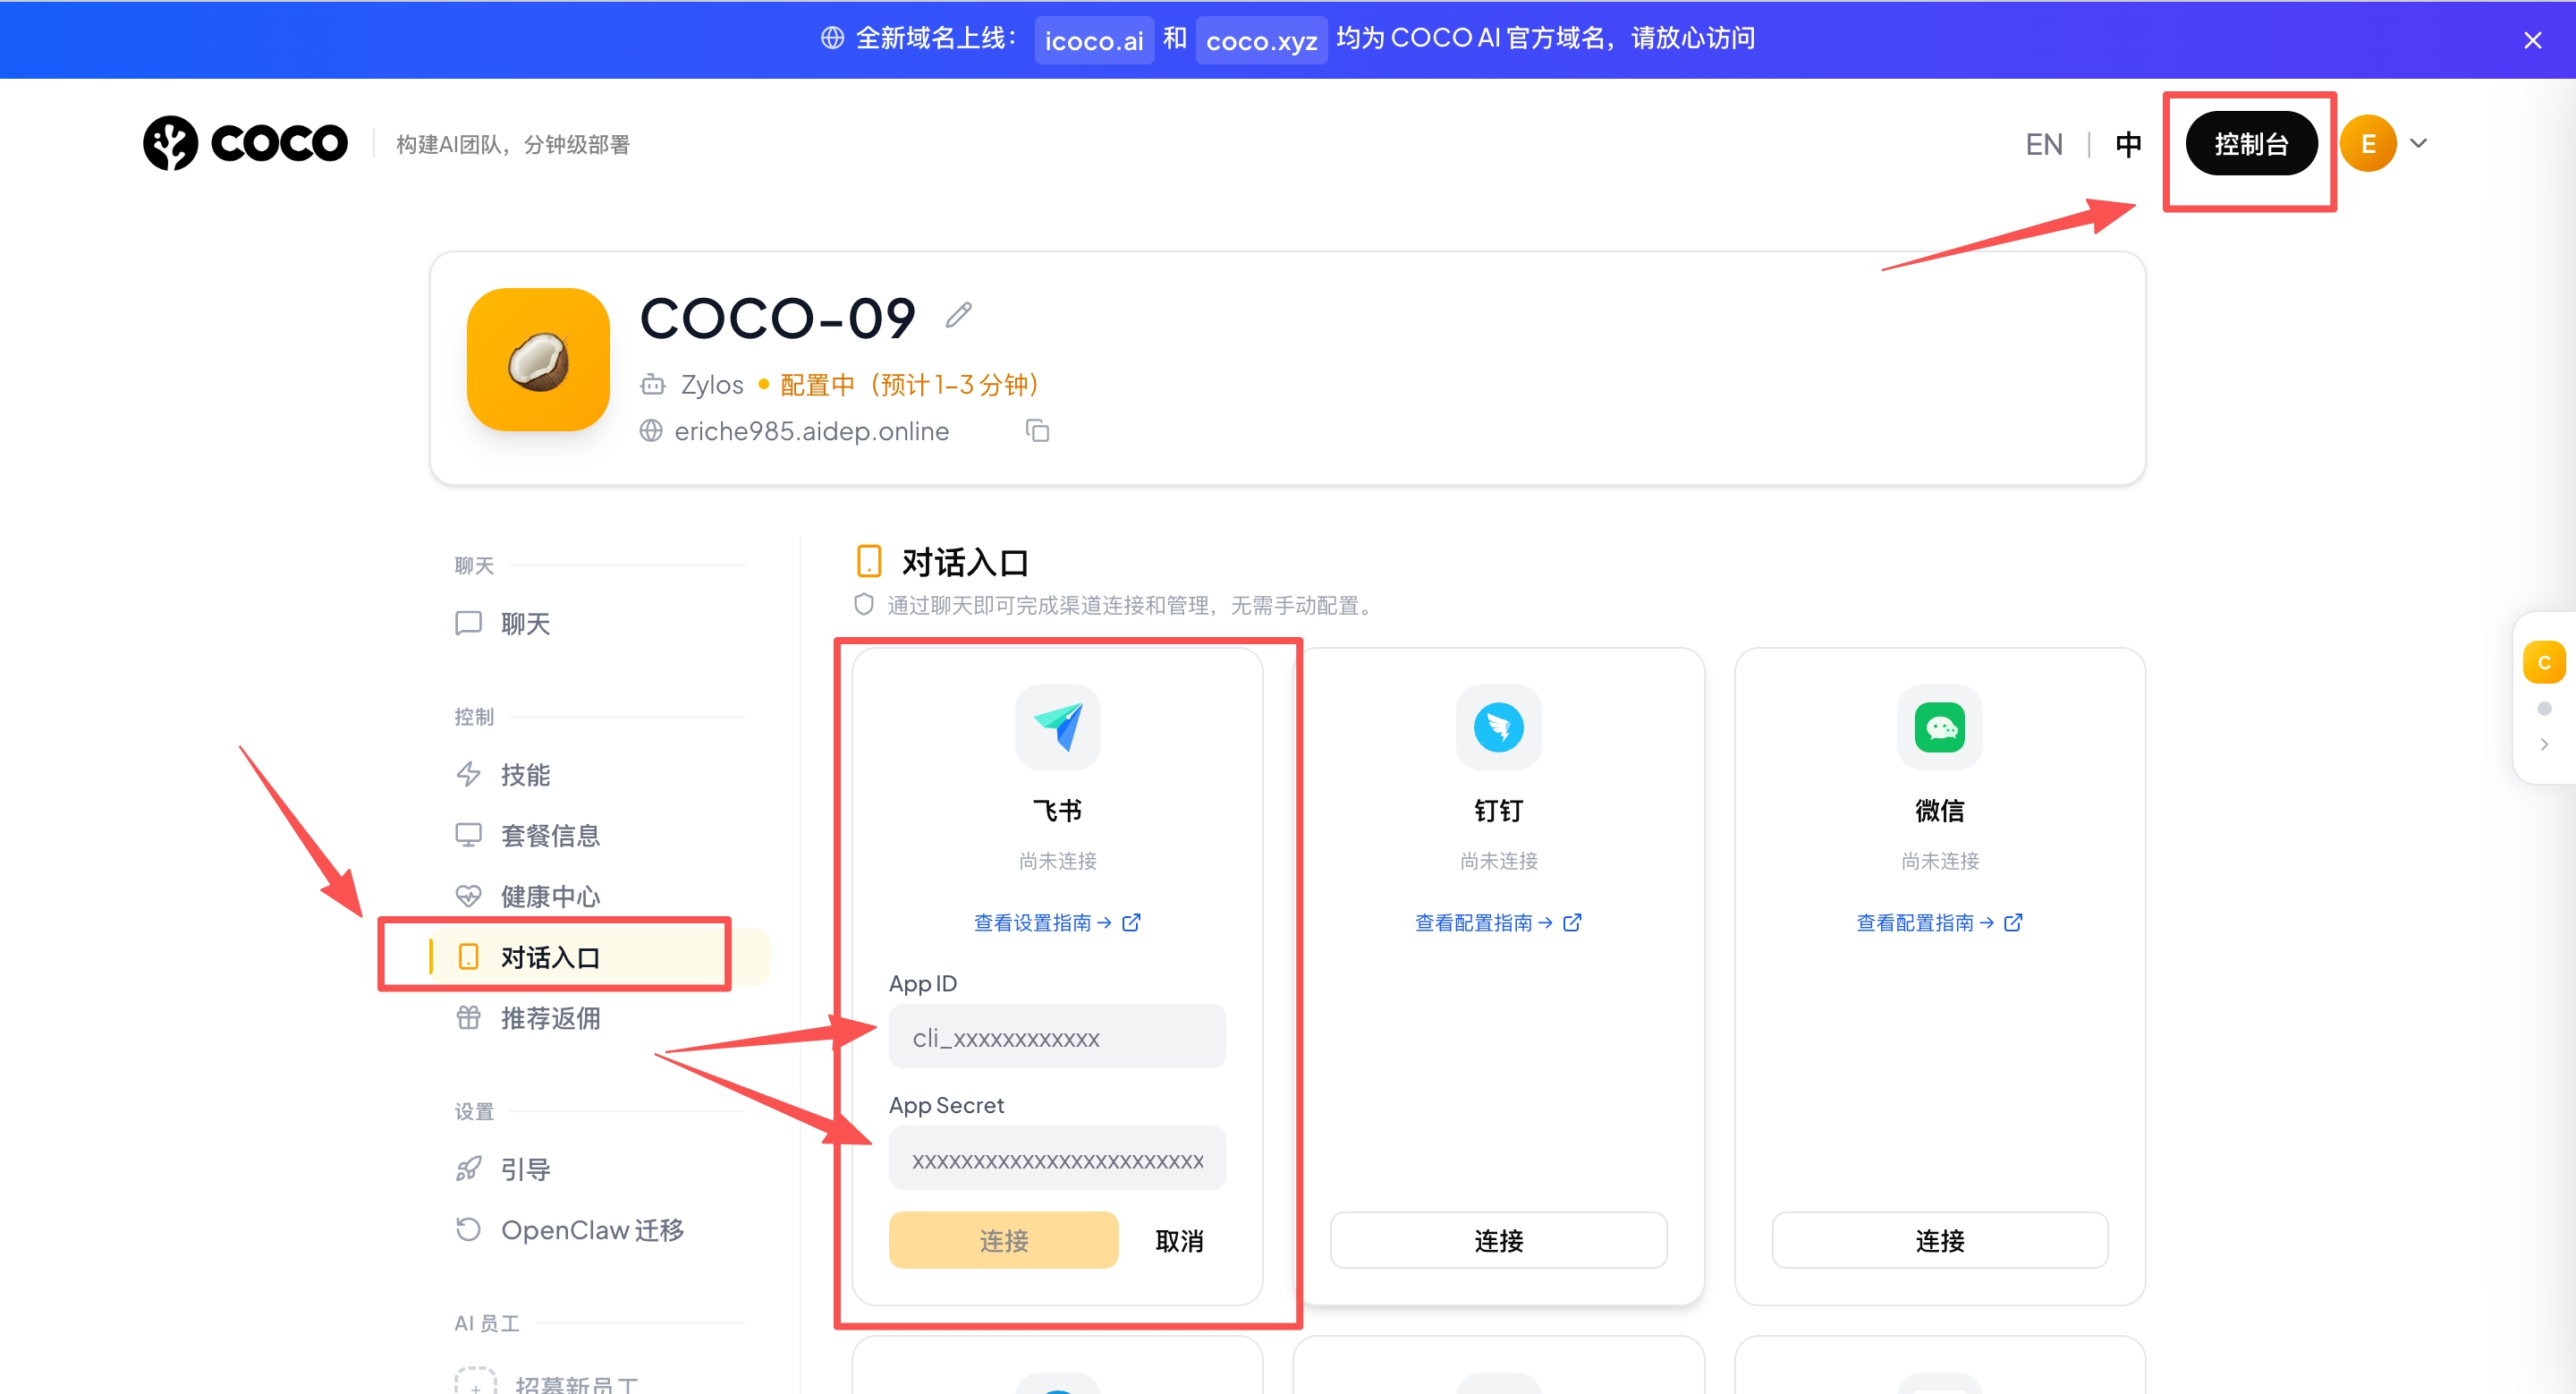
- Go back to the Smart Agent Created Successfully page, copy the App ID and App Secret
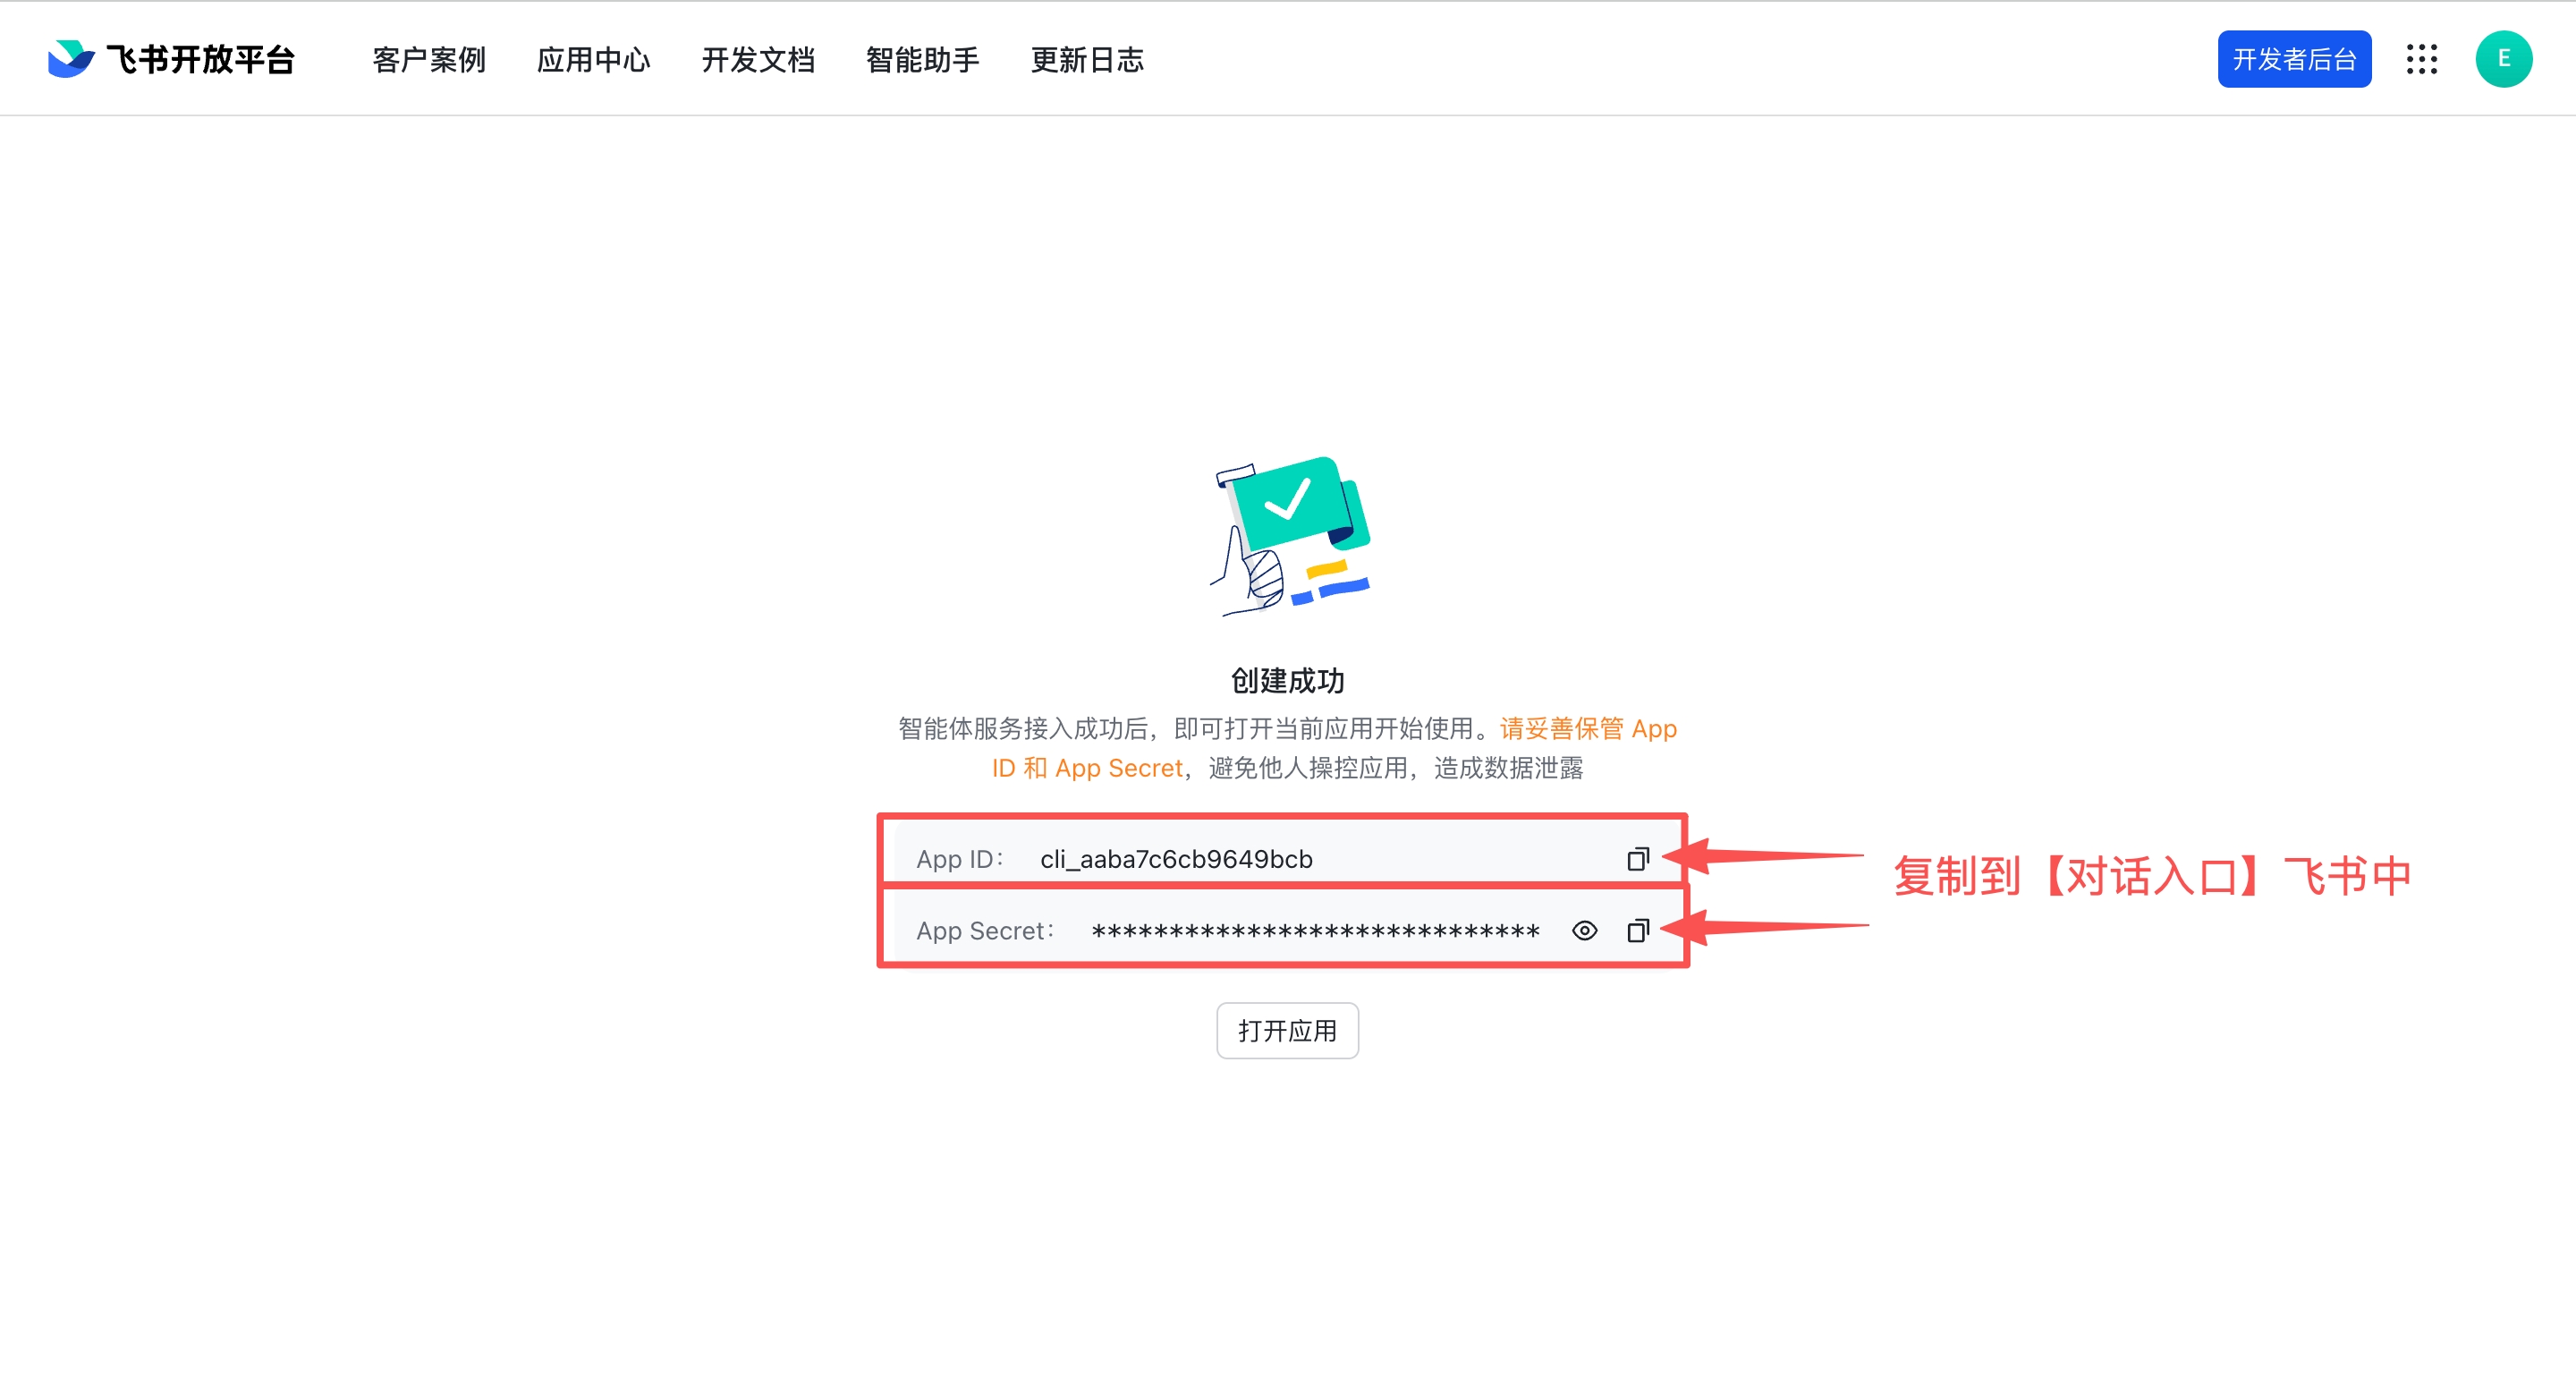
- Fill in the App ID and App Secret, click Connect — the system will automatically deploy your AI employee (typically takes 2-3 minutes)
Step 5: Add Required Permissions for Group Chats
The permissions granted automatically at creation only cover basic messaging. For your AI employee to work properly in group chats and display real user names, manually enable the following 4 scopes:
- Back in the Feishu Developer Backend, open your app and go to Permissions & Scopes
- Search for each scope ID below and click Enable:
| Scope | Purpose | If missing |
|---|---|---|
im:message.group_msg | Receive group messages and respond to @mentions | Bot cannot see group messages |
im:chat:readonly | Read group info and member lists | Names show as ID fragments (e.g. c08f09) |
contact:user.base:readonly | Resolve user IDs to real names | User names are unreadable |
contact:user.employee_id:readonly | Match users by employee ID | Users cannot be identified by employee ID |
- For each scope, set the data permission scope to All — if it is limited to specific groups, the bot will not work in groups outside that list
- If your organization requires approval for permission changes, publish a new app version for them to take effect (if the bot still reports 403 errors, check Version Management & Release)
Step 6: Search for Bot and Start Chatting
After connection is complete, search for your bot name in the Feishu client, confirm the bot has been created correctly, and click to start chatting.
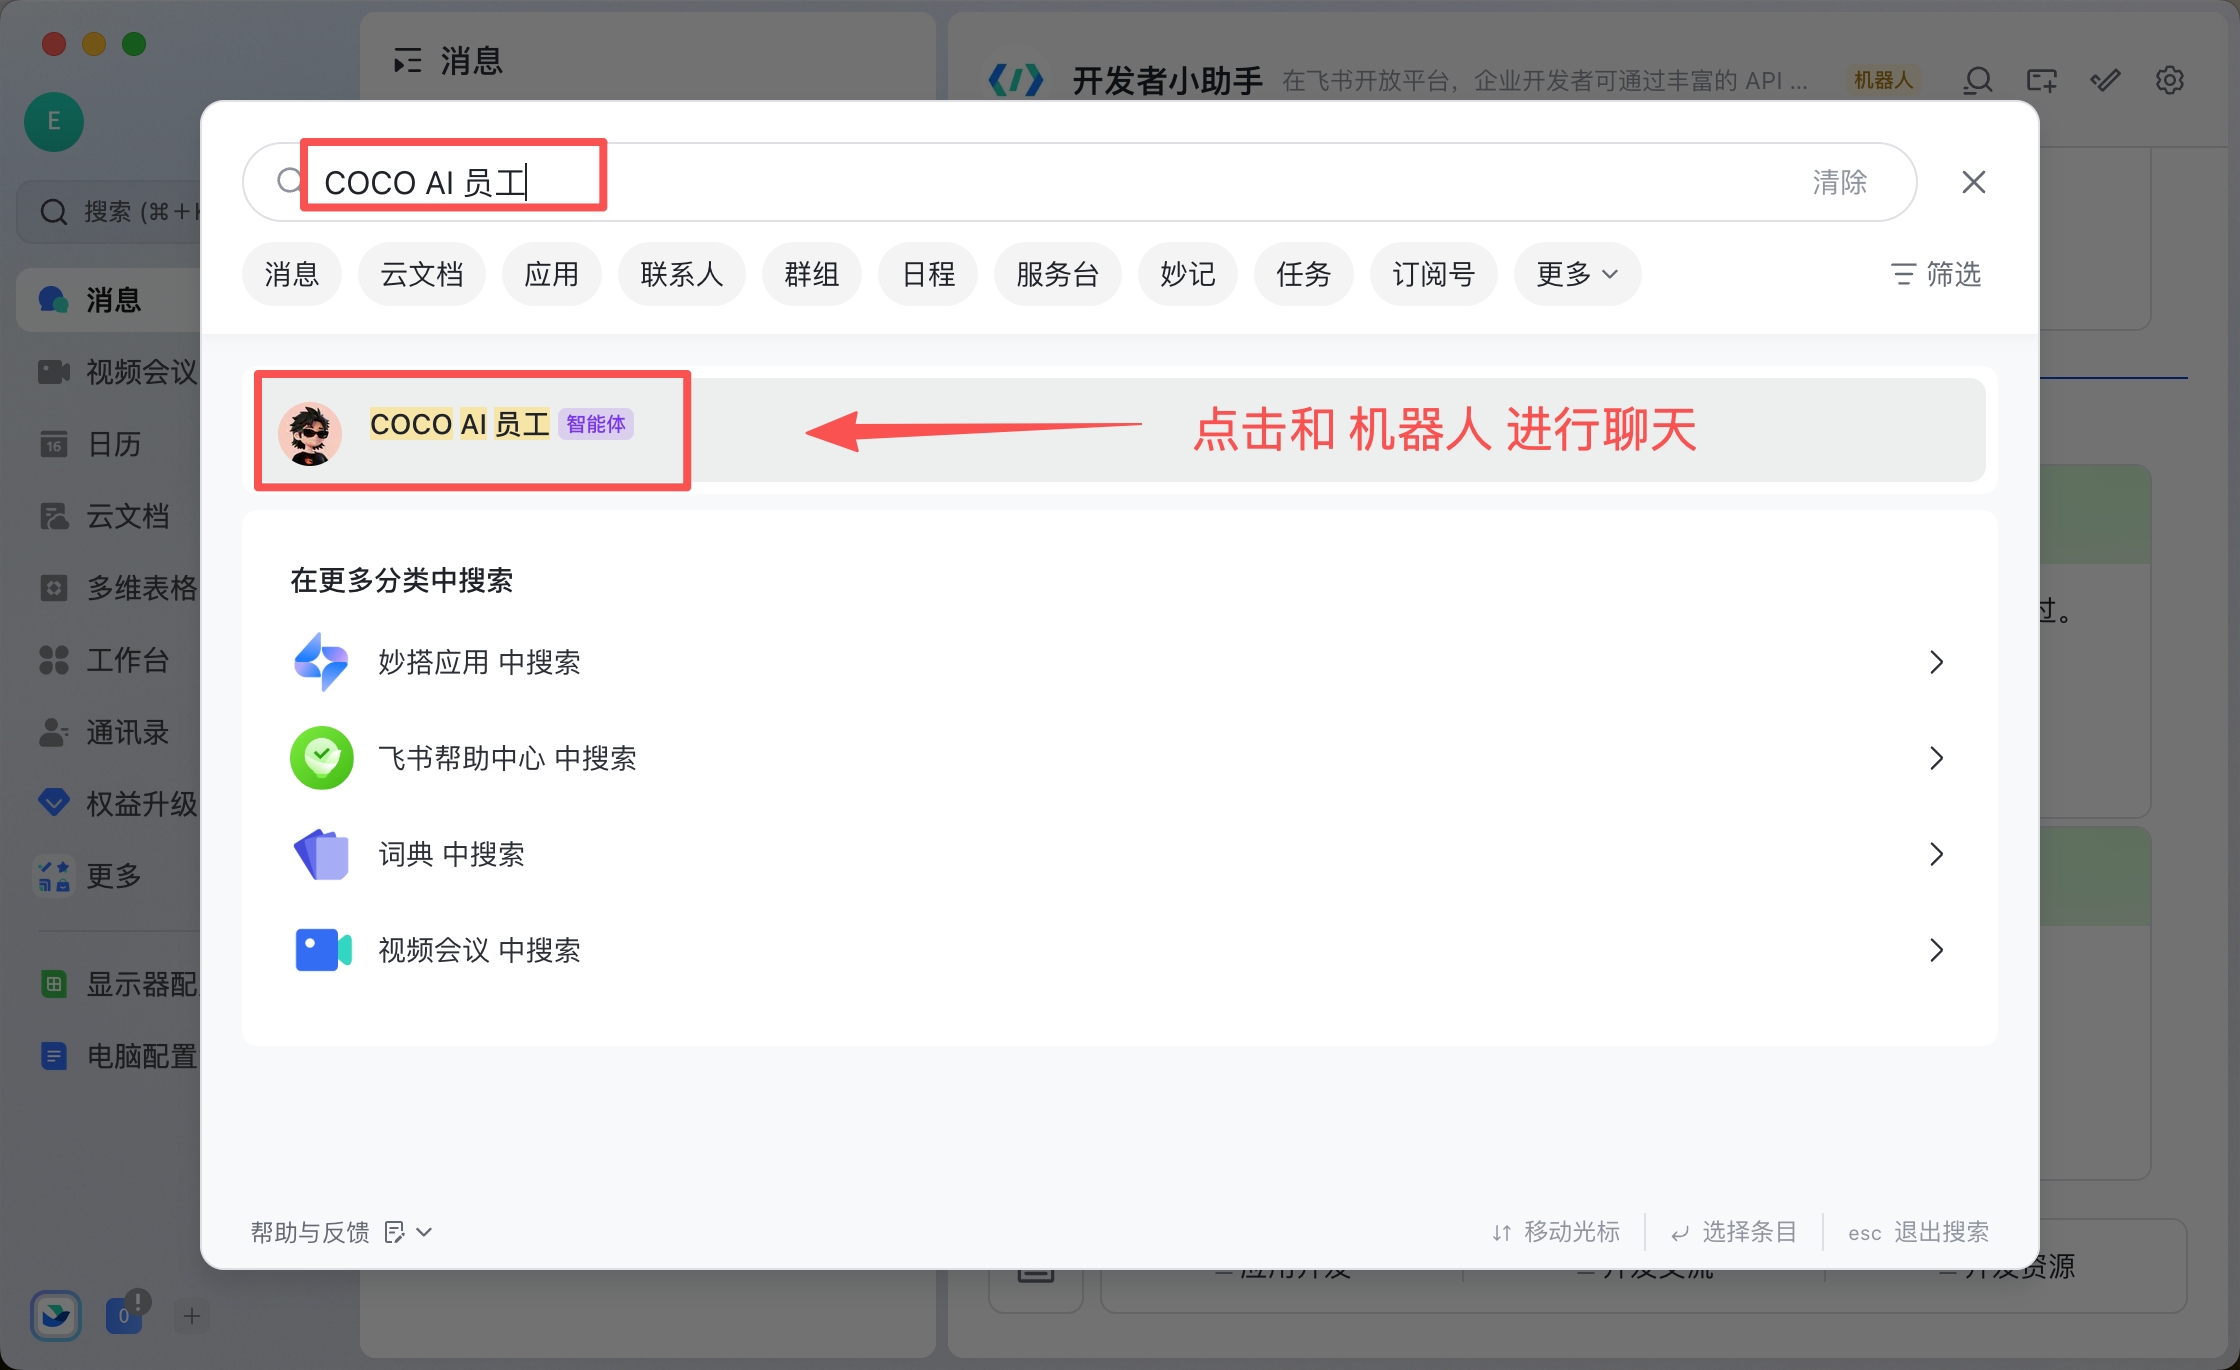
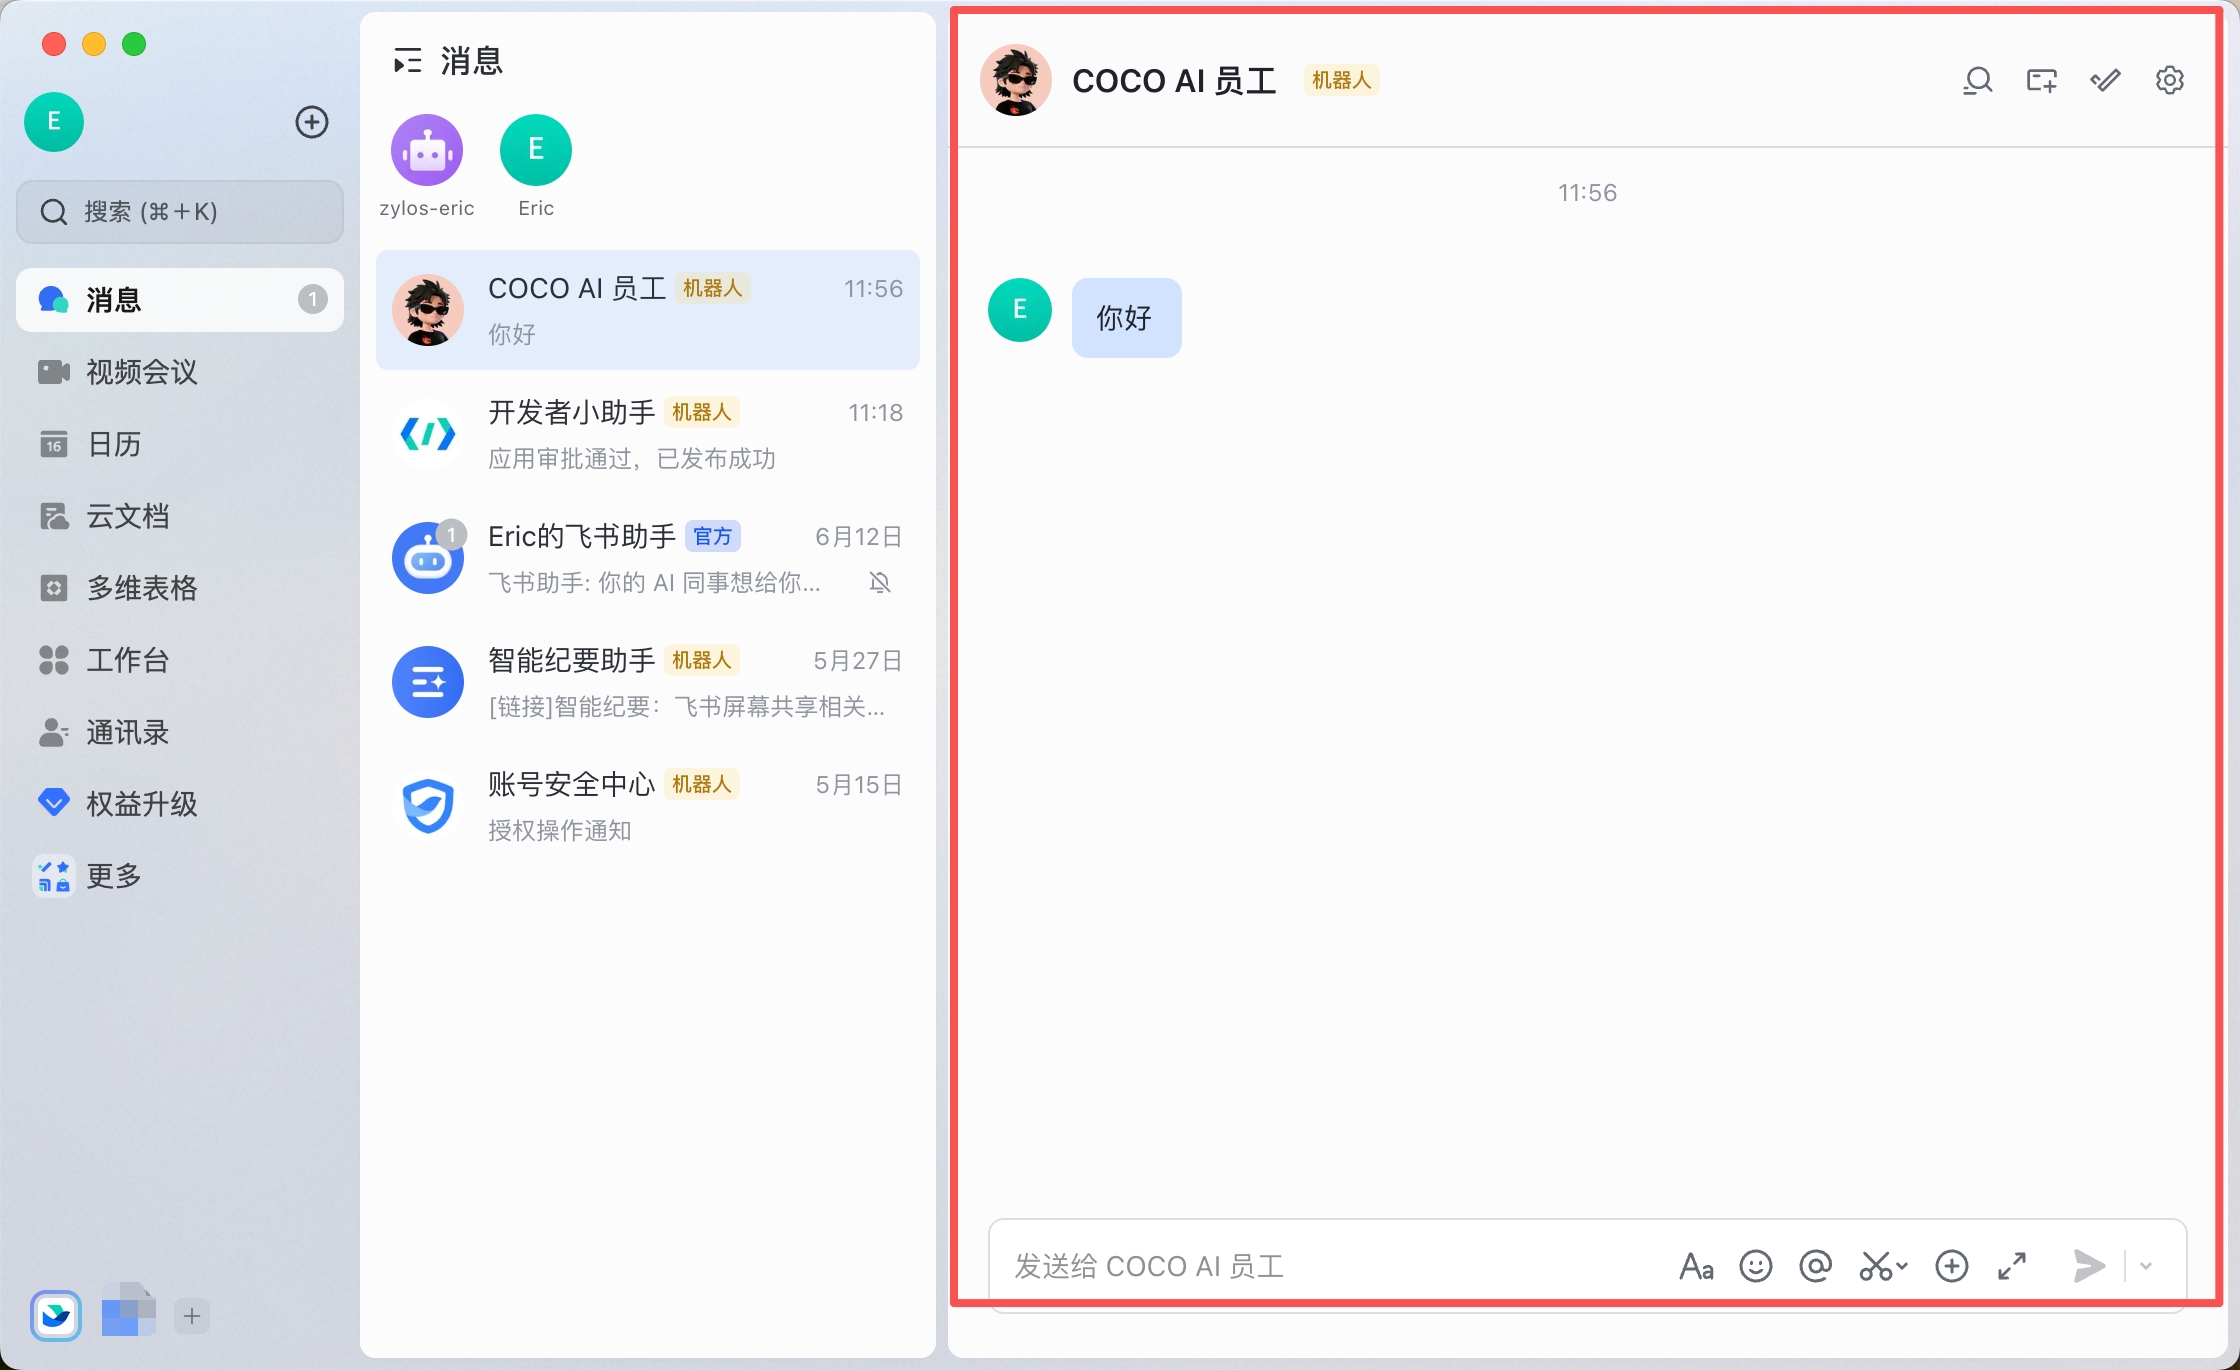
Deployment complete! Your AI employee is now online. You can chat with it directly or add it to group chats.
Option 2: Custom App Deploy (Full Configuration)
Estimated time: 8-15 minutes | Manually create a custom app and configure permissions, event subscriptions, and version publishing step by step. Suitable for advanced users who need fine-grained permission control or custom configuration.
WebSocket (Recommended): Simplest setup — only needs App ID and App Secret, no Webhook URL or verification required.
Webhook (Traditional): Feishu pushes events to a Webhook URL — requires Verification Token configuration.
Step 1: Access Feishu Open Platform
- Visit Feishu Open Platform
- Log in with your Feishu account
- Click Developer Backend in the top-right corner
Step 2: Create an Enterprise App
- In the Developer Backend, click Create Custom App
- Enter app name (e.g.,
OpenMax AI Employee) and description, select an app icon - Click Create to finish
- After creation, go to Credentials & Basic Info in the left sidebar and note down:
- App ID
- App Secret
Tip: Enterprise admin permissions are required. If you're not an admin, contact your IT department or use a Feishu personal account first.
Step 3: Add Bot Capability and Configure Permissions
In the app management page, first add the Bot capability by clicking + Add, then go to Permission Management in the left sidebar.
In the Permission Management page, copy the following JSON and import all permissions at once:
{
  "scopes": {
    "tenant": [
      "contact:contact.base:readonly",
      "contact:user.base:readonly",
      "im:app_feed_card:write",
      "im:chat",
      "im:chat.announcement:read",
      "im:chat.announcement:write_only",
      "im:chat.chat_pins:read",
      "im:chat.chat_pins:write_only",
      "im:chat.collab_plugins:read",
      "im:chat.collab_plugins:write_only",
      "im:chat.managers:write_only",
      "im:chat.members:bot_access",
      "im:chat.members:read",
      "im:chat.members:write_only",
      "im:chat.menu_tree:read",
      "im:chat.menu_tree:write_only",
      "im:chat.moderation:read",
      "im:chat.tabs:read",
      "im:chat.tabs:write_only",
      "im:chat.top_notice:write_only",
      "im:chat.widgets:read",
      "im:chat.widgets:write_only",
      "im:chat:create",
      "im:chat:delete",
      "im:chat:moderation:write_only",
      "im:chat:operate_as_owner",
      "im:chat:read",
      "im:chat:readonly",
      "im:chat:update",
      "im:datasync.feed_card.time_sensitive:write",
      "im:message",
      "im:message.group_at_msg:readonly",
      "im:message.group_msg",
      "im:message.p2p_msg:readonly",
      "im:message.pins:read",
      "im:message.pins:write_only",
      "im:message.reactions:read",
      "im:message.reactions:write_only",
      "im:message.urgent",
      "im:message.urgent:phone",
      "im:message.urgent:sms",
      "im:message:readonly",
      "im:message:recall",
      "im:message:send_as_bot",
      "im:message:send_multi_depts",
      "im:message:send_sys_msg",
      "im:message:update",
      "im:resource",
      "im:url_preview.update",
      "im:user_agent:read"
    ],
    "user": []
  }
}
Feishu vs Lark scopes: The Feishu (domestic China) scope set above differs slightly from the Lark (international) version. Two scopes —
im:chat.labelsandim:message.group_msg:readonly— are not supported on the Feishu China platform and have been removed. All other scopes are identical.
Step 4: Get Verification Token
- In app management, go to Events & Callbacks
- Click the Encryption Strategy tab
- Find the Verification Token at the bottom of the page, click the eye icon to view and copy it
Tip: On the same page you'll also find the Encrypt Key (optional). If you need encrypted communication, record this as well.
Step 5: Connect in OpenMax Dashboard and Deploy
- Log into OpenMax Dashboard
- Go to the channel configuration page, select Feishu
- Enter the following credentials:
| Field | Source |
|---|---|
| App ID | Feishu Open Platform → Credentials & Basic Info |
| App Secret | Feishu Open Platform → Credentials & Basic Info |
| Verification Token | Feishu Open Platform → Events & Callbacks → Encryption Strategy |
| Encrypt Key (optional) | Feishu Open Platform → Events & Callbacks → Encryption Strategy |
- Click Connect — the system will automatically deploy your AI employee (typically takes 2-3 minutes)
- After deployment, the page will display your dedicated Webhook URL — copy this URL (needed in the next step)
Step 6: Configure Event Subscription
- Return to the Feishu Developer Backend, go to Events & Callbacks
- Under "Event Configuration", select Send events to developer server
- Paste the Webhook URL from the previous step into the Request URL field
- Subscribe to events:
im.message.receive_v1— Receive messages (required)im.chat.member.bot.added_v1— Bot added to group (optional)
- Click Save
Step 7: Create Version and Publish
- In the Feishu Developer Backend, go to Version Management & Publishing
- Click Create Version
- Enter version number (e.g.,
1.0.0) and update description - Confirm app capabilities and permissions, click Save
- In the confirmation dialog, click Confirm Publish
Admin Approval: After publishing a Feishu custom app, the enterprise admin must approve it in the Feishu Admin Console before the app becomes active. If you're using a personal account, this step is not needed.
Step 8: Enable Bot and Add to Groups
- In Feishu Open Platform, go to Bot menu, confirm bot functionality is enabled
- Open Feishu client
- Create or enter a group
- Group Settings → Bots → Add Bot → Search for your app name
- Confirm addition
- @mention your bot in the group and send a message
- AI employee responds → Deployment complete!
Also works in private chat: Search for your app name in Feishu and start a direct conversation.
Option C: WeCom (企业微信) Deployment
Estimated time: ~5 minutes
Version Note: This guide applies to WeCom component v0.1.1 and above (WebSocket long connection mode — no public IP or SSL required). If you are on the older v0.1.0 webhook mode, upgrade by sending
帮我升级 wecom 组件via the Dashboard Web Console.
Only 2 credentials are required:
| Credential | Description |
|---|---|
| Bot ID | Unique identifier for the intelligent robot |
| Secret | Robot authentication key |
Step 1: Create an Intelligent Robot
In the WeCom Admin Console, go to Workbench (工作台) → Intelligent Robots (智能机器人) → click Create Robot (创建机器人).
Step 2: Select Creation Method
In the dialog, click 手动创建 > (Manual Creation), or use AI auto-generation.
Step 3: Switch to API Mode
At the bottom of the page, click 切换至 API 模式创建 (Switch to API Mode Creation).
Step 4: Enable Long Connection and Copy Credentials
- Select 使用长连接 (Use Long Connection)
- Copy the Bot ID and Secret displayed on the page
- Set the Visibility Scope (可见范围) to determine who can use the bot
- Click Save
Important: The Secret is only shown once at creation. Save it immediately.
Step 5: Connect in Dashboard
In the OpenMax Dashboard, go to the employee instance detail page → Conversation Entrance (会话入口) → click the WeCom Connection button → enter the Bot ID and Secret from Step 4. Click Connect.
WeCom FAQ
| Issue | Solution |
|---|---|
| Bot not responding | Verify that Long Connection mode is enabled and the Bot ID / Secret are entered correctly |
| Secret lost | Delete the robot and create a new one — Secrets cannot be retrieved after creation |
Option D: DingTalk (钉钉) Deployment
Estimated time: 8-12 minutes
Note: DingTalk (钉钉) is Alibaba's enterprise collaboration platform, widely used by Chinese companies. DingTalk uses Stream mode (WebSocket long connection), so no public callback URL is needed — deployment is simpler.
Three credentials are required:
| Credential | Description |
|---|---|
| AppKey | Application unique identifier |
| AppSecret | Application credential key |
| RobotCode | Robot identifier (usually same as AppKey) |
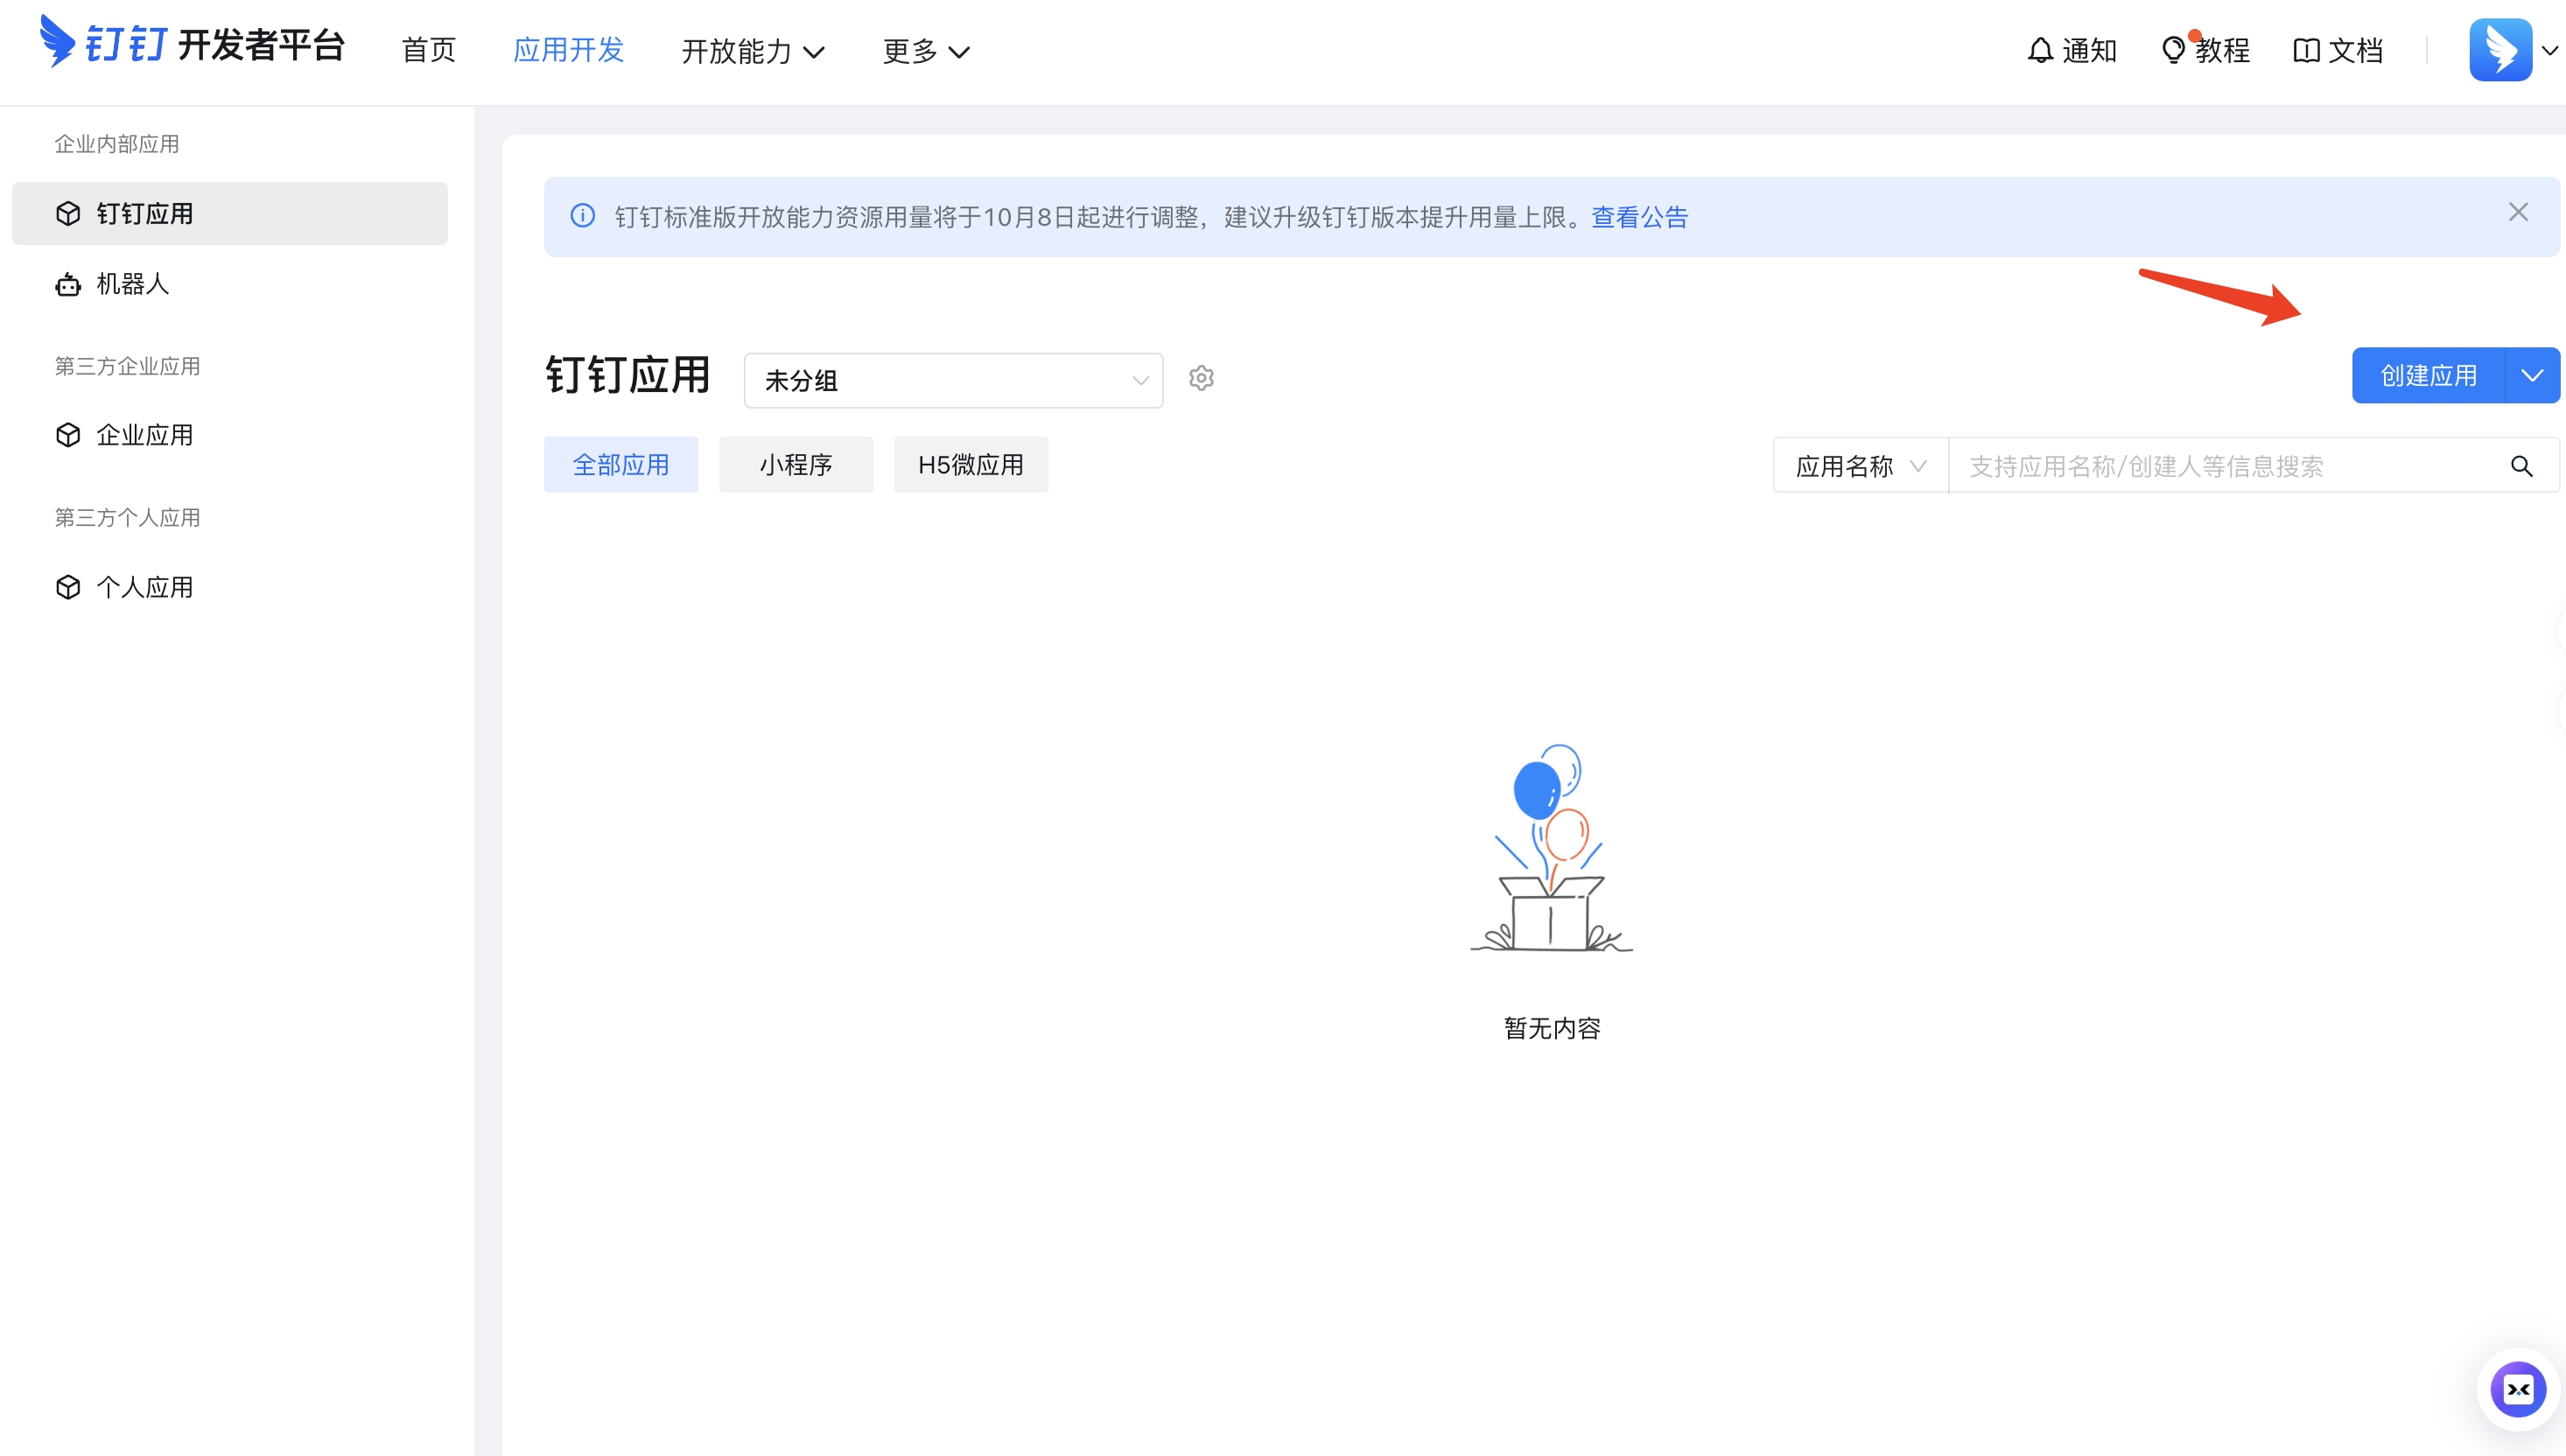
Step 1: Access DingTalk Open Platform and Create an Application
Visit the DingTalk Open Platform App Management page and click Create Application.
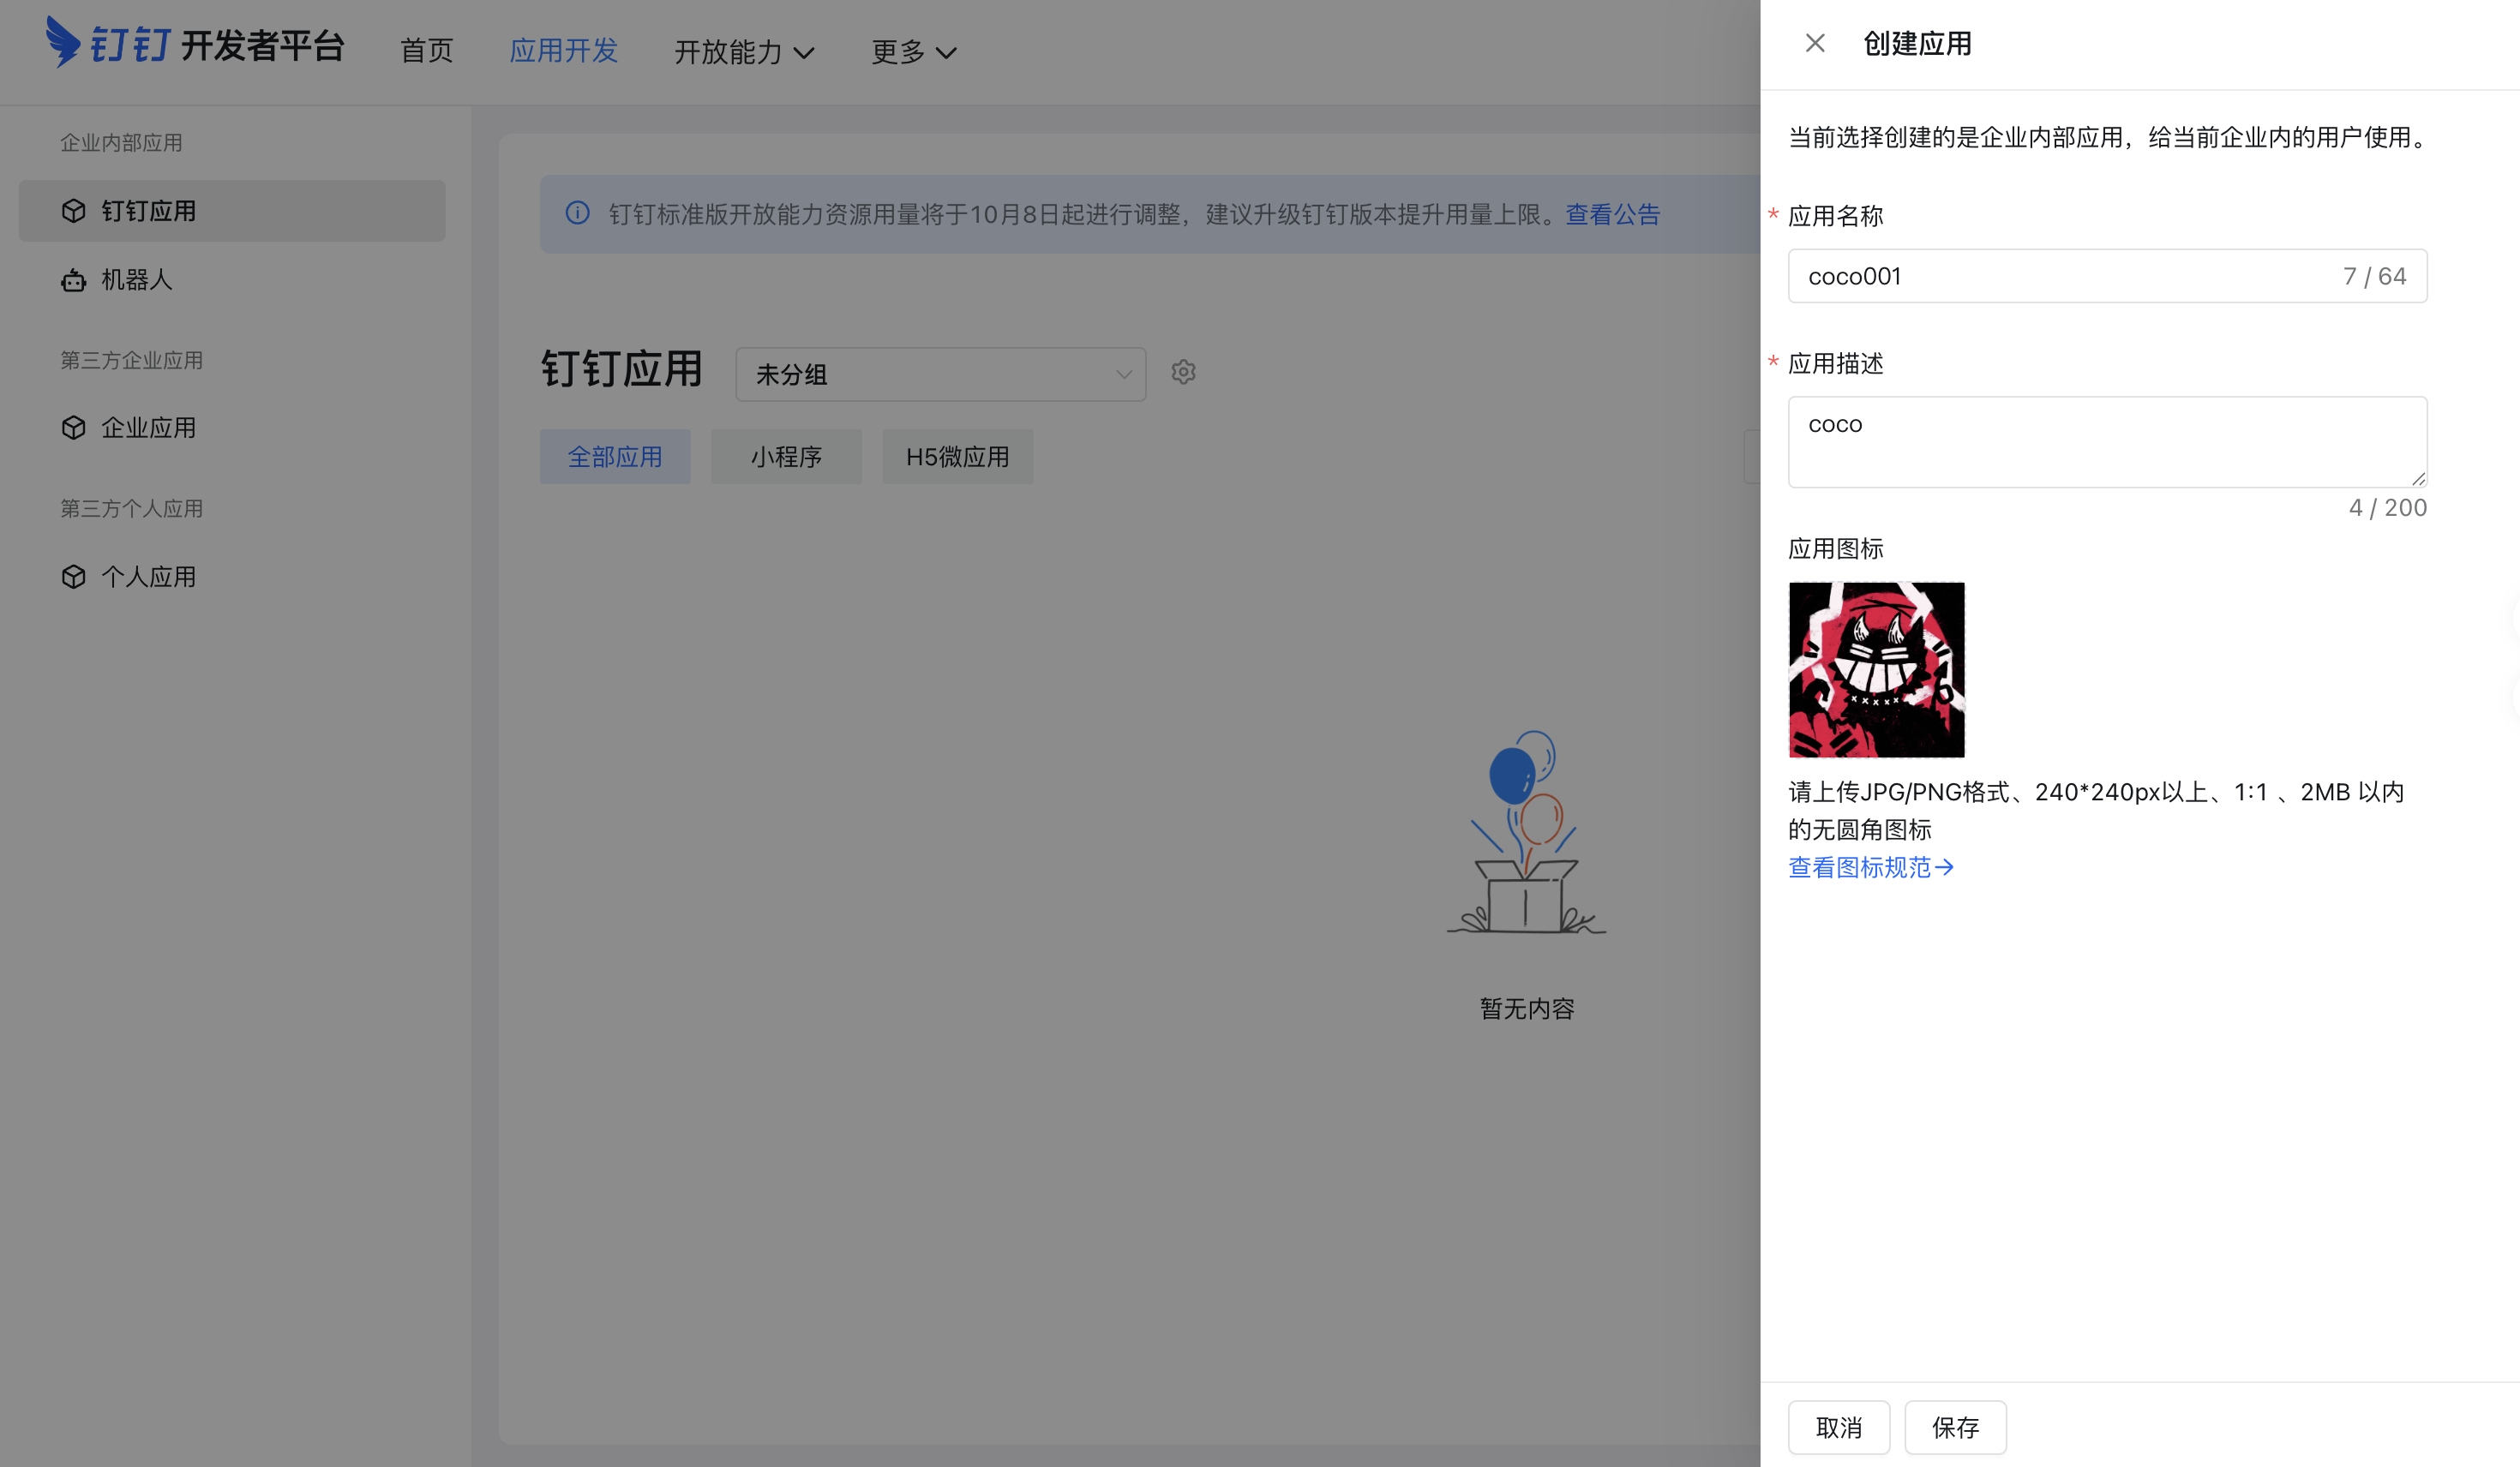
Step 2: Enter Application Name and Description
Enter the Application Name (e.g., OpenMax AI Employee) and Description, then click Save.
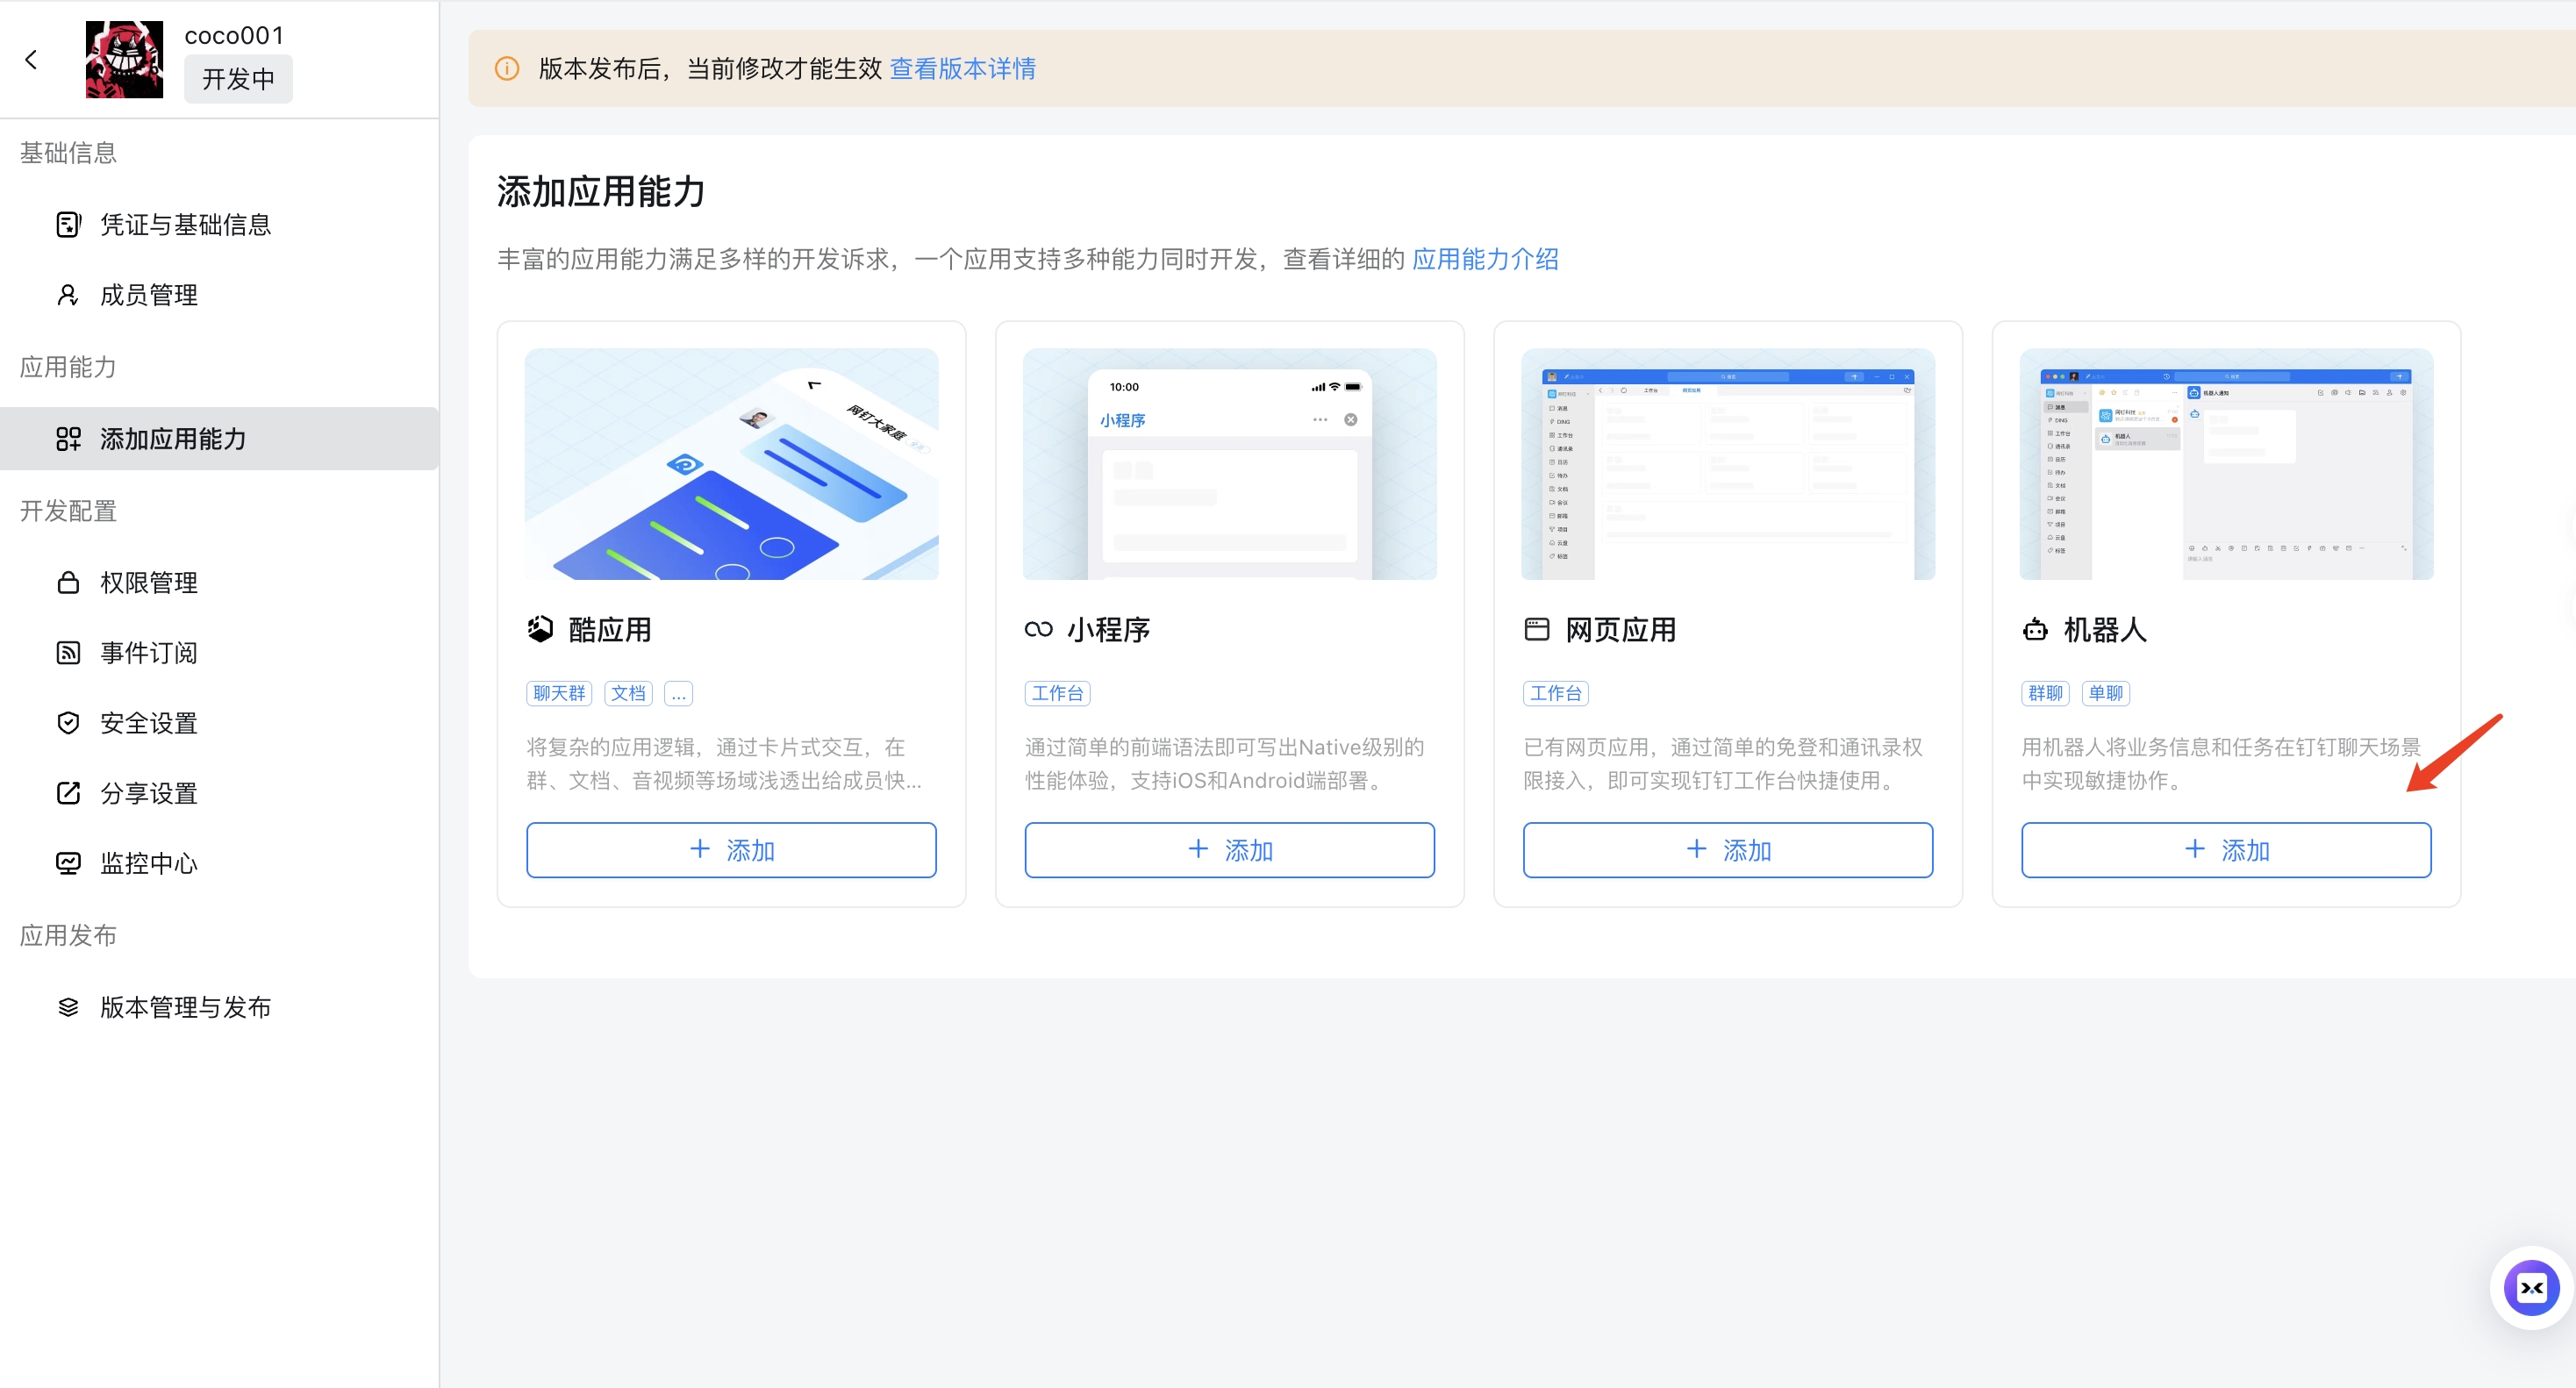
Step 3: Add Robot Capability
After saving, you'll be redirected to the "Add Capabilities" page. Click Add Robot capability.
Step 4: Configure Robot and Select Stream Mode
Open the robot configuration page, fill in the required information, select Stream Mode for message reception, then publish.
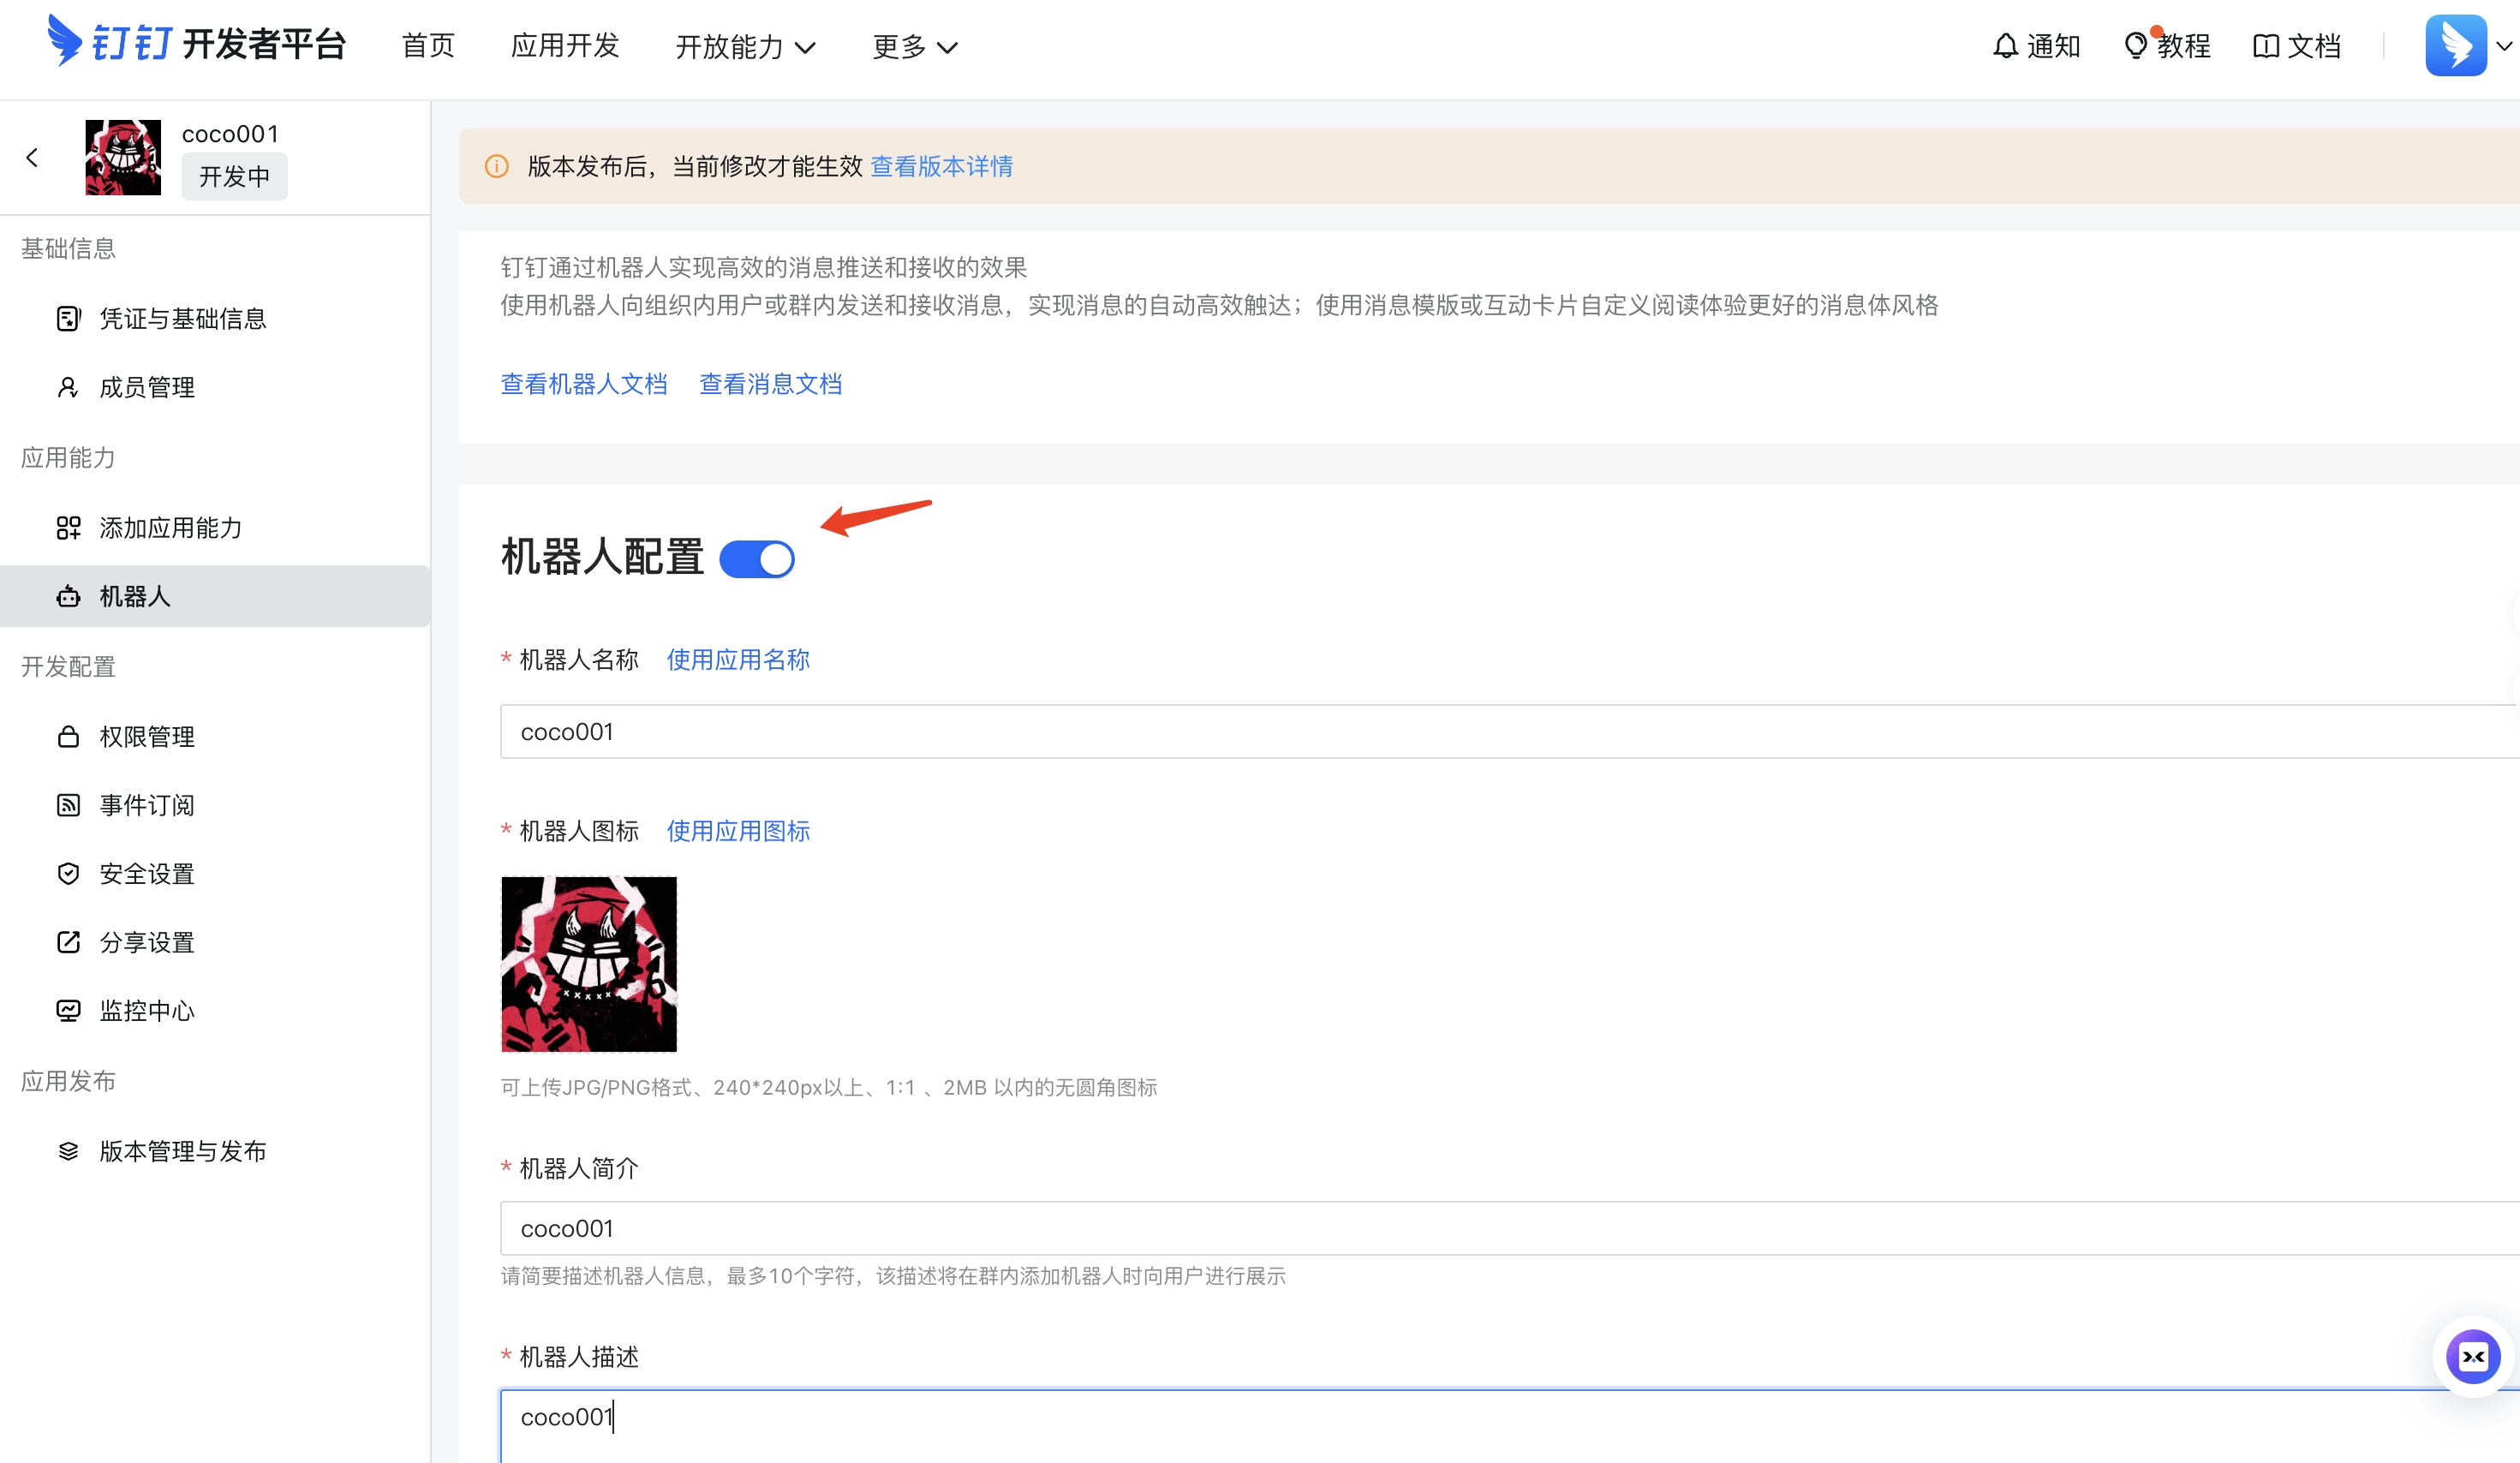
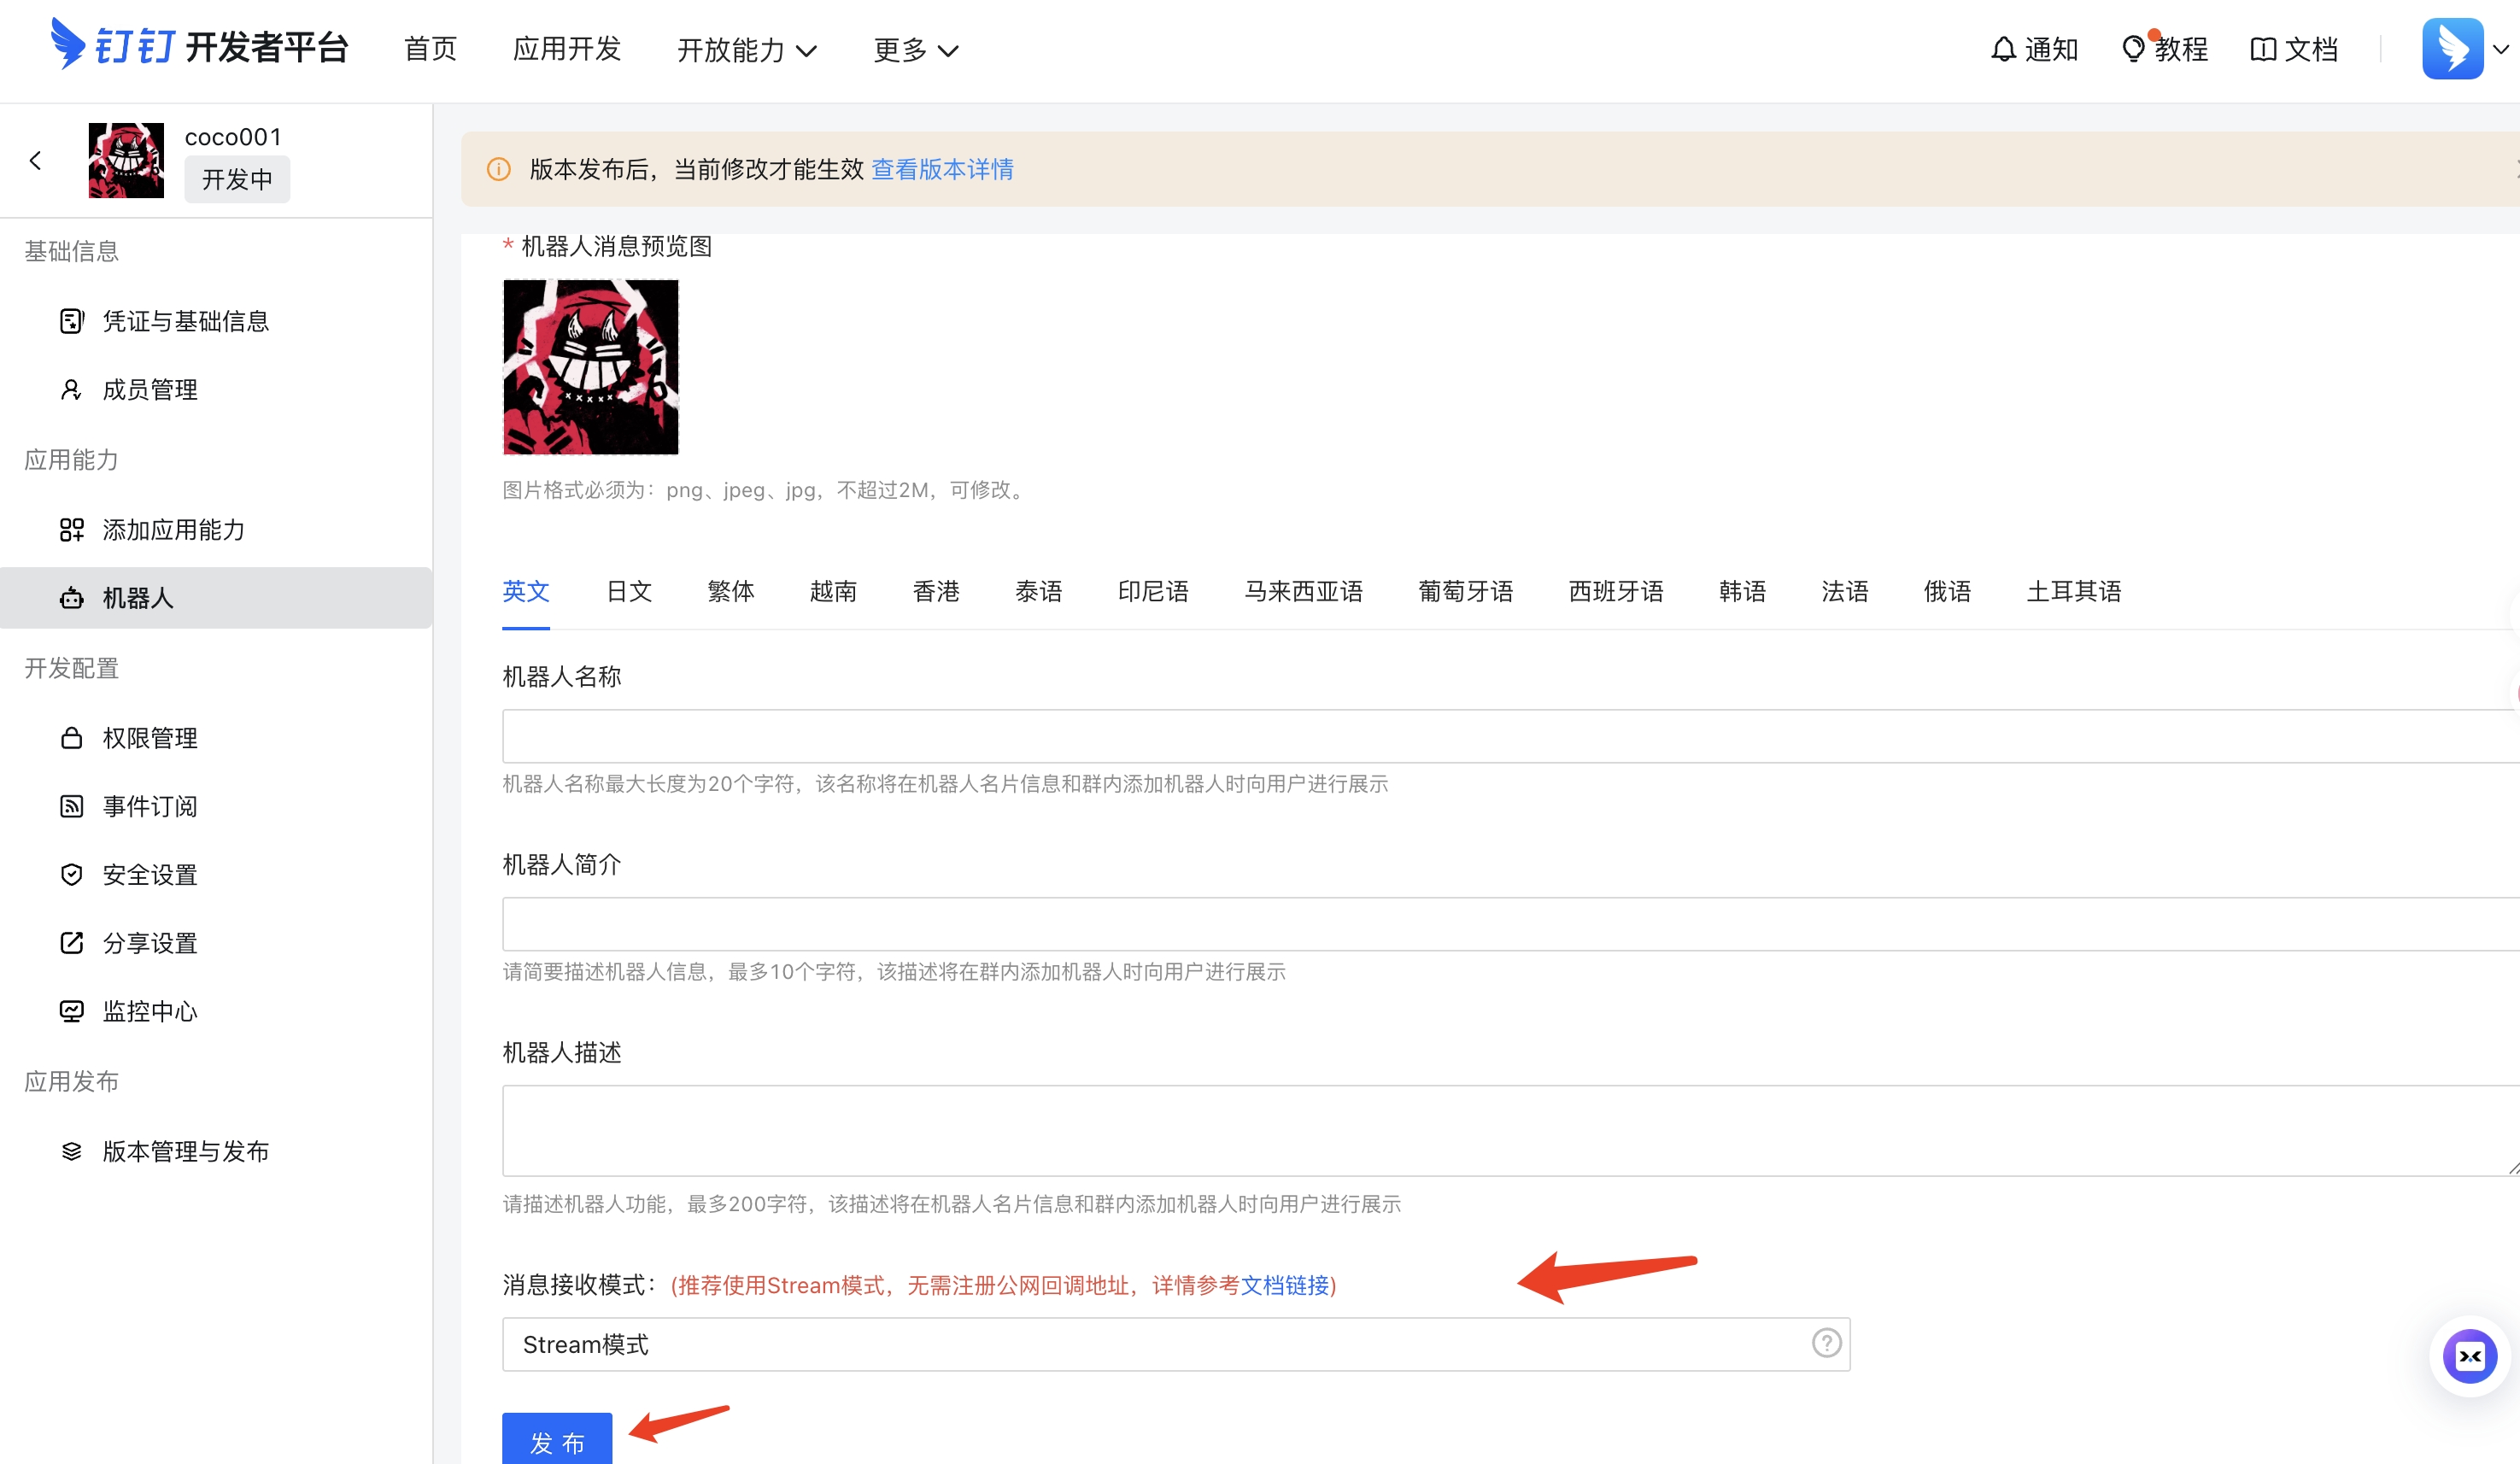
Note: Stream mode uses WebSocket long connections to receive messages — no public callback URL configuration needed, making deployment simpler.
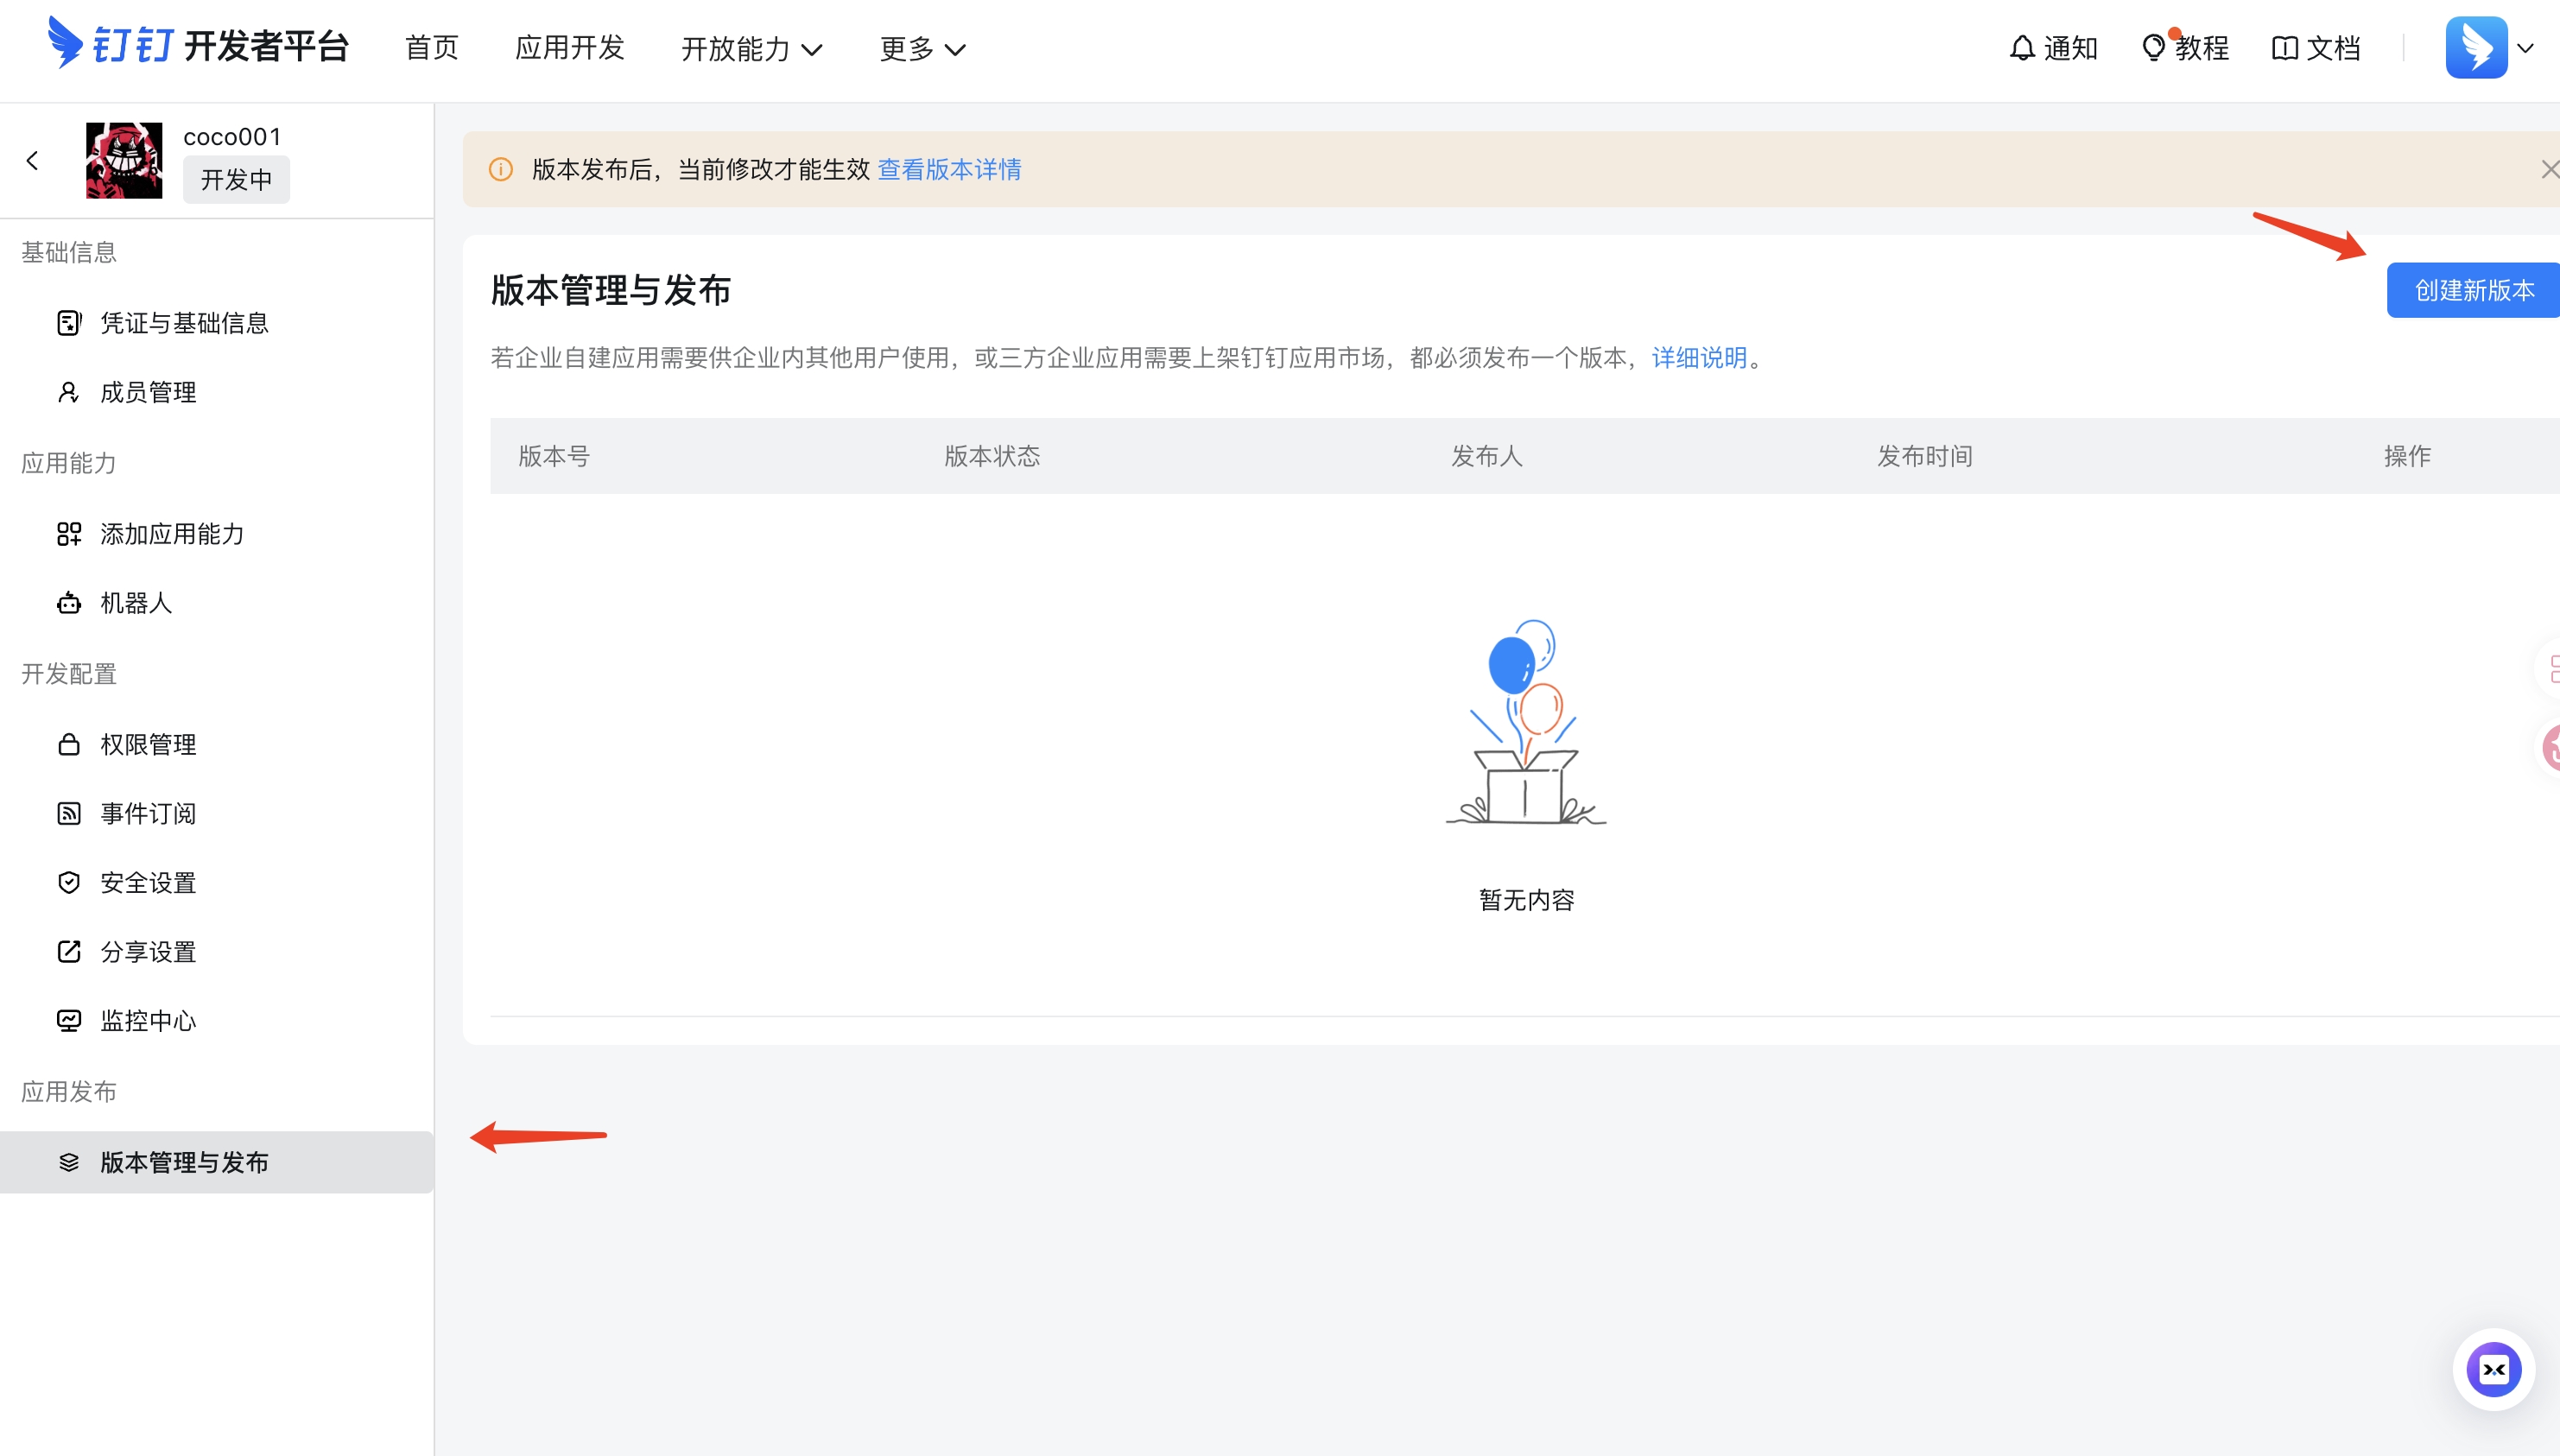
Step 5: Version Management and Publishing
In the left sidebar, select Version Management & Publishing and click Create New Version.
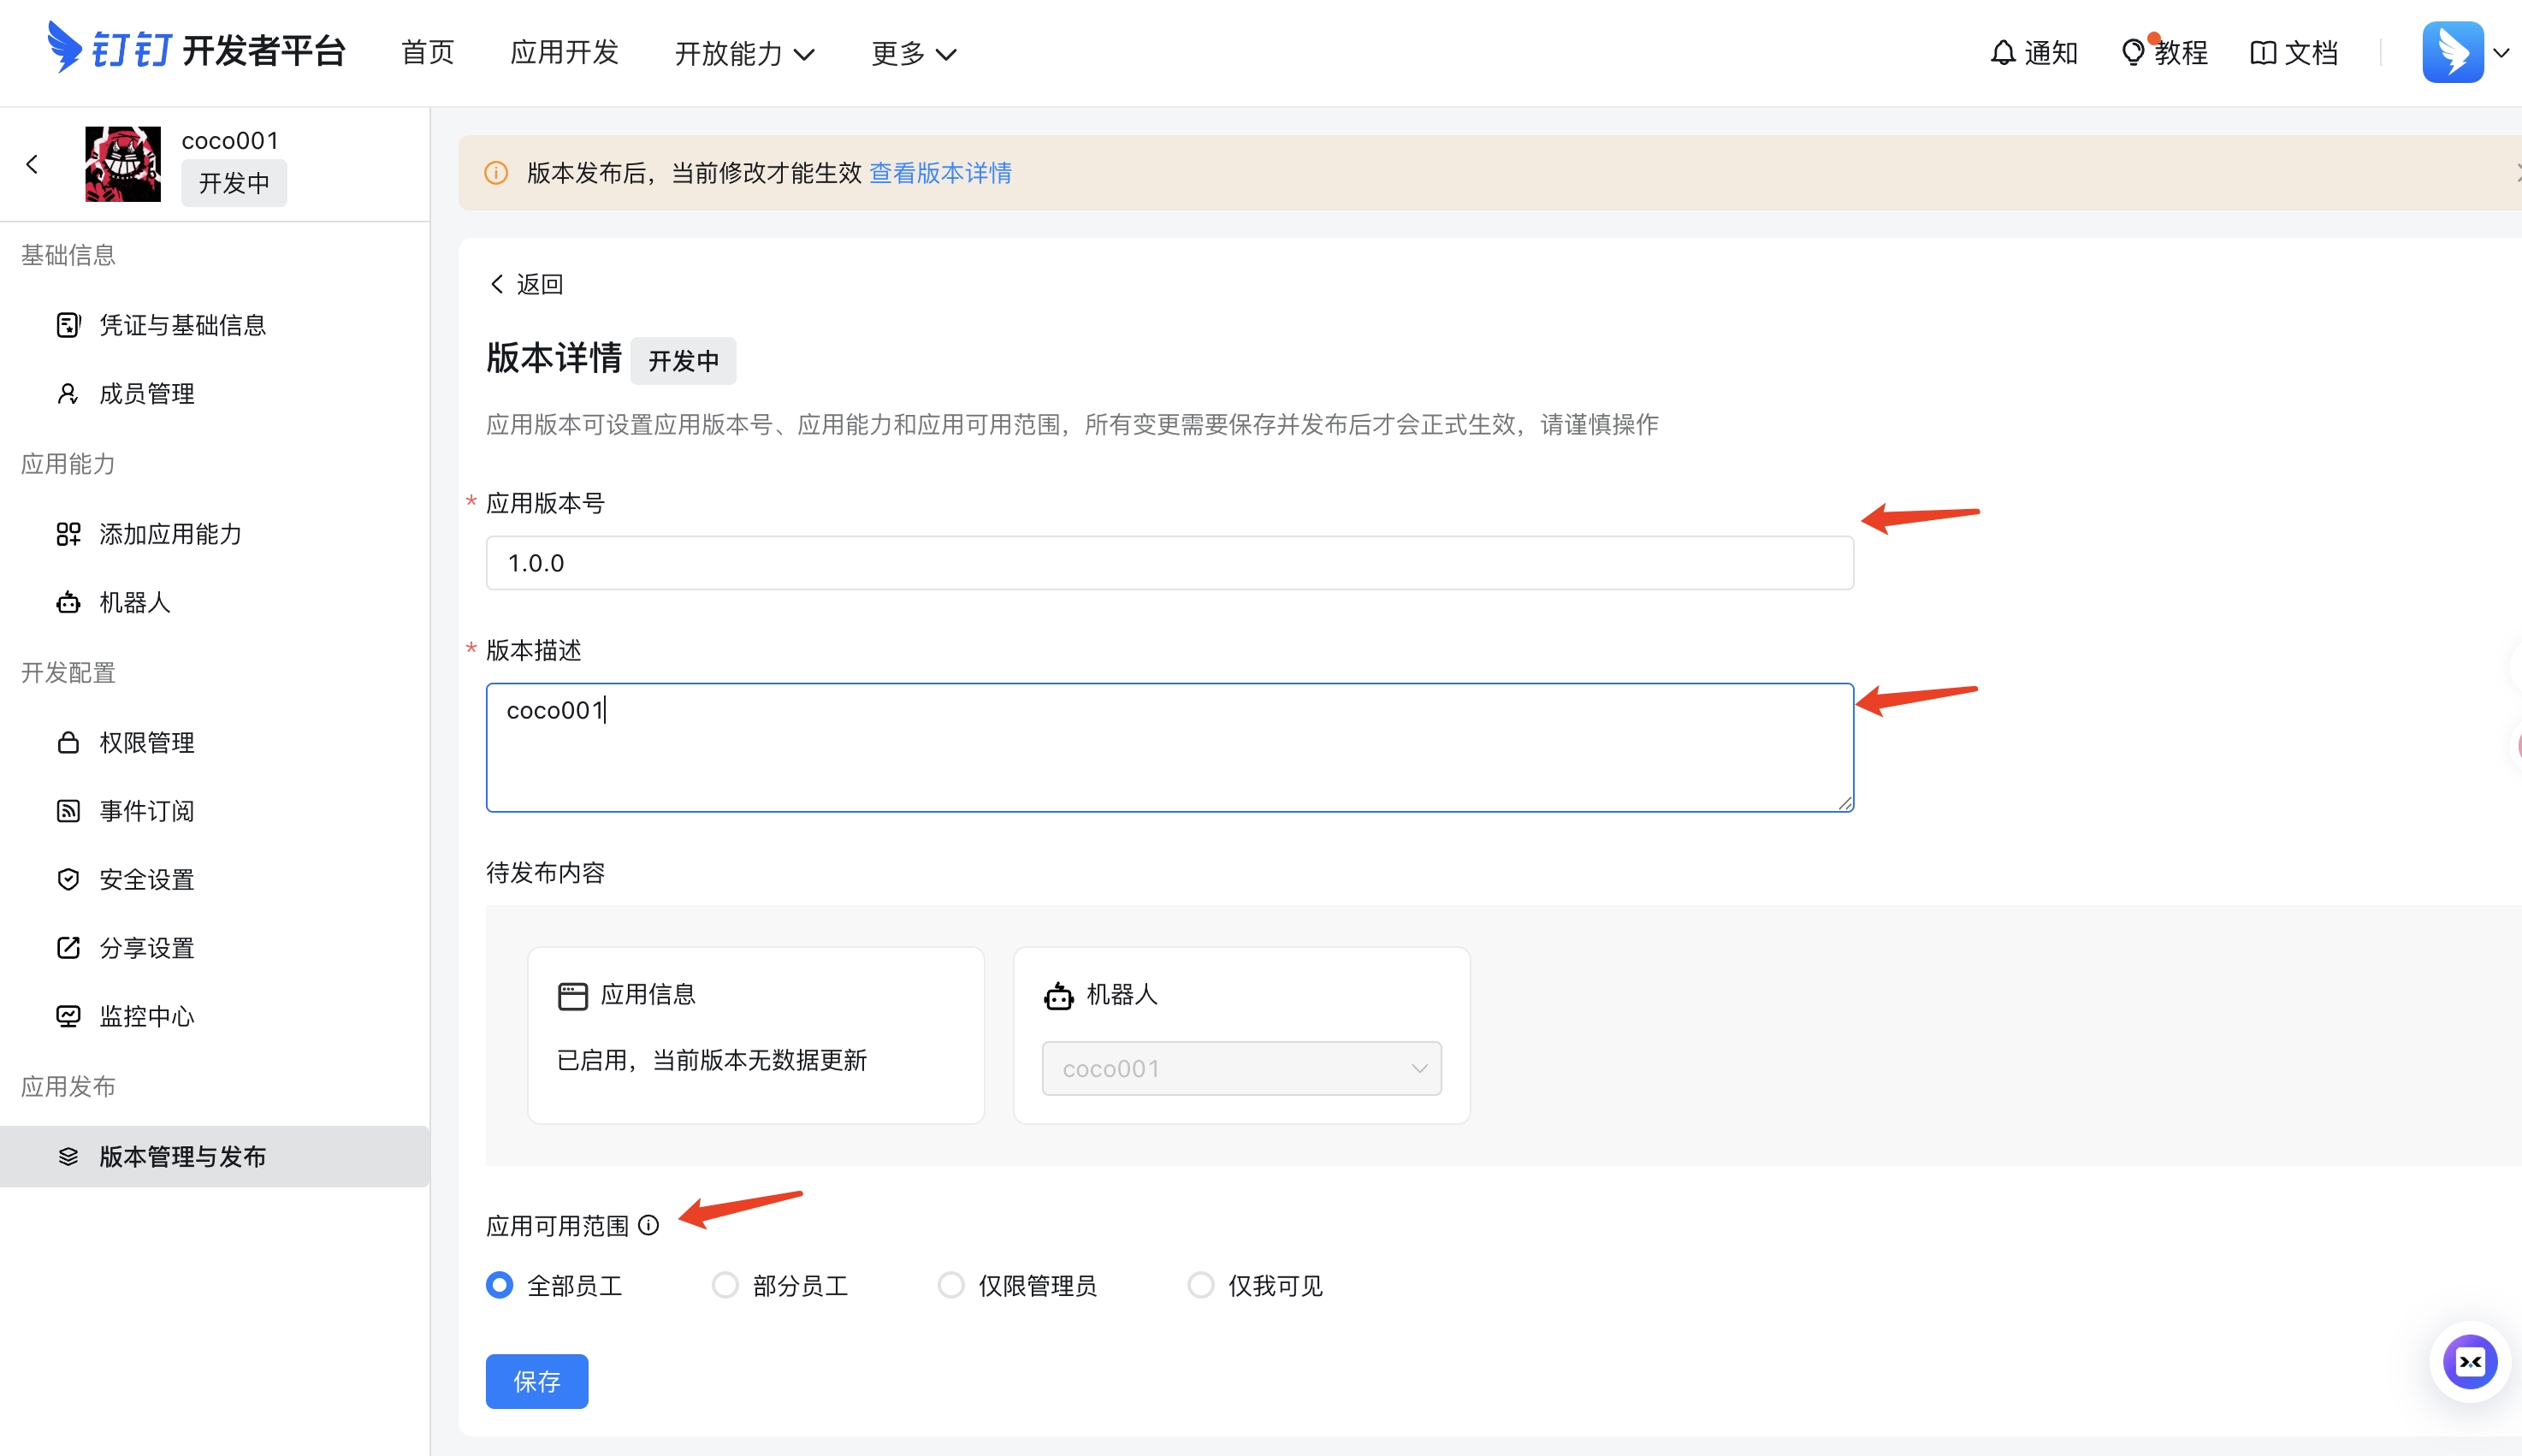
Step 6: Set Application Visible Scope
Enter the version information, select the appropriate Visible Scope (which team members can see and use the Bot), then save and publish.
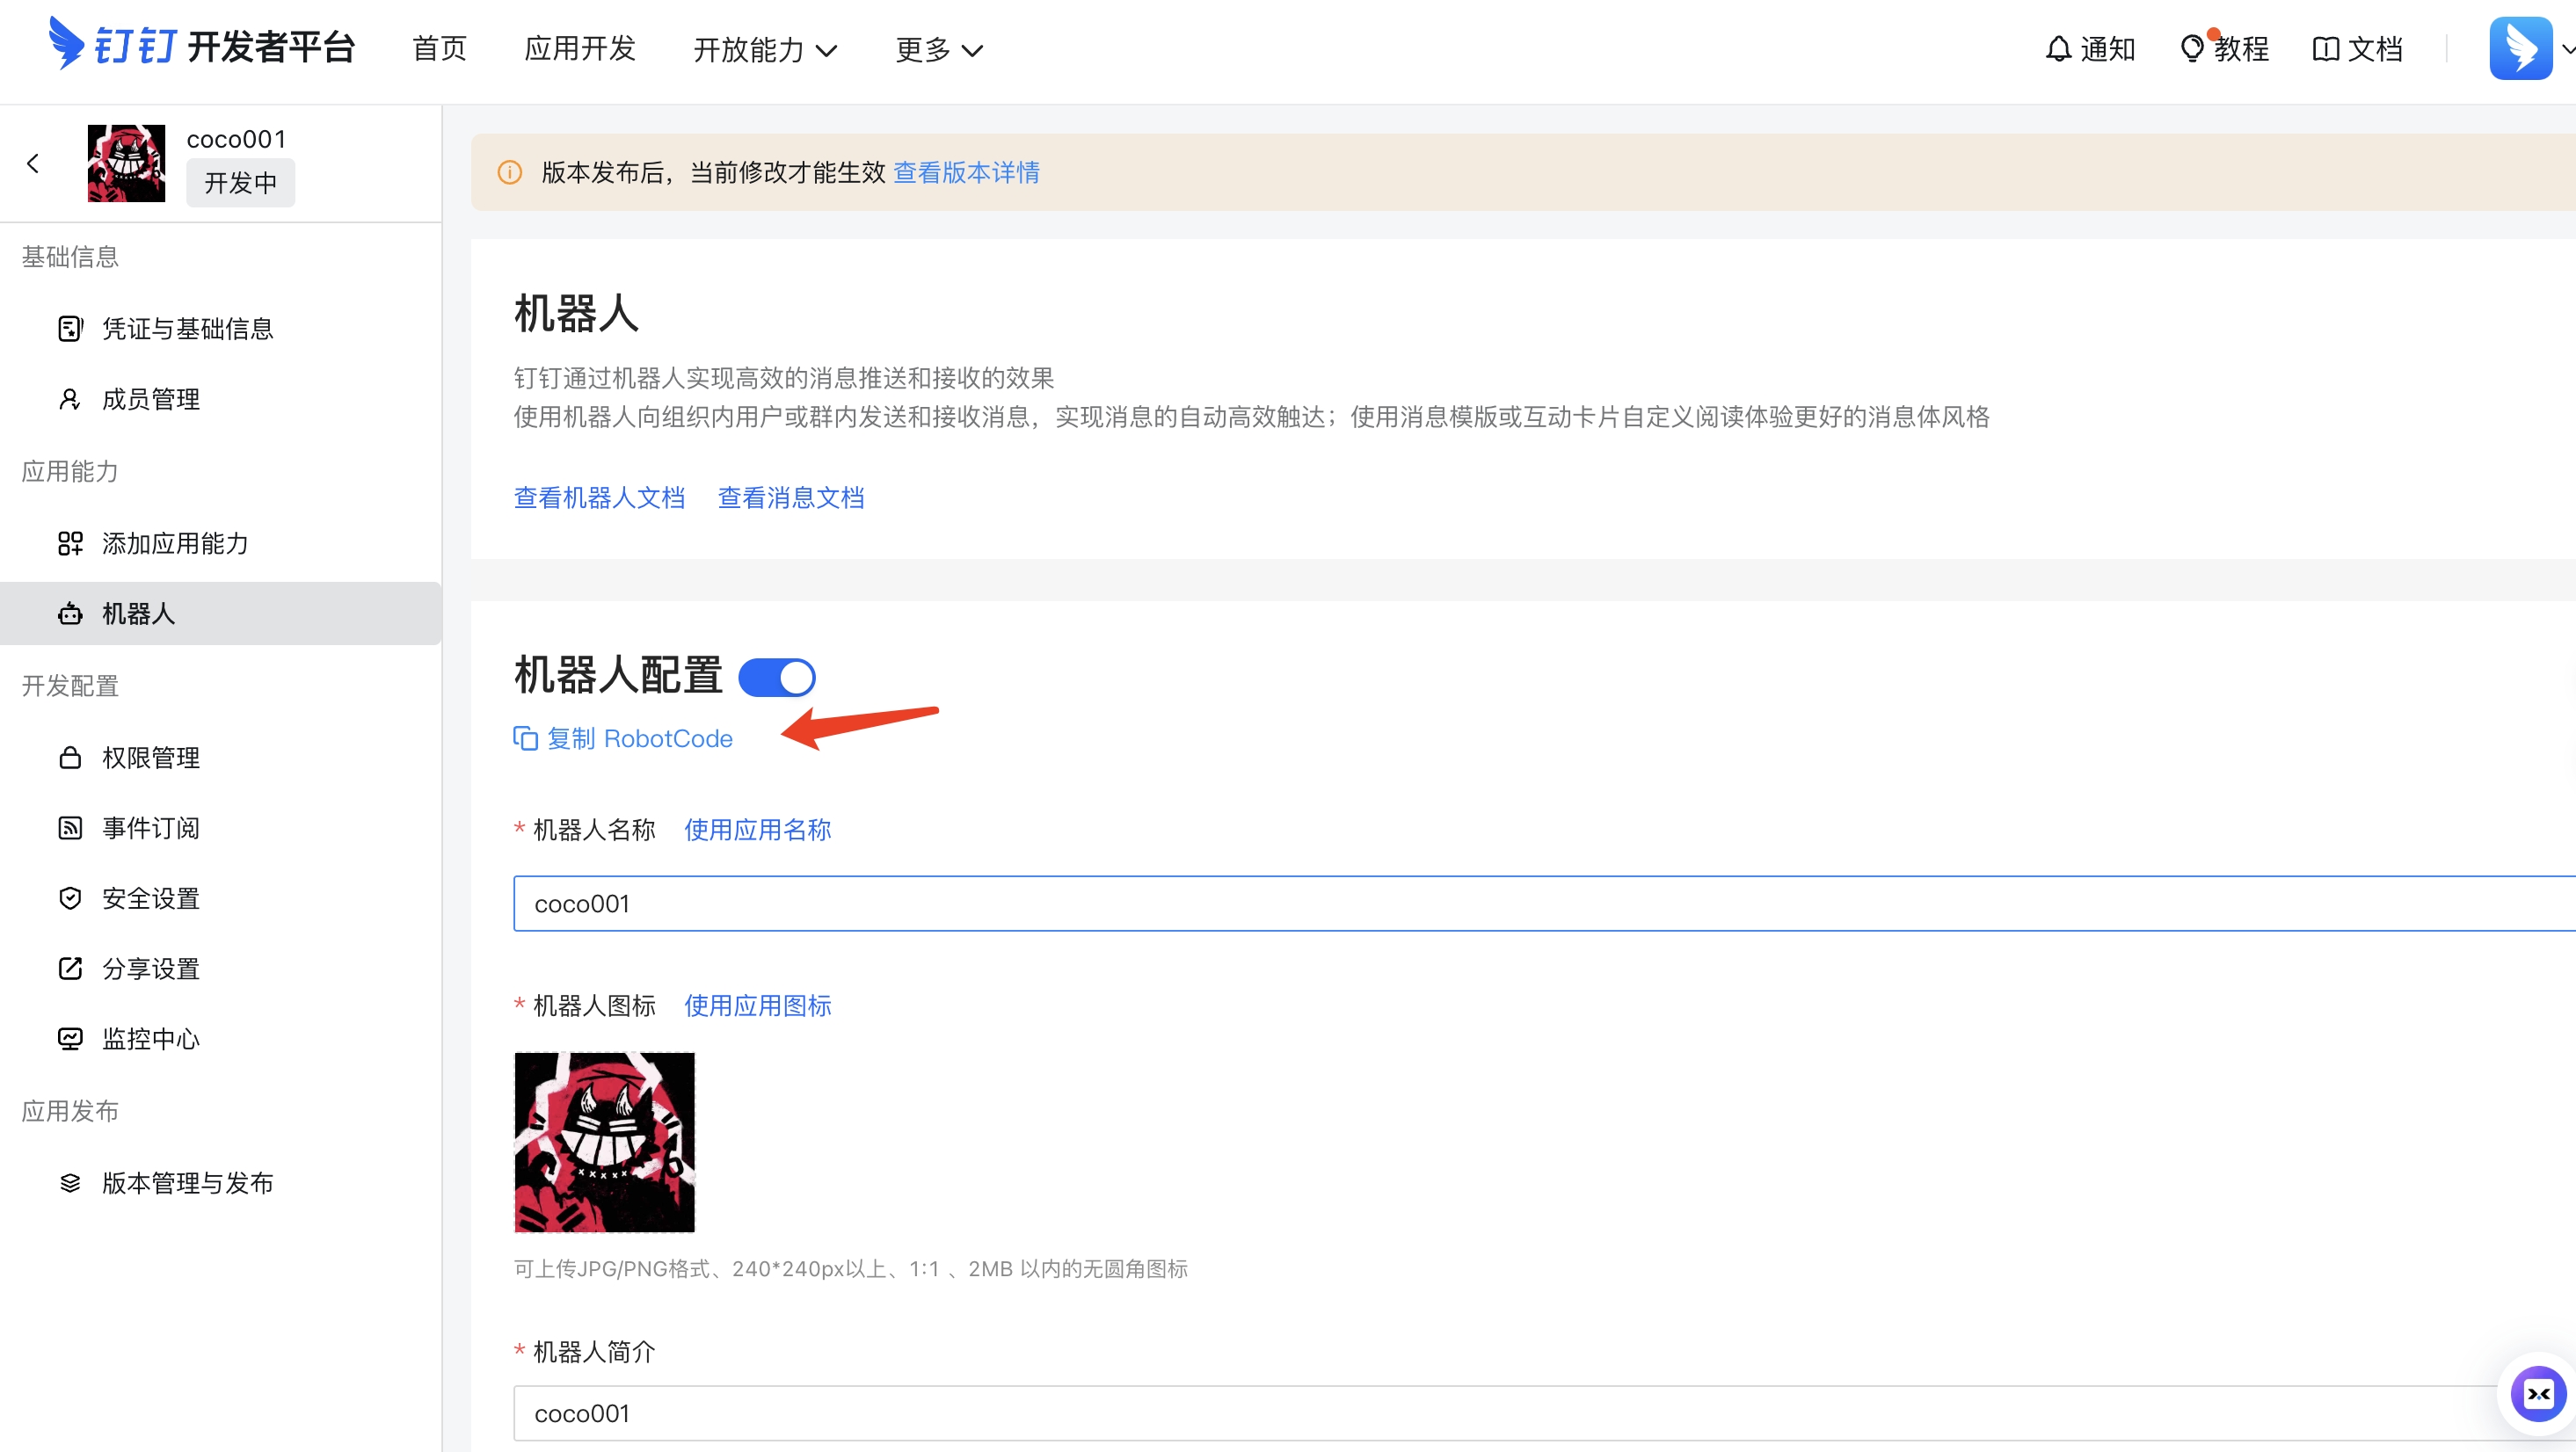
Step 7: Get AppKey, AppSecret, and RobotCode
In the application detail page under "Credentials & Basic Info":
- AppKey — application unique identifier
- AppSecret — click "Show" to view
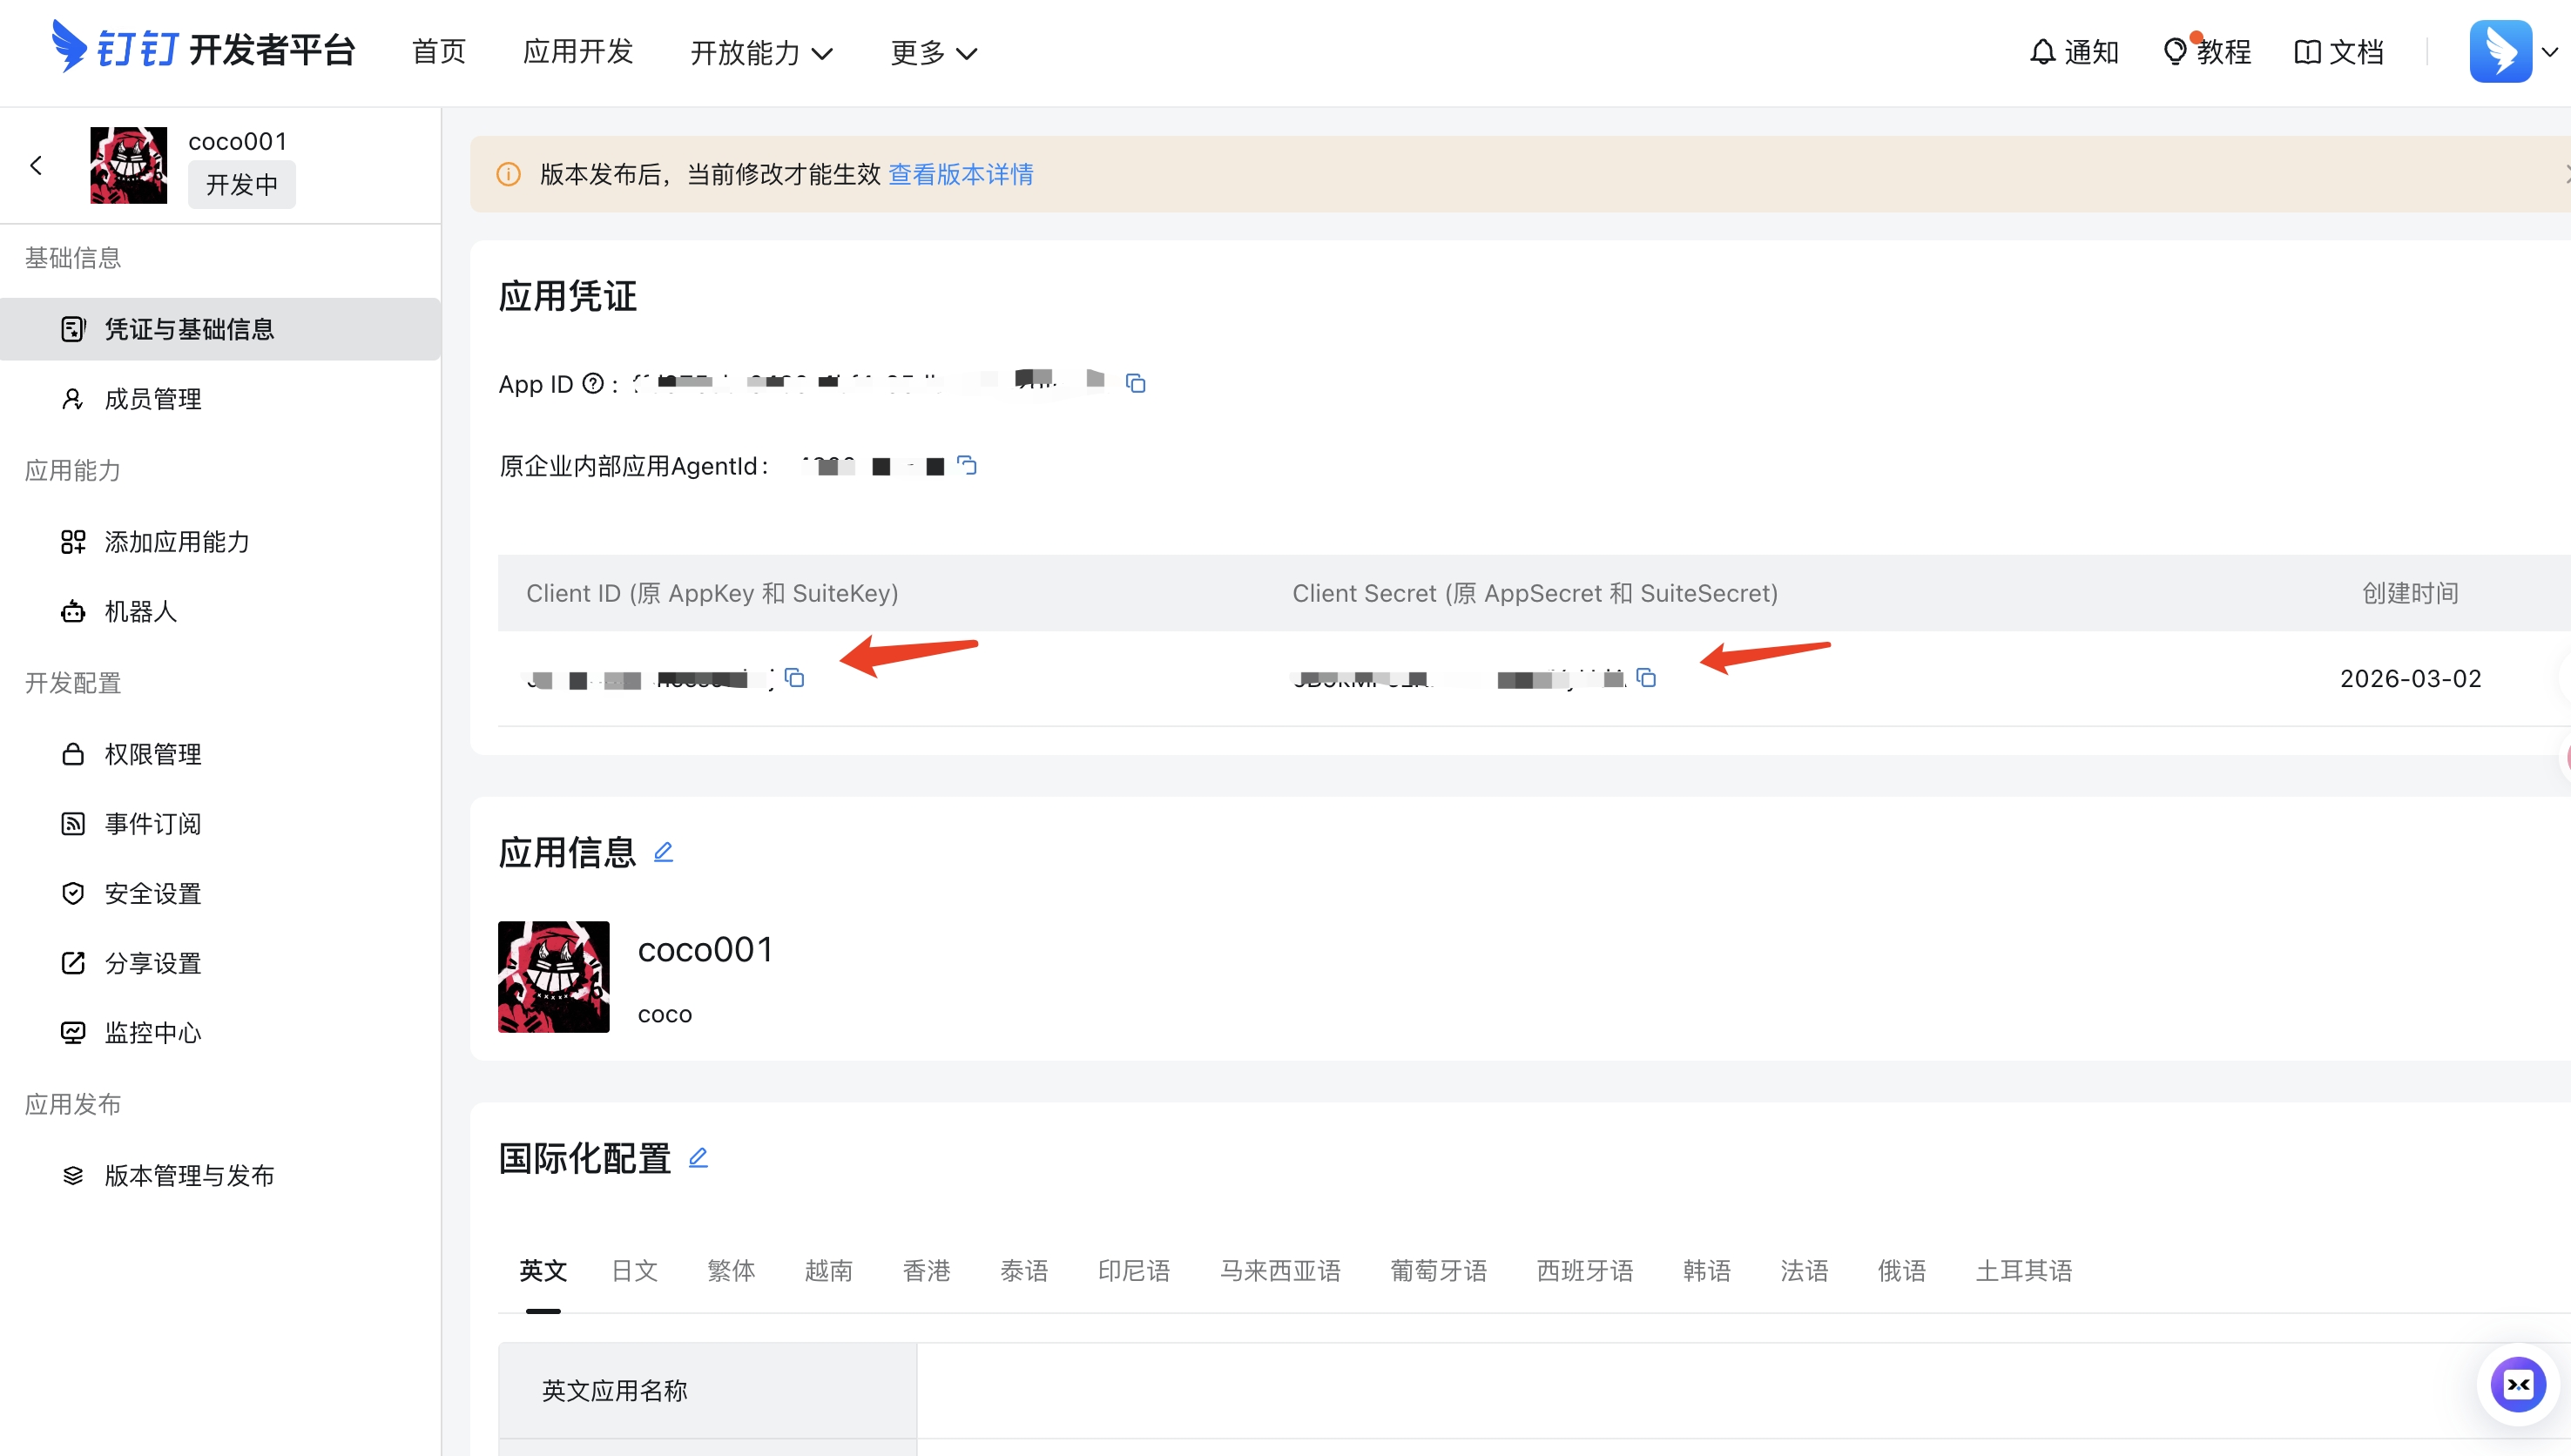
On the robot configuration page, find the RobotCode (usually the same as AppKey).
Step 8: Enter Credentials in Dashboard
Enter the AppKey, AppSecret, and RobotCode into the OpenMax Dashboard's DingTalk channel configuration page and click Connect.
Step 9: Start Chatting
Search for the Bot name in DingTalk and start chatting with your AI employee.
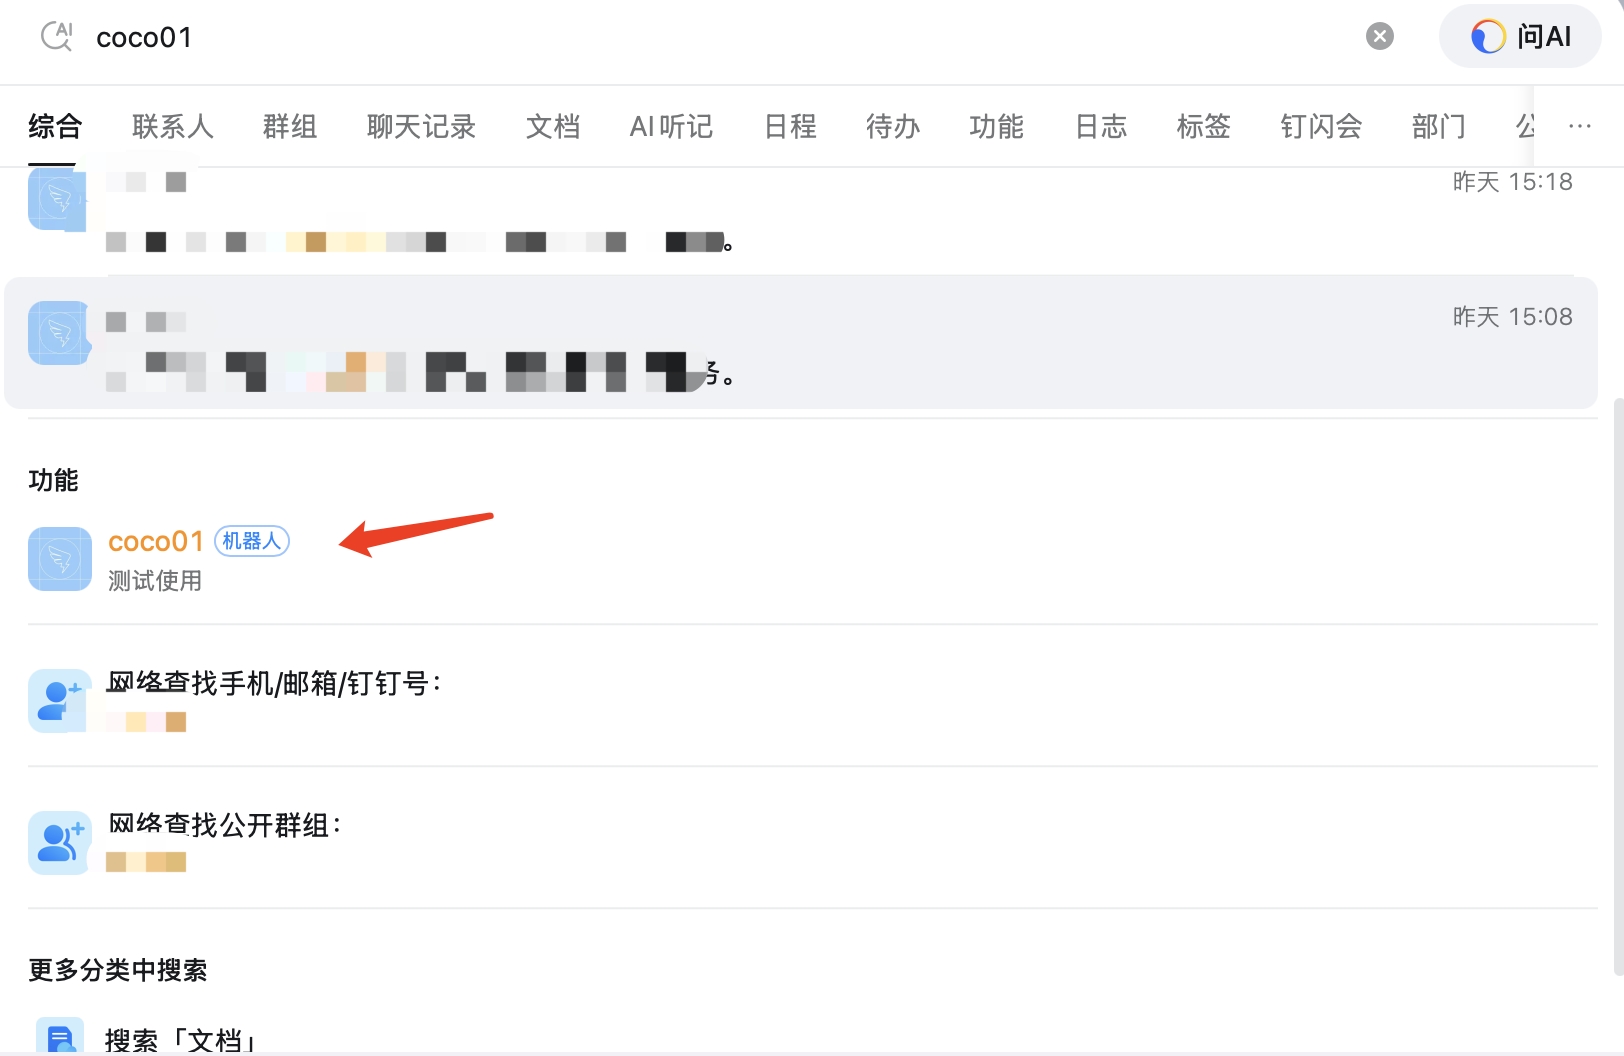
Group usage: In a DingTalk group chat, @mention your Bot to interact with the AI employee.
DingTalk FAQ
| Issue | Solution |
|---|---|
| Application not visible to team members | Check the Visible Scope in version publishing — ensure all intended users are included |
| Bot not responding in group | Confirm the robot has been added to the group and use @mention to trigger |
| AppSecret forgotten | View or reset in the application credentials page |
Option E: Slack Deployment
Estimated time: 8-12 minutes
Note: Slack is widely used by European and US enterprises for team collaboration. Slack uses Socket Mode (WebSocket connection), so no public callback URL is needed — deployment is straightforward.
Two credentials are required:
| Credential | Format | Description |
|---|---|---|
| Bot Token | xoxb-... | Bot User OAuth Token, used to call the Slack API |
| App Token | xapp-... | App-Level Token, used for Socket Mode connection |
Step 1: Create a Slack App
- Visit Slack App Management and log in
- Click Create New App in the top-right corner
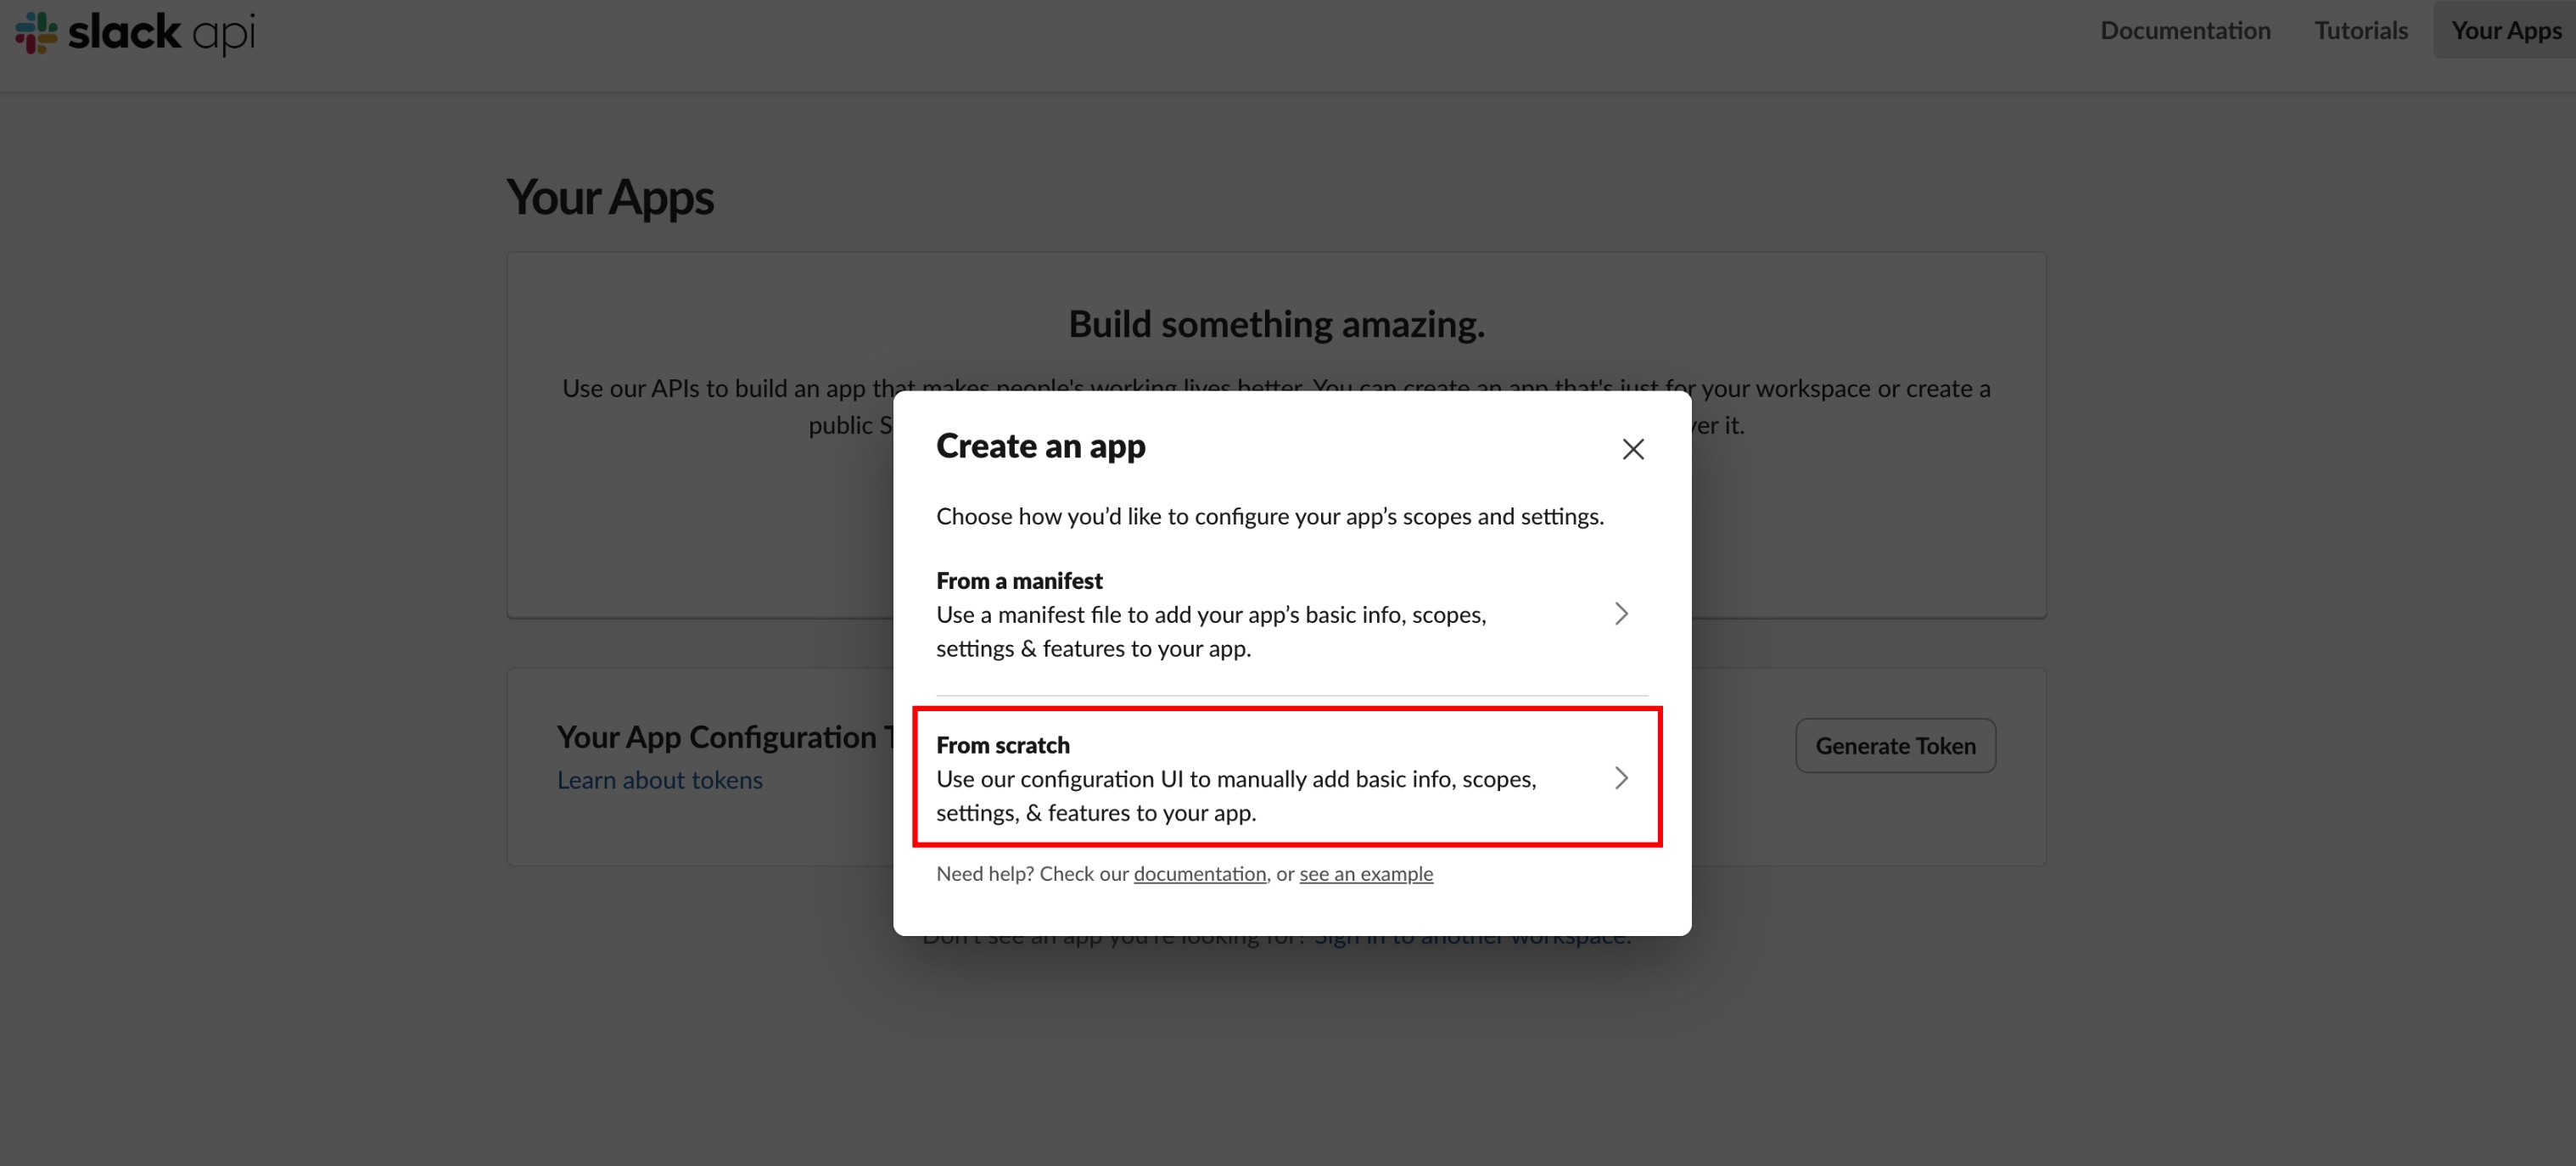
- Select From scratch in the popup
- Enter your App name (e.g.,
OpenMax AI Employee) and select the Workspace to install to - Click Create App to finish
Step 2: Enable Socket Mode and Generate App Token
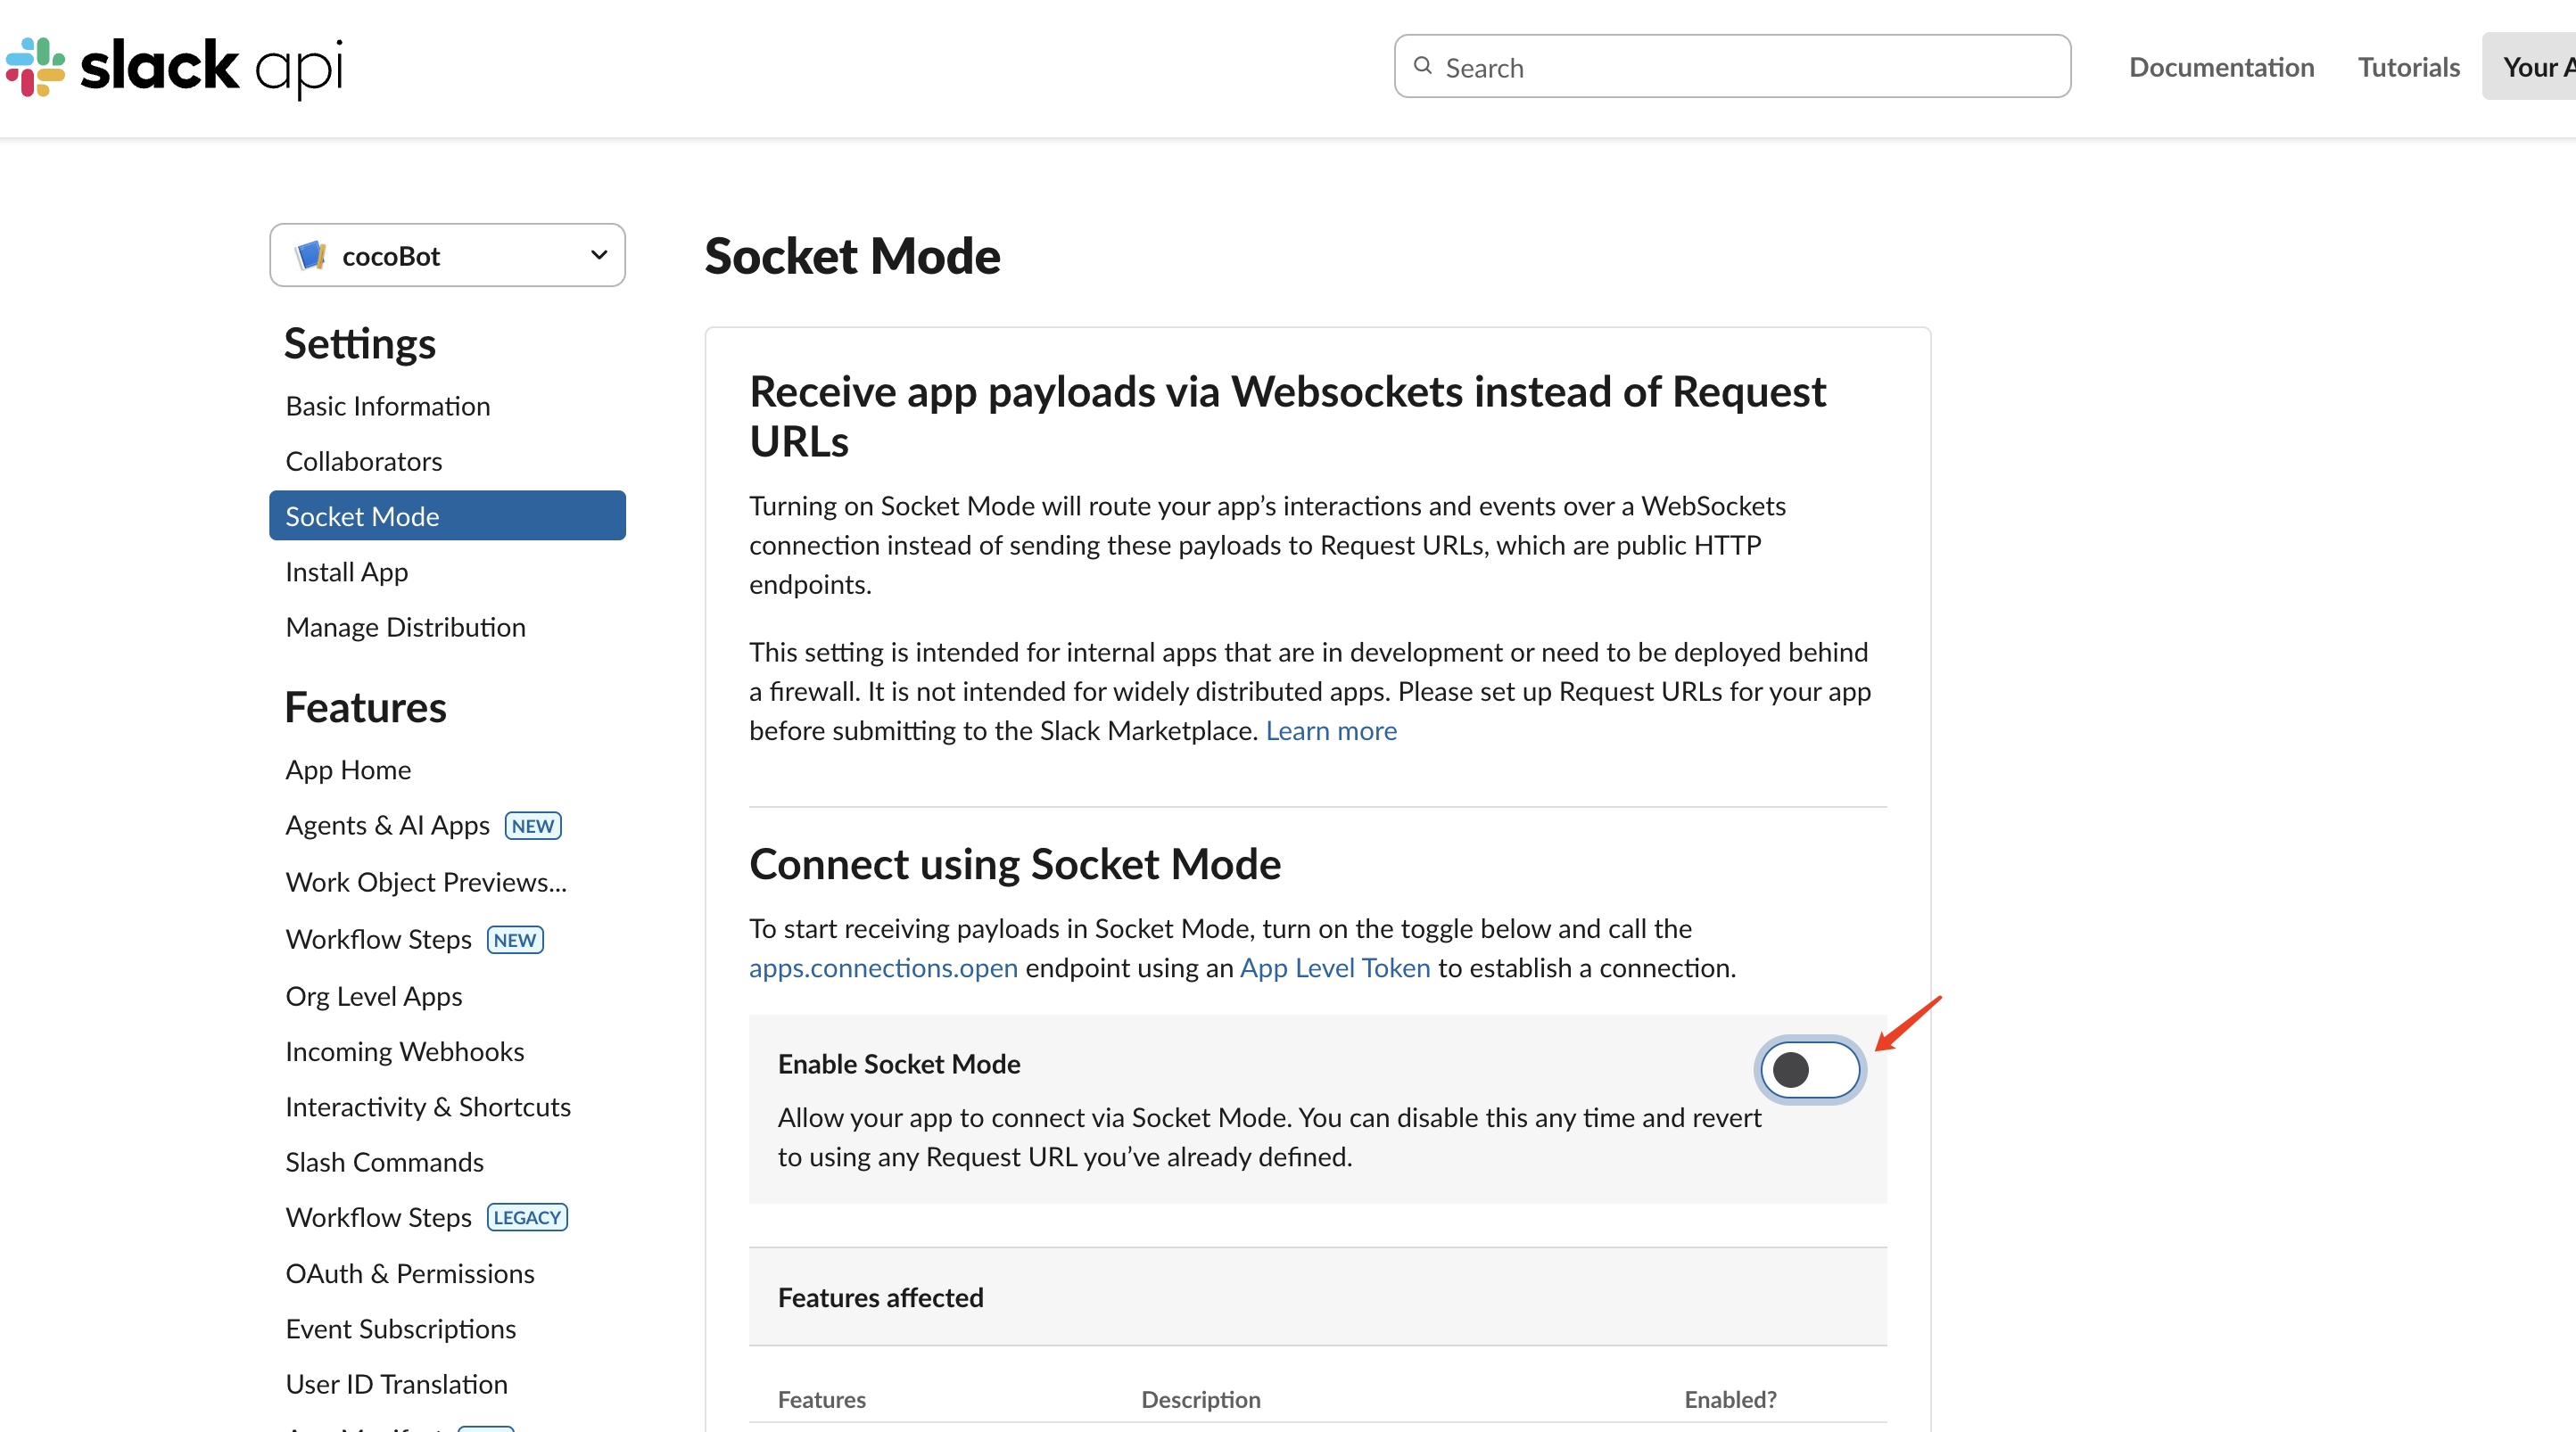
- In the App settings left sidebar, find Socket Mode
- Toggle Enable Socket Mode on
- When prompted to generate an App-Level Token:
- Name the Token (e.g.,
zylos-socket) - Add Scope: search and select
connections:write - Click Generate
- Name the Token (e.g.,
- Copy and save the generated Token (format:
xapp-...)
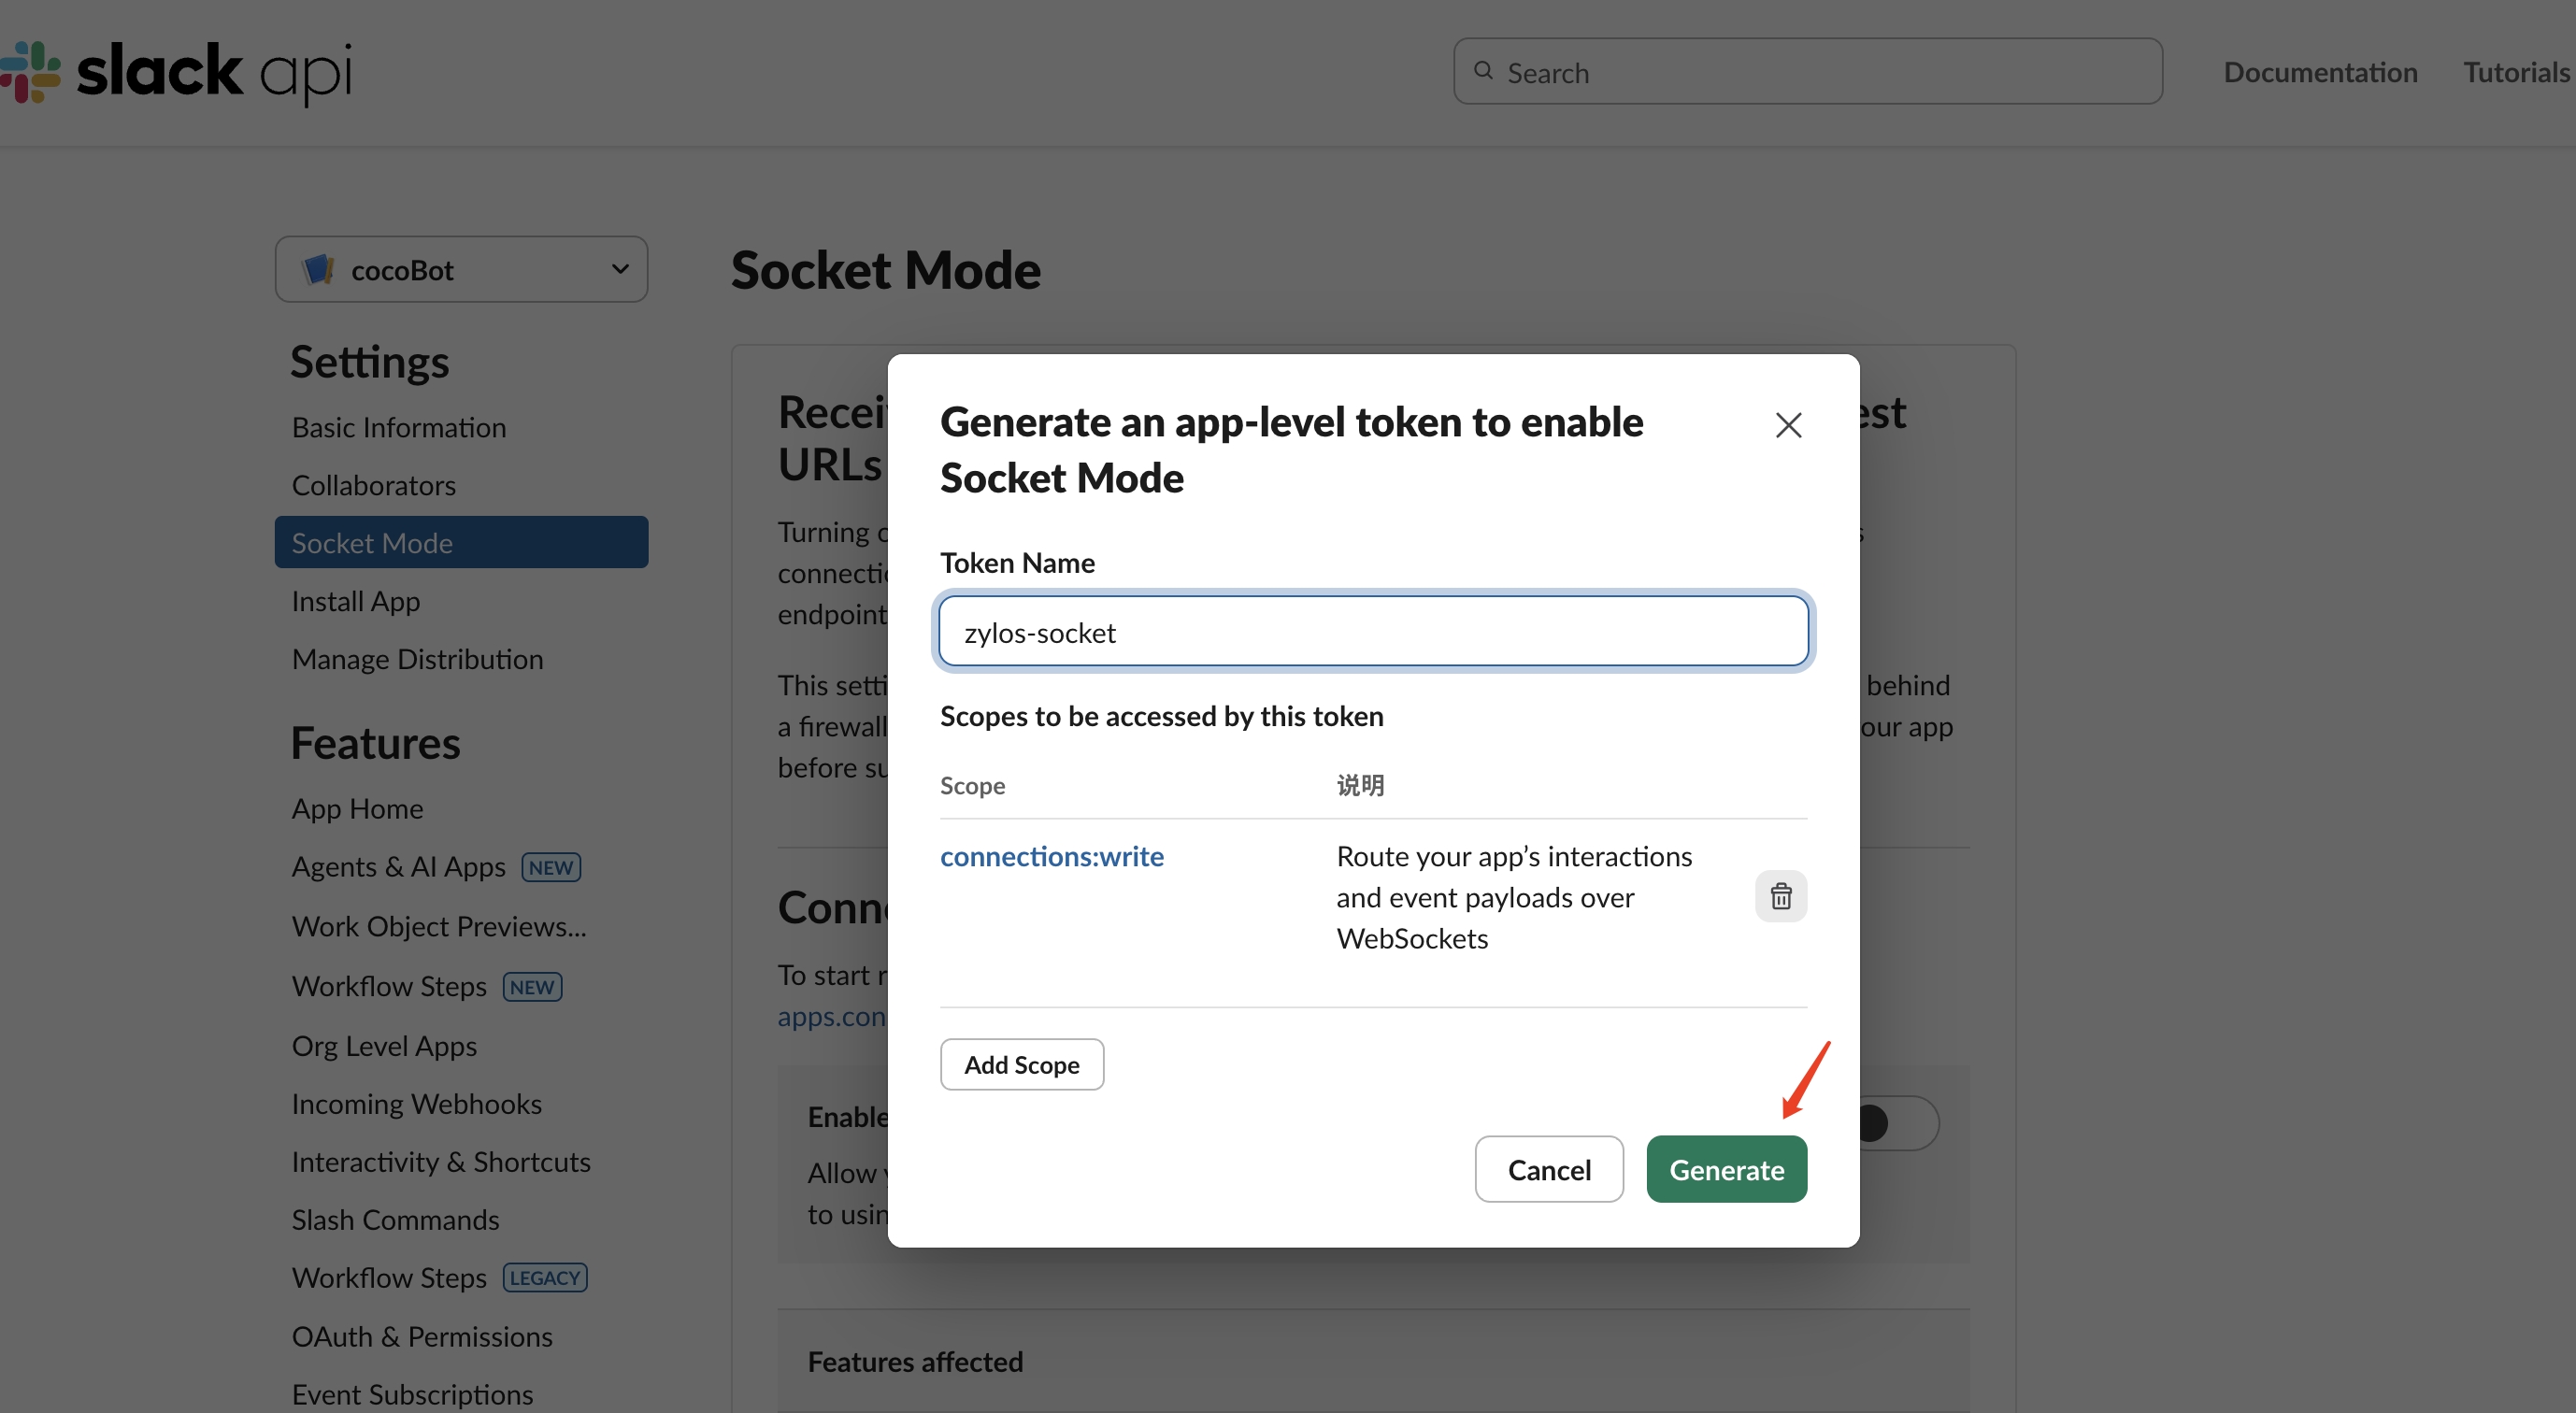
Important: The App Token is displayed only once after generation. Save it immediately. If lost, you'll need to regenerate it.
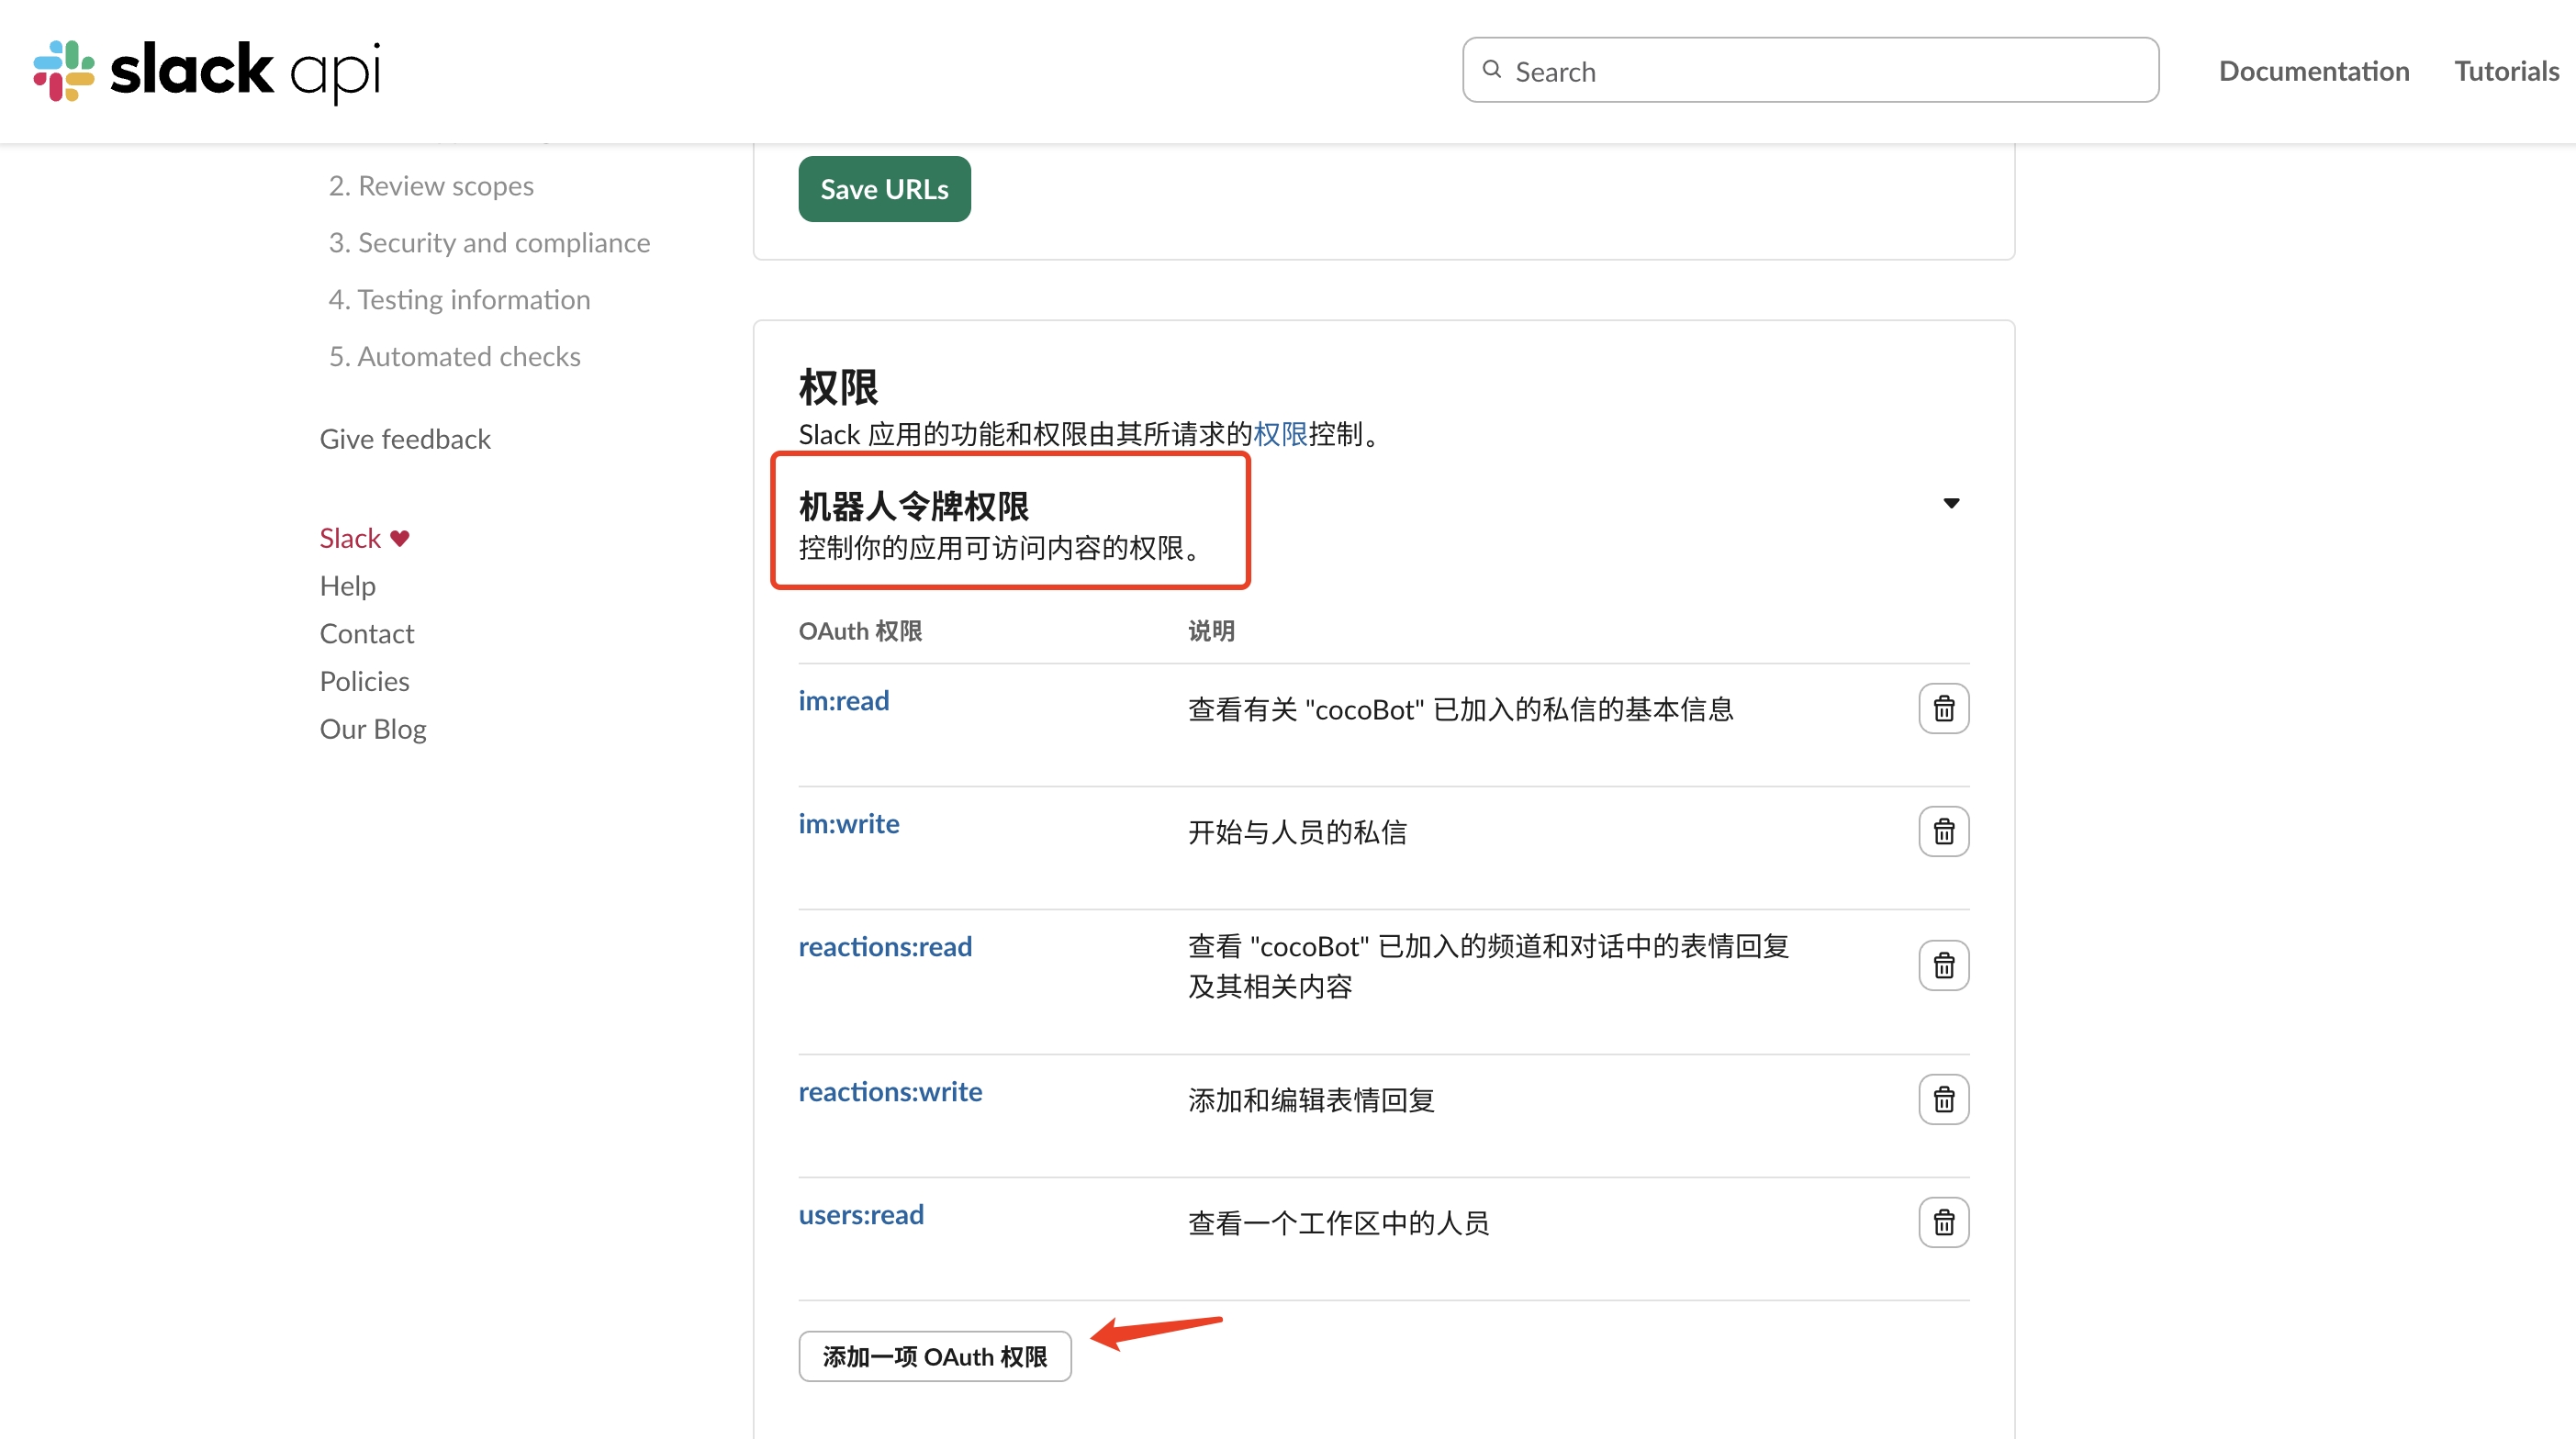
Step 3: Configure Bot Token Scopes
- In the left sidebar, go to OAuth & Permissions
- Scroll down to the Scopes section
- Under Bot Token Scopes, click Add an OAuth Scope and add the following permissions:
| Scope | Purpose |
|---|---|
app_mentions:read | Read @mentions of the bot |
channels:history | Read messages in public channels |
channels:read | View basic channel info |
chat:write | Send messages as the bot |
files:read | Read files shared with the bot |
files:write | Upload files |
groups:history | Read messages in private channels |
groups:read | View basic private channel info |
im:history | Read direct message history |
im:read | View basic DM info |
im:write | Start direct messages |
reactions:read | Read emoji reactions |
reactions:write | Add emoji reactions |
users:read | View user info |
Step 4: Install App to Workspace
- Go back to the top of the OAuth & Permissions page
- Click Install to Workspace (or Reinstall to Workspace)
- Confirm the permissions in the authorization popup, click Allow
- After installation, copy and save the Bot User OAuth Token (format:
xoxb-...)
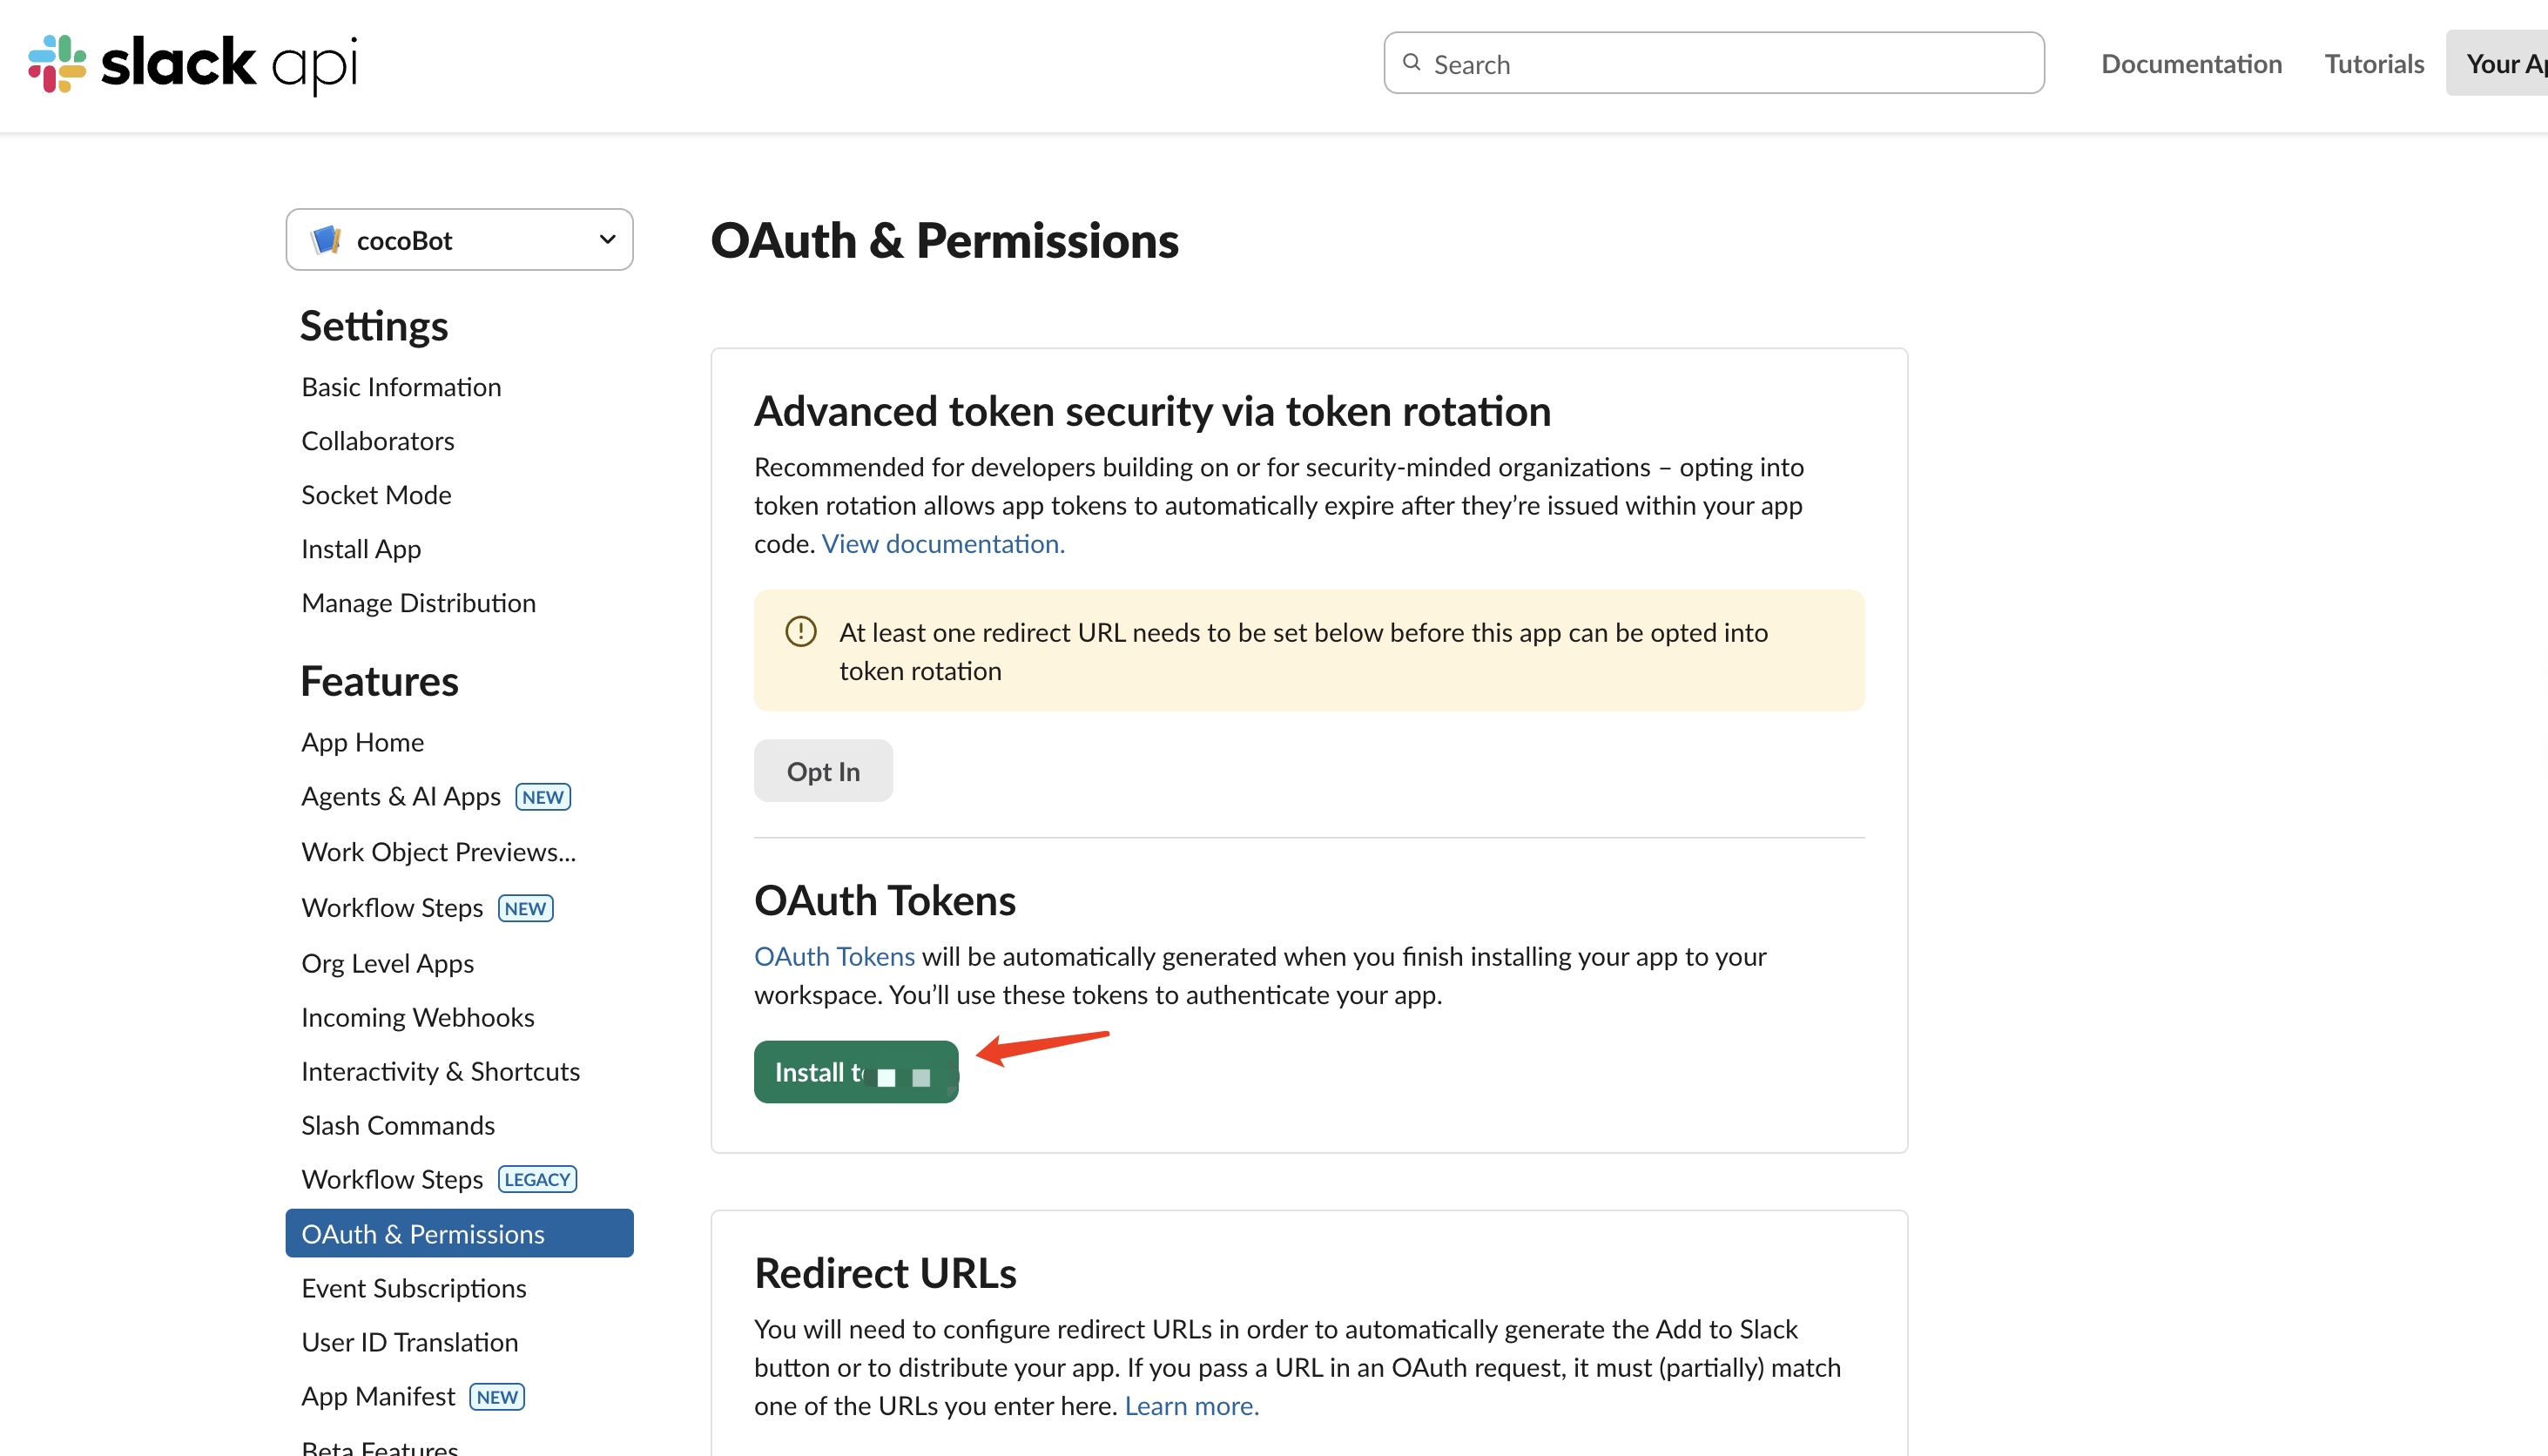
Important: Each time you modify Scopes, you must reinstall the App to Workspace. The Token will be regenerated — update your configuration accordingly.
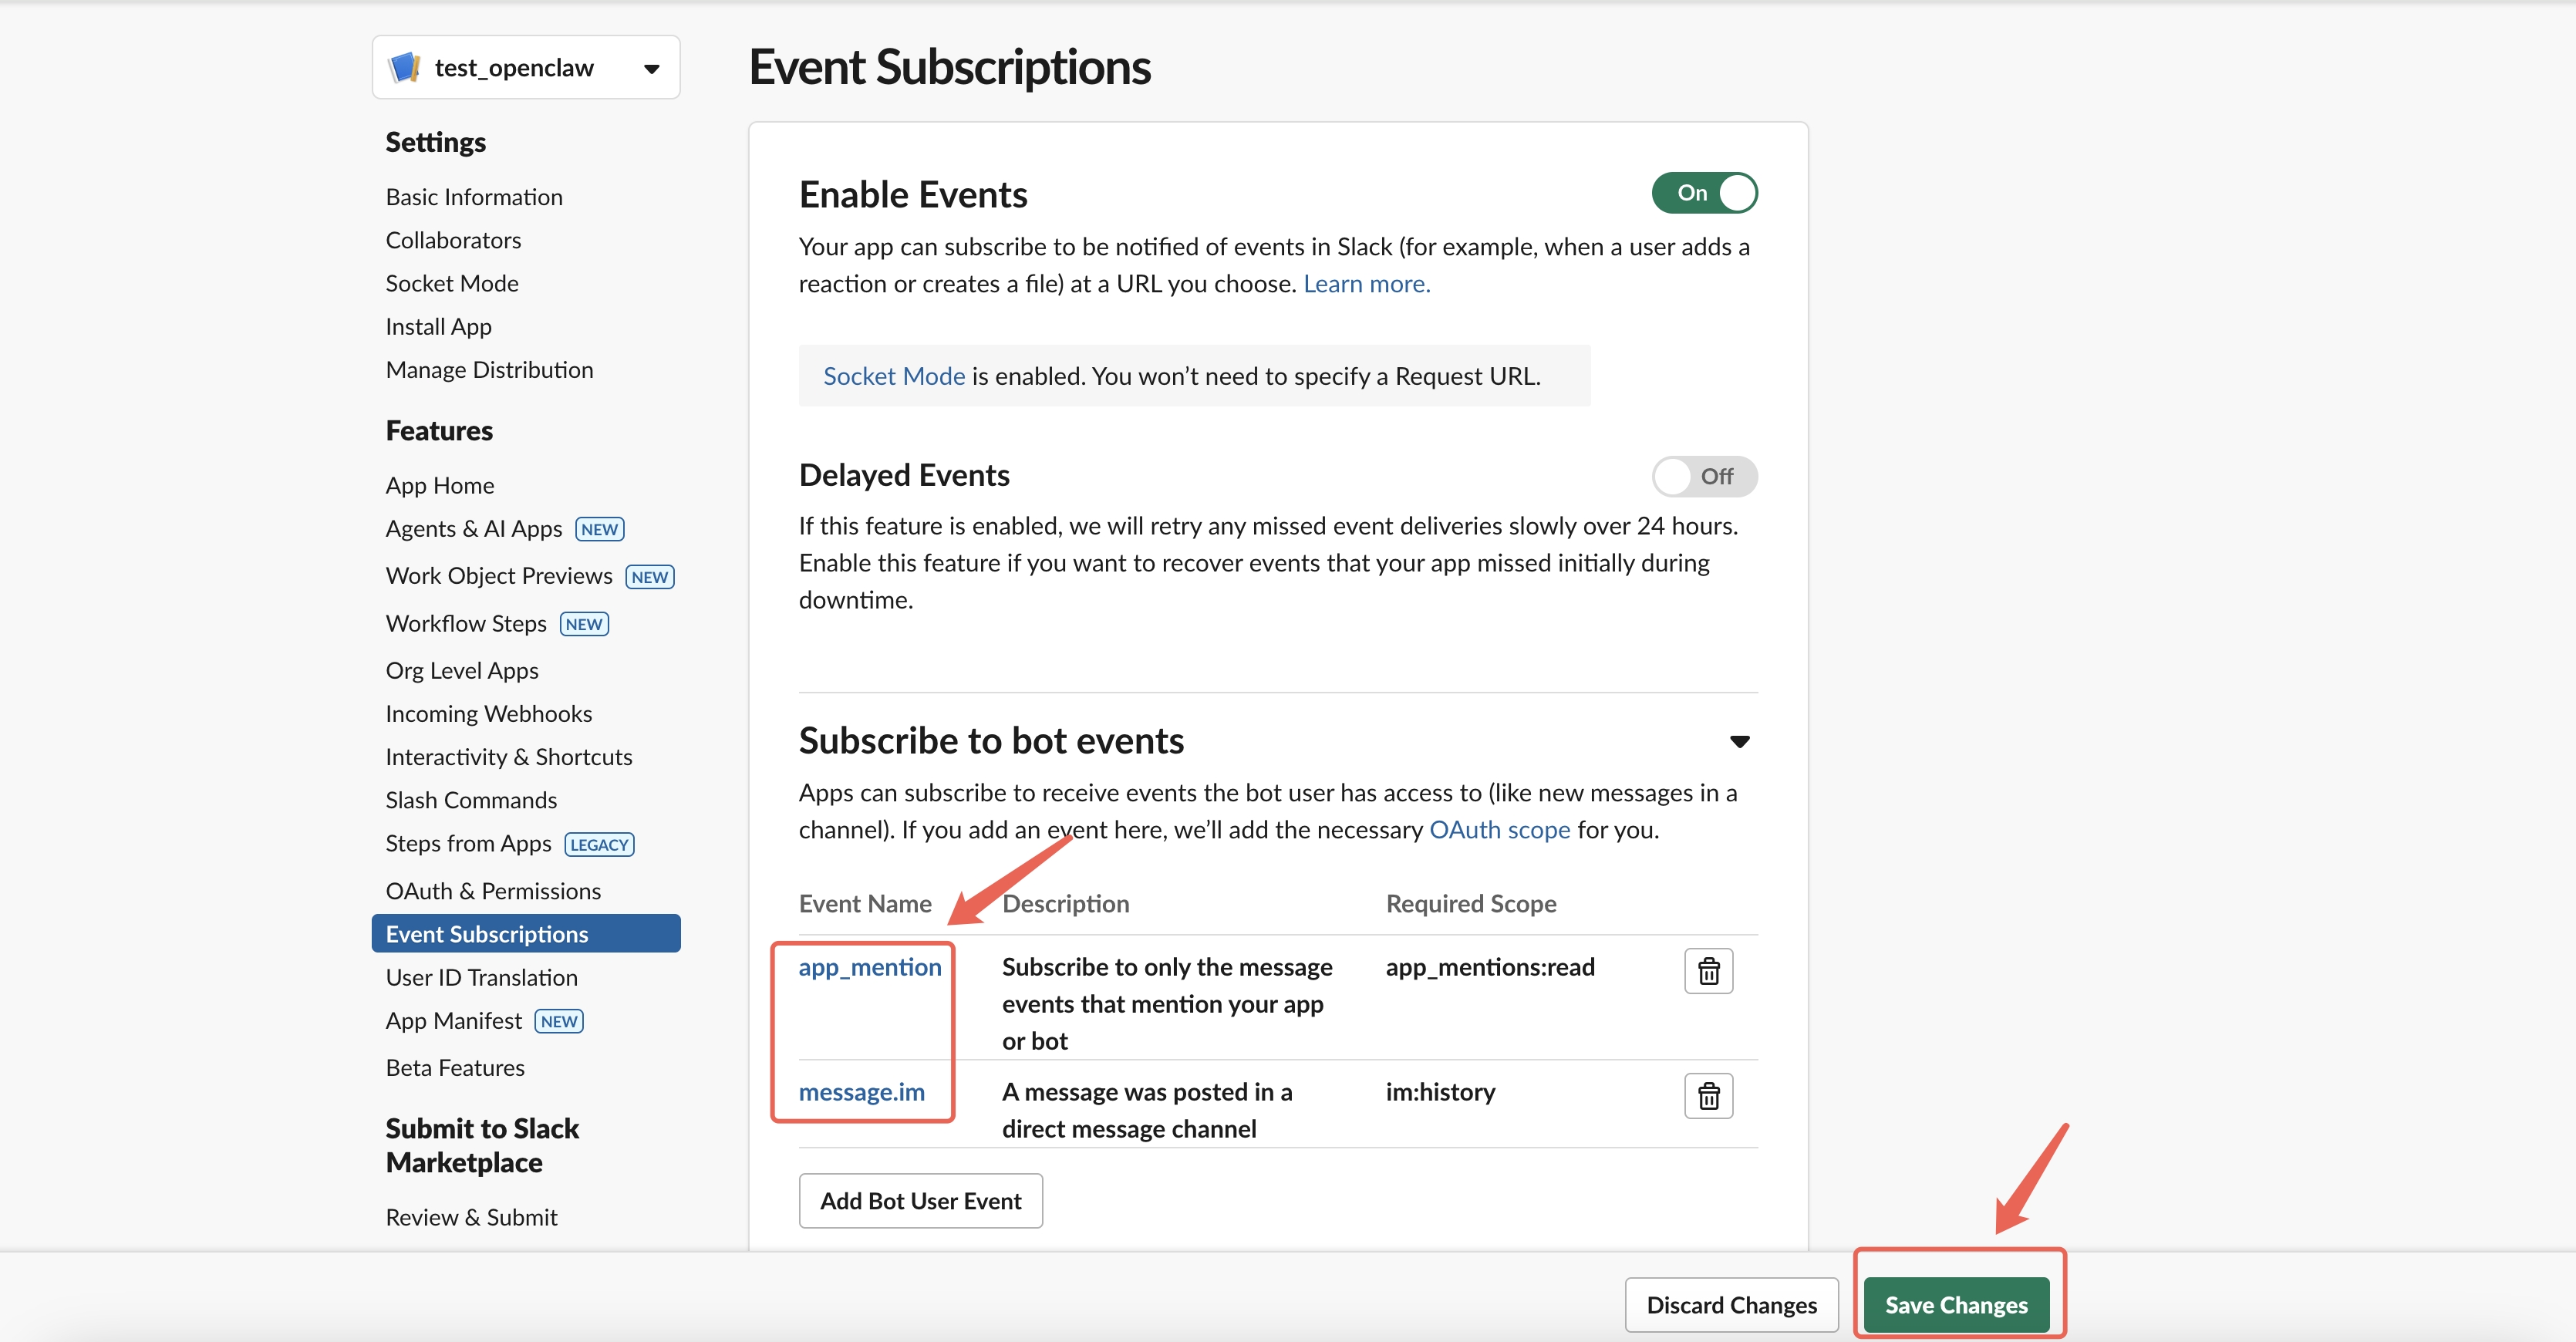
Step 5: Enable Event Subscriptions
- In the left sidebar, go to Event Subscriptions
- Toggle Enable Events on
- Expand Subscribe to bot events, click Add Bot User Event, and add:
| Event | Purpose |
|---|---|
message.im | Receive direct messages |
message.channels | Receive messages in public channels |
message.groups | Receive messages in private channels |
app_mention | Receive @mentions |
- Click Save Changes at the bottom
Step 6: Configure App Home
- In the left sidebar, go to App Home
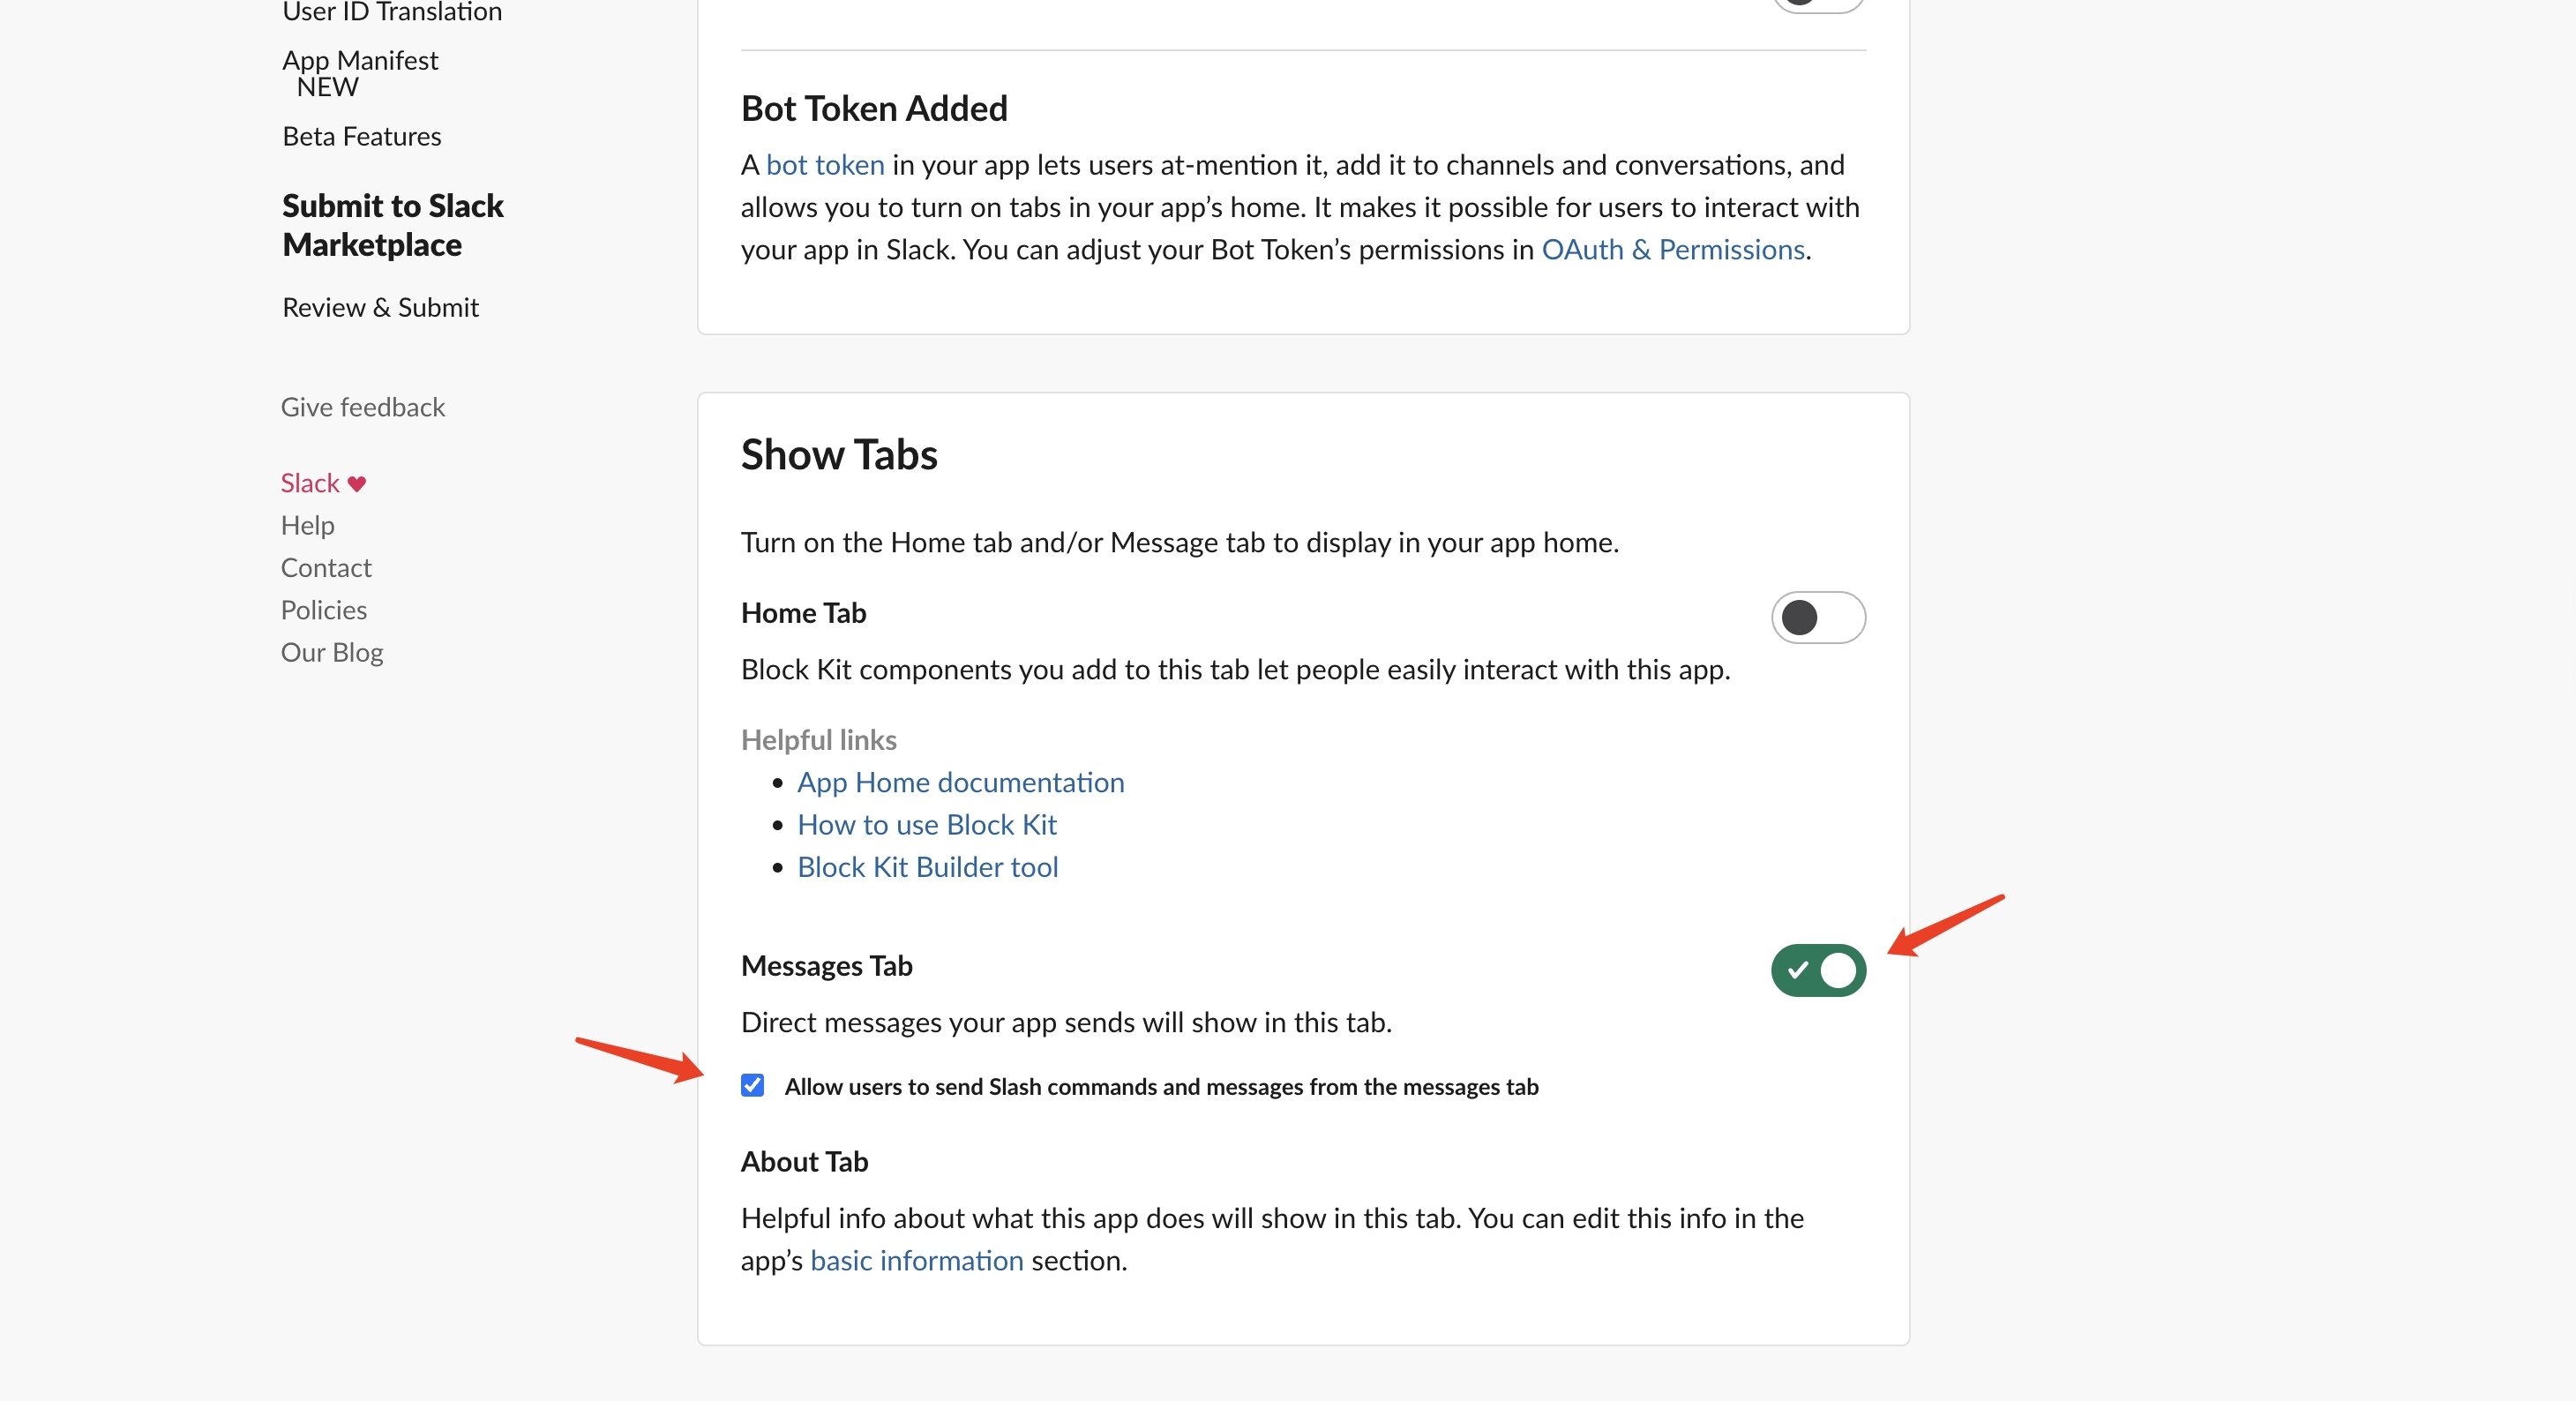
- Under Show Tabs:
- Check Messages Tab
- Check Allow users to send Slash commands and messages from the messages tab
This enables users to send direct messages to your bot in Slack.
Step 7: Send Tokens to Your AI Employee
Once the Slack App setup is complete, simply send both tokens to your AI employee in chat to finish the connection. For example:
Bot Token: xoxb-xxxxxxxx App Token: xapp-xxxxxxxx
Your AI employee will automatically configure the Slack channel connection.
Step 8: Start Chatting
- In Slack, search for your Bot name or find it in the Apps list
- Click to start a DM conversation — AI employee responds immediately
- To use in a channel, invite the Bot by typing
/invite @BotNamein the channel - @mention your Bot to trigger responses in the channel
- Deployment complete!
Tip: Slack Bot supports both DMs and channel @mentions. You can use it across multiple channels simultaneously.
Slack FAQ
| Issue | Solution |
|---|---|
| Bot not responding | Re-send both Bot Token and App Token to your AI employee in chat |
| Bot not visible in Slack | Ensure the App is installed to Workspace (Step 4) and App Home is configured (Step 6) |
| Bot not responding in channels | The Bot must be invited to the channel first using /invite @BotName |
| Token regenerated after scope change | Reinstall the App to Workspace after any scope modification, then update tokens in Dashboard |
| Cannot send DMs to Bot | Confirm Messages Tab is enabled in App Home settings |
Option F: WhatsApp Deployment
Estimated time: ~5 minutes
Note: WhatsApp connects via QR code scanning (linked device), similar to using WhatsApp Web. No API keys, developer accounts, or app configuration are needed — just a phone with WhatsApp installed.
Looking for the official WhatsApp Business API? This option links a regular WhatsApp account by QR code. For a verified business number on Meta's official Cloud API (no QR or phone linking), see WhatsApp Business (Official API).
Use a Dedicated WhatsApp Account
Please use a newly registered, dedicated WhatsApp account for the bot — do not use your personal WhatsApp account. The connected account will serve exclusively as the bot's number.
No credentials are required. You only need:
| Item | Description |
|---|---|
| OpenMax AI Employee | An existing instance in OpenMax Dashboard |
| WhatsApp Account | A phone with WhatsApp installed and logged in |
| ~5 minutes | Time to complete deployment |
Step 1: Create an AI Employee and Enter Configuration Page
- Log into OpenMax Dashboard
- Create a new AI employee or select an existing instance
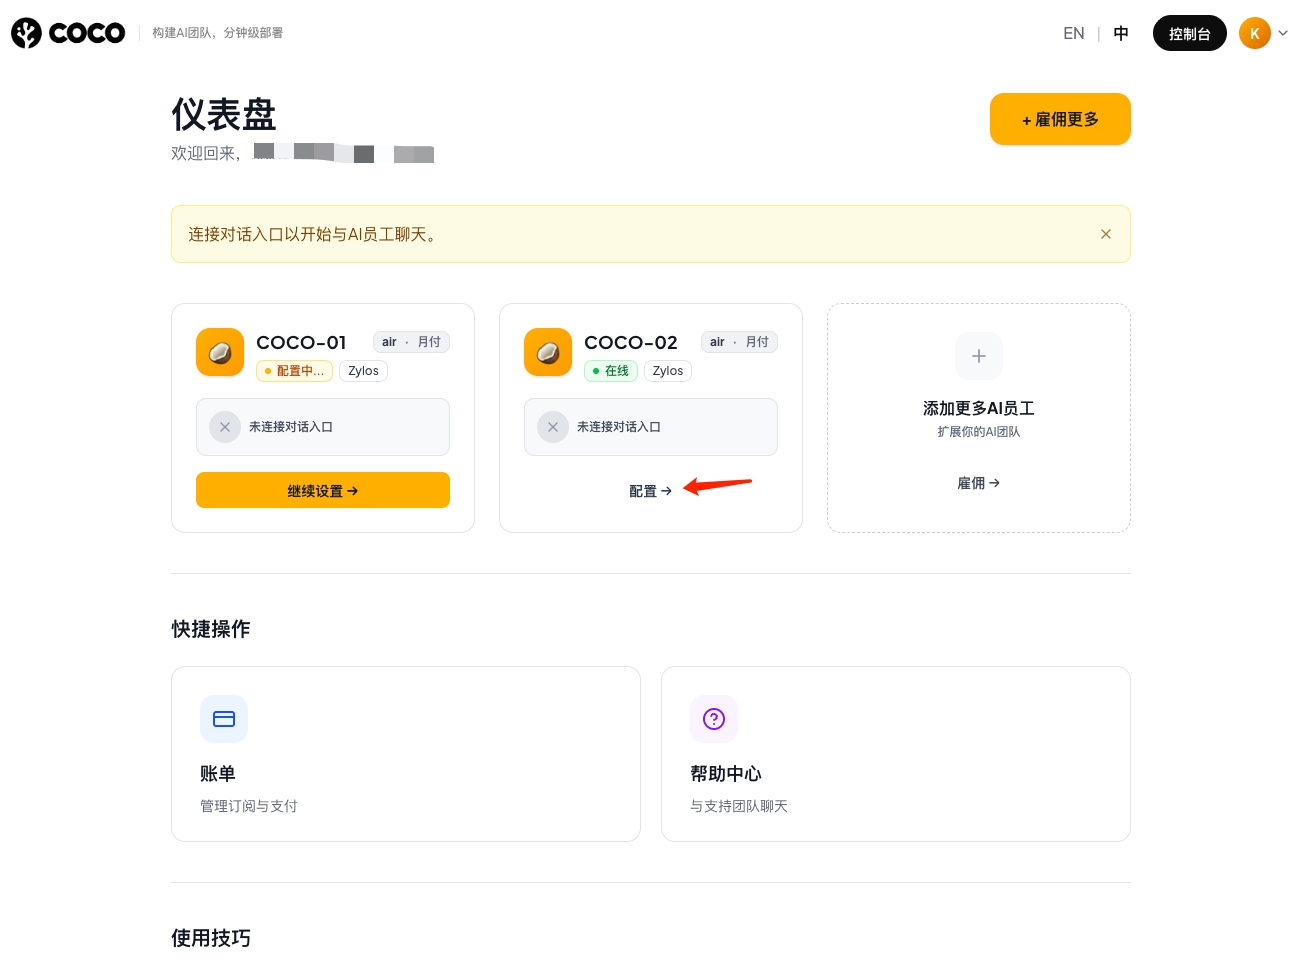
- Click Configure → on the employee card to enter the instance detail page
Step 2: Click WhatsApp "Connect" and Wait for QR Code
- In the channel list on the instance detail page, find the WhatsApp card
- Click the Connect button
- The system will prepare a WhatsApp session in the background — the QR code takes ~30 seconds to generate, please be patient
- Once generated, the QR code refreshes automatically every 15 seconds
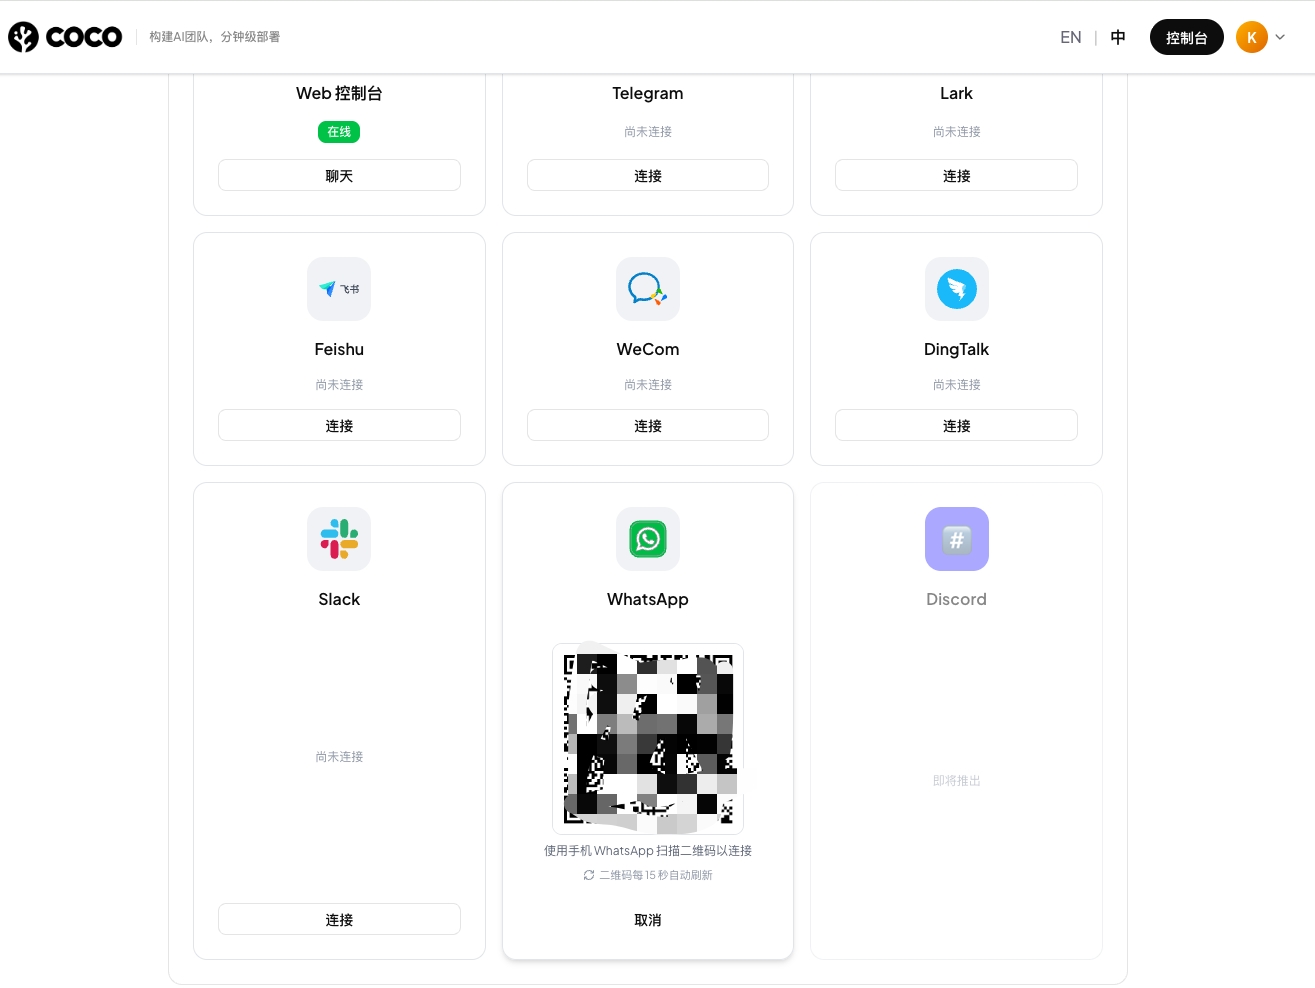
Important: Do not close the page or click repeatedly while waiting — this may trigger duplicate requests.
Step 3: Open WhatsApp on Your Phone → Linked Devices
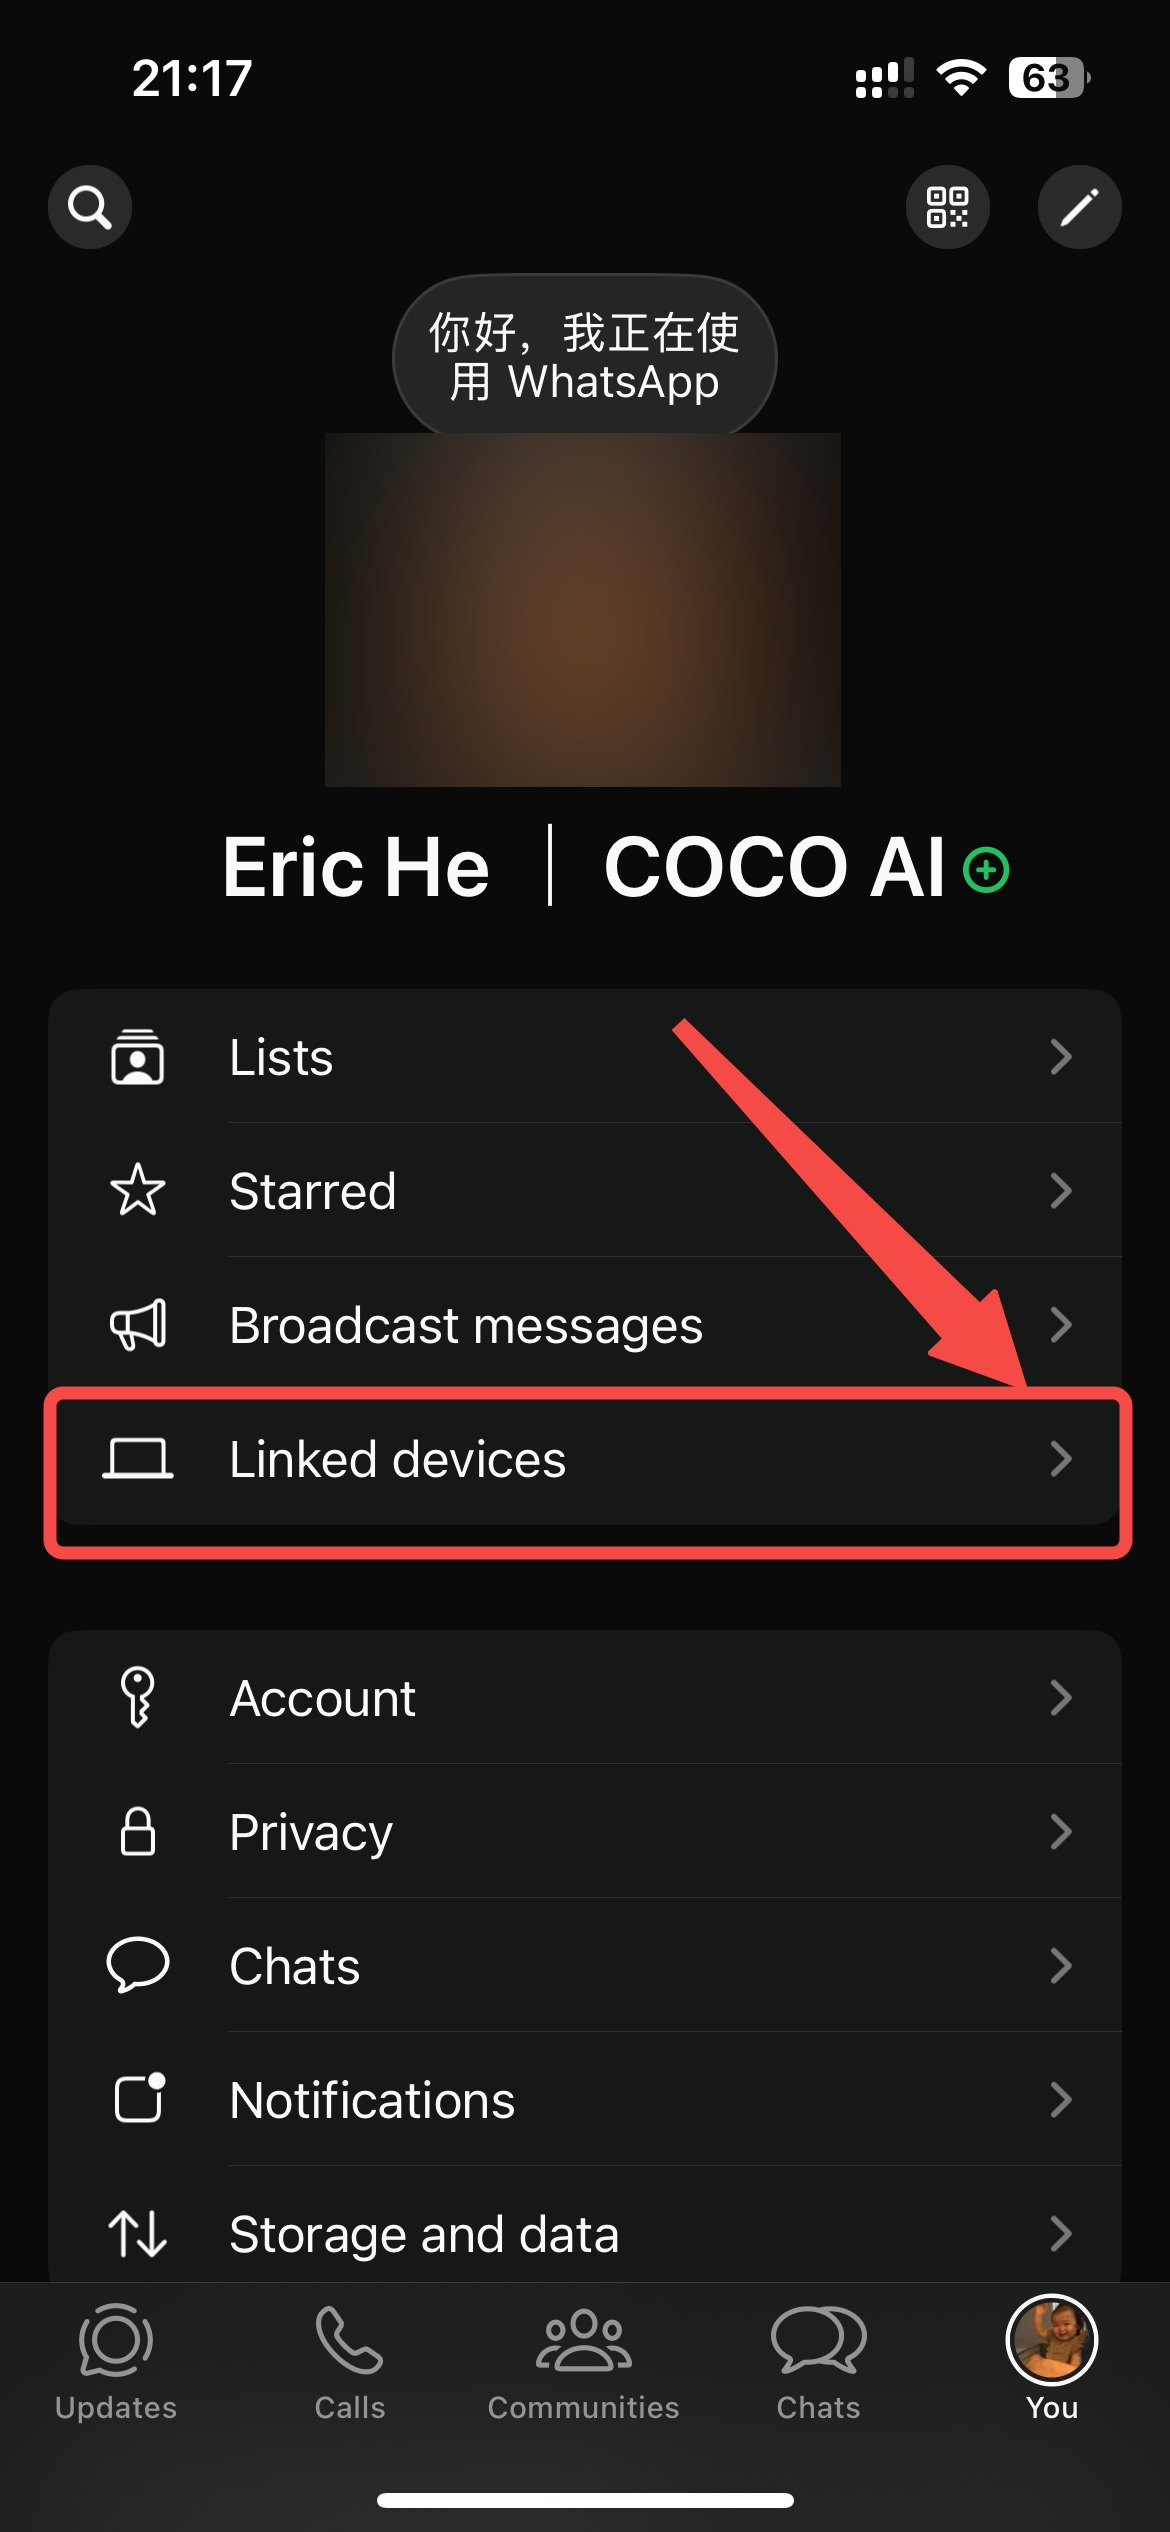
- Open WhatsApp on your phone
- Tap Me (profile icon) in the bottom-right corner
- In the settings list, tap Linked Devices
Step 4: Tap "Link a Device" and Scan the QR Code
- On the "Linked Devices" page, tap the Link a Device button at the bottom
- Your phone's camera opens — point it at the QR code displayed on the Dashboard in Step 2
- Wait a few seconds for the connection to complete
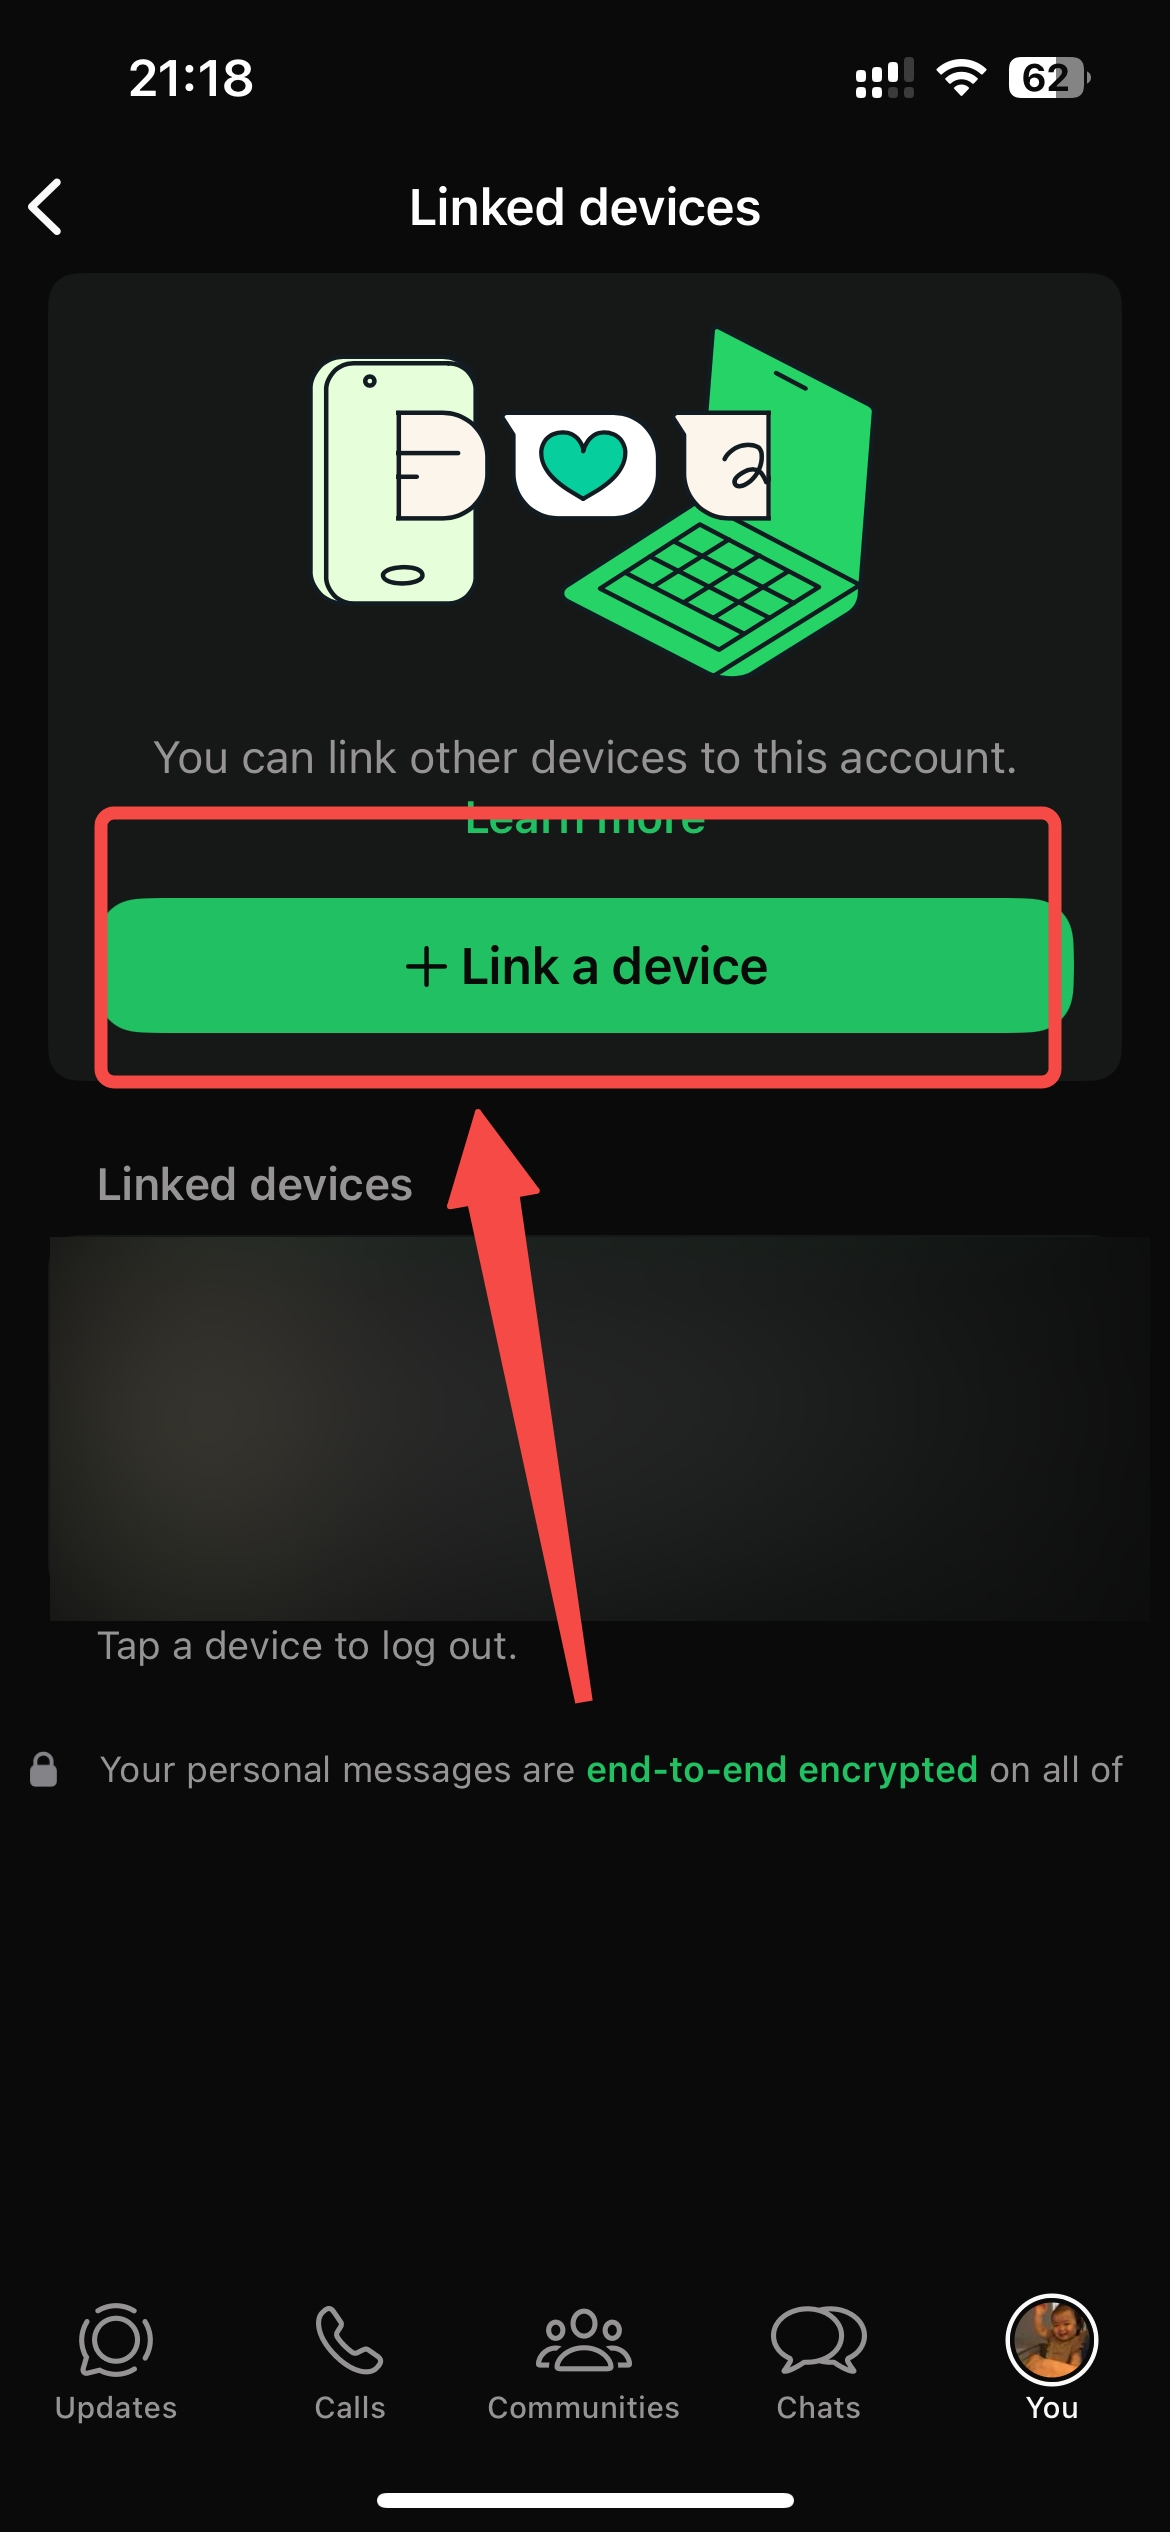
Tip: If the QR code has expired, the Dashboard will automatically refresh it. Scan the latest QR code displayed.
Step 5: Verify Connection and Manage Chat Permissions
- After successful scanning, the Dashboard automatically detects the connection — the WhatsApp card shows Connected
- Deployment complete! You are now the Owner (administrator) of this WhatsApp bot
Verify the Bot Is Working
Search for your own WhatsApp account and send yourself a message — the AI employee will reply automatically. This confirms the connection is live.
Managing Who Can Chat with the Bot
By default, only the Owner can chat with the bot. To allow others to interact, configure access via two modes — just send a natural language instruction to the bot:
Allowlist Mode — Only specified phone numbers can chat:
Send to bot:
Enable allowlist mode, add +1 555xxxx888 to the list
The bot will update its configuration automatically. Only users on the allowlist can initiate conversations.
Open Mode — Anyone can chat:
Send to bot:
Enable open mode, anyone can DM you
The bot will open chat access to all users.
Note: WhatsApp linked devices may disconnect automatically if the phone is offline for an extended period. If disconnected, return to the Dashboard and scan the QR code again to reconnect.
WhatsApp FAQ
| Issue | Solution |
|---|---|
| QR code takes a long time to appear | The first generation may take 30-60 seconds — this is normal. Do not close the page |
| QR code expired before scanning | The QR code auto-refreshes every 15 seconds. Use the latest one displayed |
| "Already in progress" error | A previous QR request is still running. Wait a moment and it will resolve automatically |
| Others can't message the bot | By default only the Owner can chat. Enable Allowlist or Open mode to grant access |
| WhatsApp disconnected after some time | Phone was offline too long. Reconnect by scanning QR code again from the Dashboard |
| Want to disconnect WhatsApp | Click the Disconnect button on the WhatsApp card in the instance detail page |
Option G: Microsoft Teams Deployment
Estimated time: 15-20 minutes
Note: Microsoft Teams is widely used by enterprises on Microsoft 365. Deployment requires creating an Azure Bot resource, configuring permissions, and publishing the app via the Teams Developer Portal. No servers or coding skills needed — the free Azure tier is sufficient.
Before You Start
Please make sure you have the following:
- A Microsoft Entra (Azure AD) tenant — every organization using Microsoft 365 already has one.
- An active Azure subscription — required to create the Azure Bot resource. This tutorial uses the F0 (Free) pricing tier throughout, and Teams is a Standard channel with no per-message billing, so the entire setup incurs zero Azure cost. If your organization already has a subscription, use it; otherwise you can create a Pay-As-You-Go subscription (a credit card is required to open it, but your bill for this setup will be $0) or use an Azure free trial.
- Microsoft 365 administrator cooperation — Step 5 requires a Global Administrator to grant admin consent for Graph API permissions, and publishing the app to your whole organization (Step 9) requires a Teams administrator's approval.
Why do I need a subscription if everything is free? An Azure subscription is just the "container" that resources are created in. The subscription itself costs nothing — you are billed only for resource usage, and this setup's Azure Bot on the F0 tier bills at $0.
Credentials You Will Collect
You will collect four credentials along the way and enter them in the OpenMax Dashboard at the end:
| Credential | Where you get it |
|---|---|
| App ID | Azure Bot → Configuration (Step 2) |
| Tenant ID | Azure Bot → Configuration (Step 2) |
| App Password | Client secret Value (Step 4) |
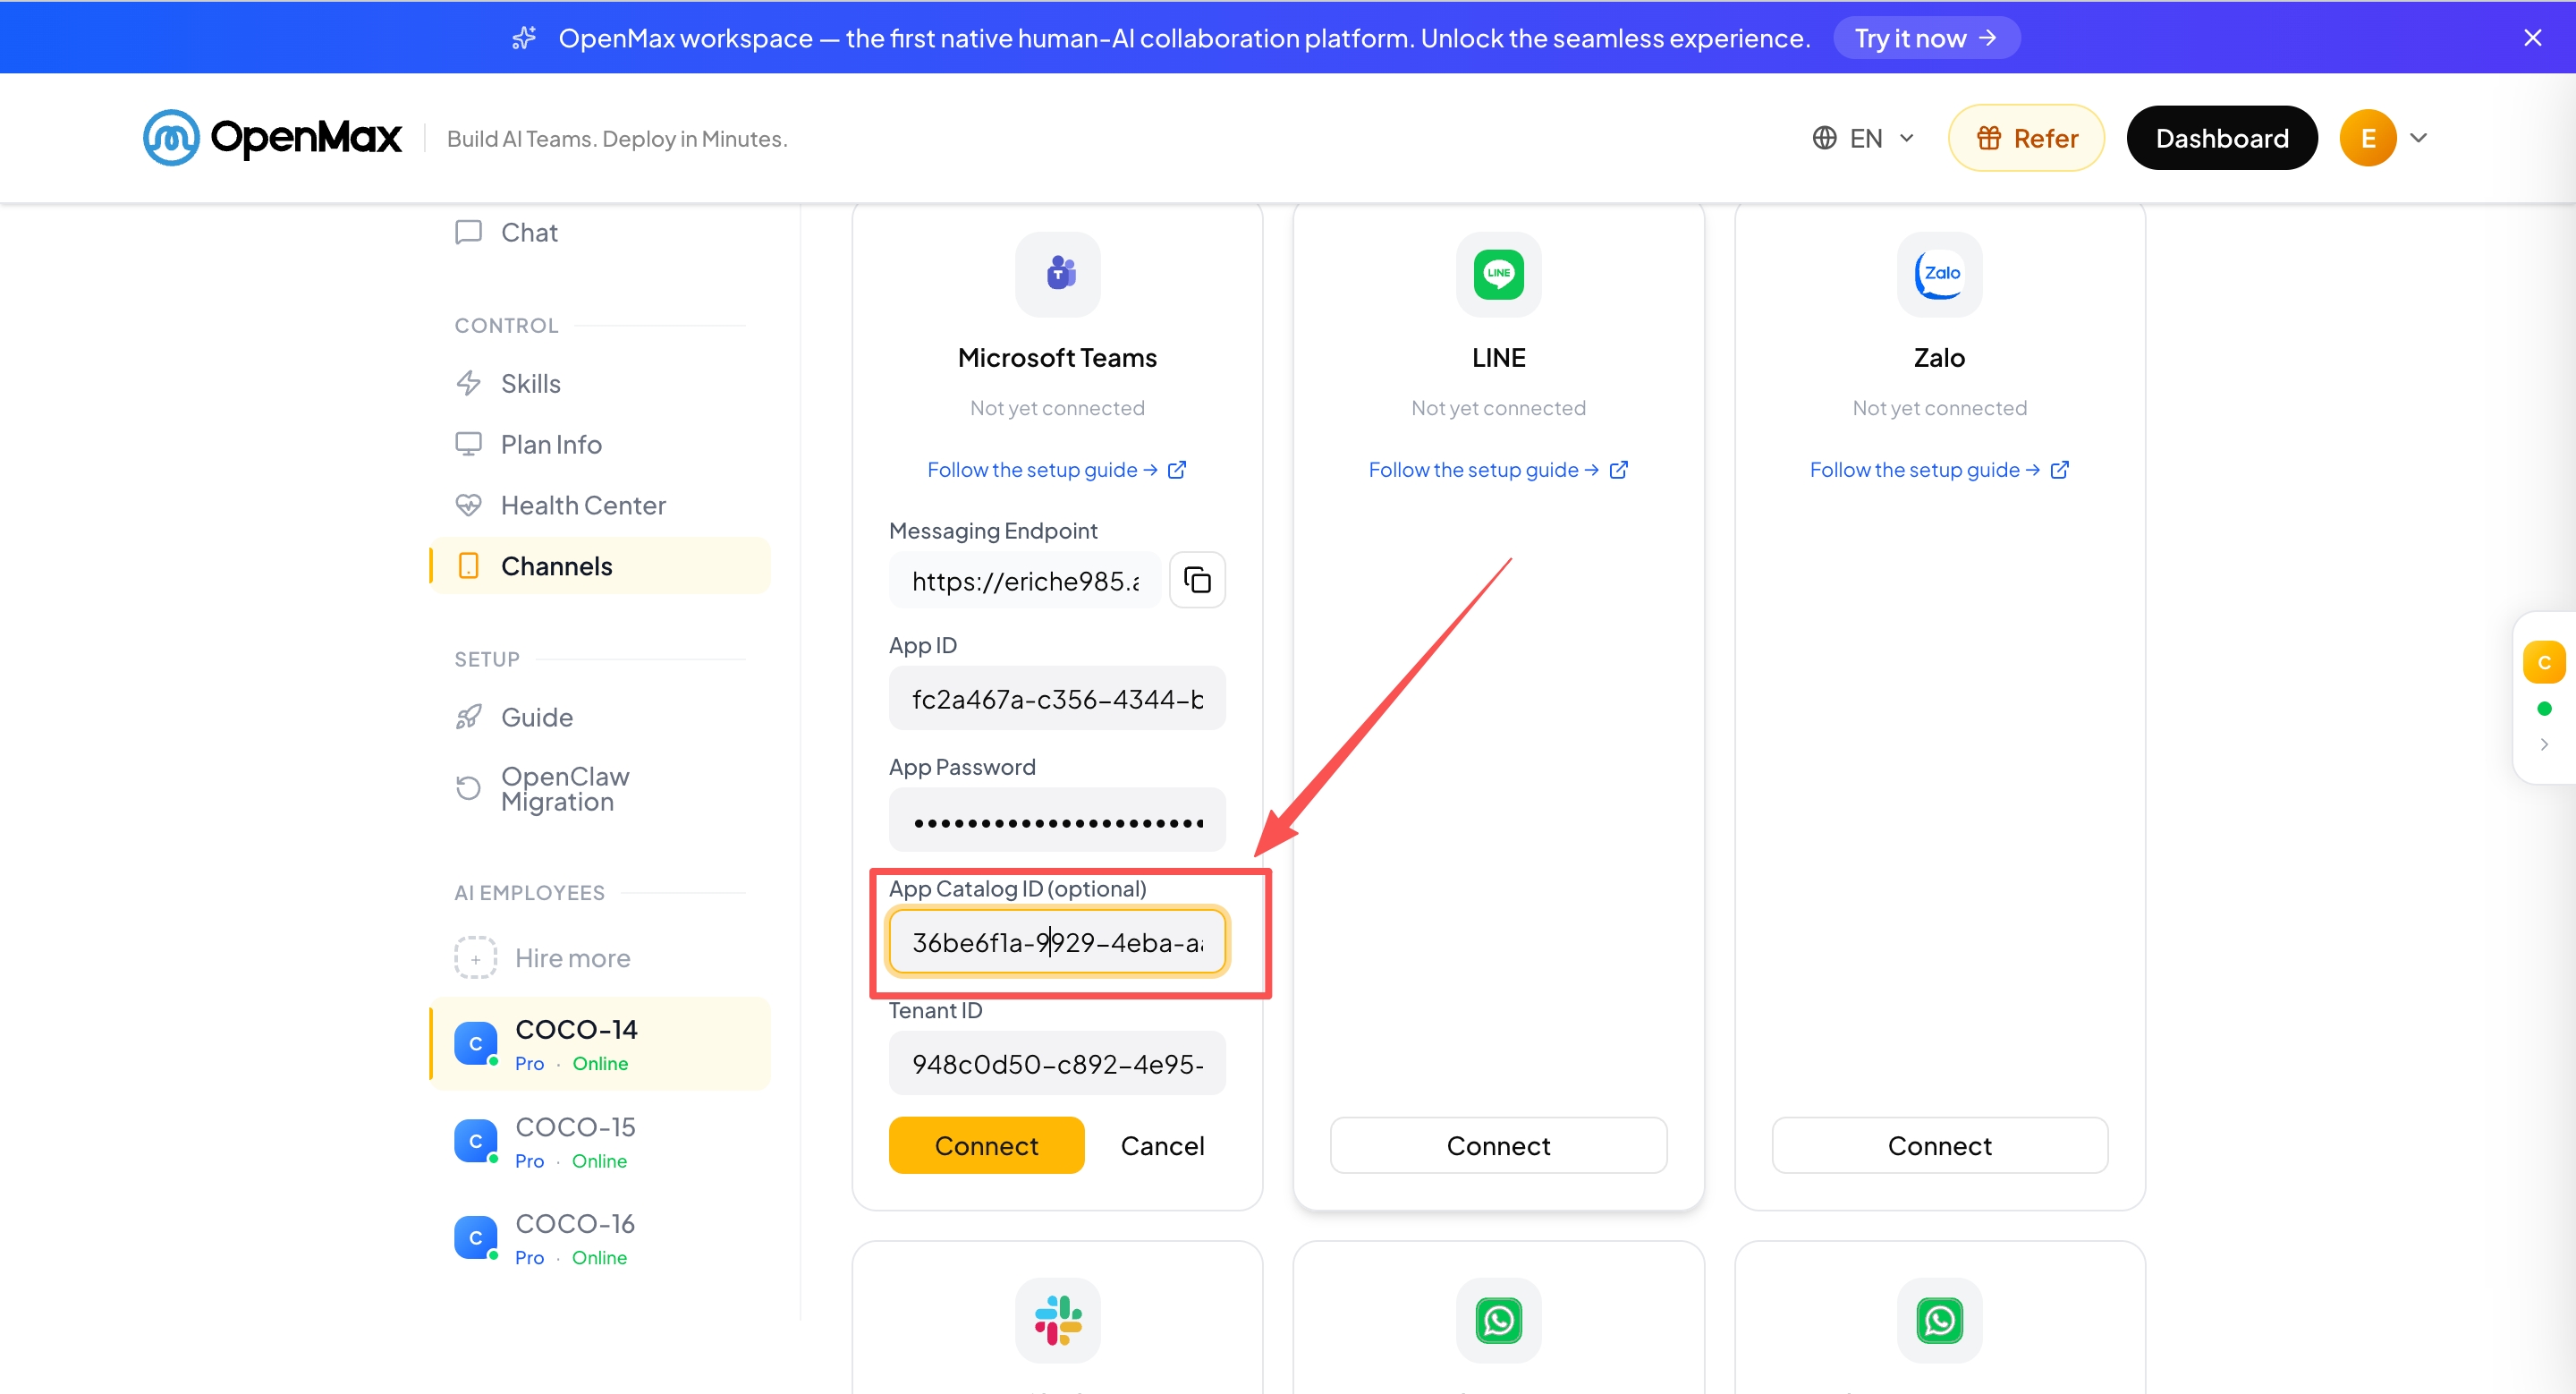
| App Catalog ID | Teams Developer Portal → Basic information (Step 6) |
Step 1: Create an Azure Bot
Sign in to the Azure Portal. You need an active Azure subscription — if you don't have one yet, see Before You Start above.
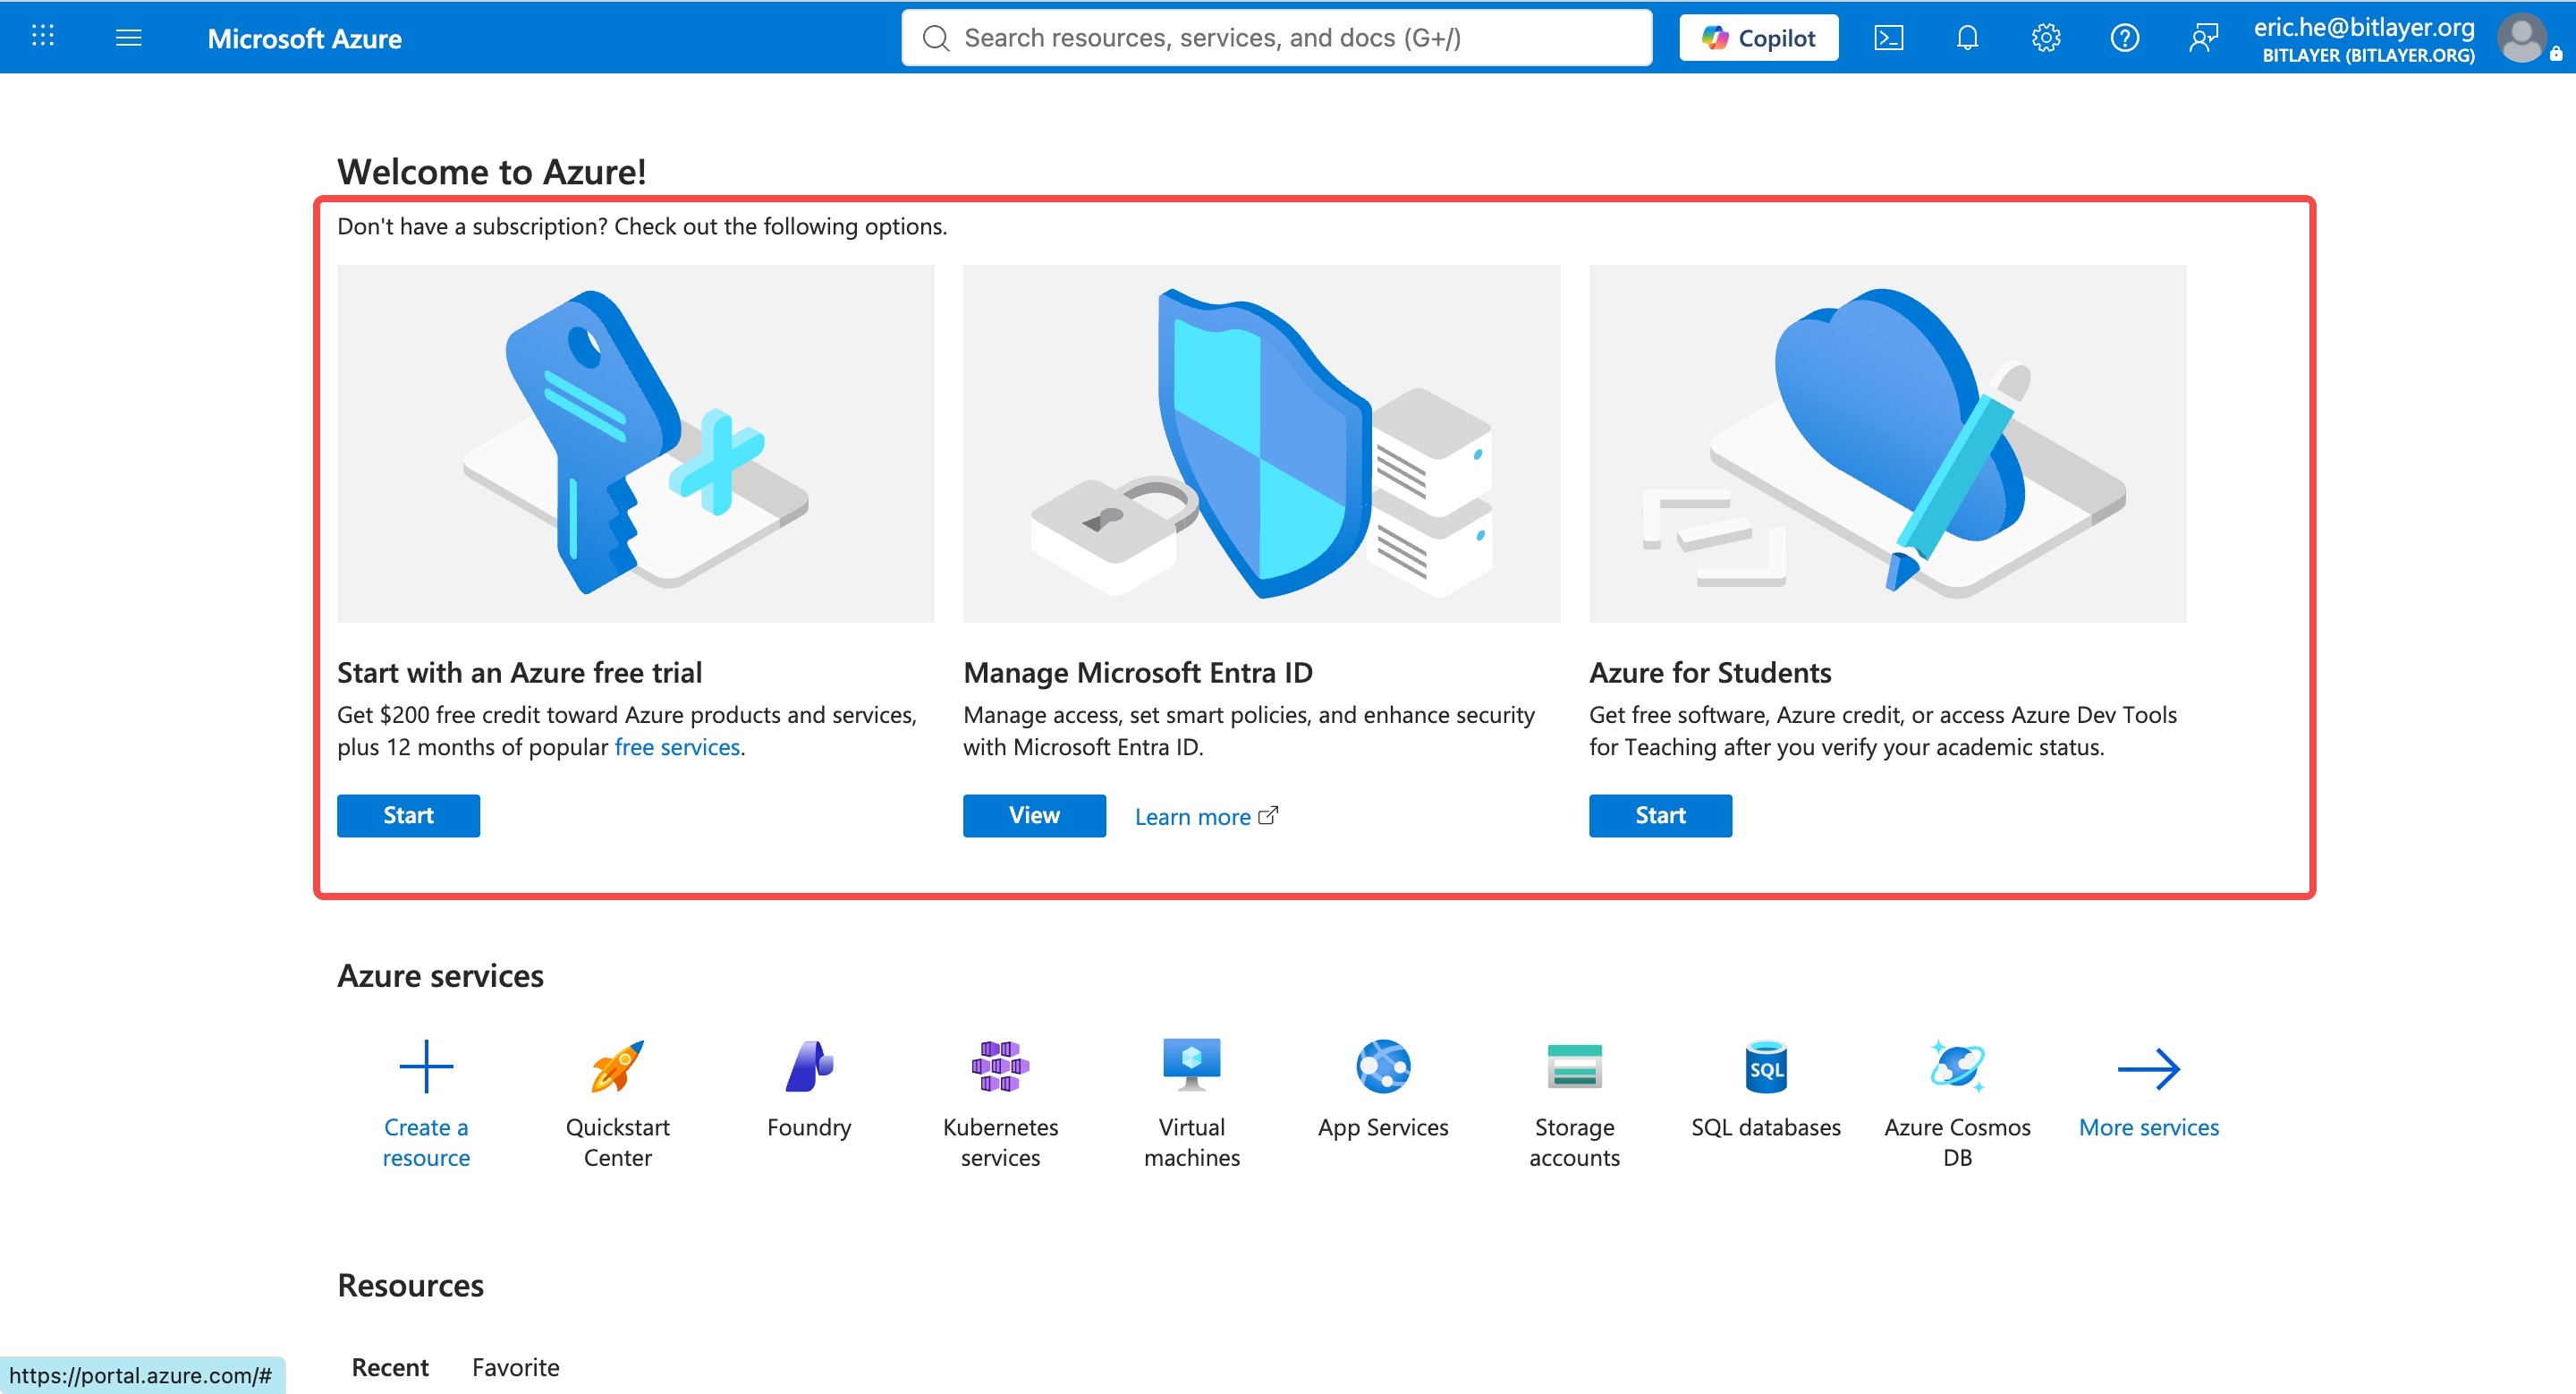
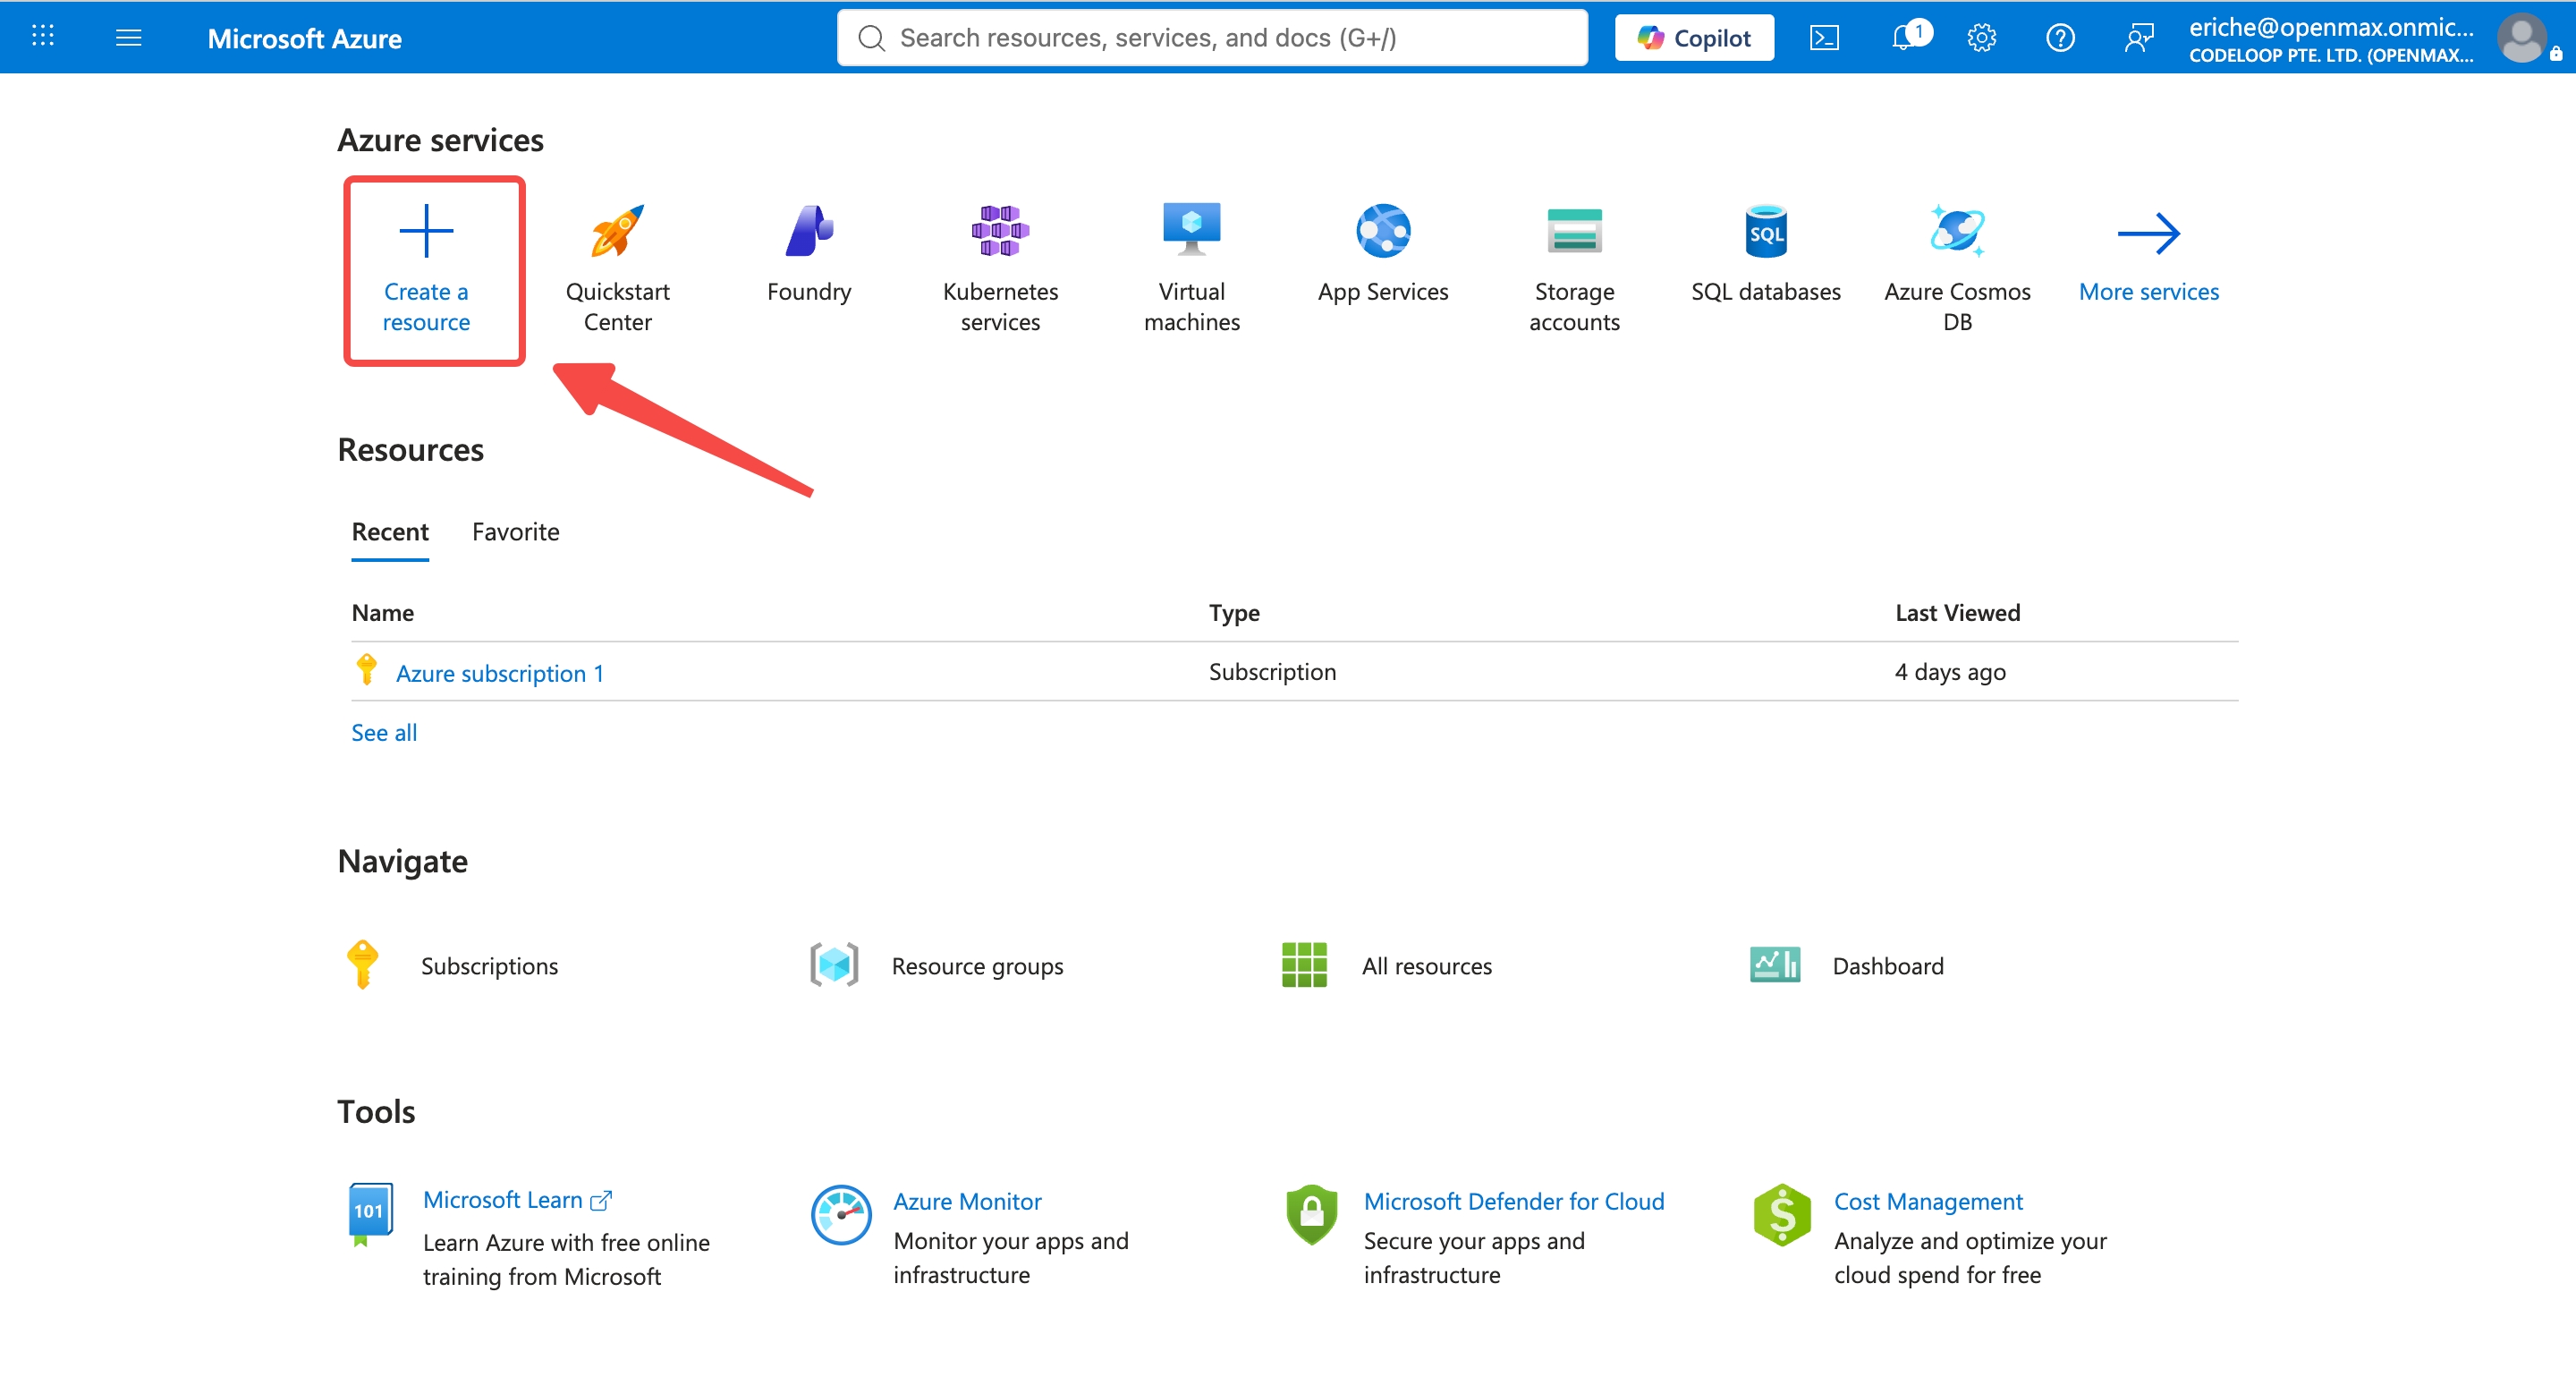
Once your subscription is ready, click Create a resource.
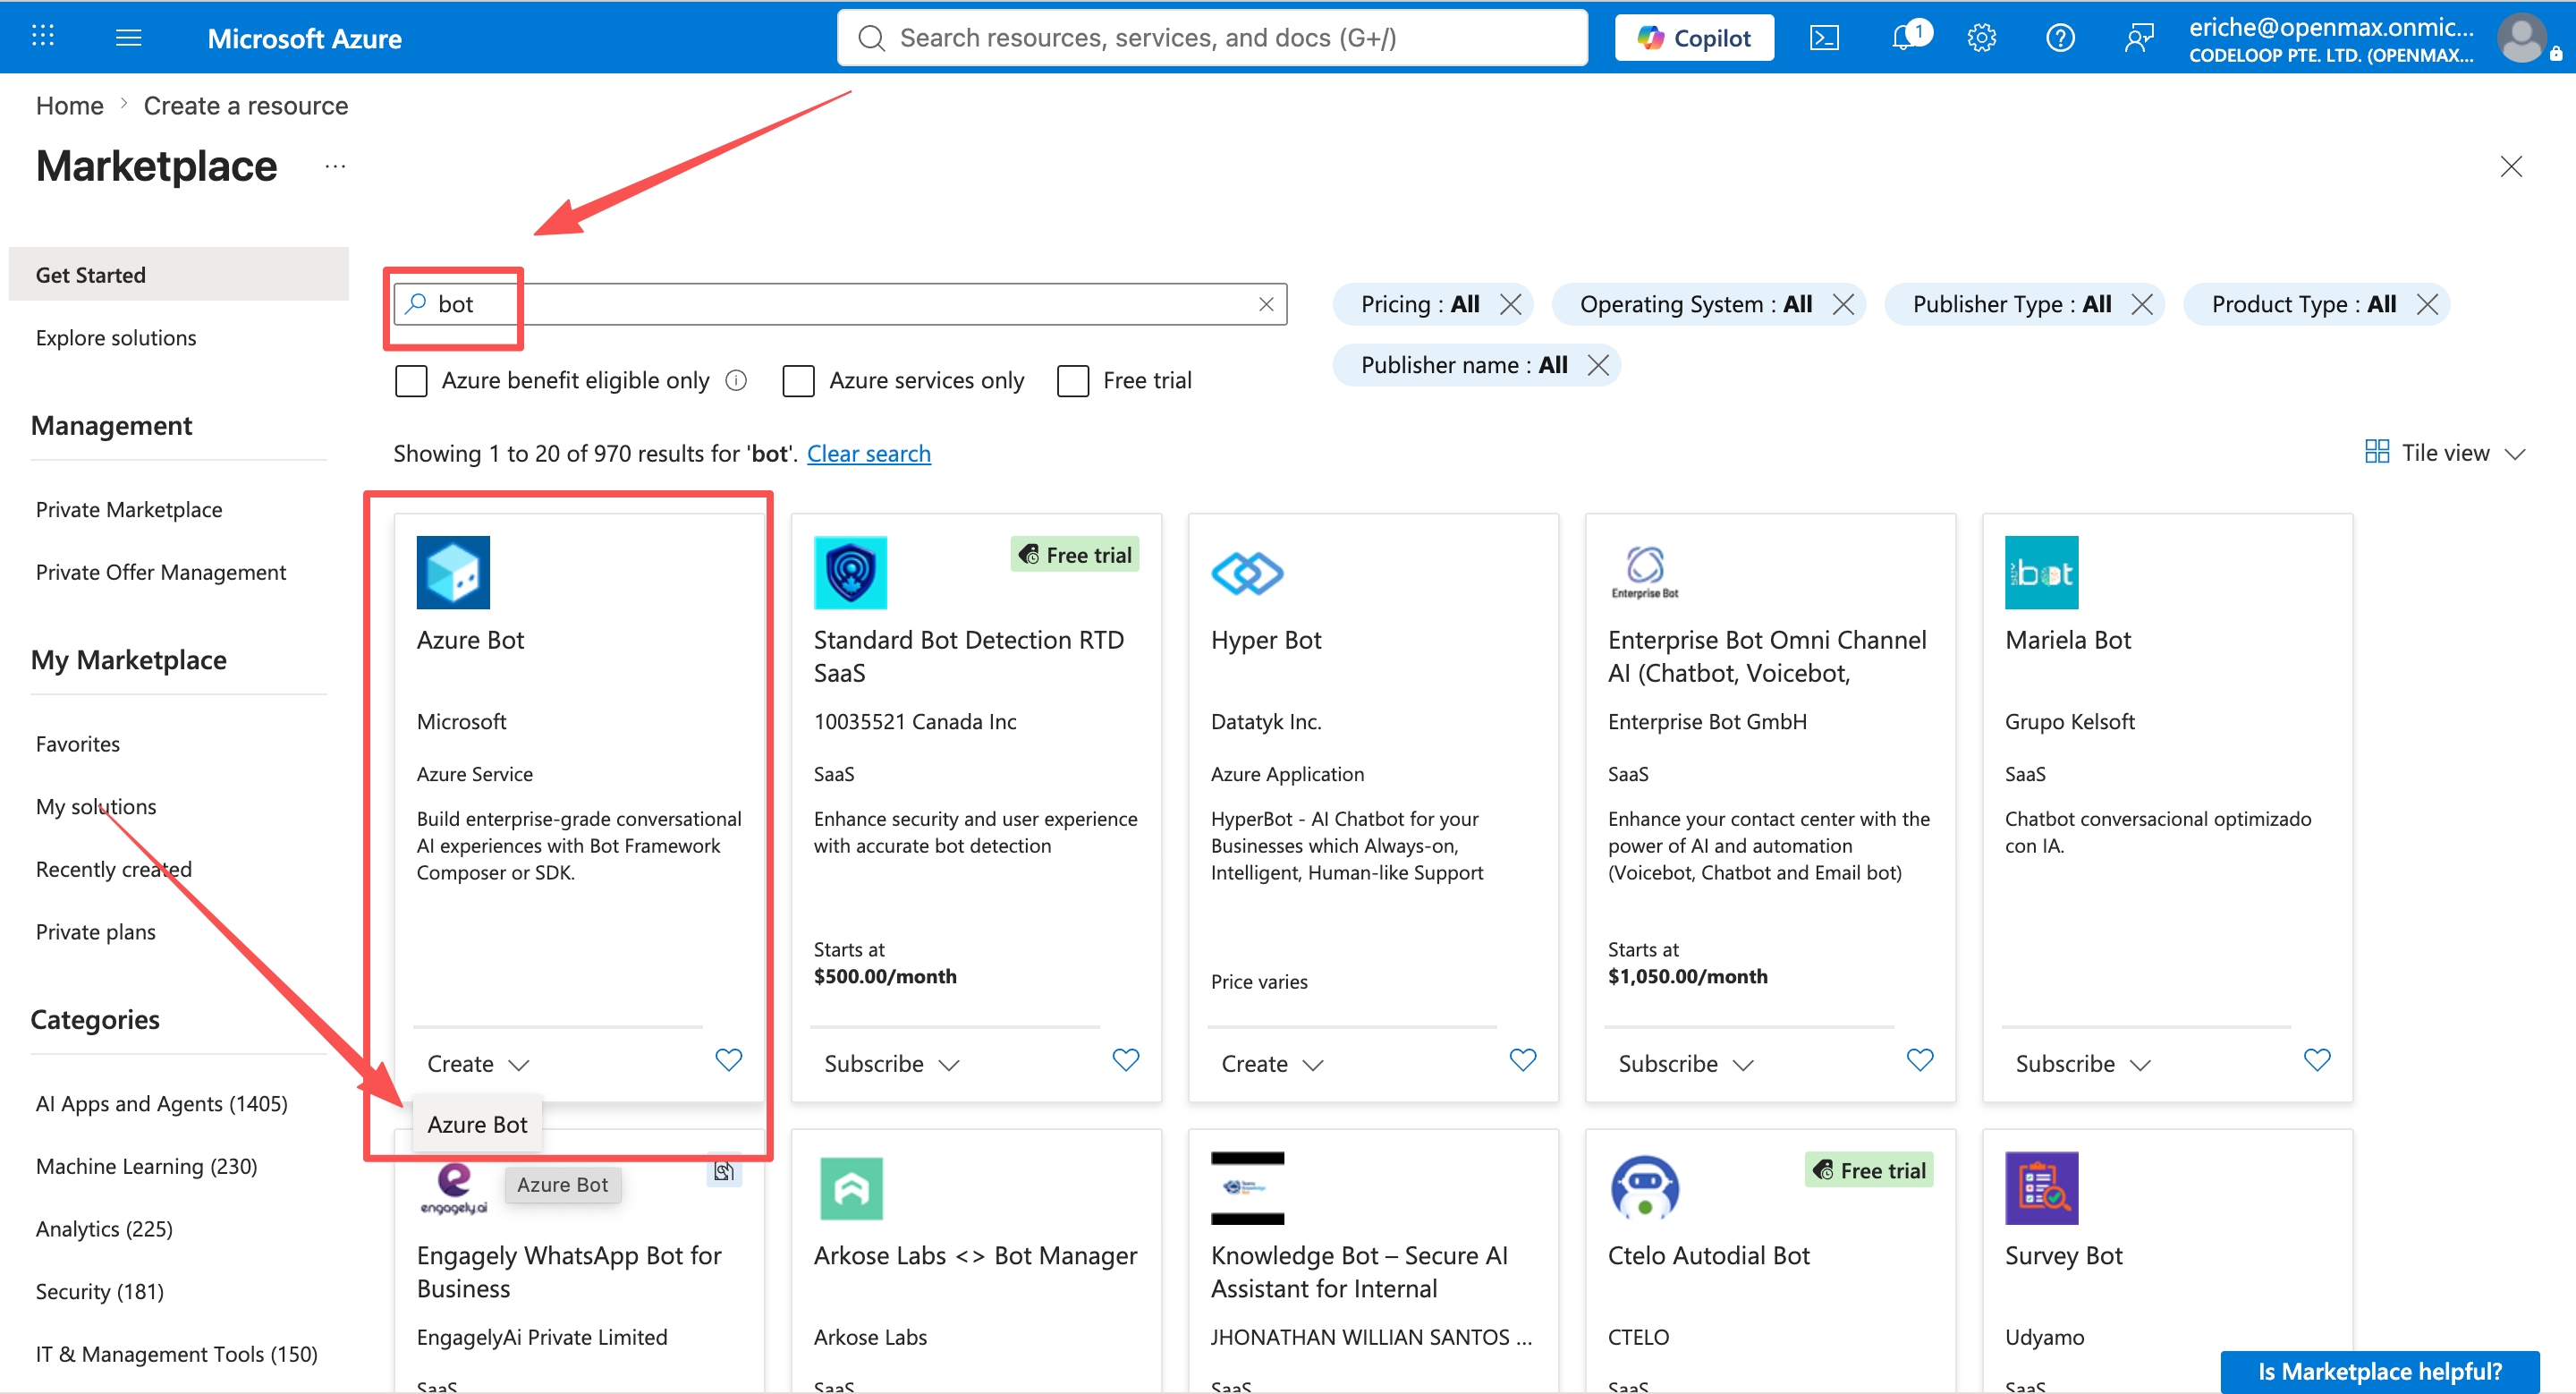
Search for bot, find Azure Bot, and click Create.
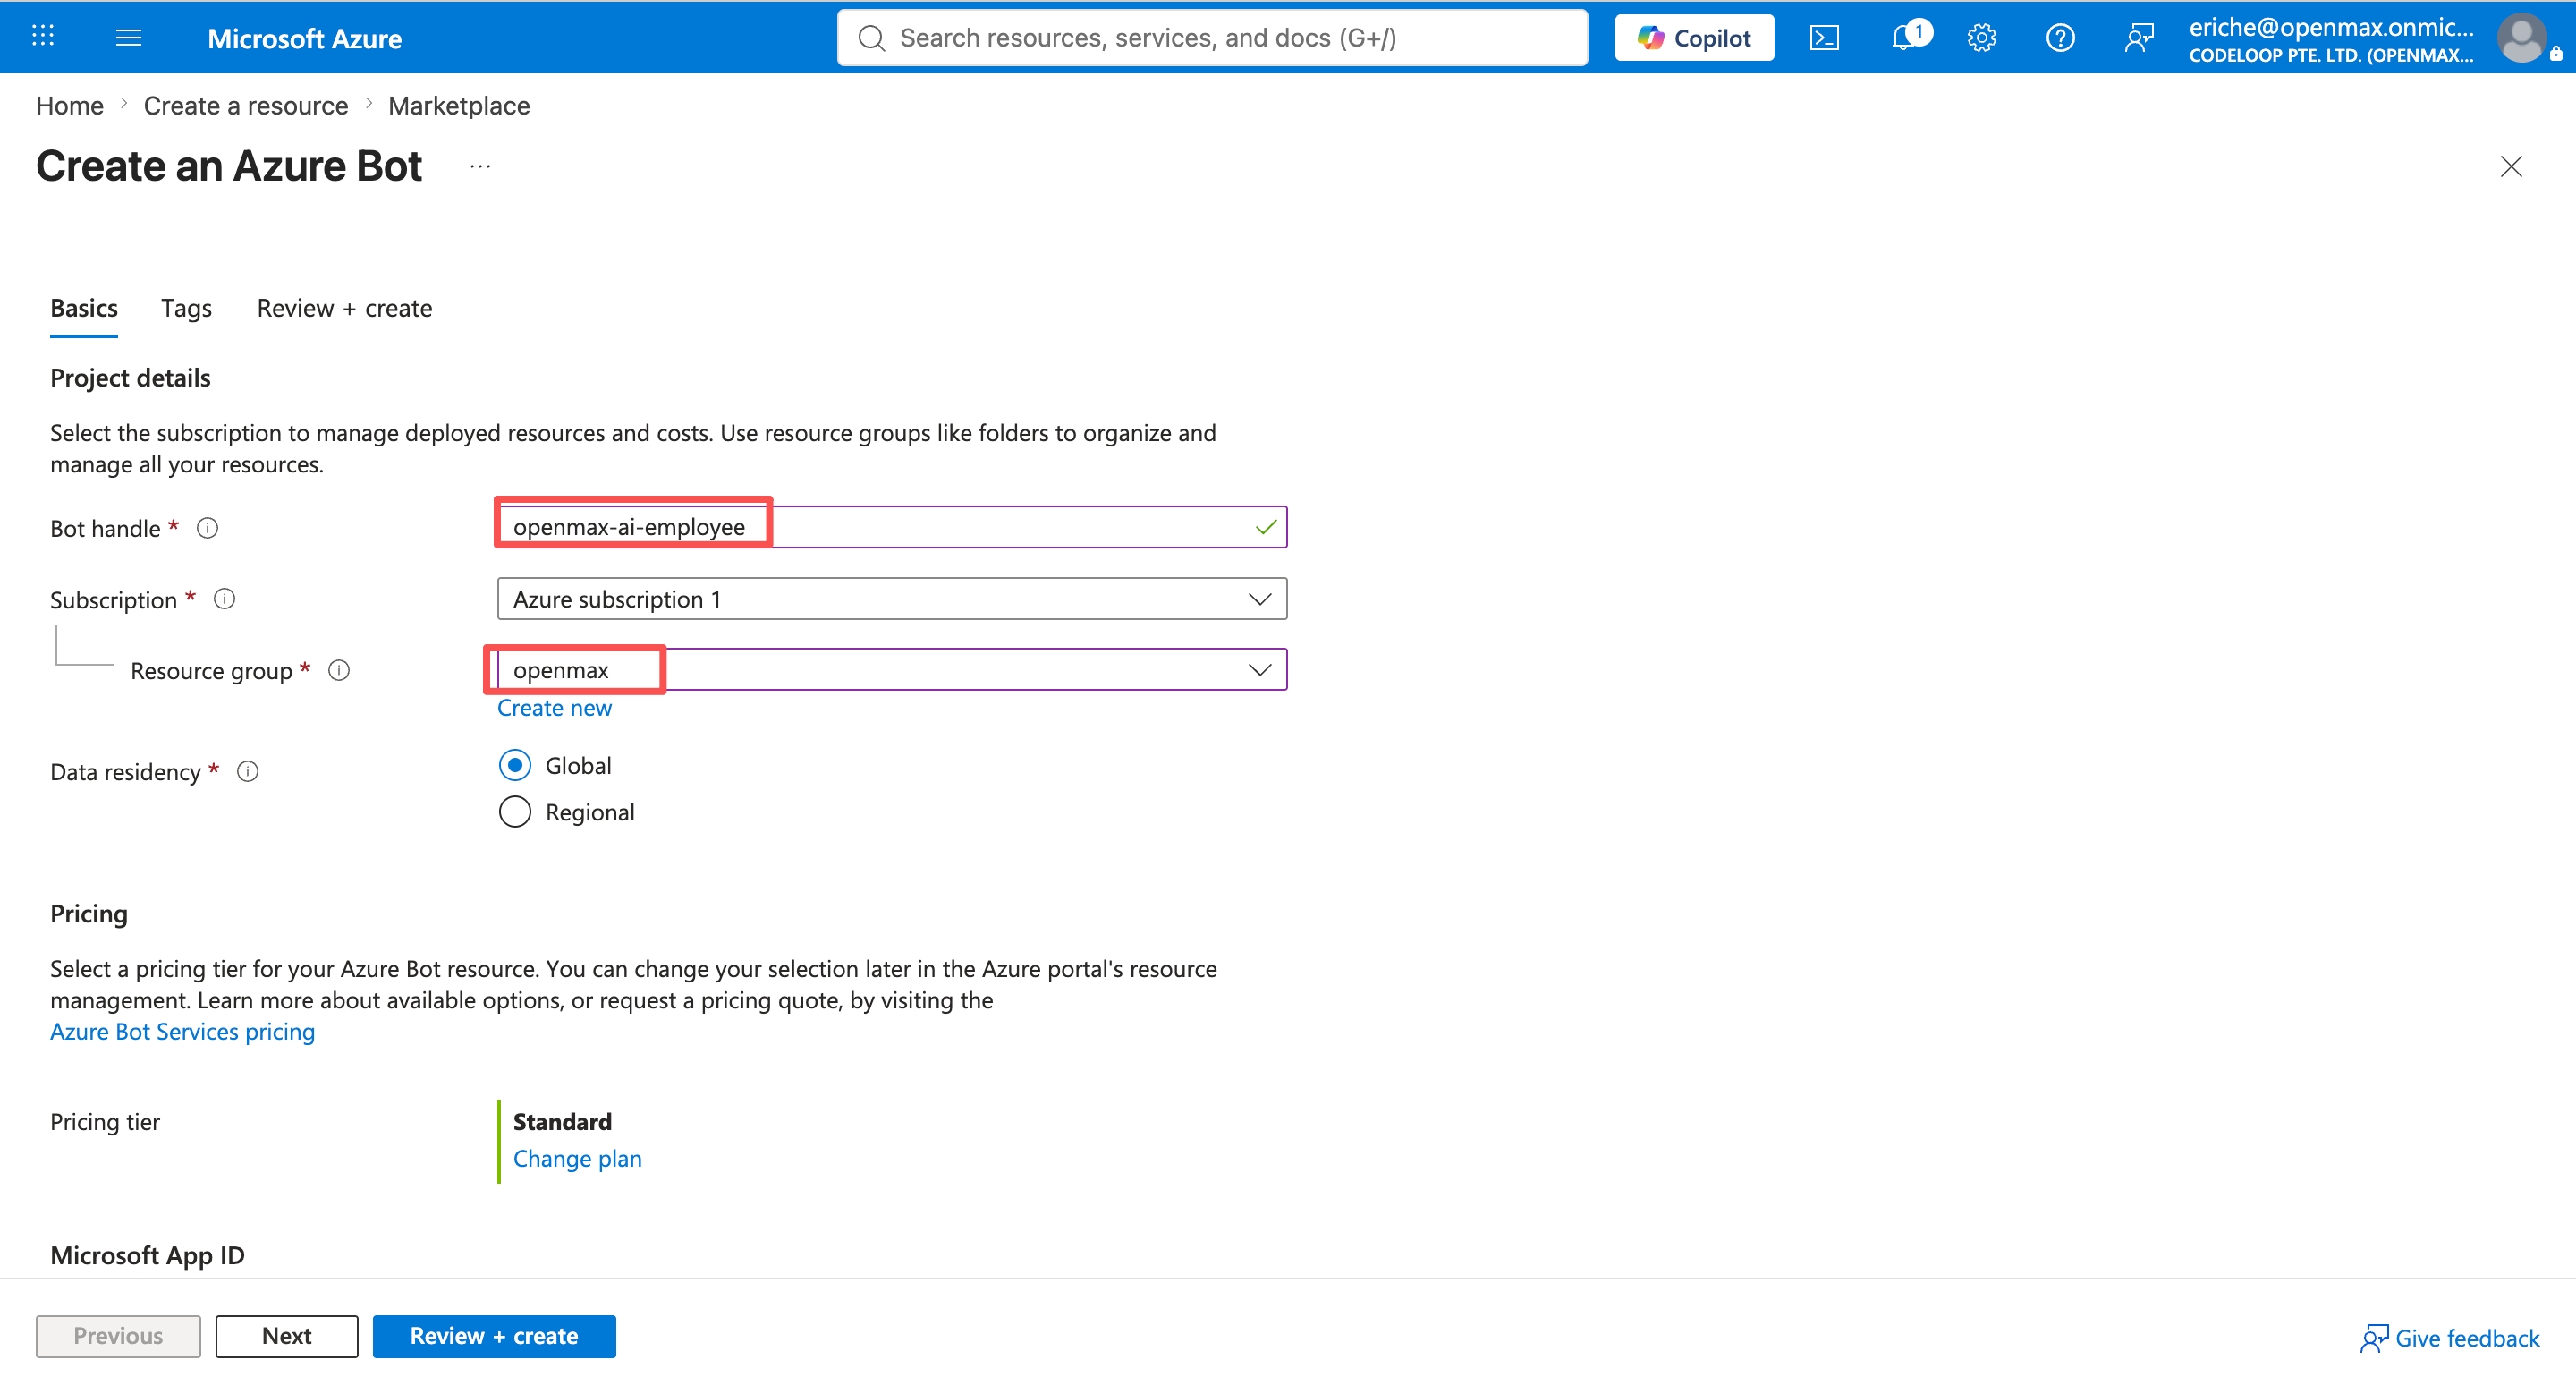
Fill in the form:
- Bot handle: a unique name, e.g.
openmax-ai-employee - Subscription / Resource group: choose your subscription and a resource group (create one if needed)
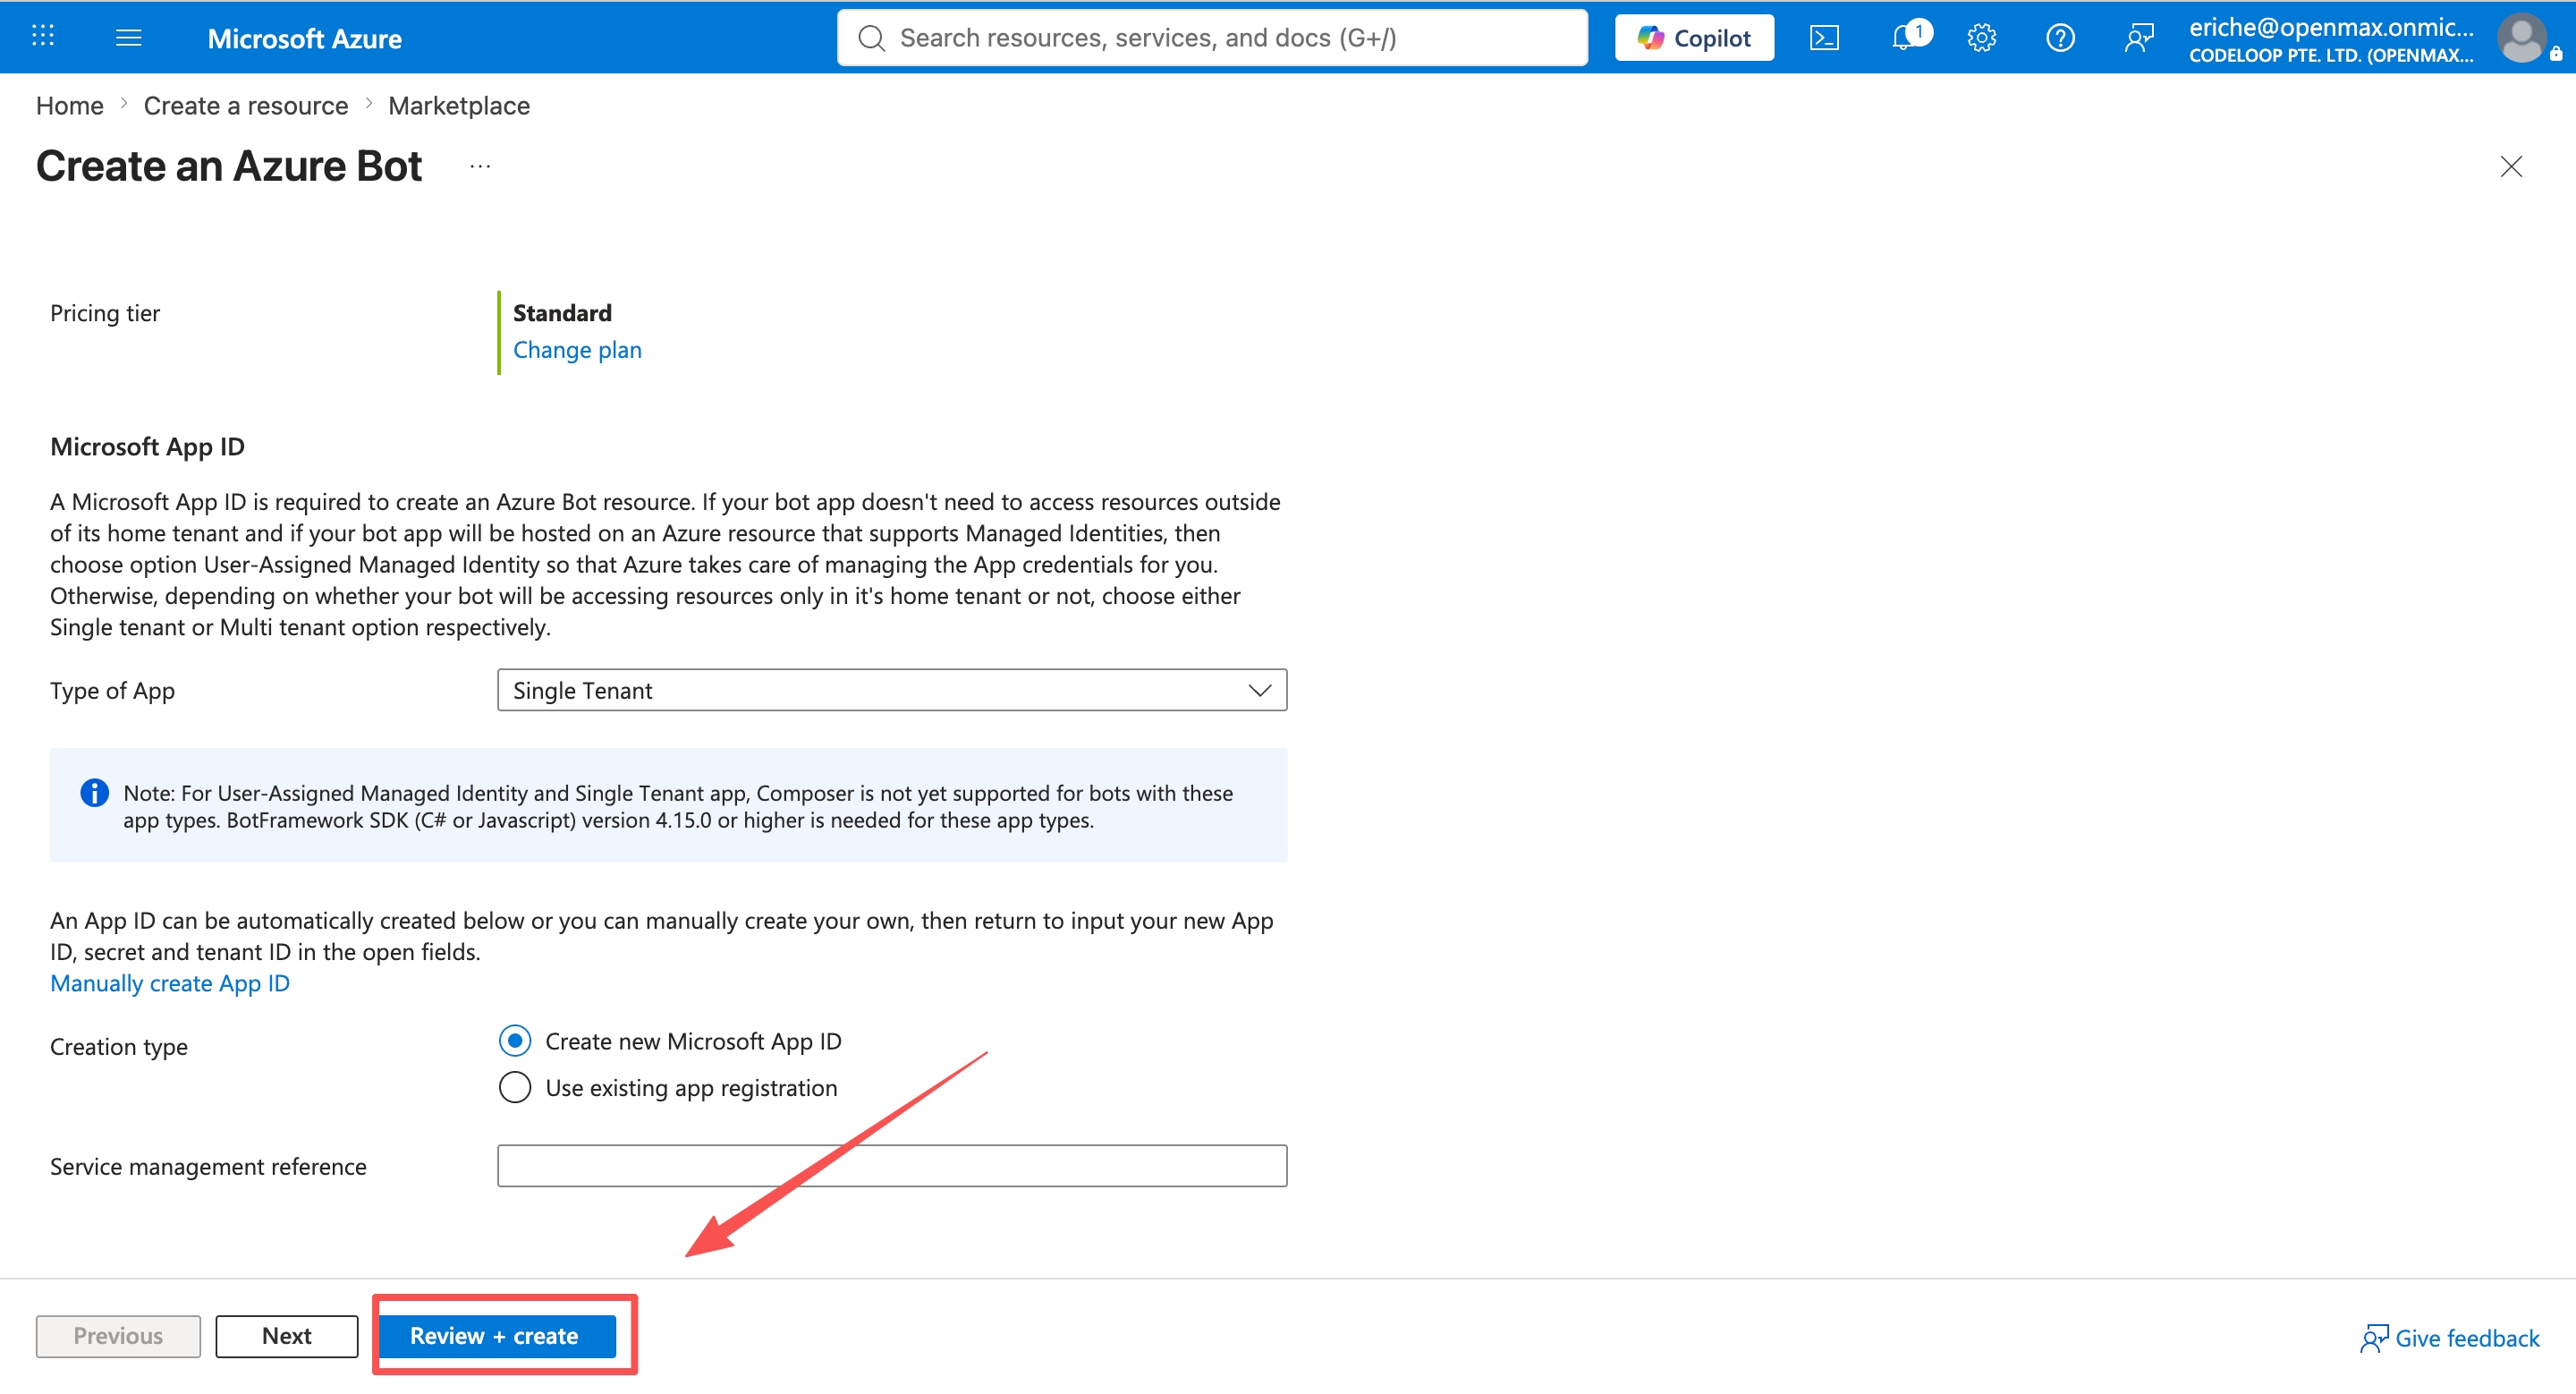
- Pricing tier: select Free (F0) (the screenshots show Standard; for the Teams channel both tiers bill $0, but F0 is the safe default)
- Type of App: Single Tenant
- Creation type: Create new Microsoft App ID
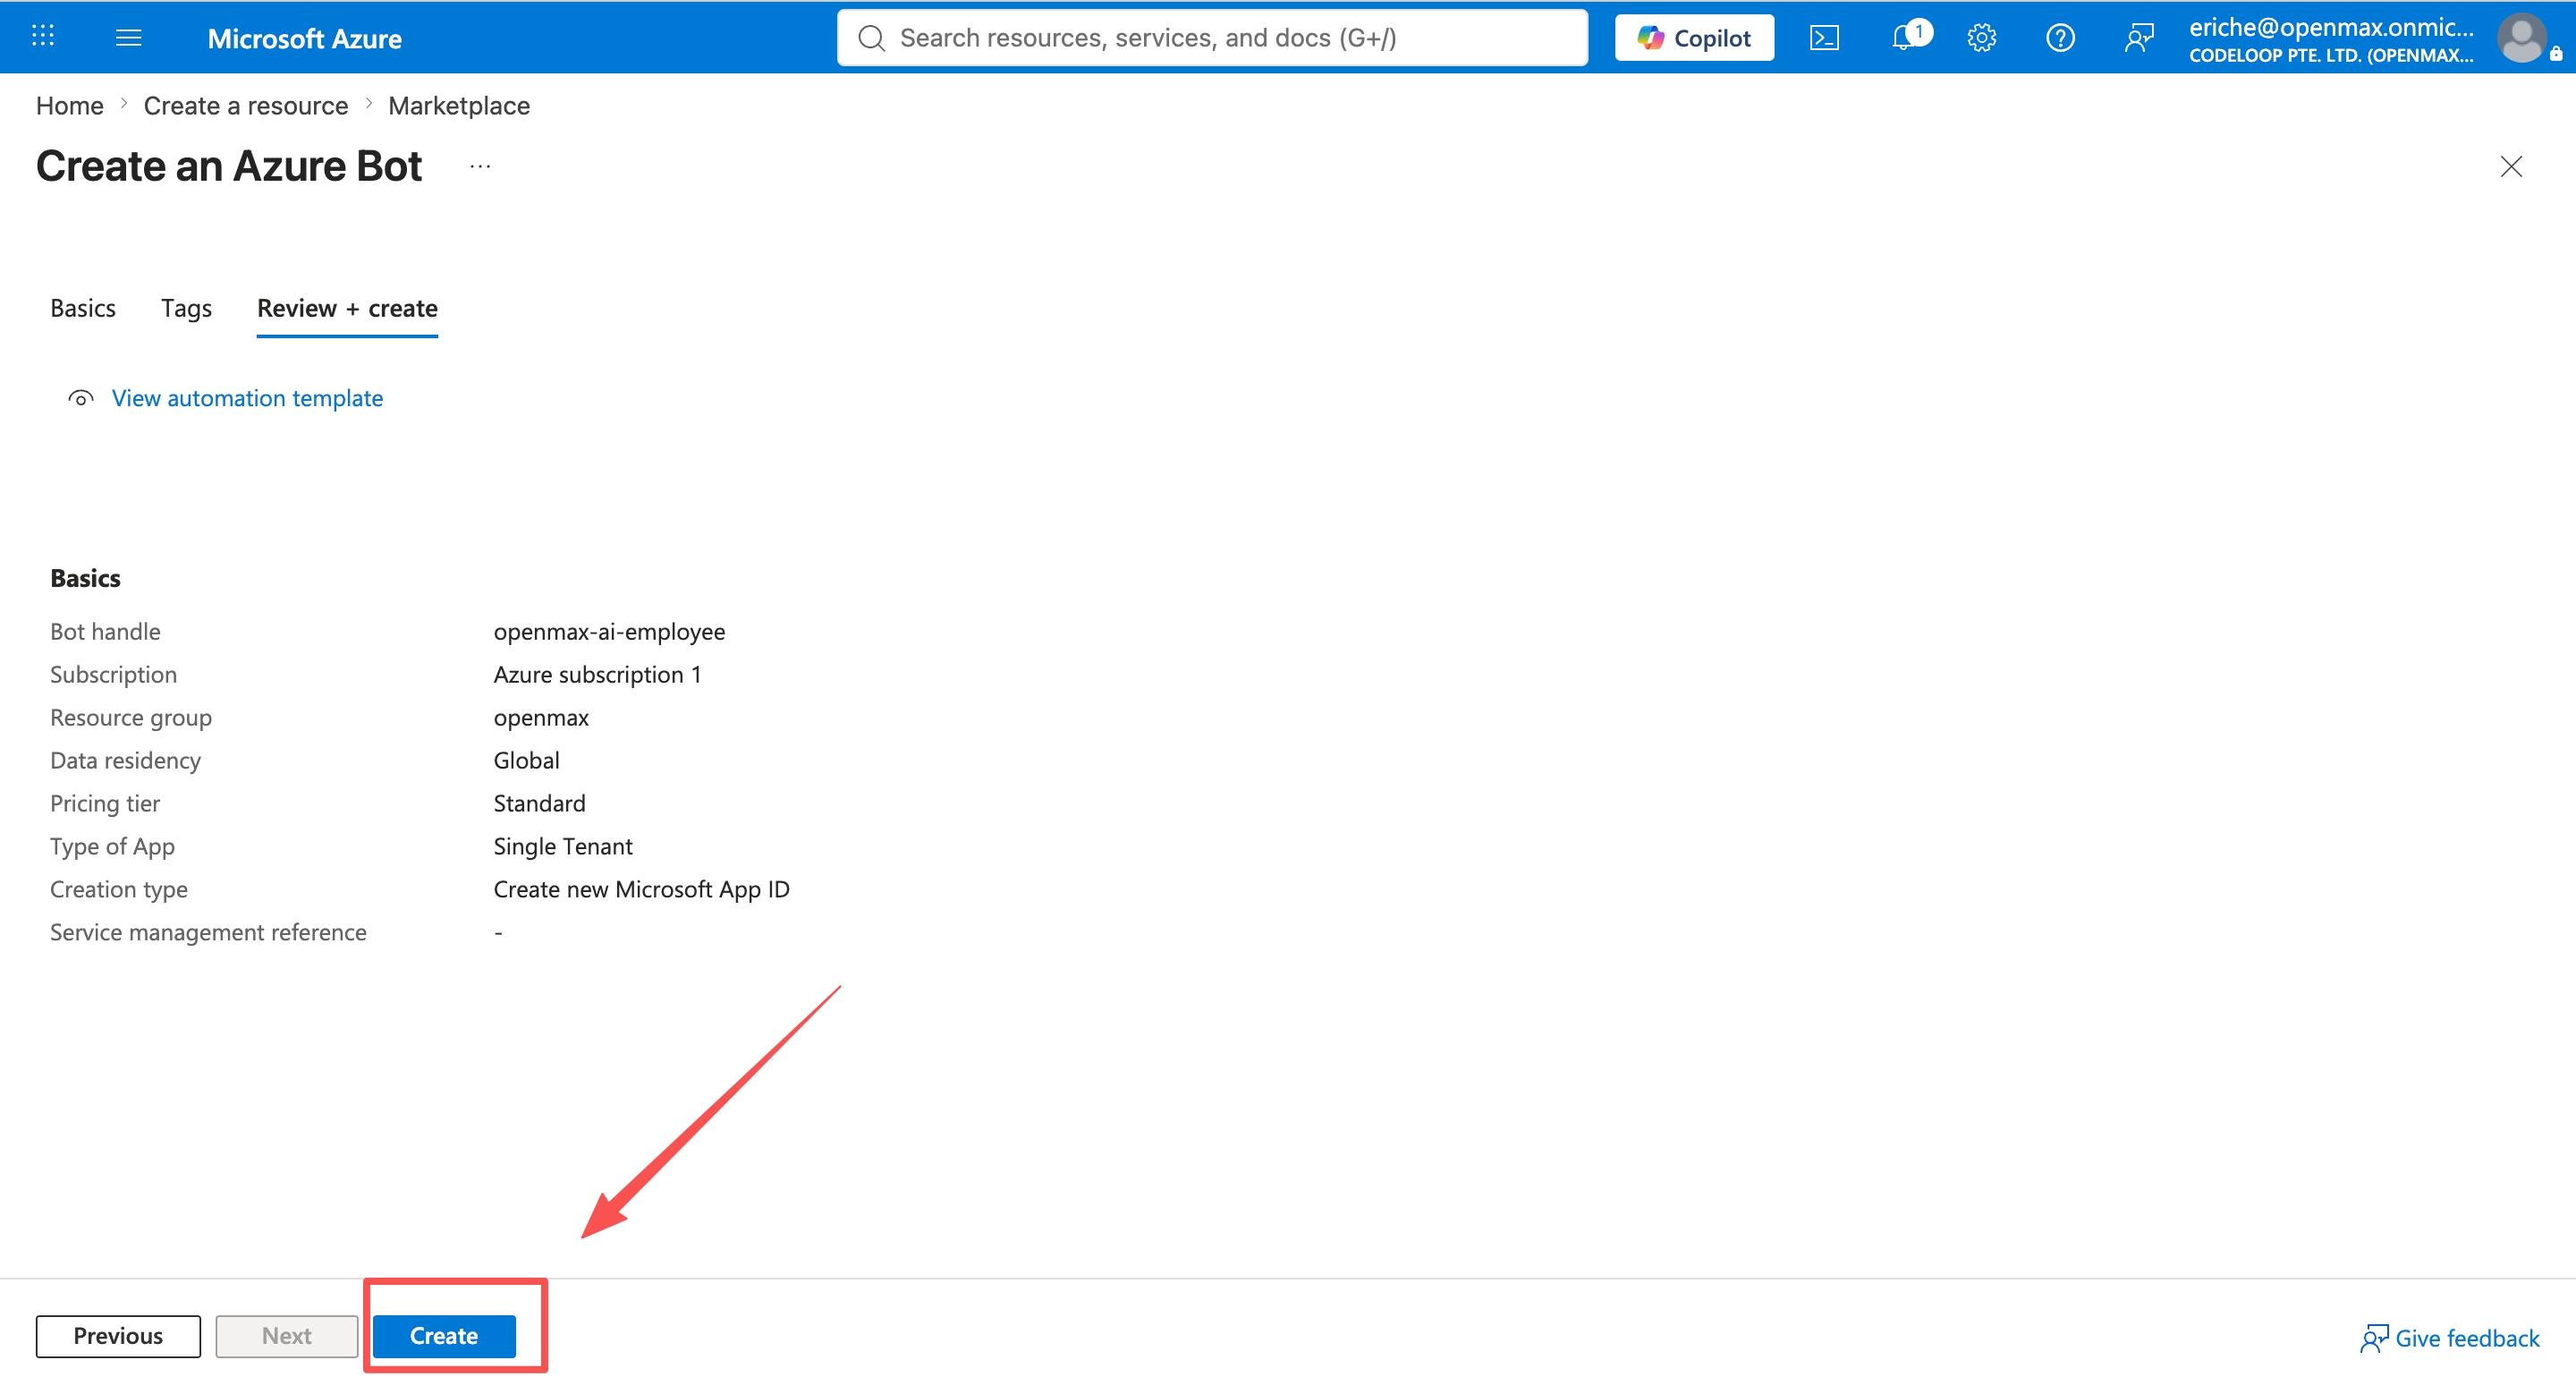
Then click Review + create, and after validation passes, click Create.
- Bot handle: a unique name, e.g.
When the deployment completes, click Go to resource.
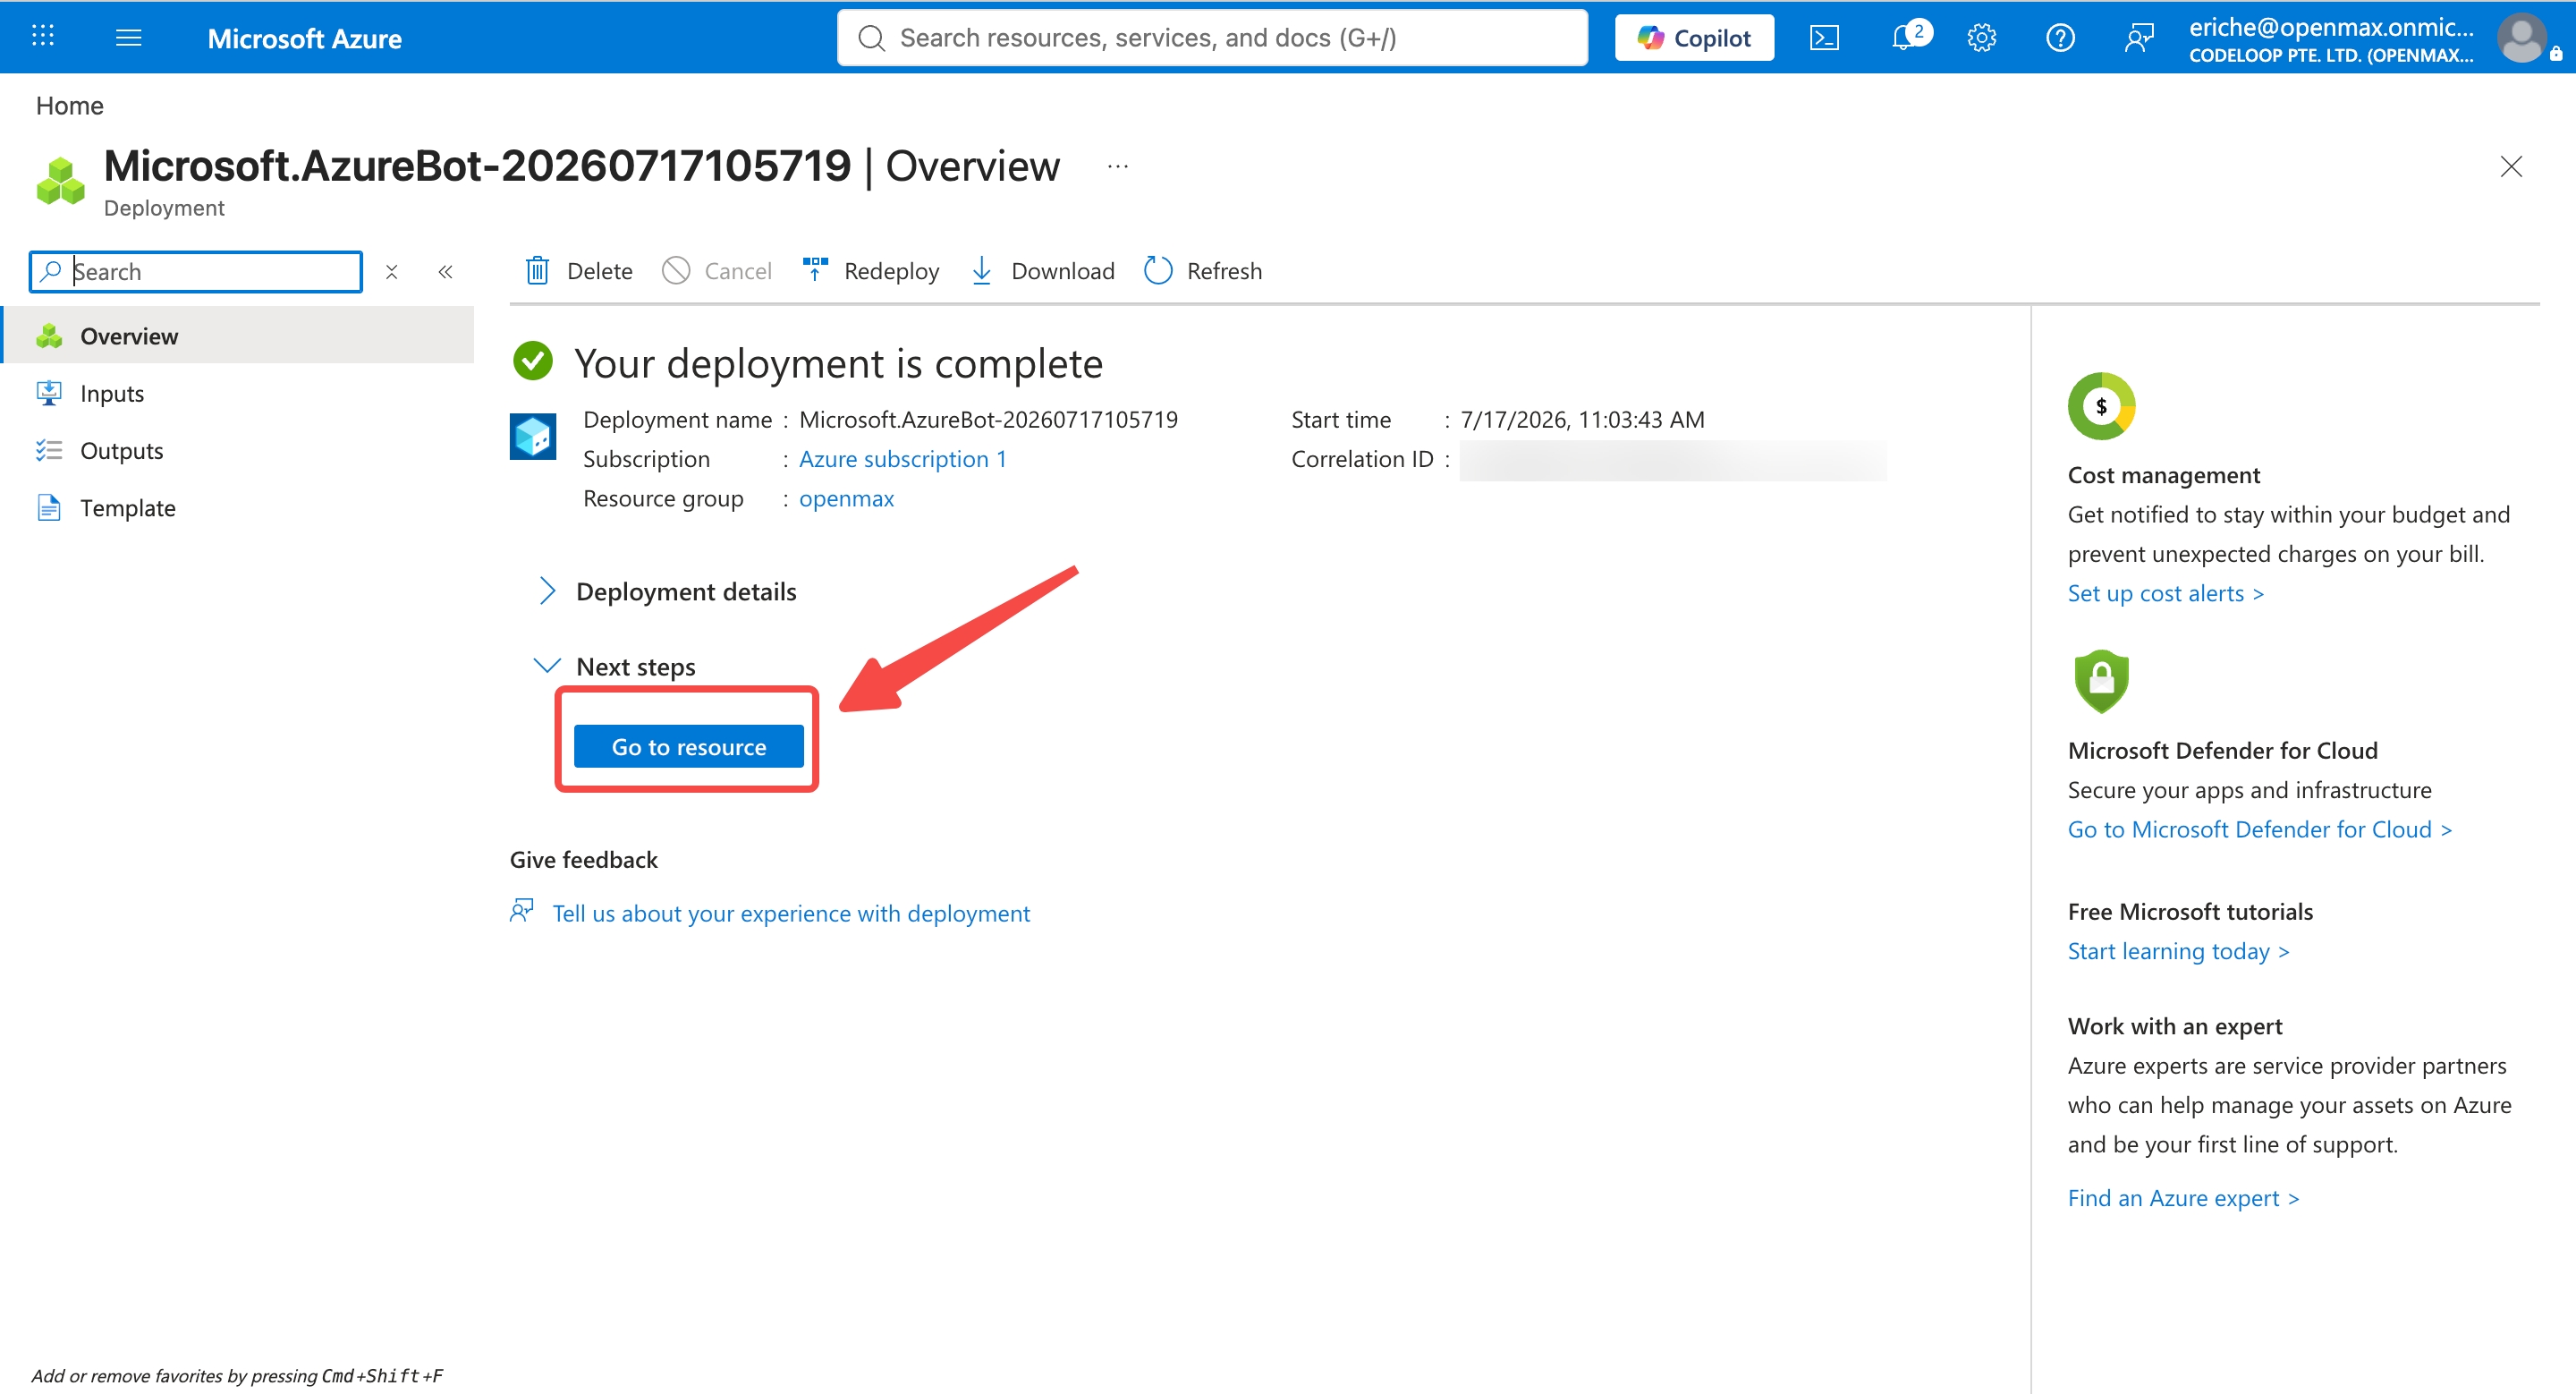
Creating the bot automatically creates an App Registration in Microsoft Entra ID — you will configure it in Steps 4 and 5.
Step 2: Configure the Messaging Endpoint and Note Your Credentials
In your Azure Bot resource, click Settings → Configuration. You will fill in the endpoint here and copy two credentials into the OpenMax Dashboard.
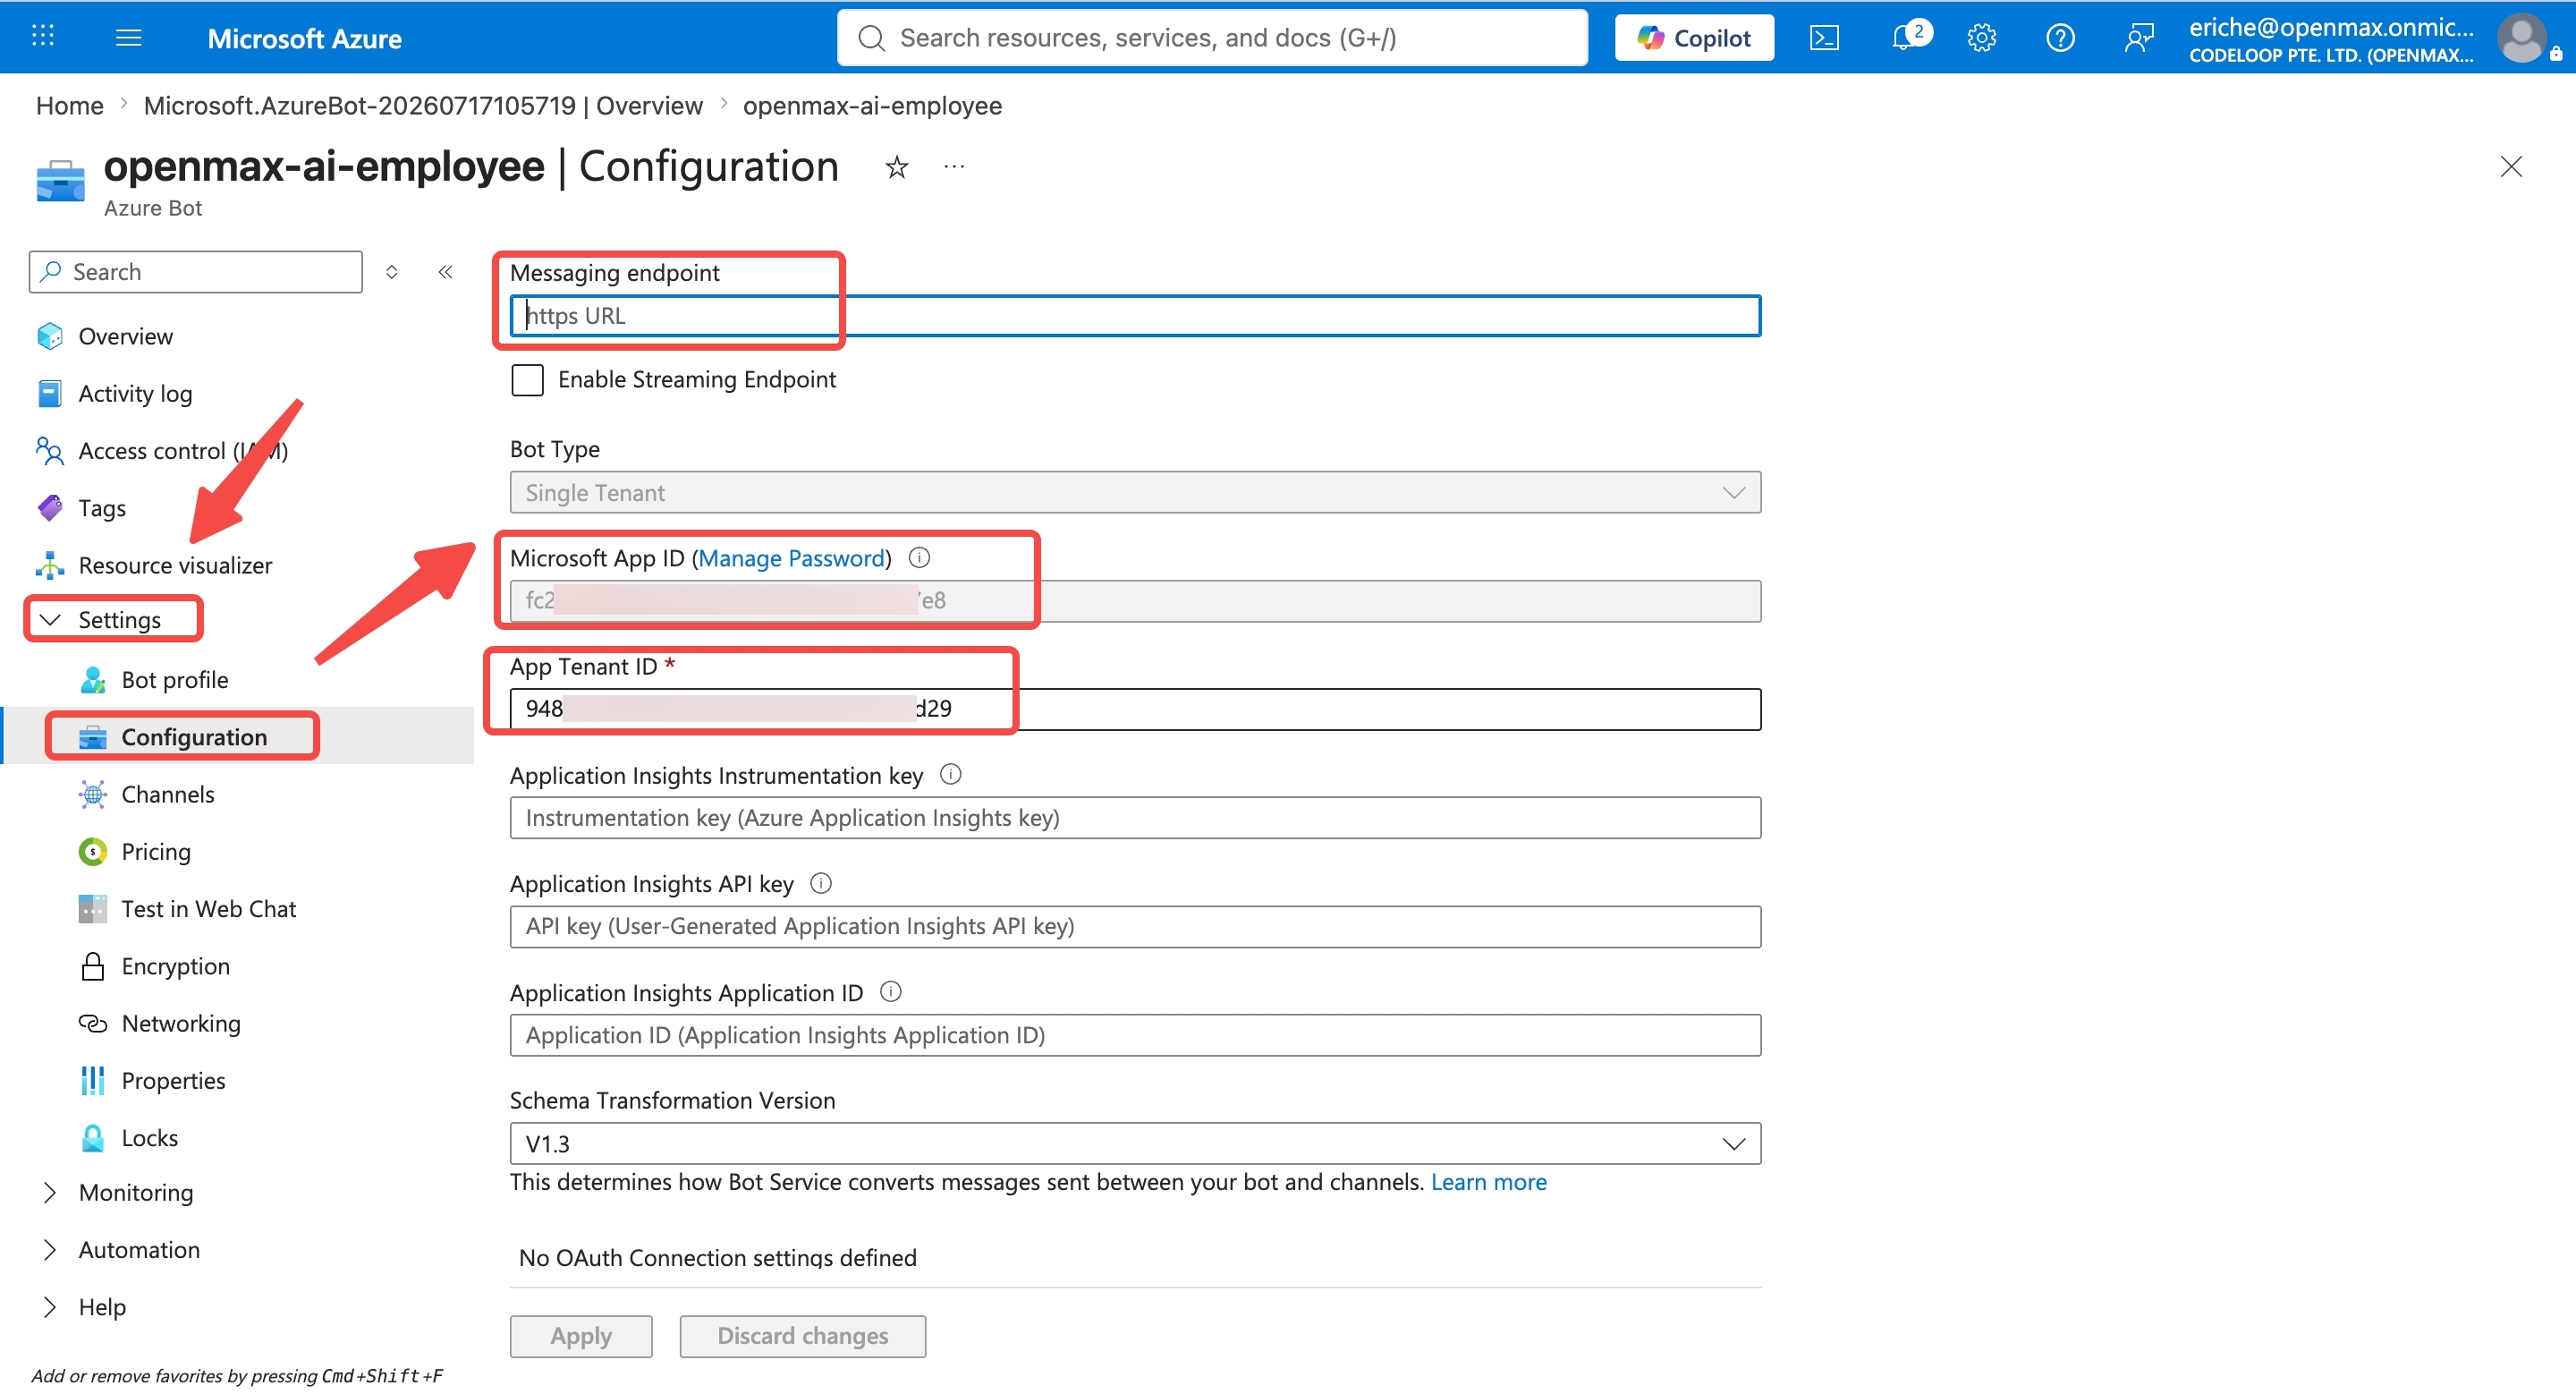
Set Messaging endpoint to the URL shown on the Microsoft Teams card in your OpenMax Dashboard → Channels page (it looks like
https://<your-agent-domain>/ms-teams/api/messages). Copy it from the Dashboard and paste it here.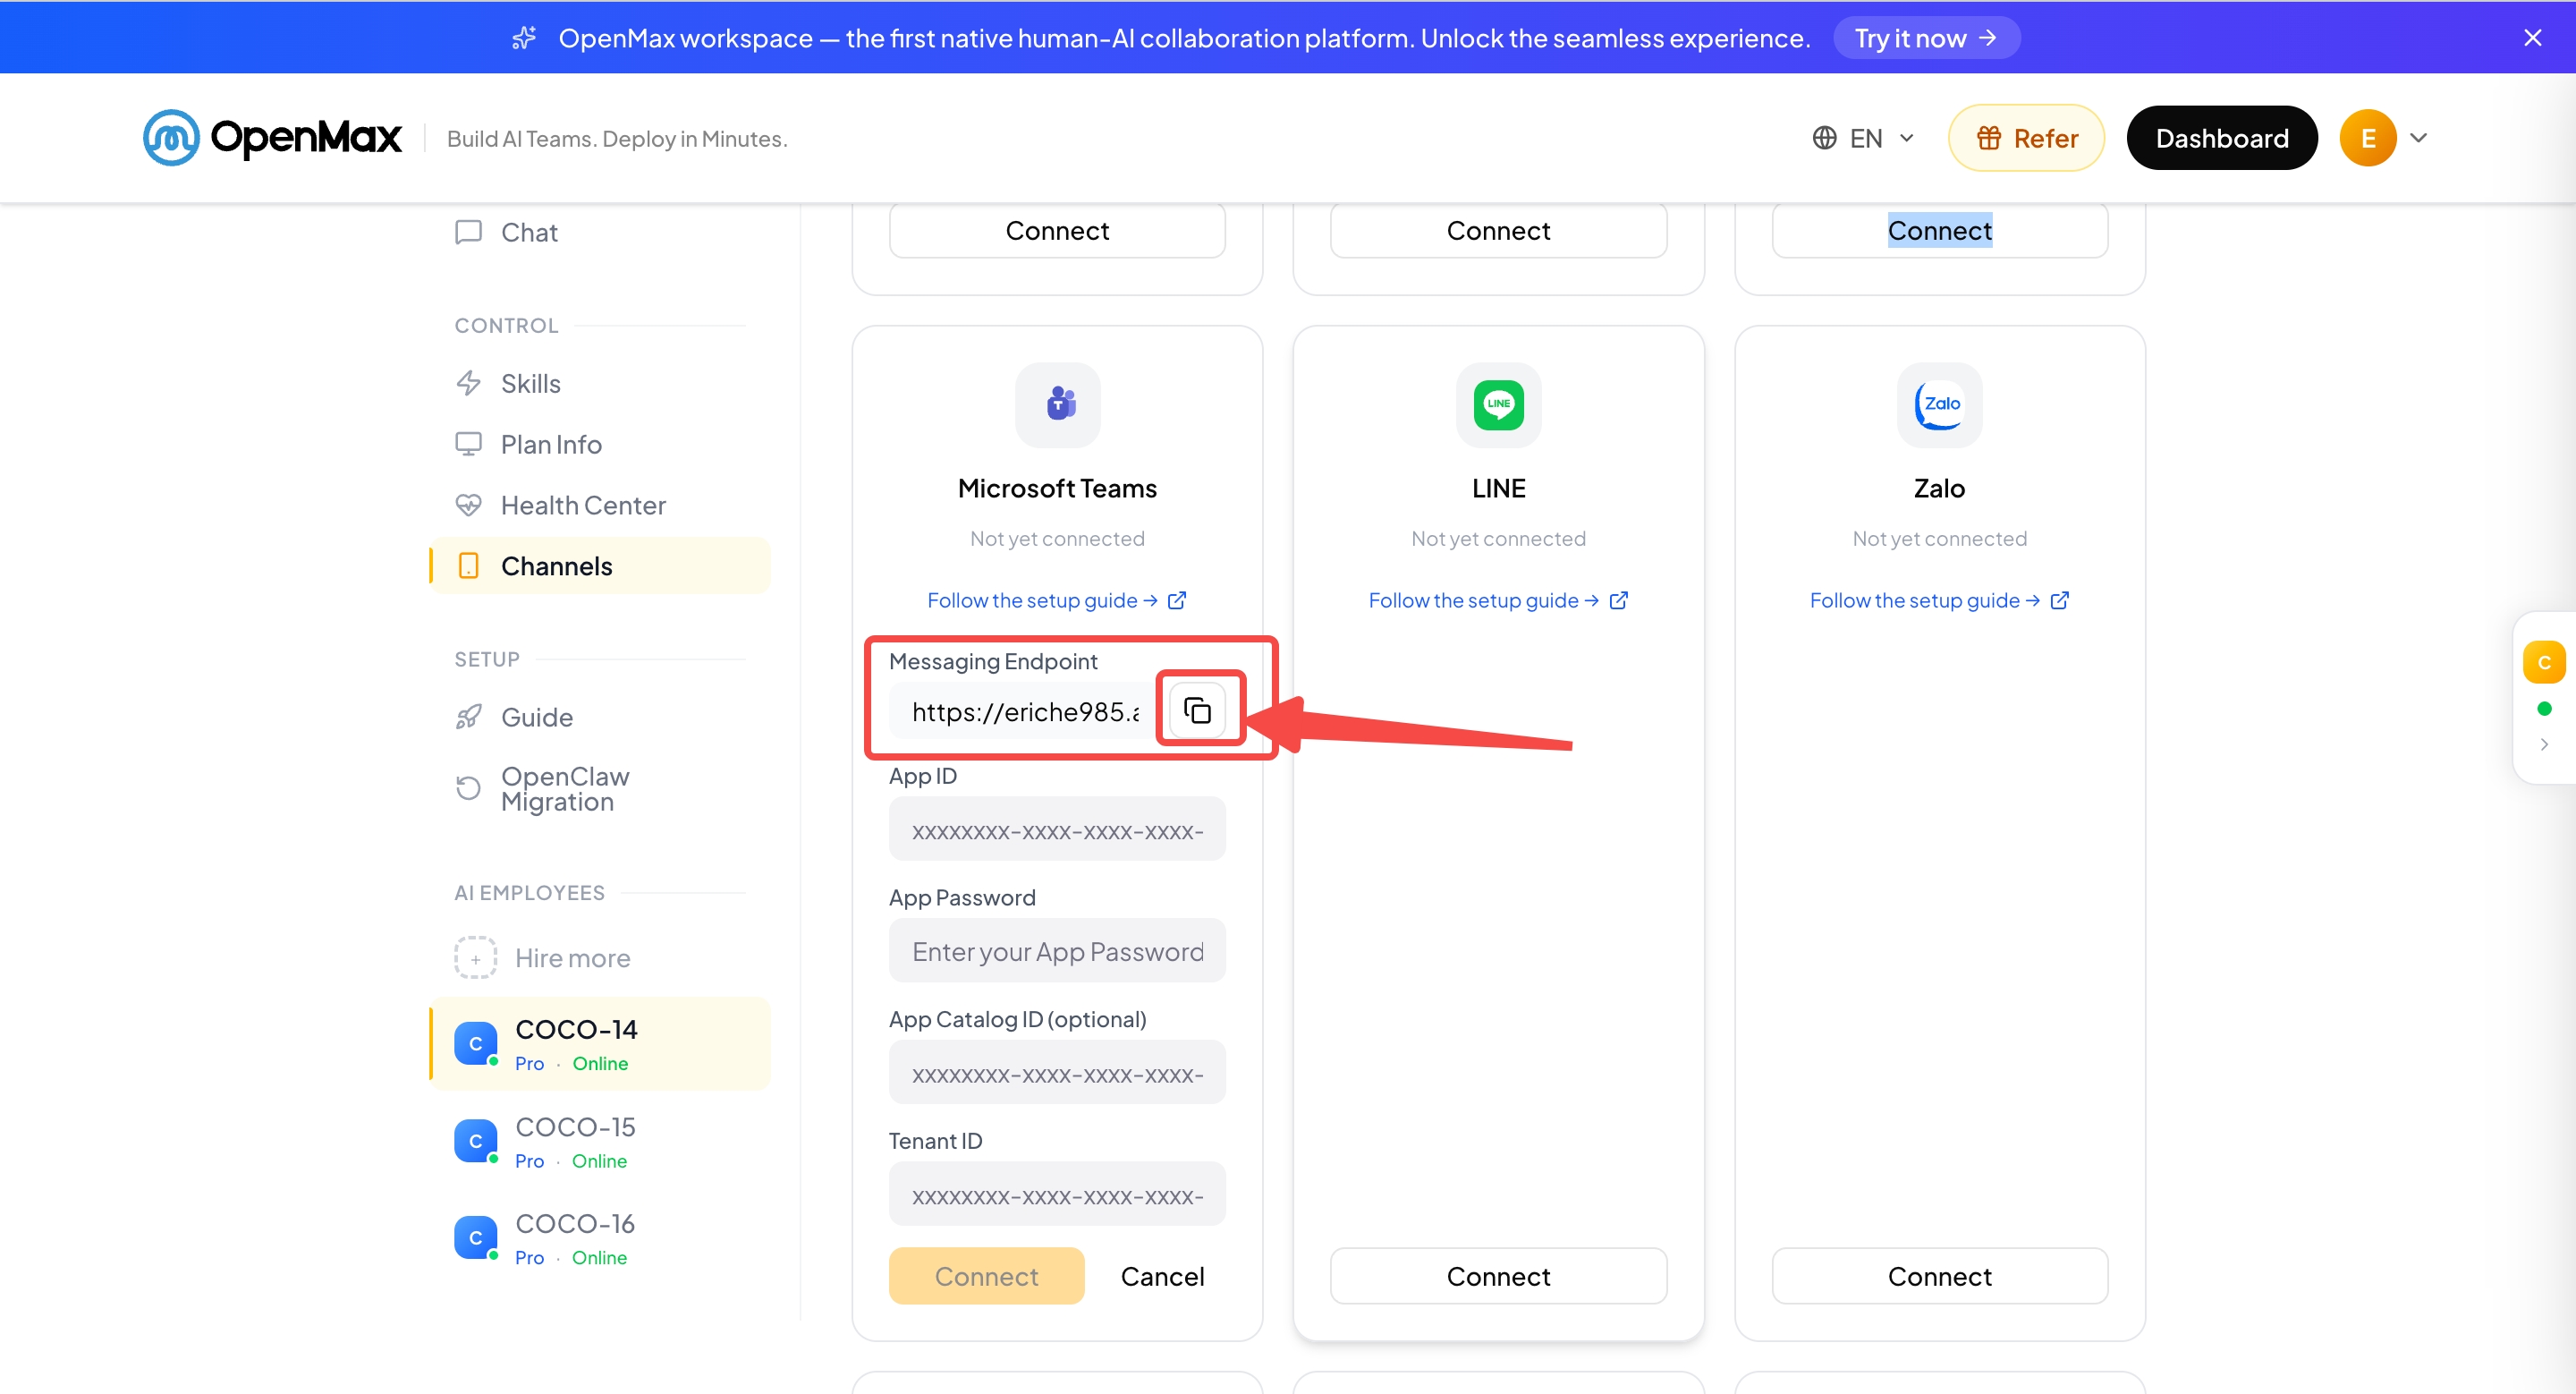
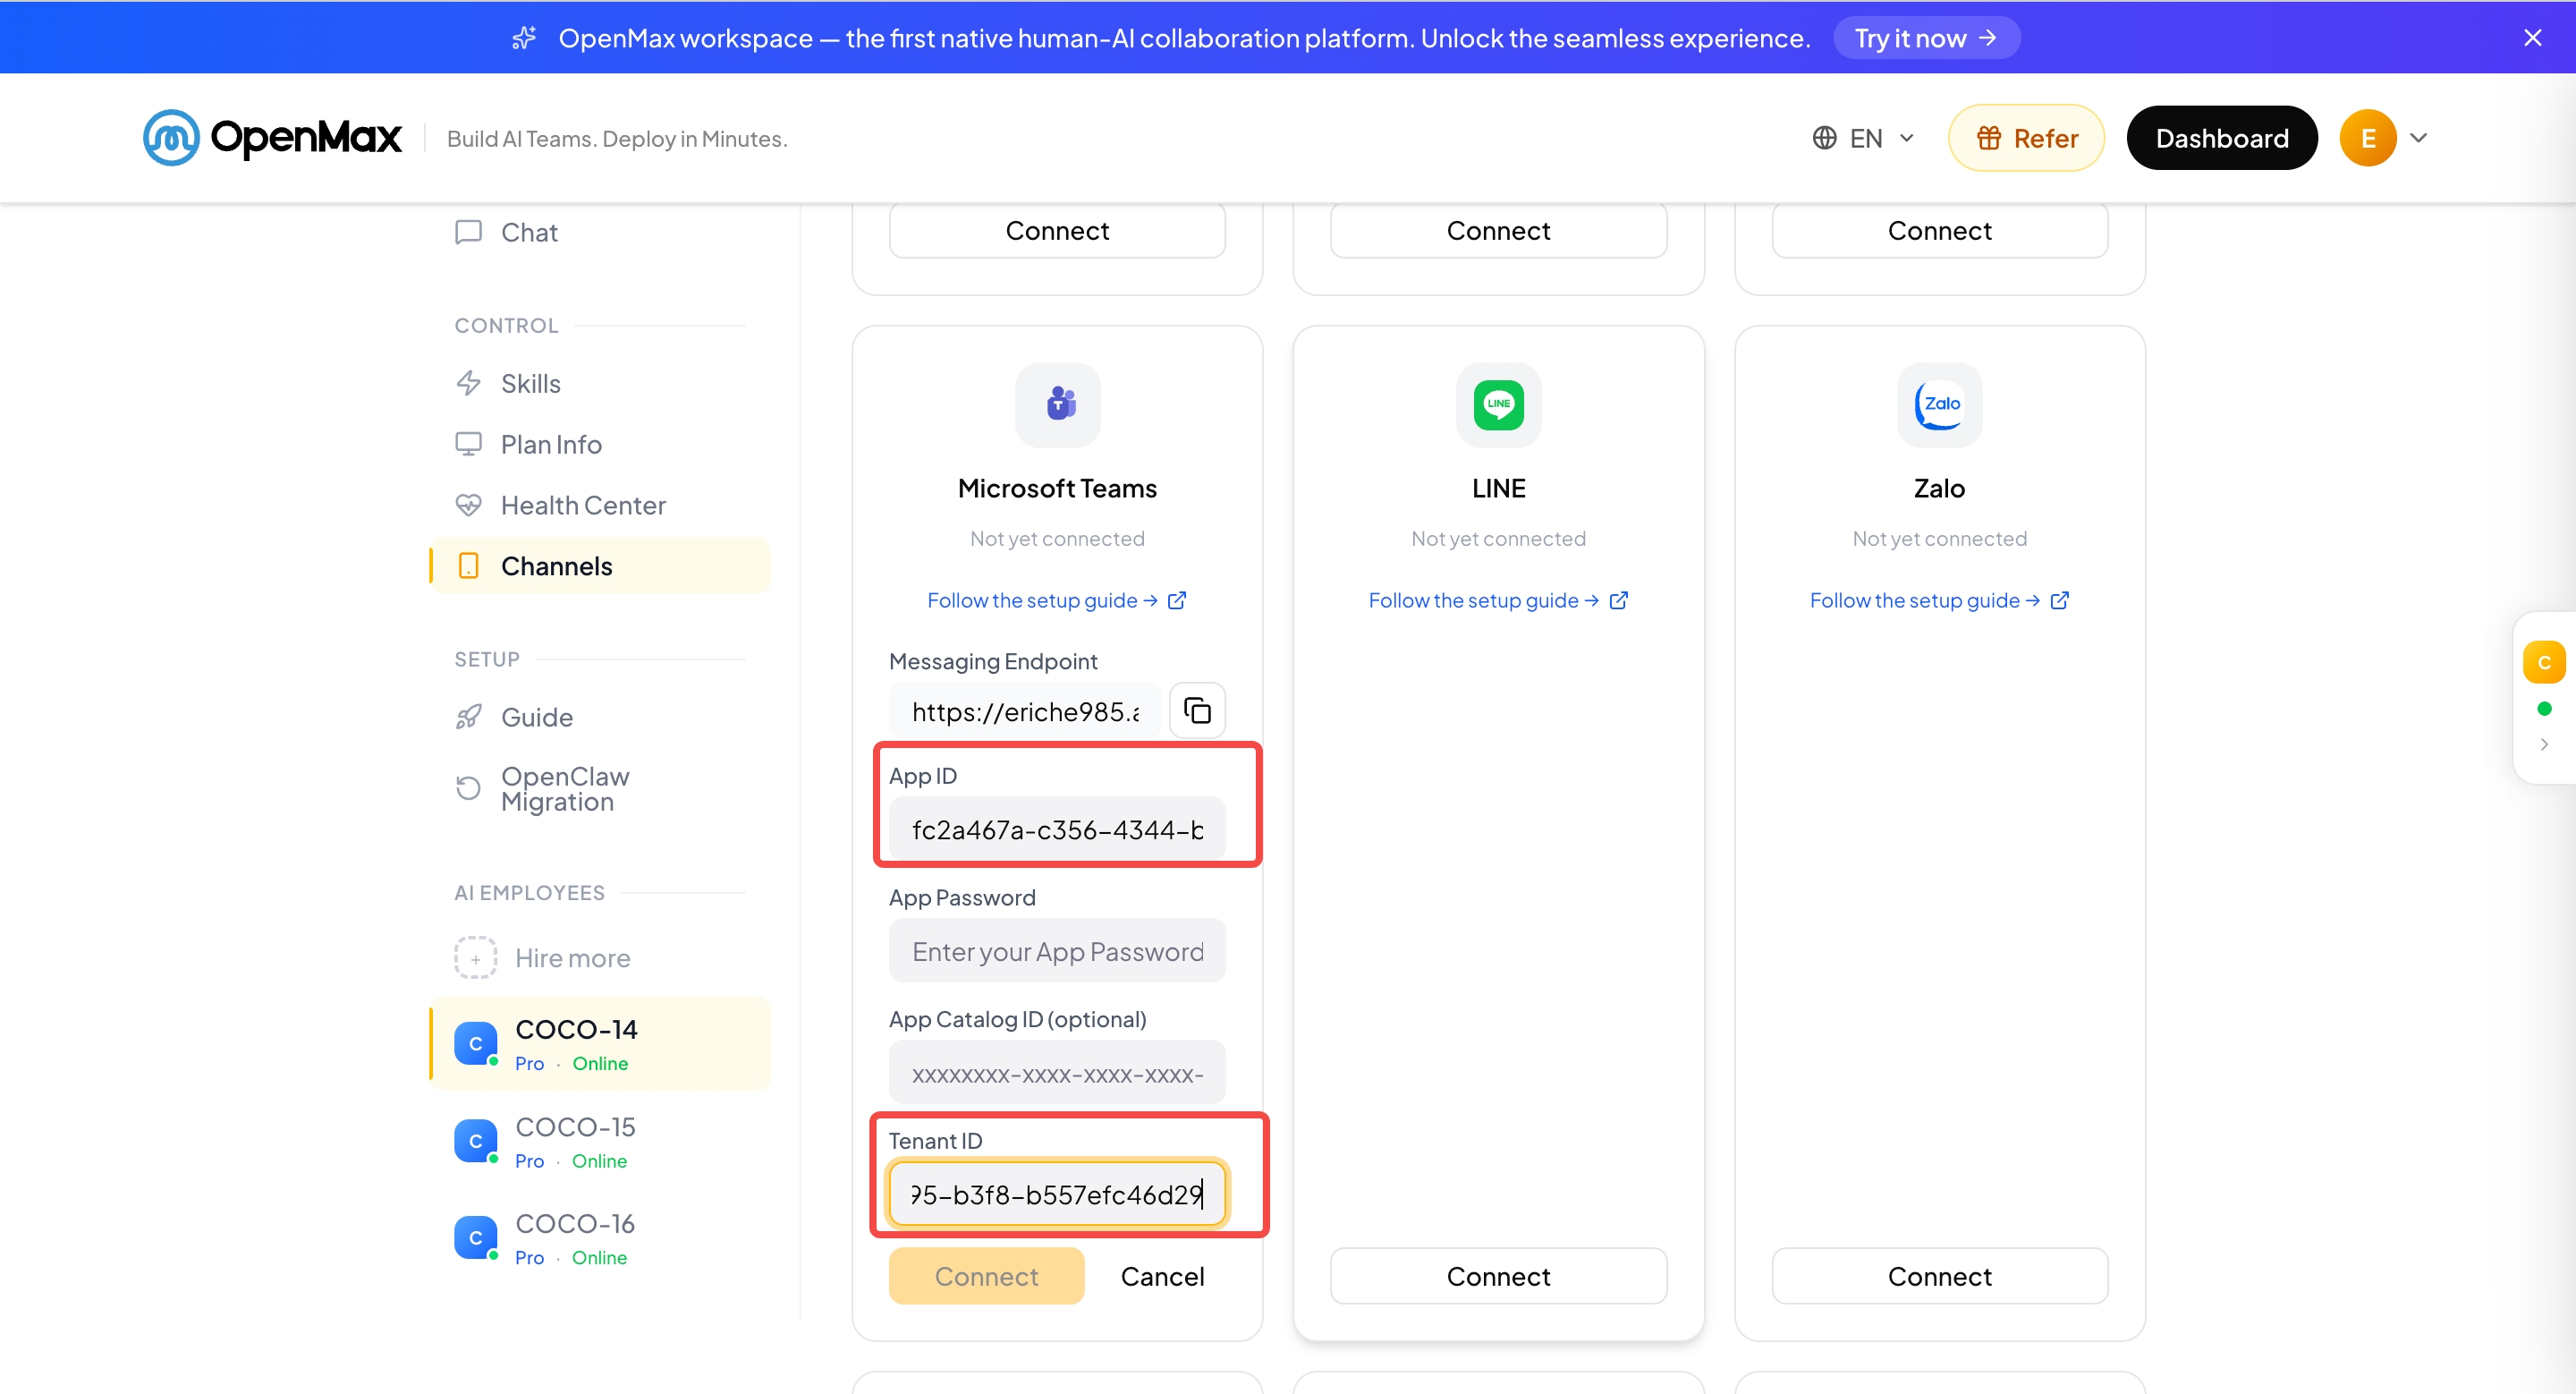
Note down the Microsoft App ID (this is your App ID) and the App Tenant ID (this is your Tenant ID). Paste both into the Microsoft Teams channel settings in the OpenMax Dashboard.
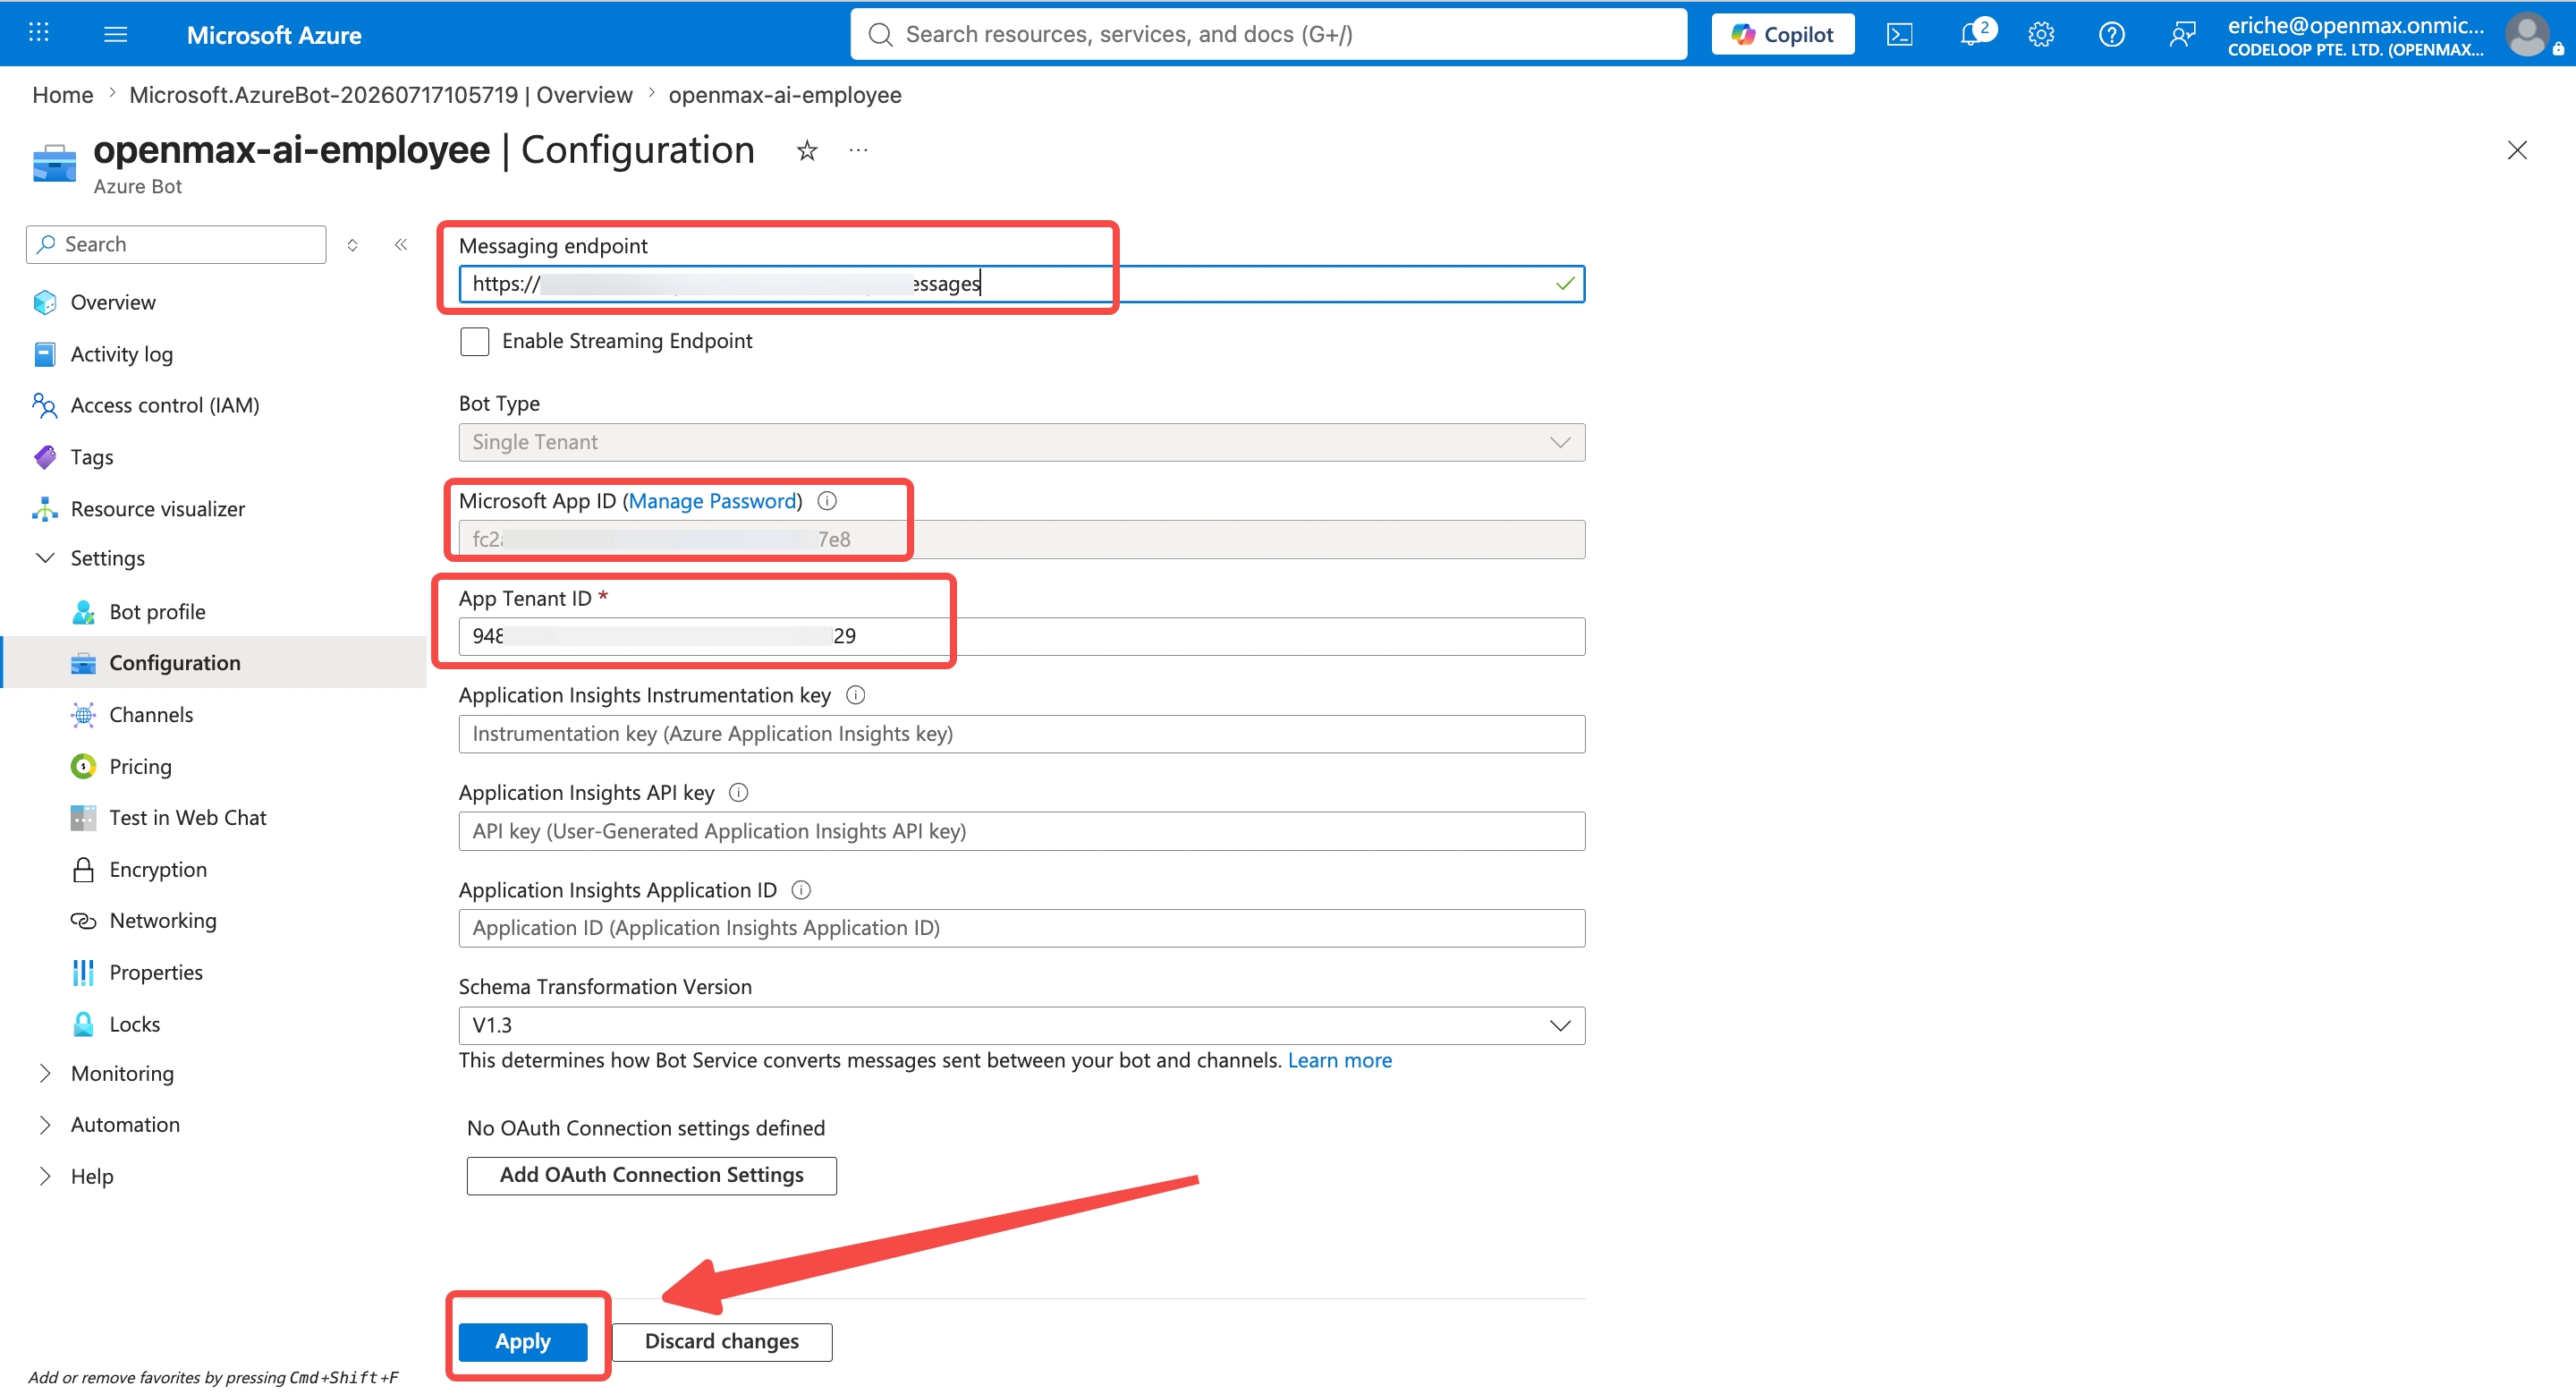
When everything is filled in, click Apply.
Step 3: Enable the Microsoft Teams Channel
Required and easy to miss — without this step, Teams will show an "Invalid Bot" error.
In your Azure Bot resource, click Settings → Channels, then find Microsoft Teams.
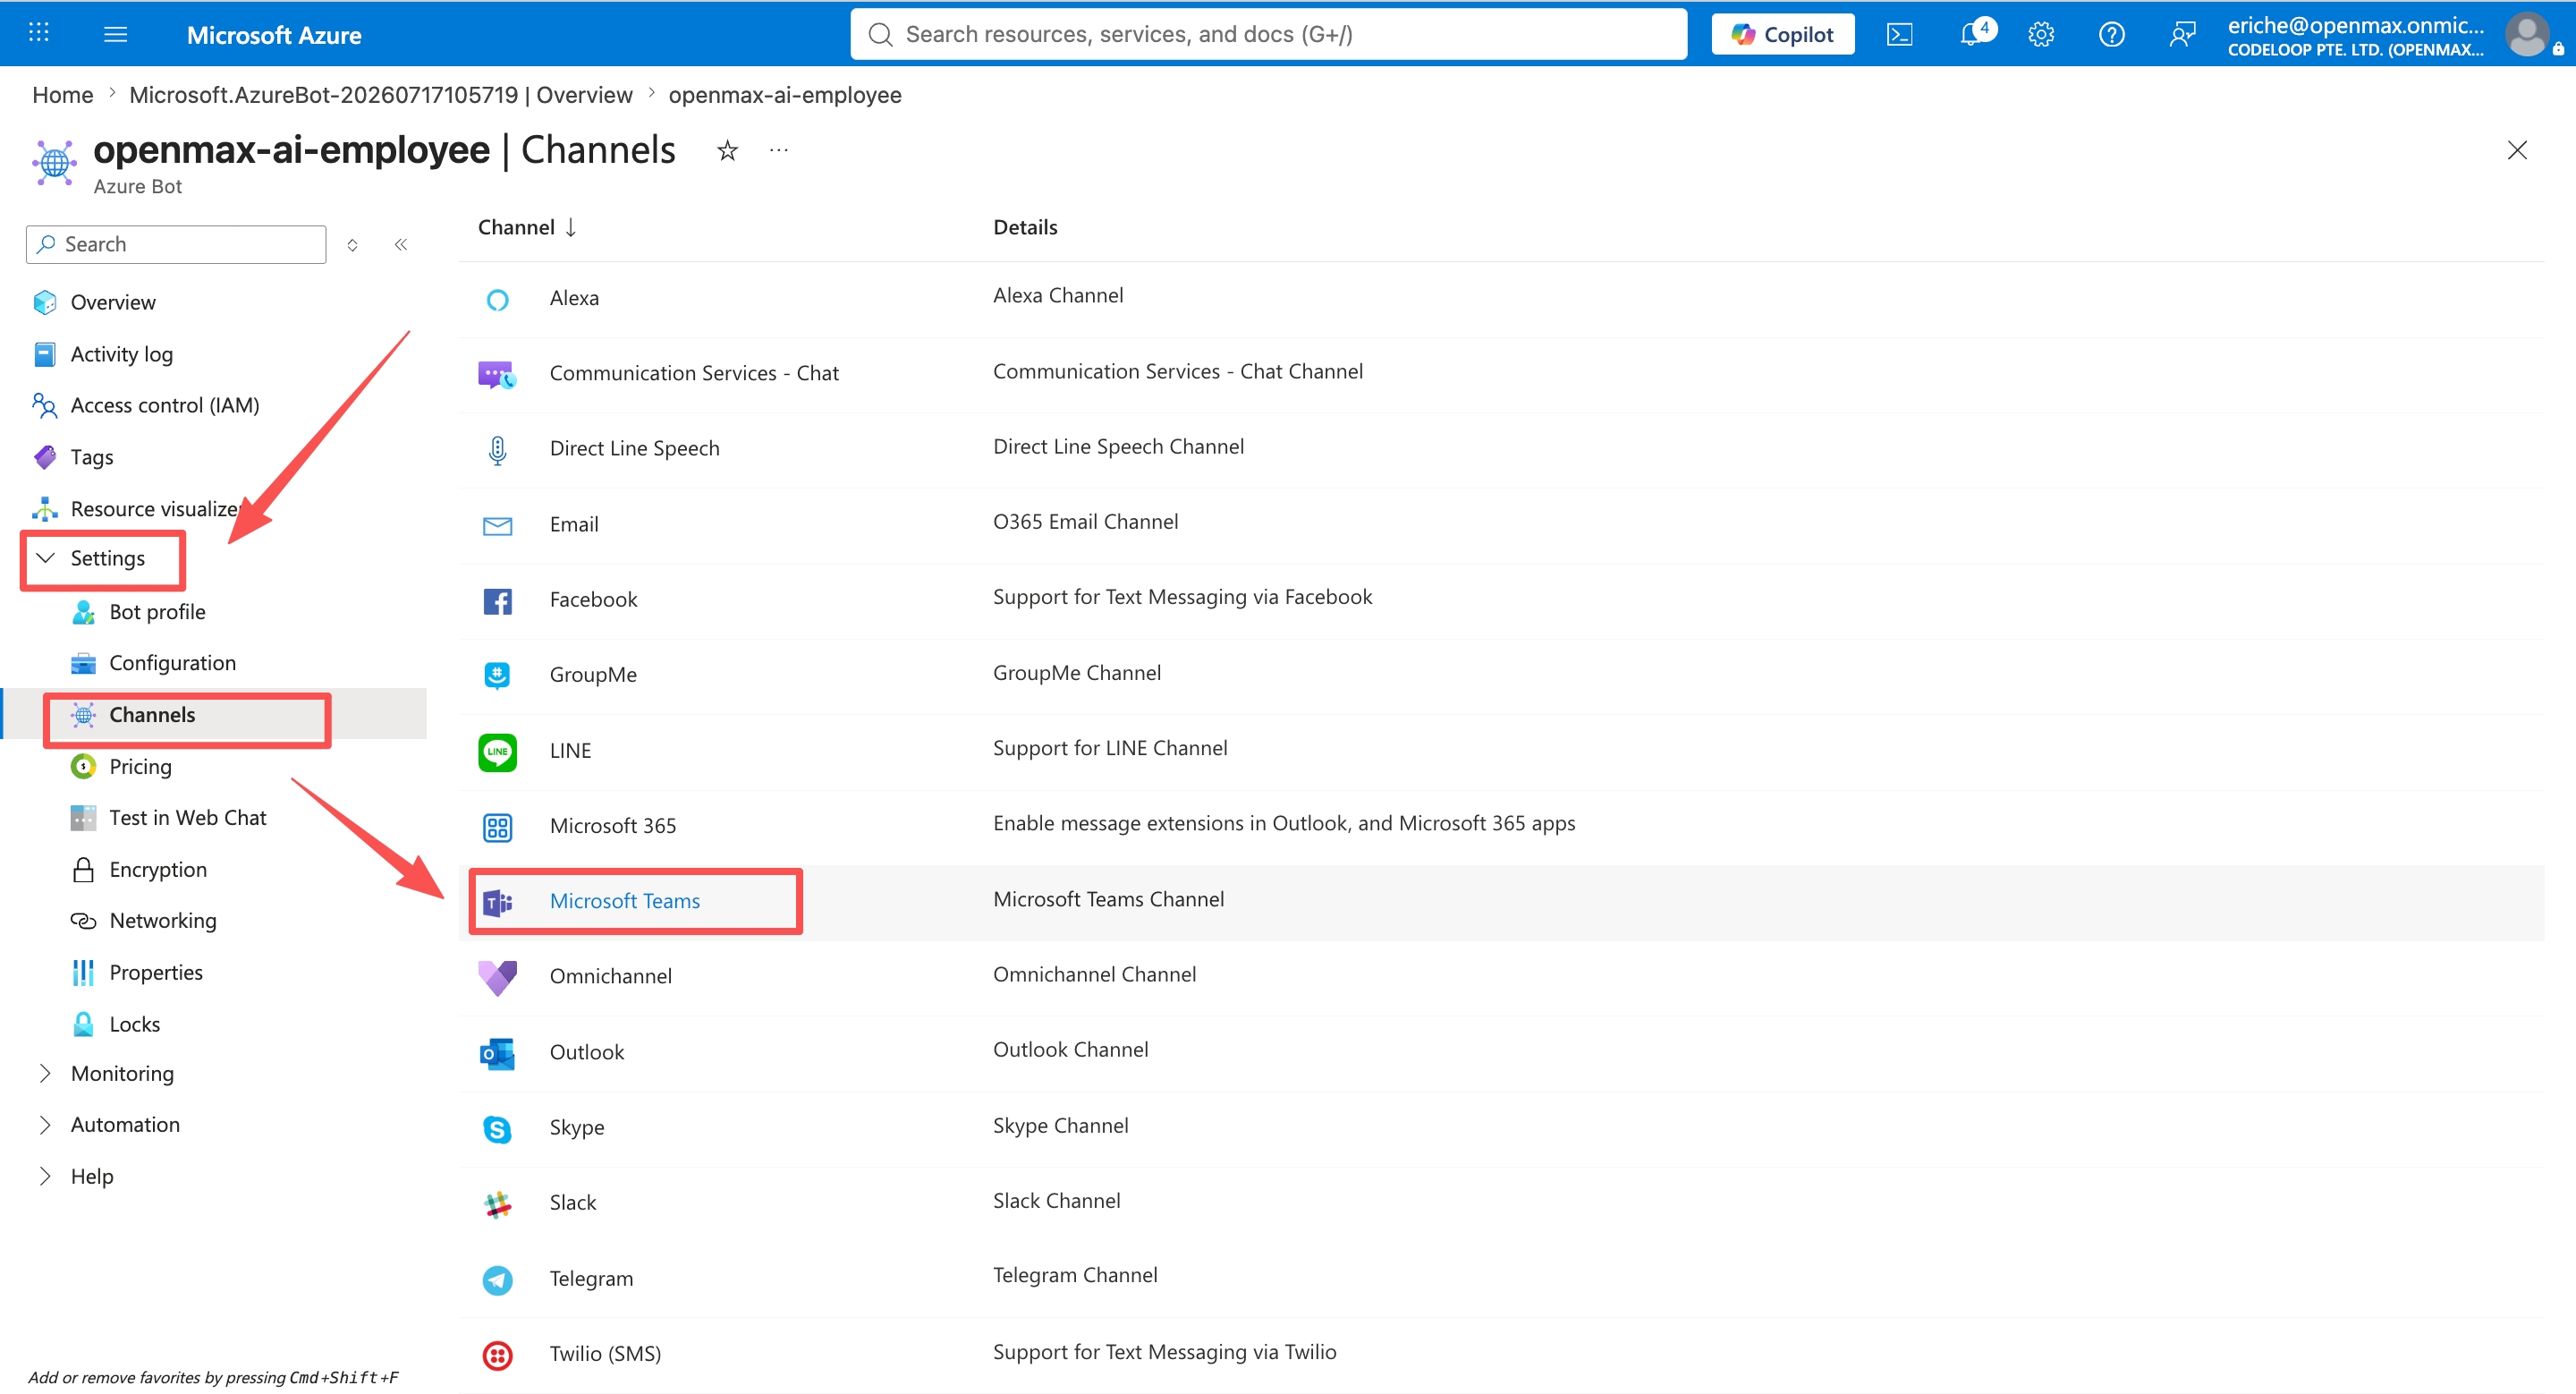
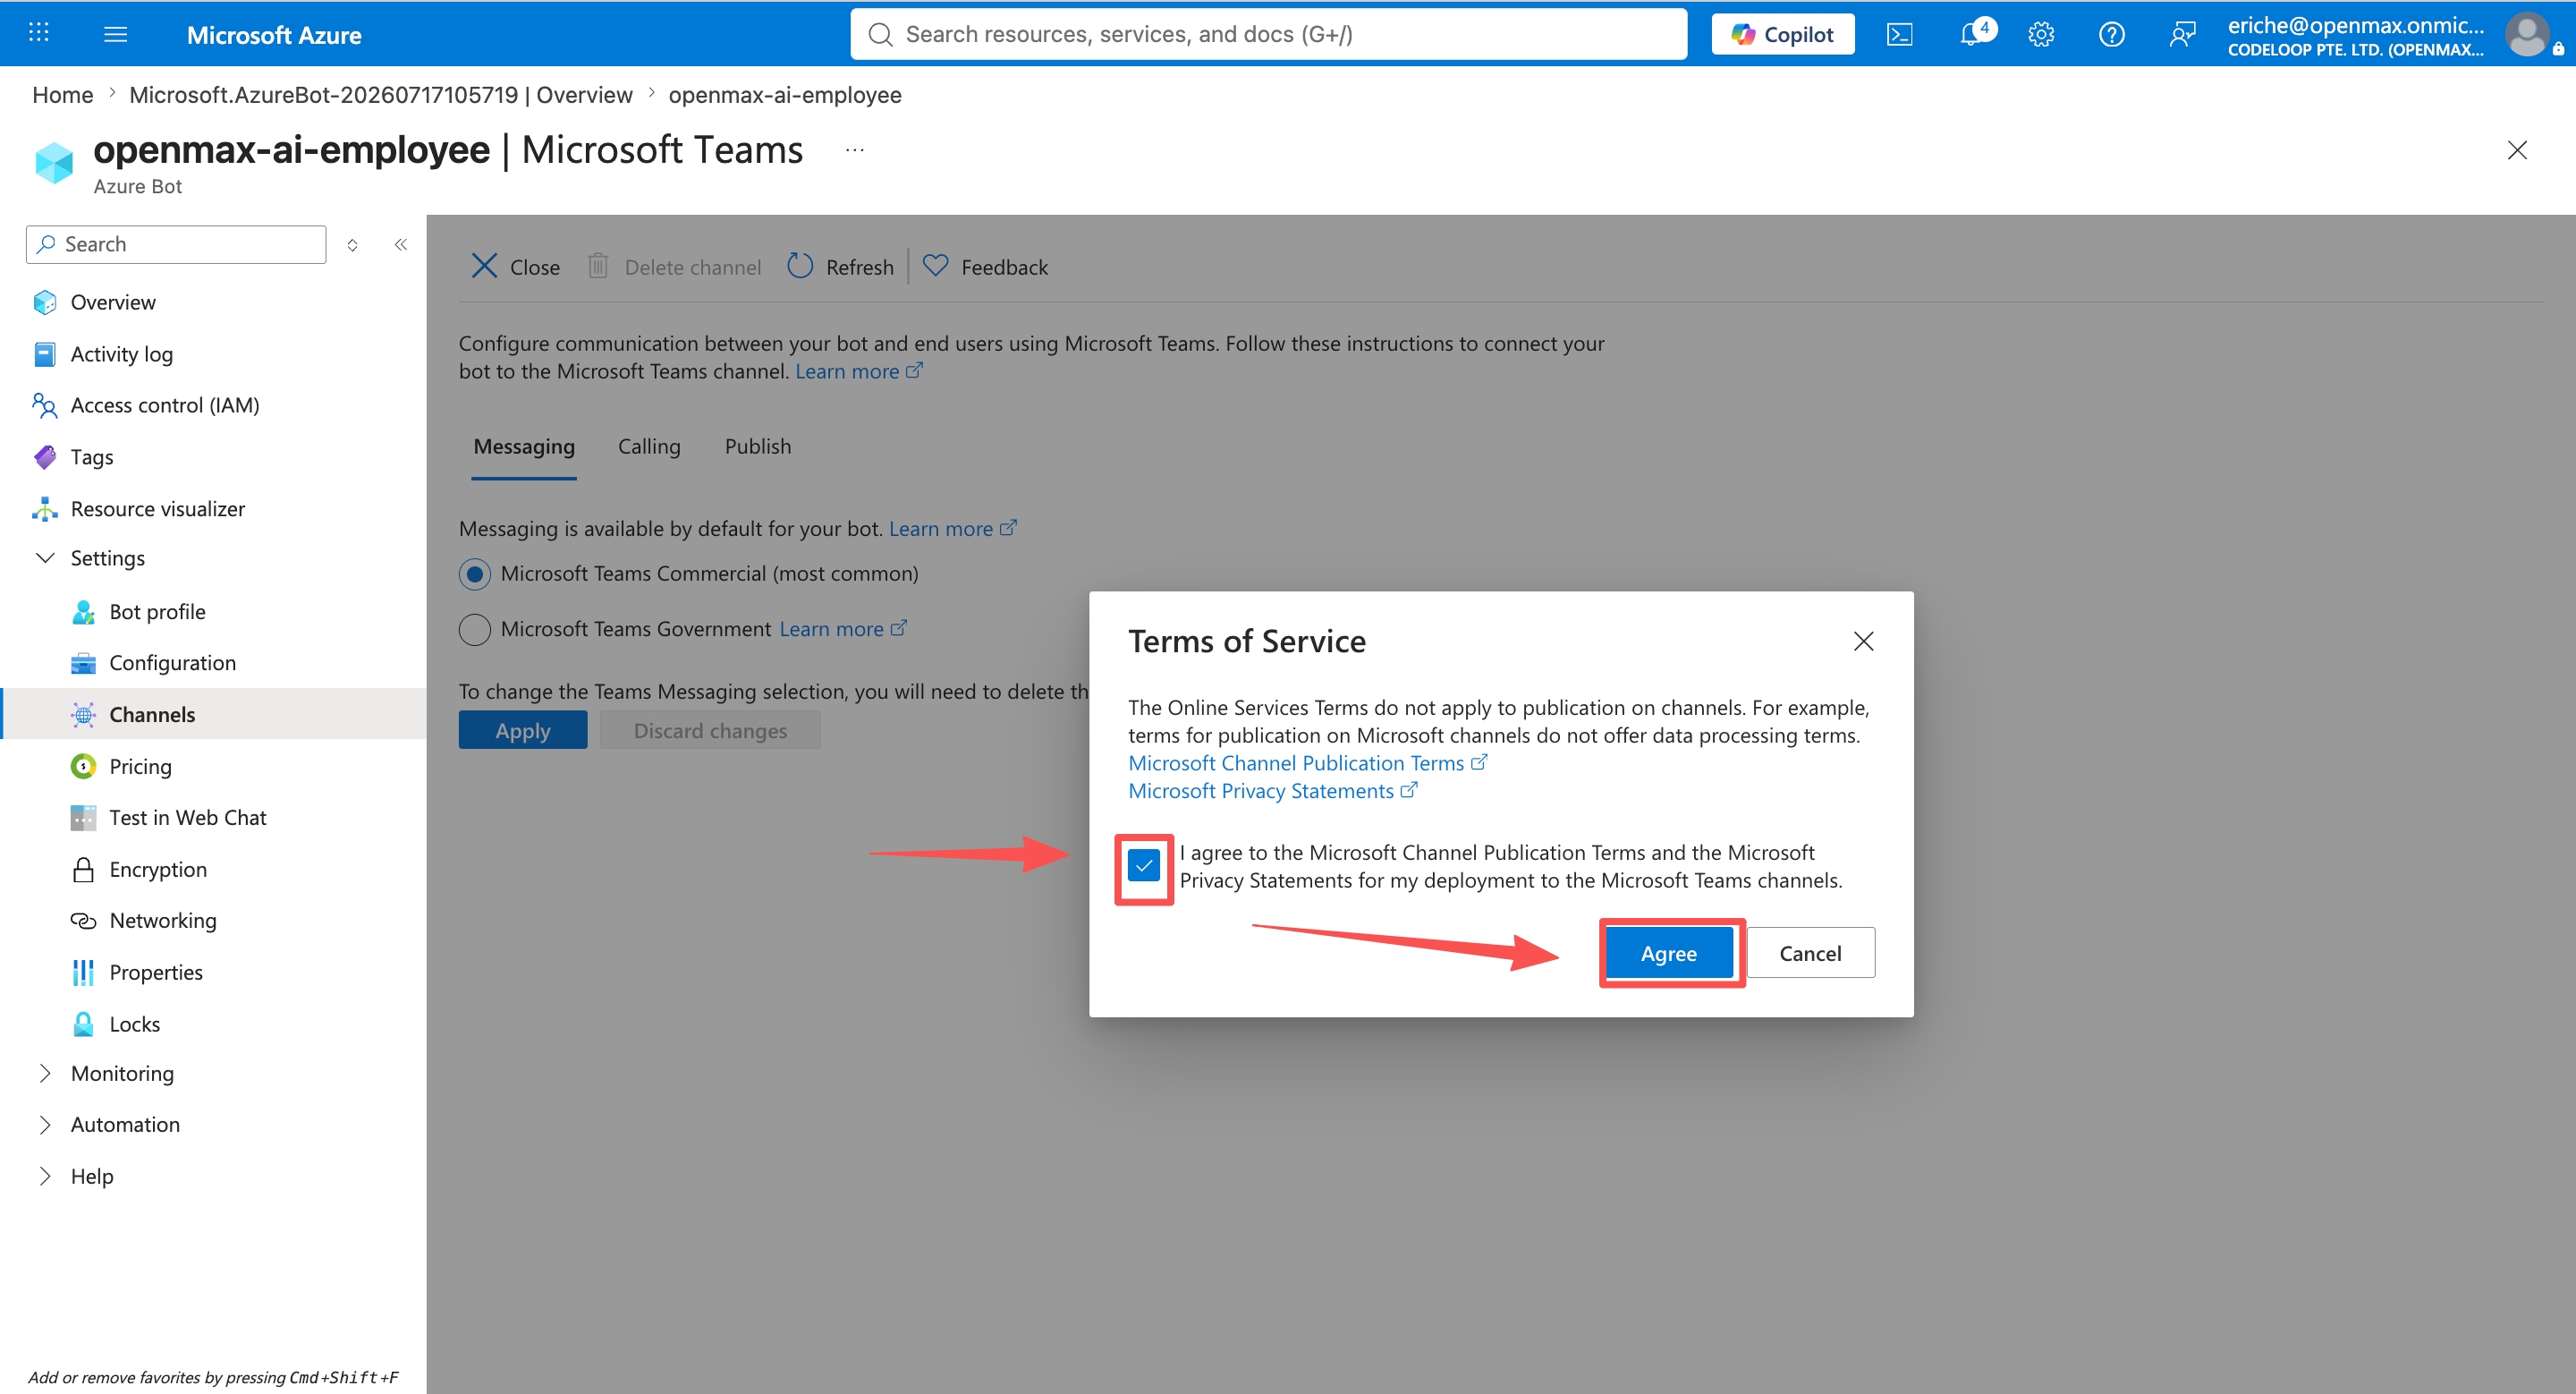
Read and accept the Terms of Service.
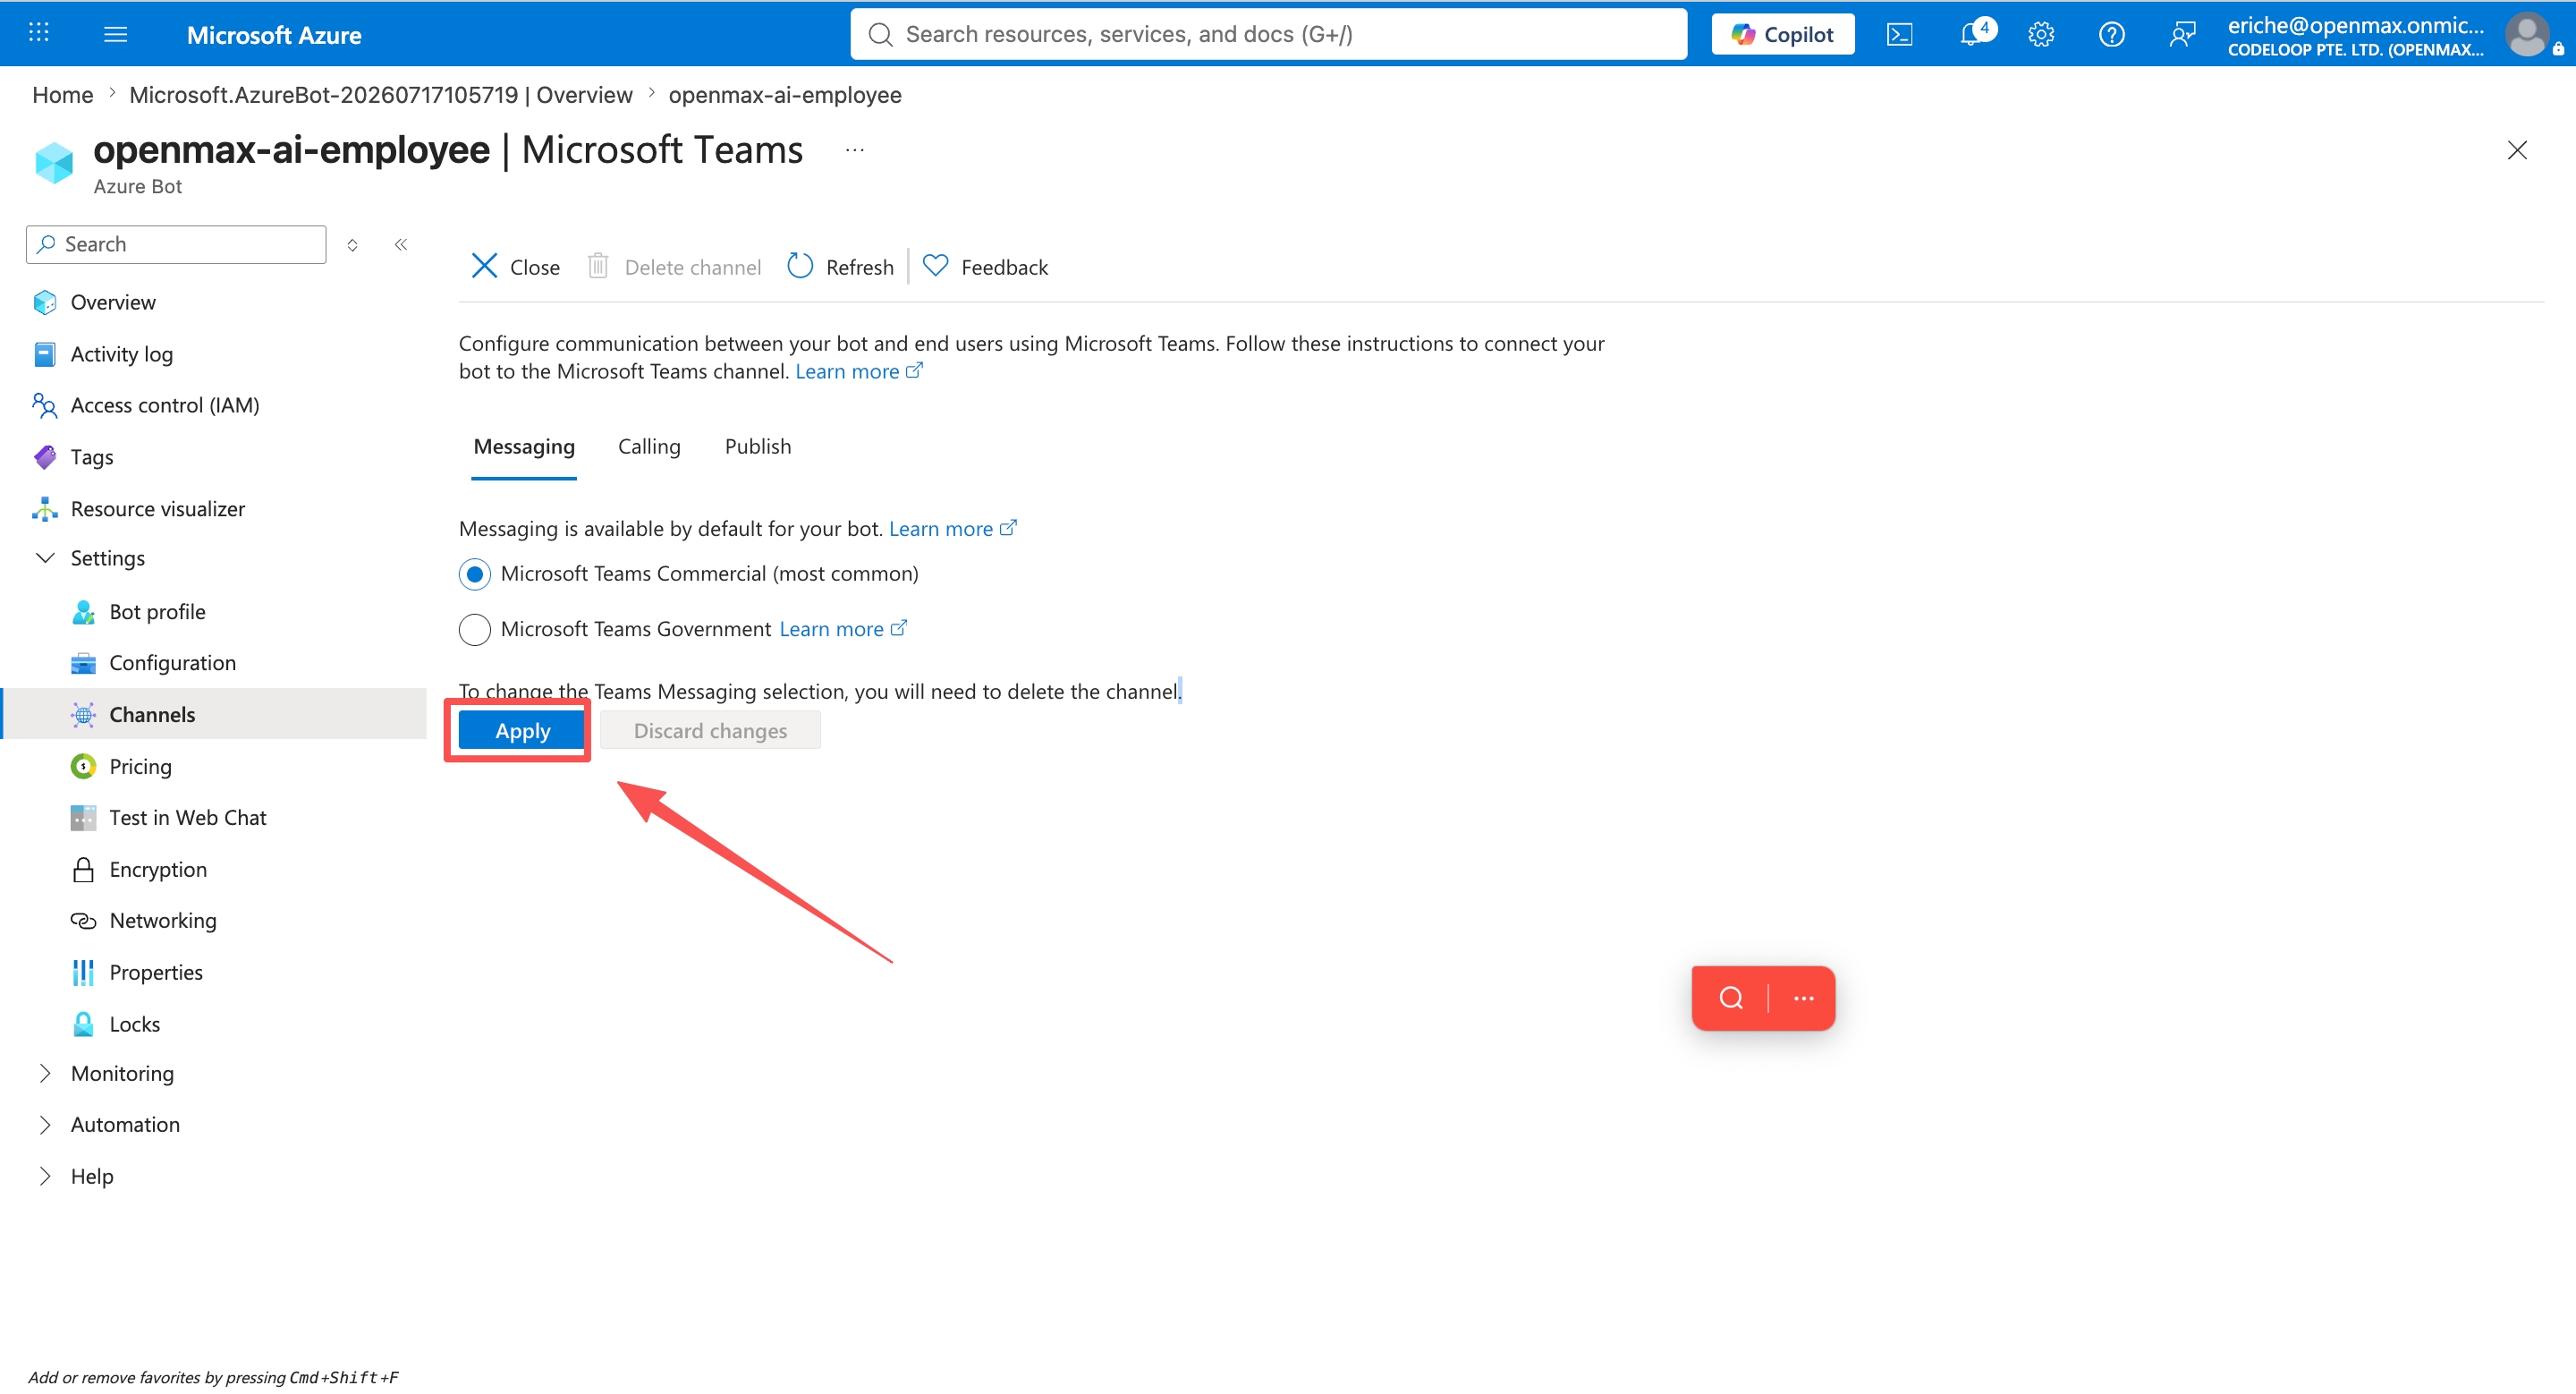
Click Apply. The channel should now show as Running.
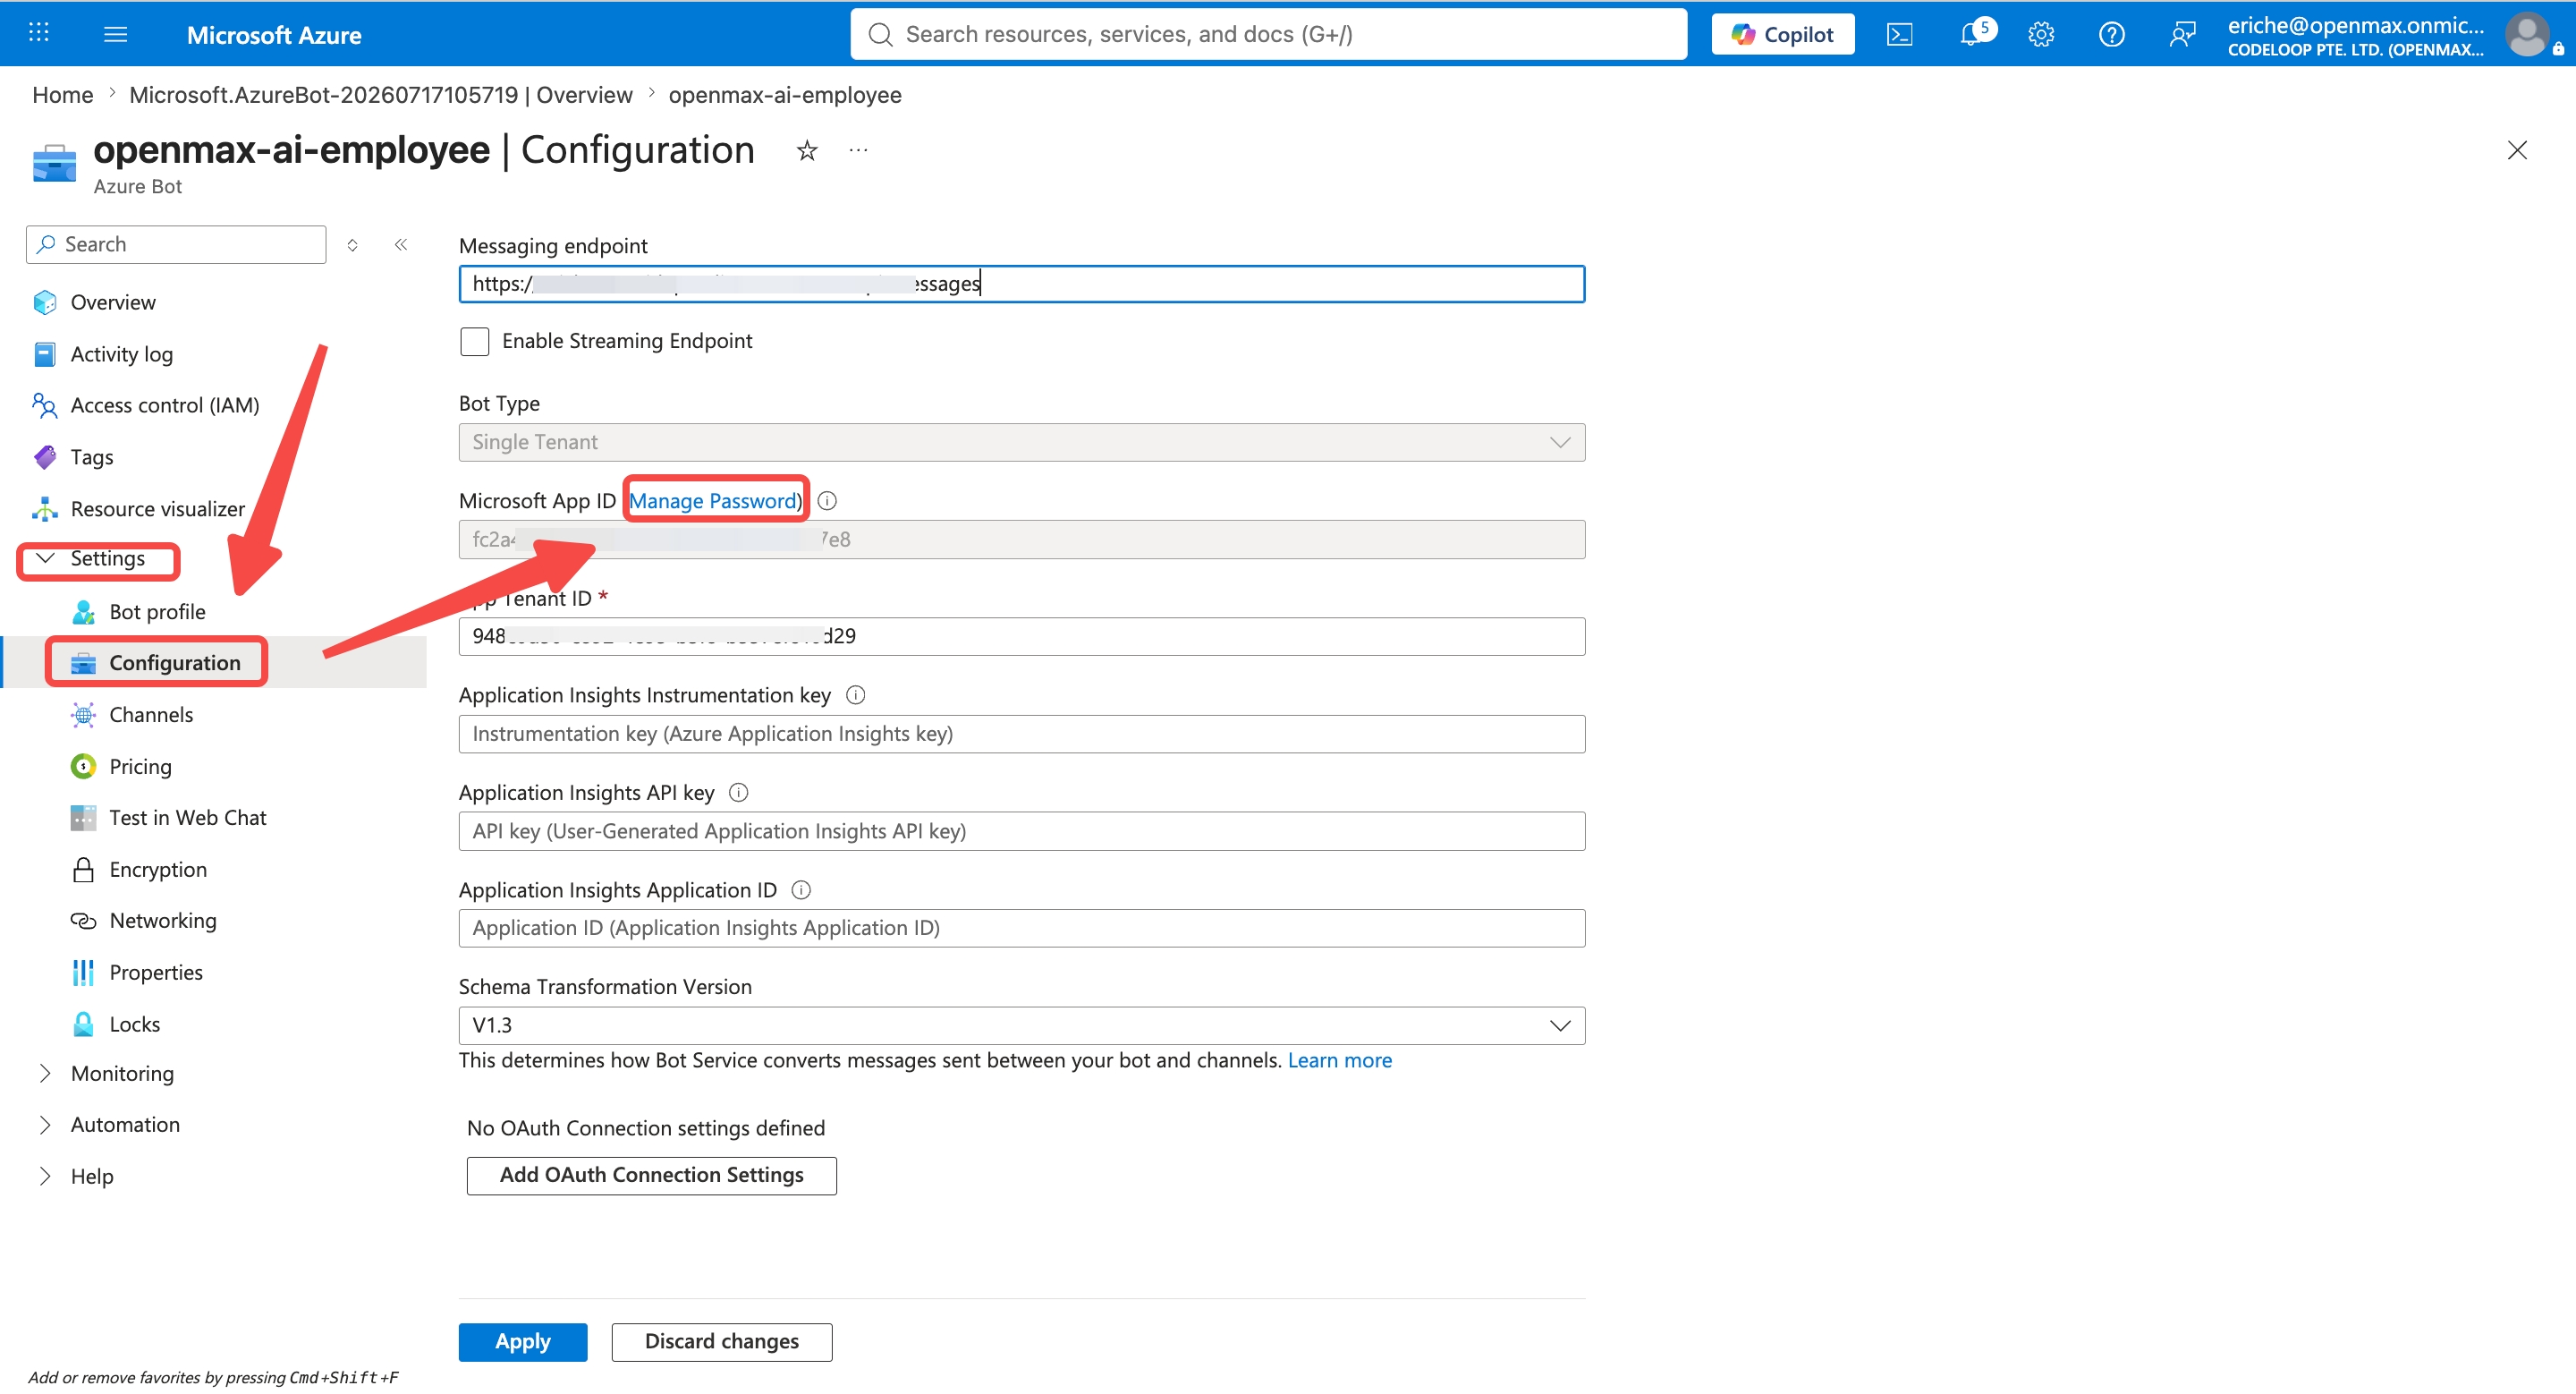
Step 4: Create a Client Secret (App Password)
Go to Settings → Configuration and click Manage Password (this opens your App Registration's Certificates & secrets page).
Click New client secret, enter a description (e.g.
openmax bot secret), choose an expiration period, and click Add.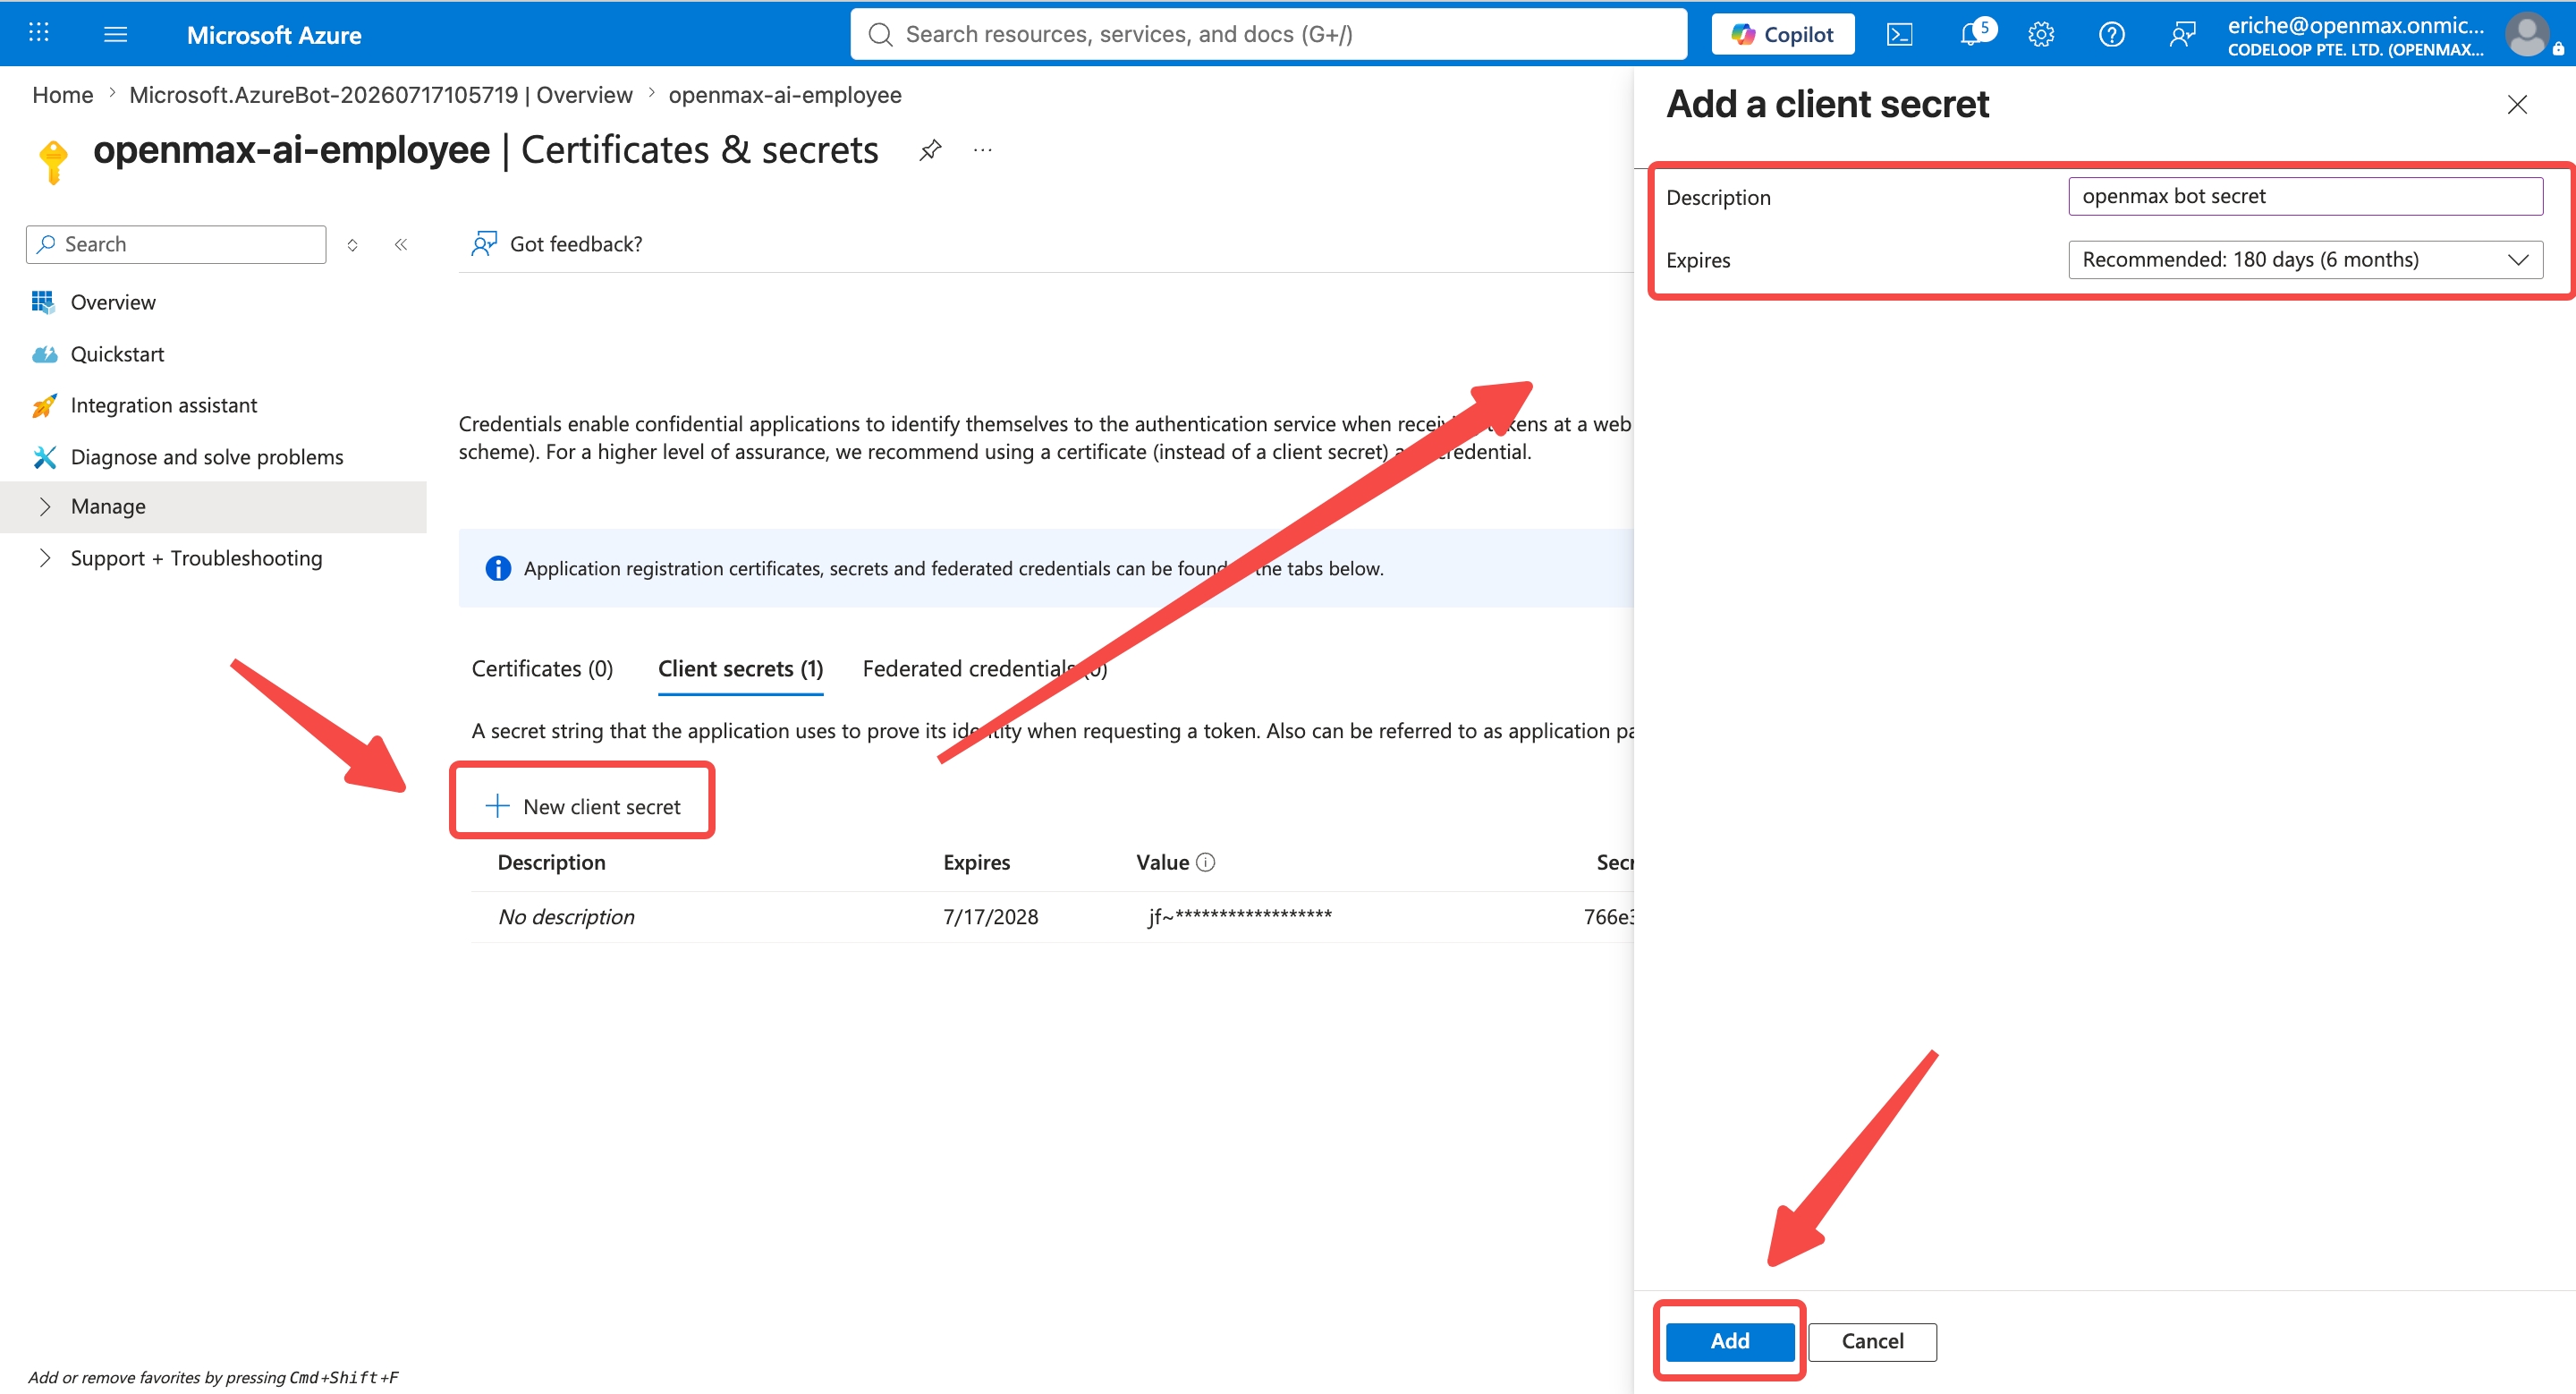
Copy the secret's Value immediately — it is shown only once and cannot be viewed again after you leave the page. This is your App Password. Store it somewhere safe right away. Then paste it into the App Password field in the OpenMax Dashboard.
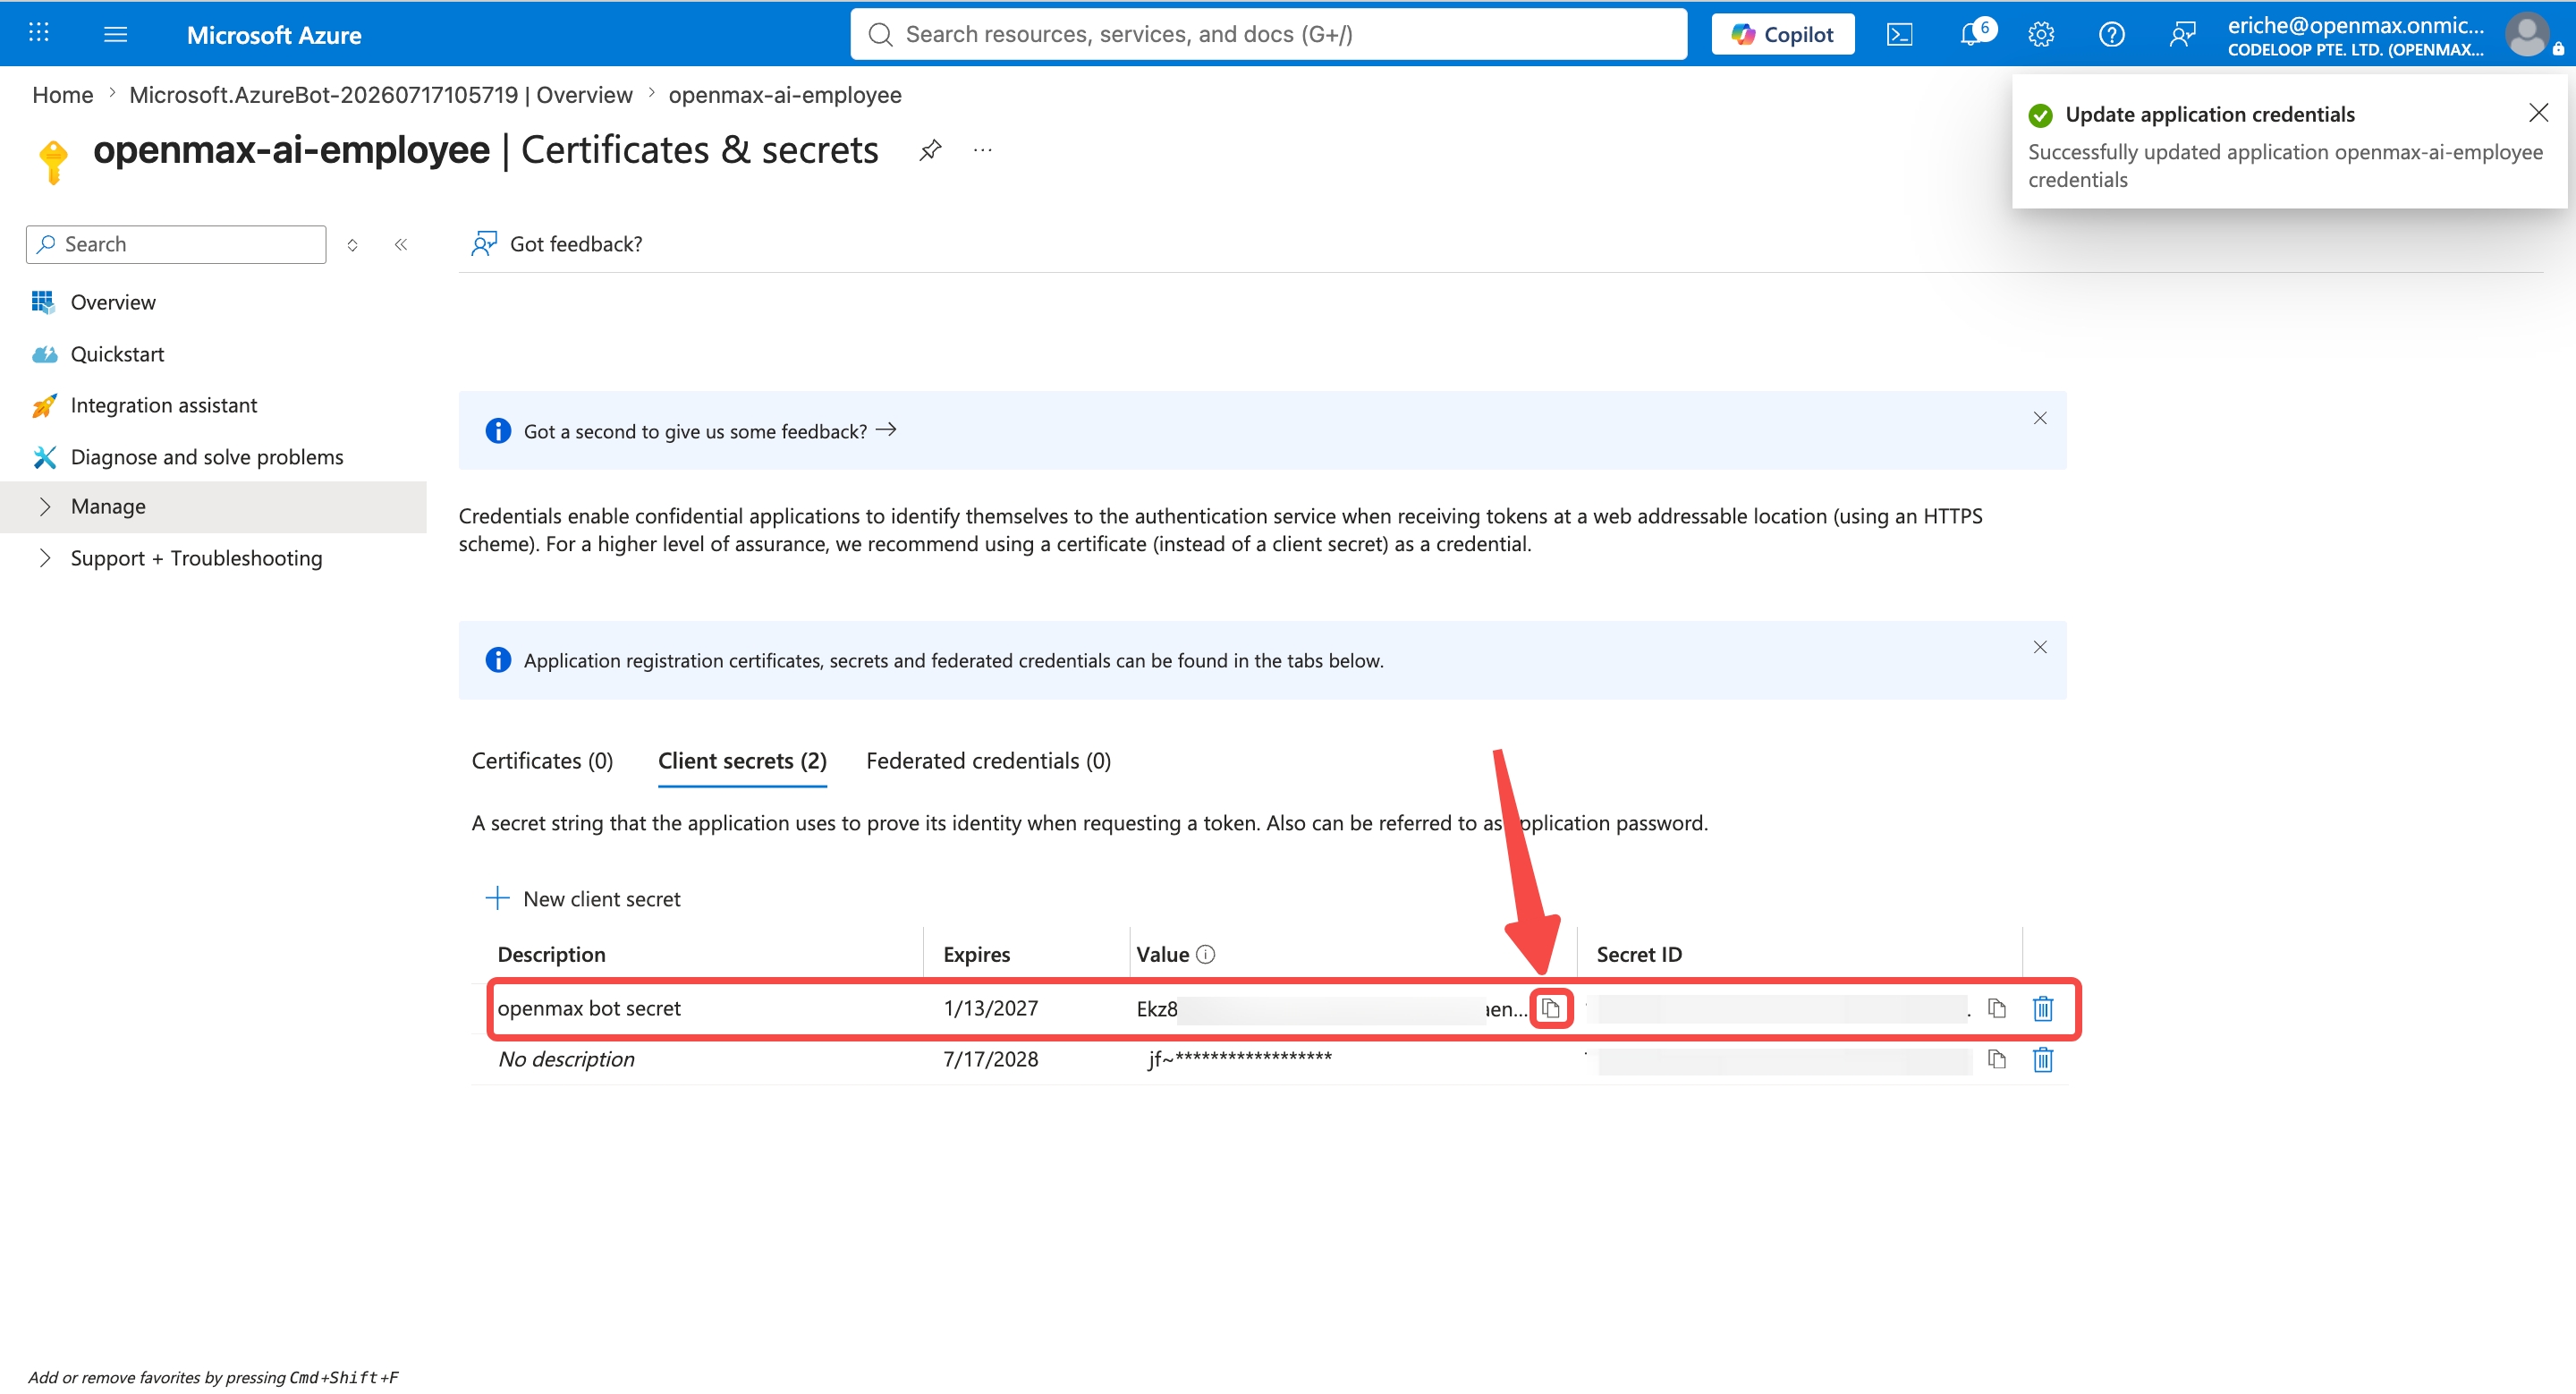
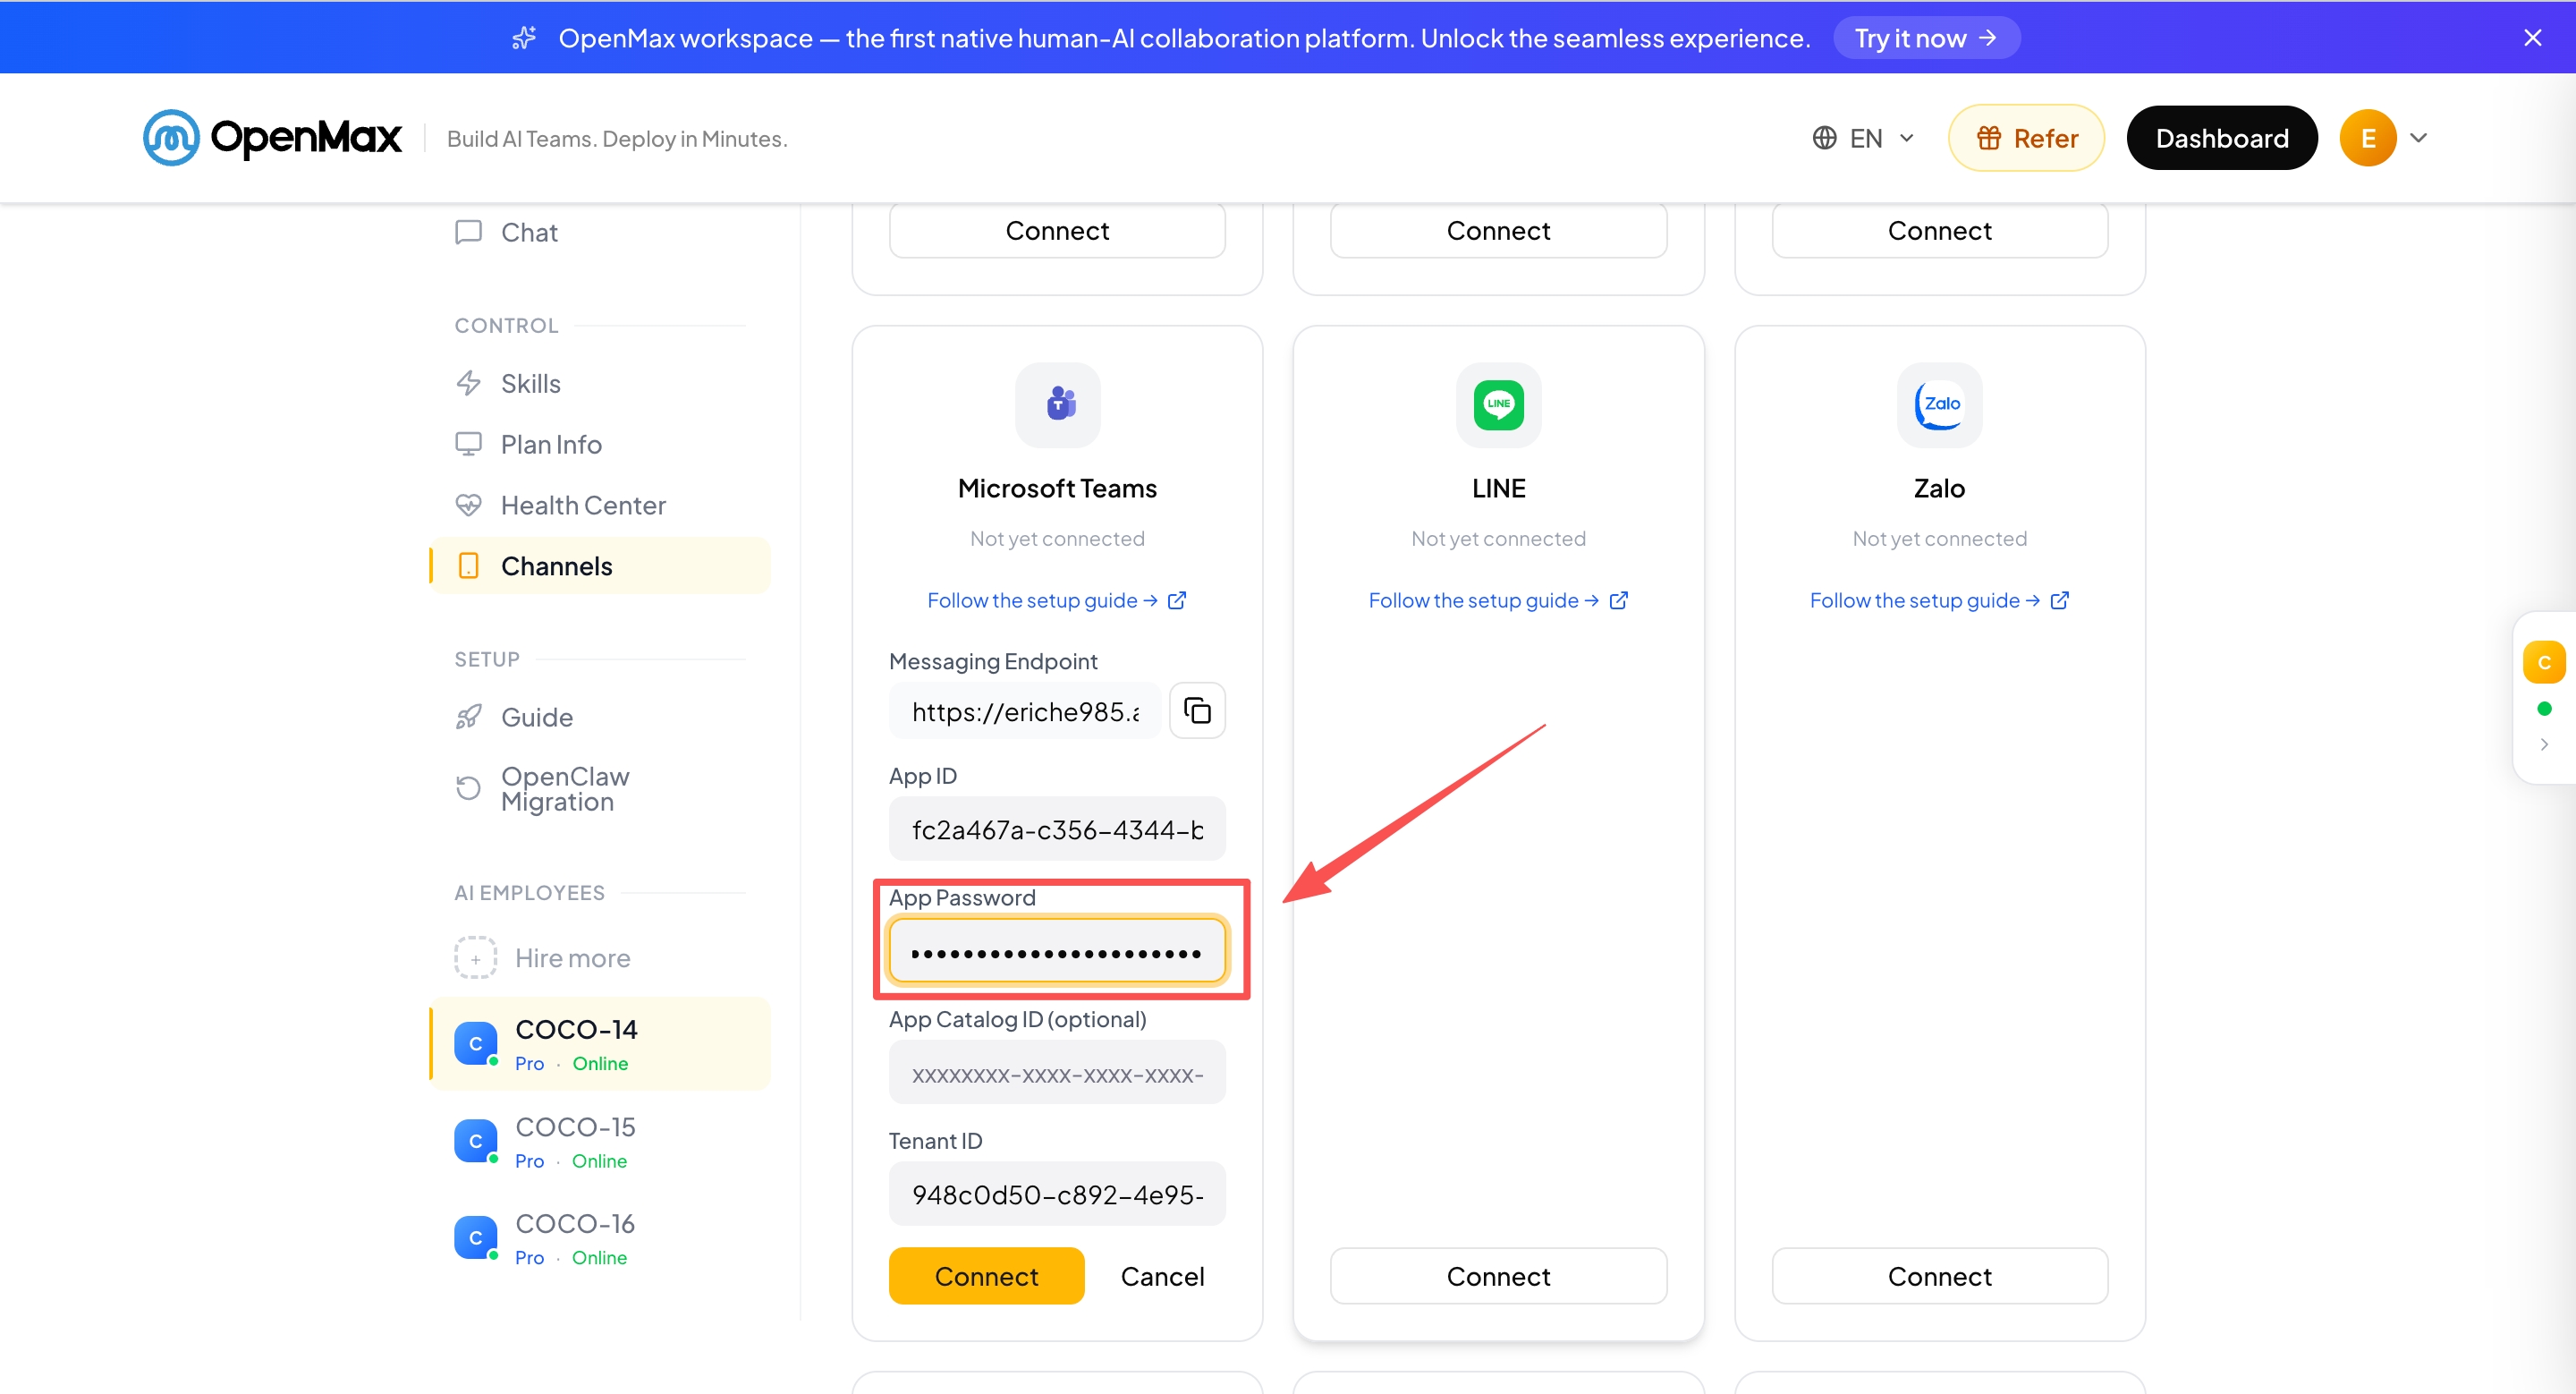
⚠️ Make sure you copy the Value column, not the Secret ID.
Step 5: Grant Graph API Permissions
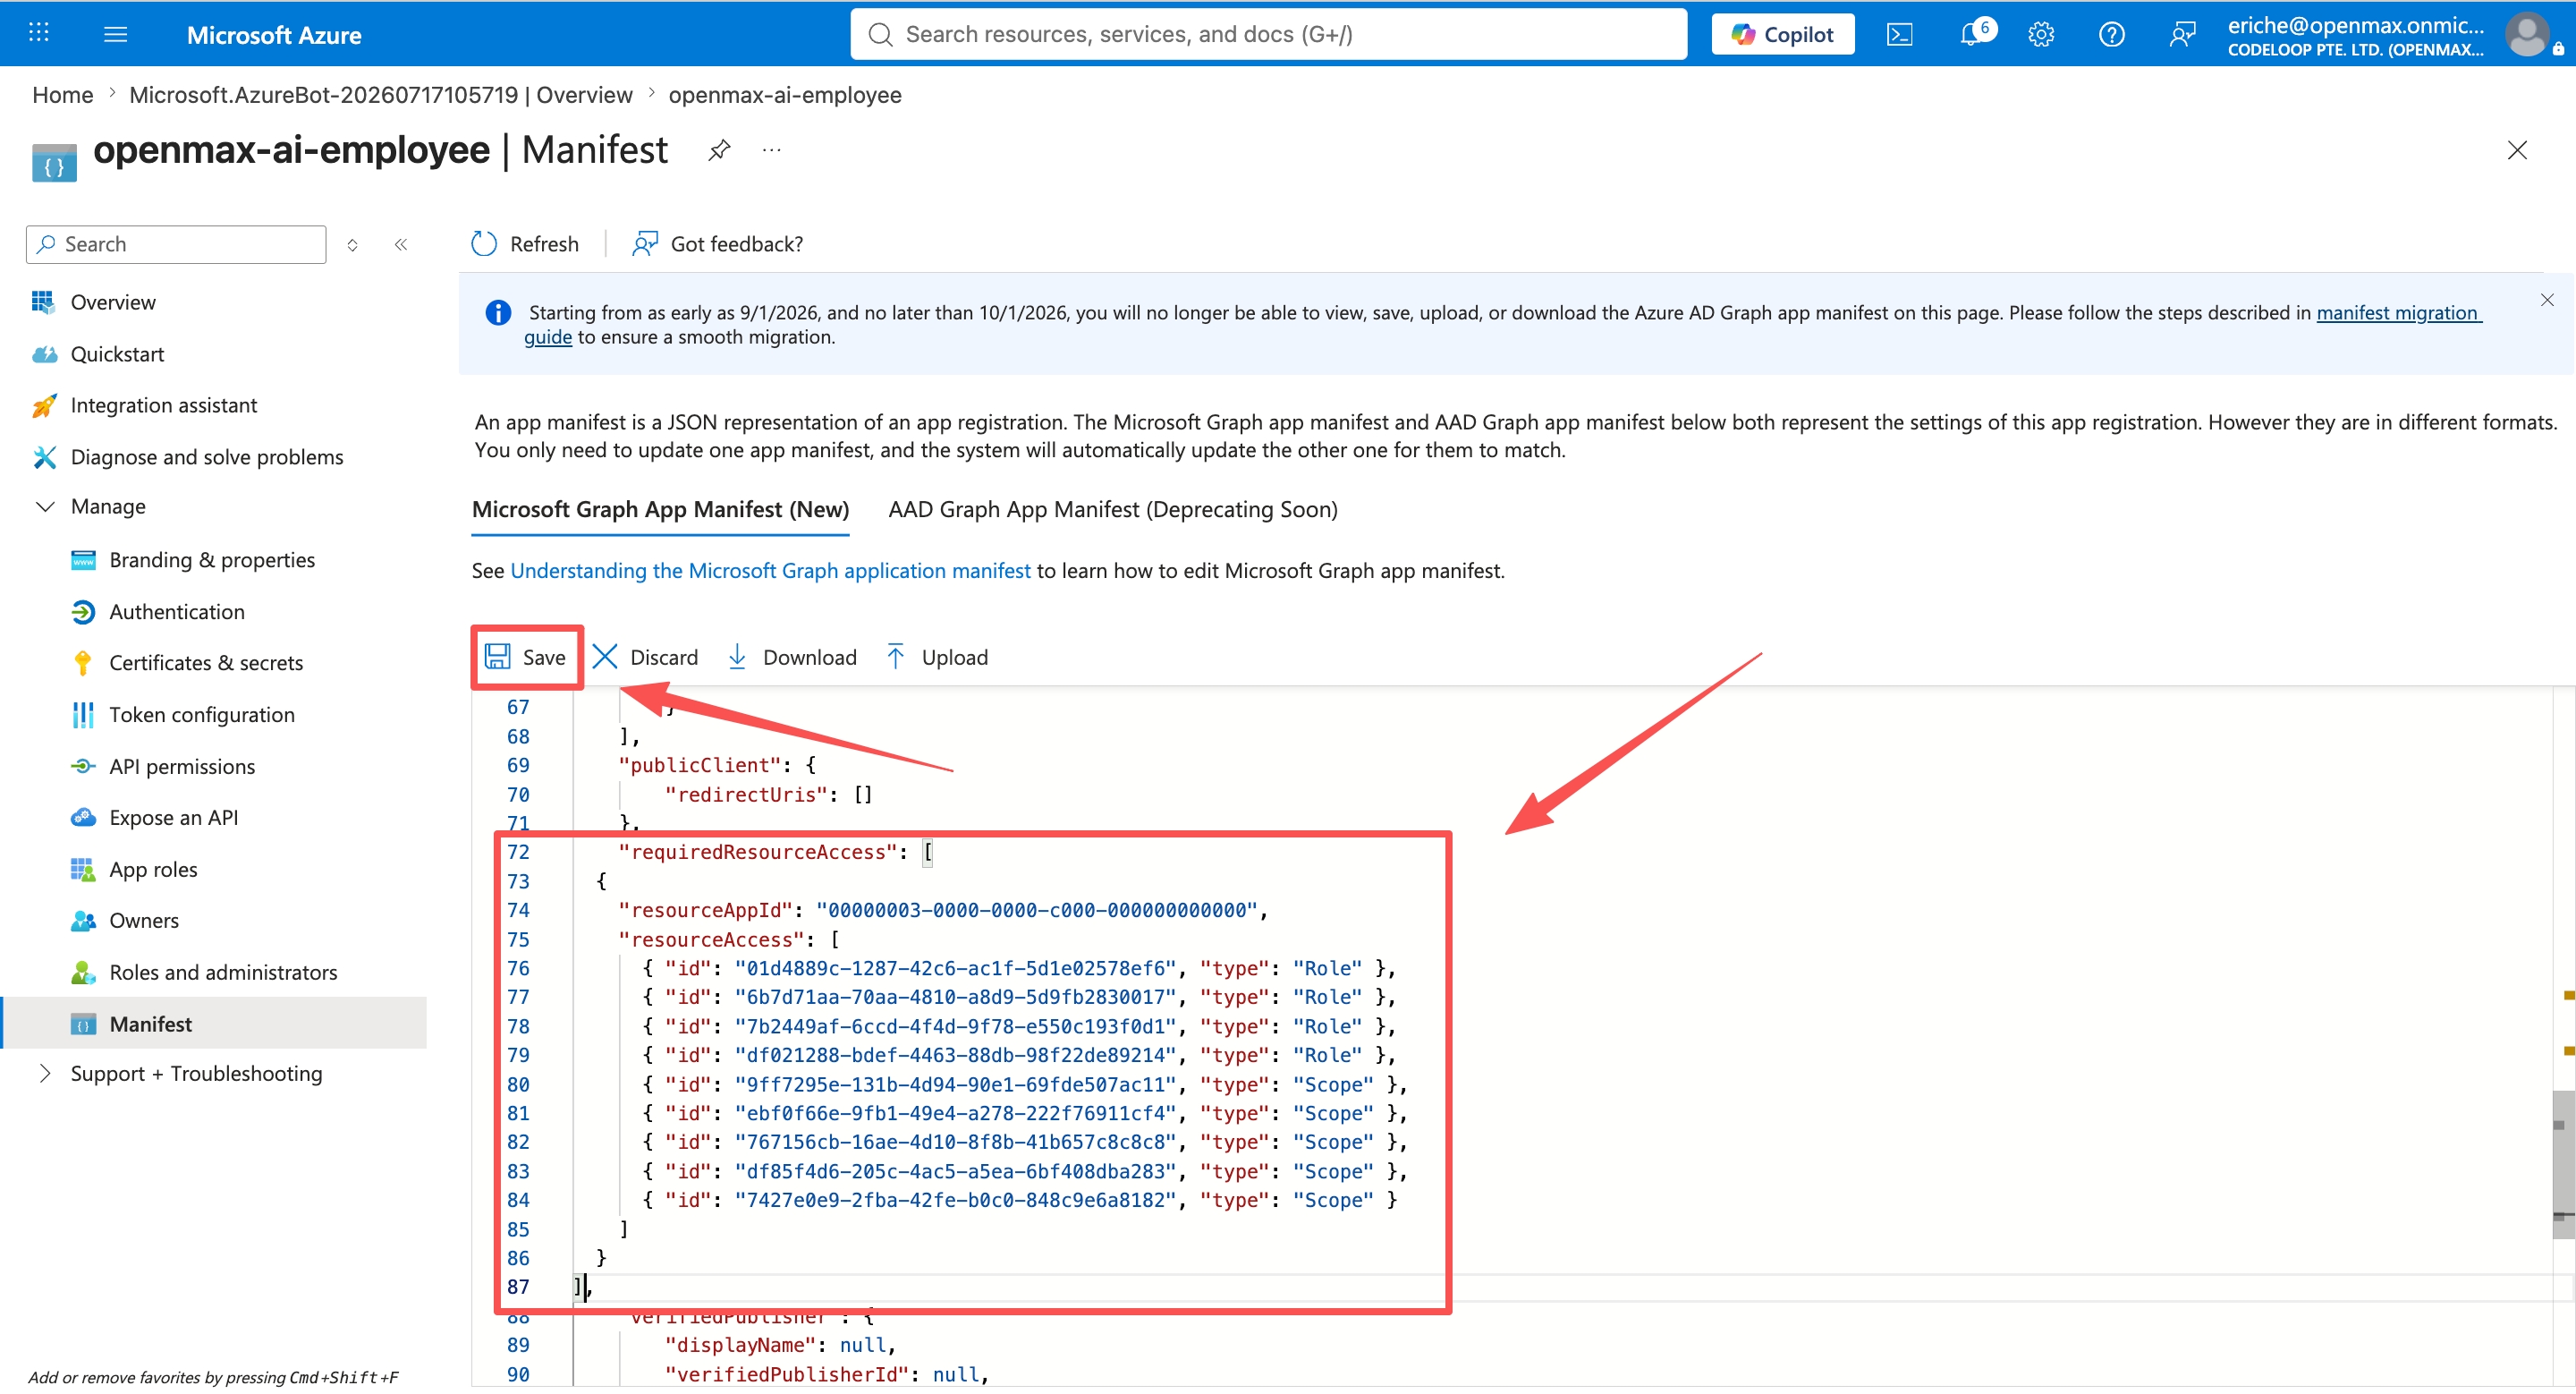
In your App Registration, click Manage → Manifest (choose Microsoft Graph App Manifest (New) if prompted). Find
"requiredResourceAccess": []and paste the following inside it: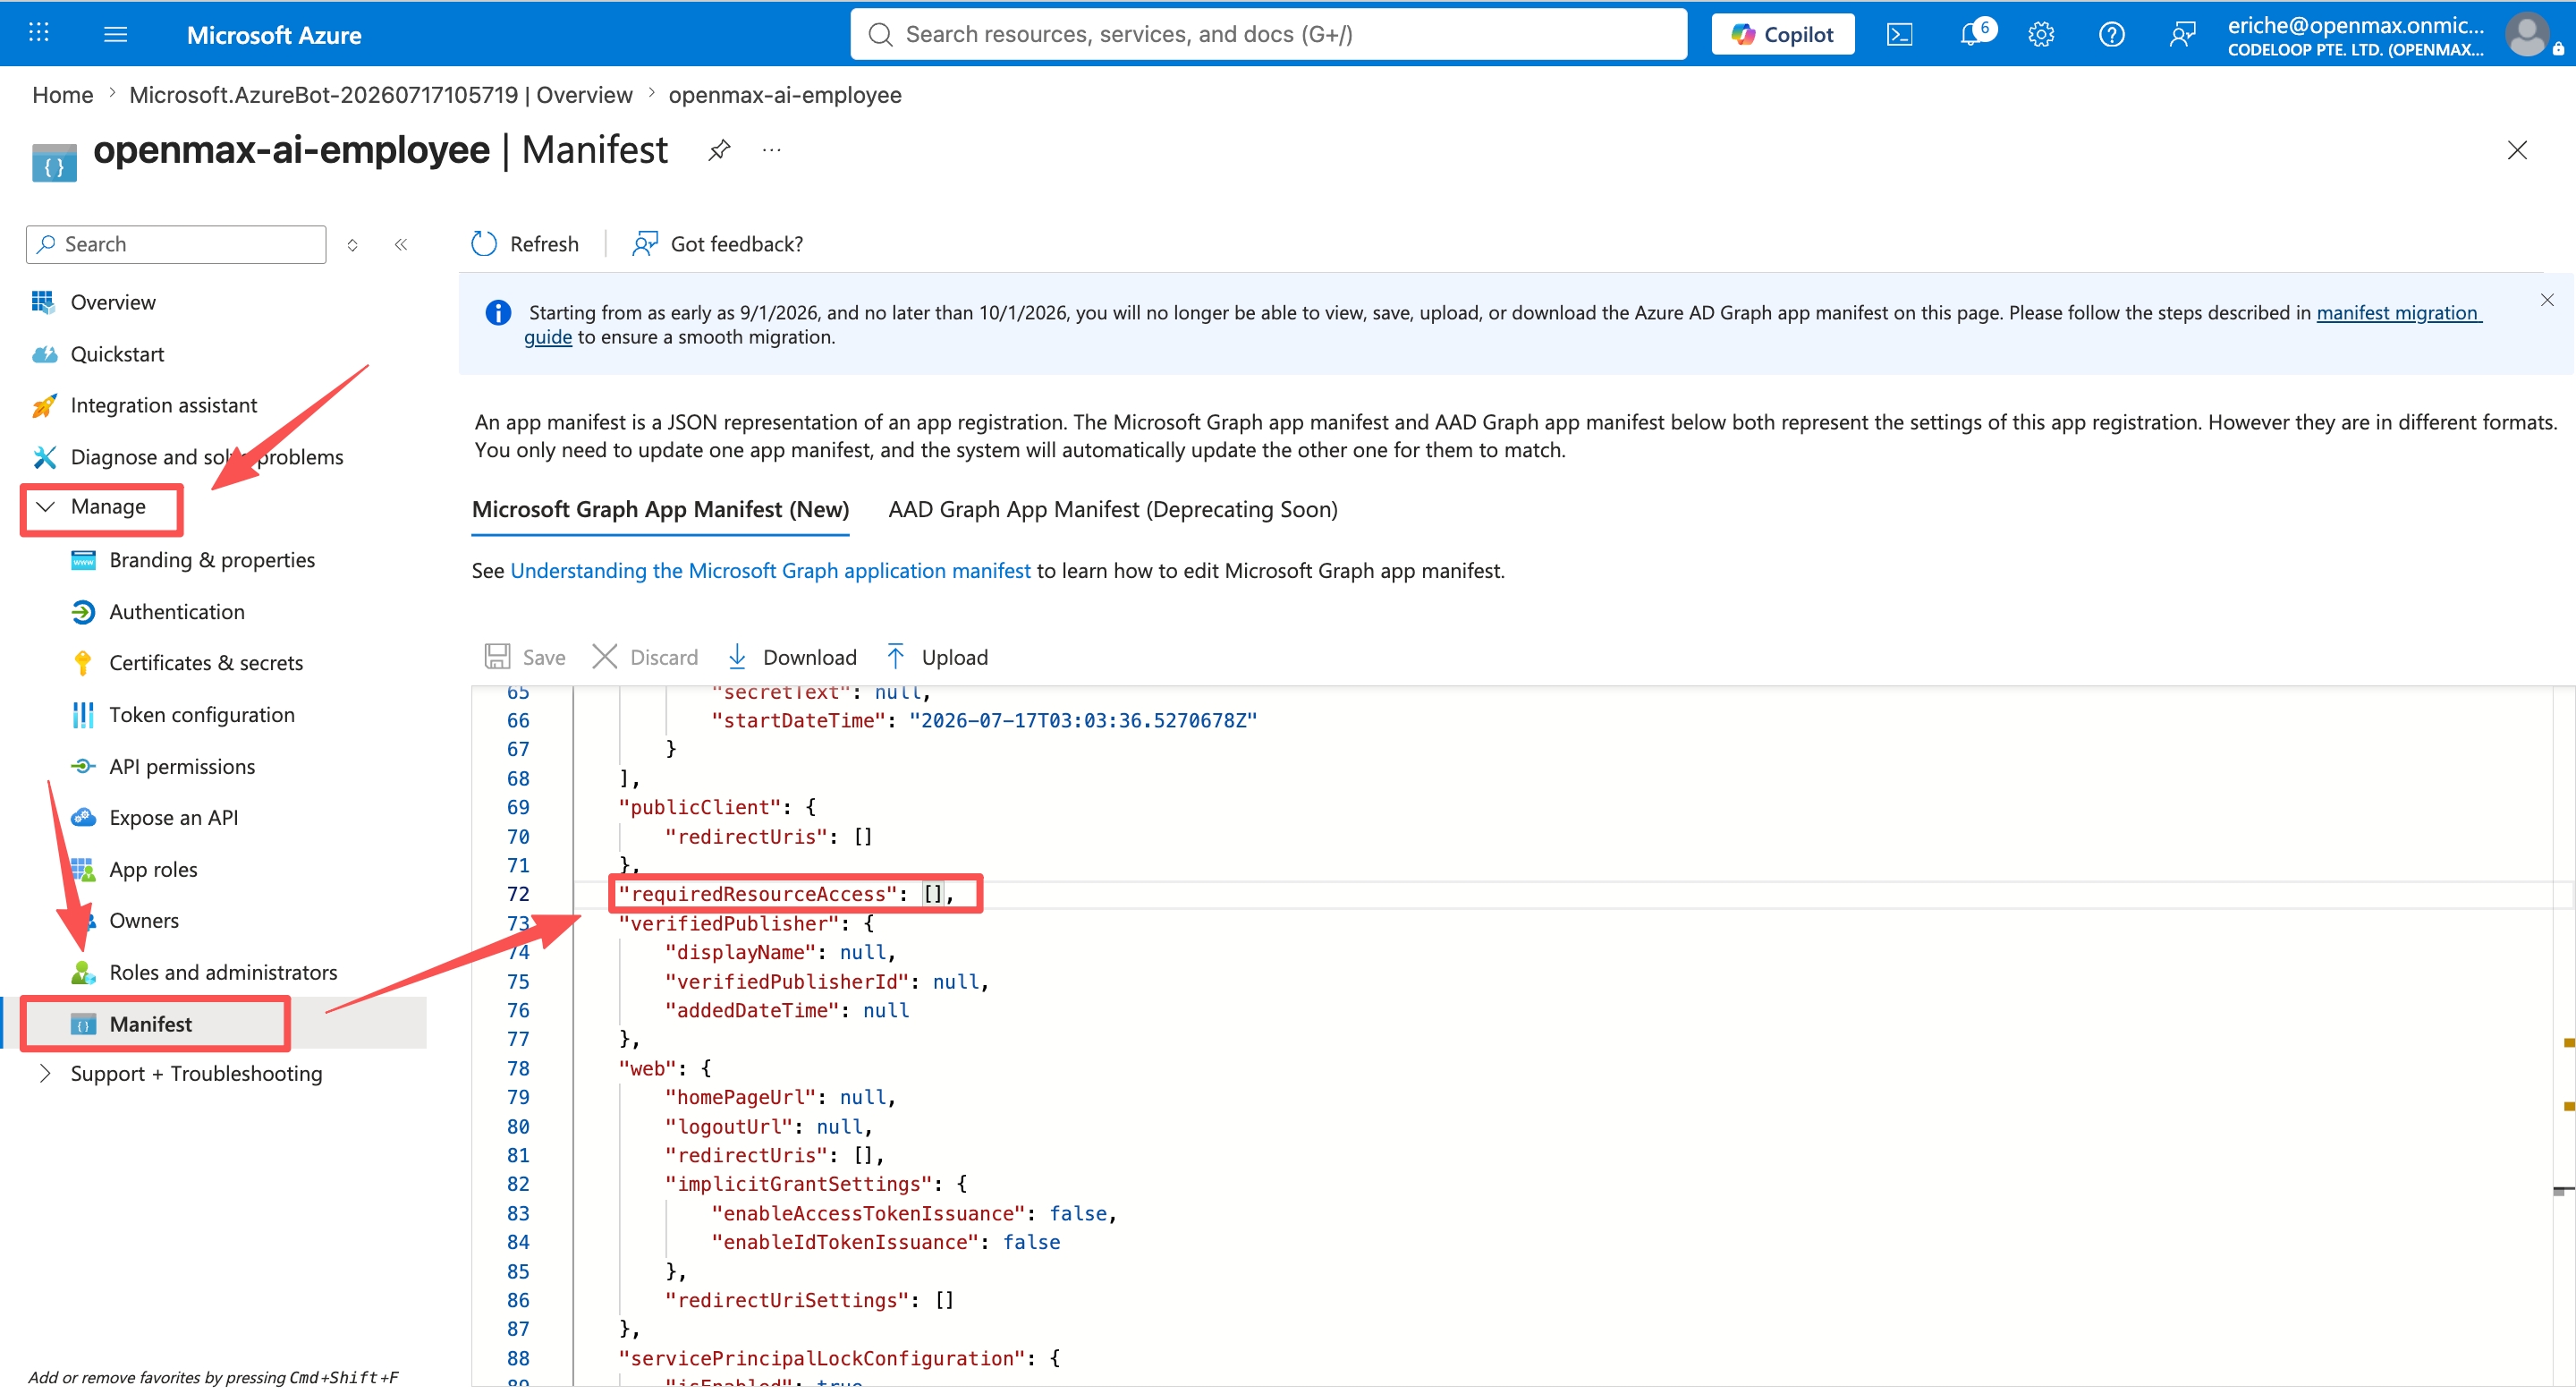
[
  {
    "resourceAppId": "00000003-0000-0000-c000-000000000000",
    "resourceAccess": [
      { "id": "01d4889c-1287-42c6-ac1f-5d1e02578ef6", "type": "Role" },
      { "id": "6b7d71aa-70aa-4810-a8d9-5d9fb2830017", "type": "Role" },
      { "id": "7b2449af-6ccd-4f4d-9f78-e550c193f0d1", "type": "Role" },
      { "id": "df021288-bdef-4463-88db-98f22de89214", "type": "Role" },
      { "id": "9ff7295e-131b-4d94-90e1-69fde507ac11", "type": "Scope" },
      { "id": "ebf0f66e-9fb1-49e4-a278-222f76911cf4", "type": "Scope" },
      { "id": "767156cb-16ae-4d10-8f8b-41b657c8c8c8", "type": "Scope" },
      { "id": "df85f4d6-205c-4ac5-a5ea-6bf408dba283", "type": "Scope" },
      { "id": "7427e0e9-2fba-42fe-b0c0-848c9e6a8182", "type": "Scope" }
    ]
  }
]
After pasting, click Save.
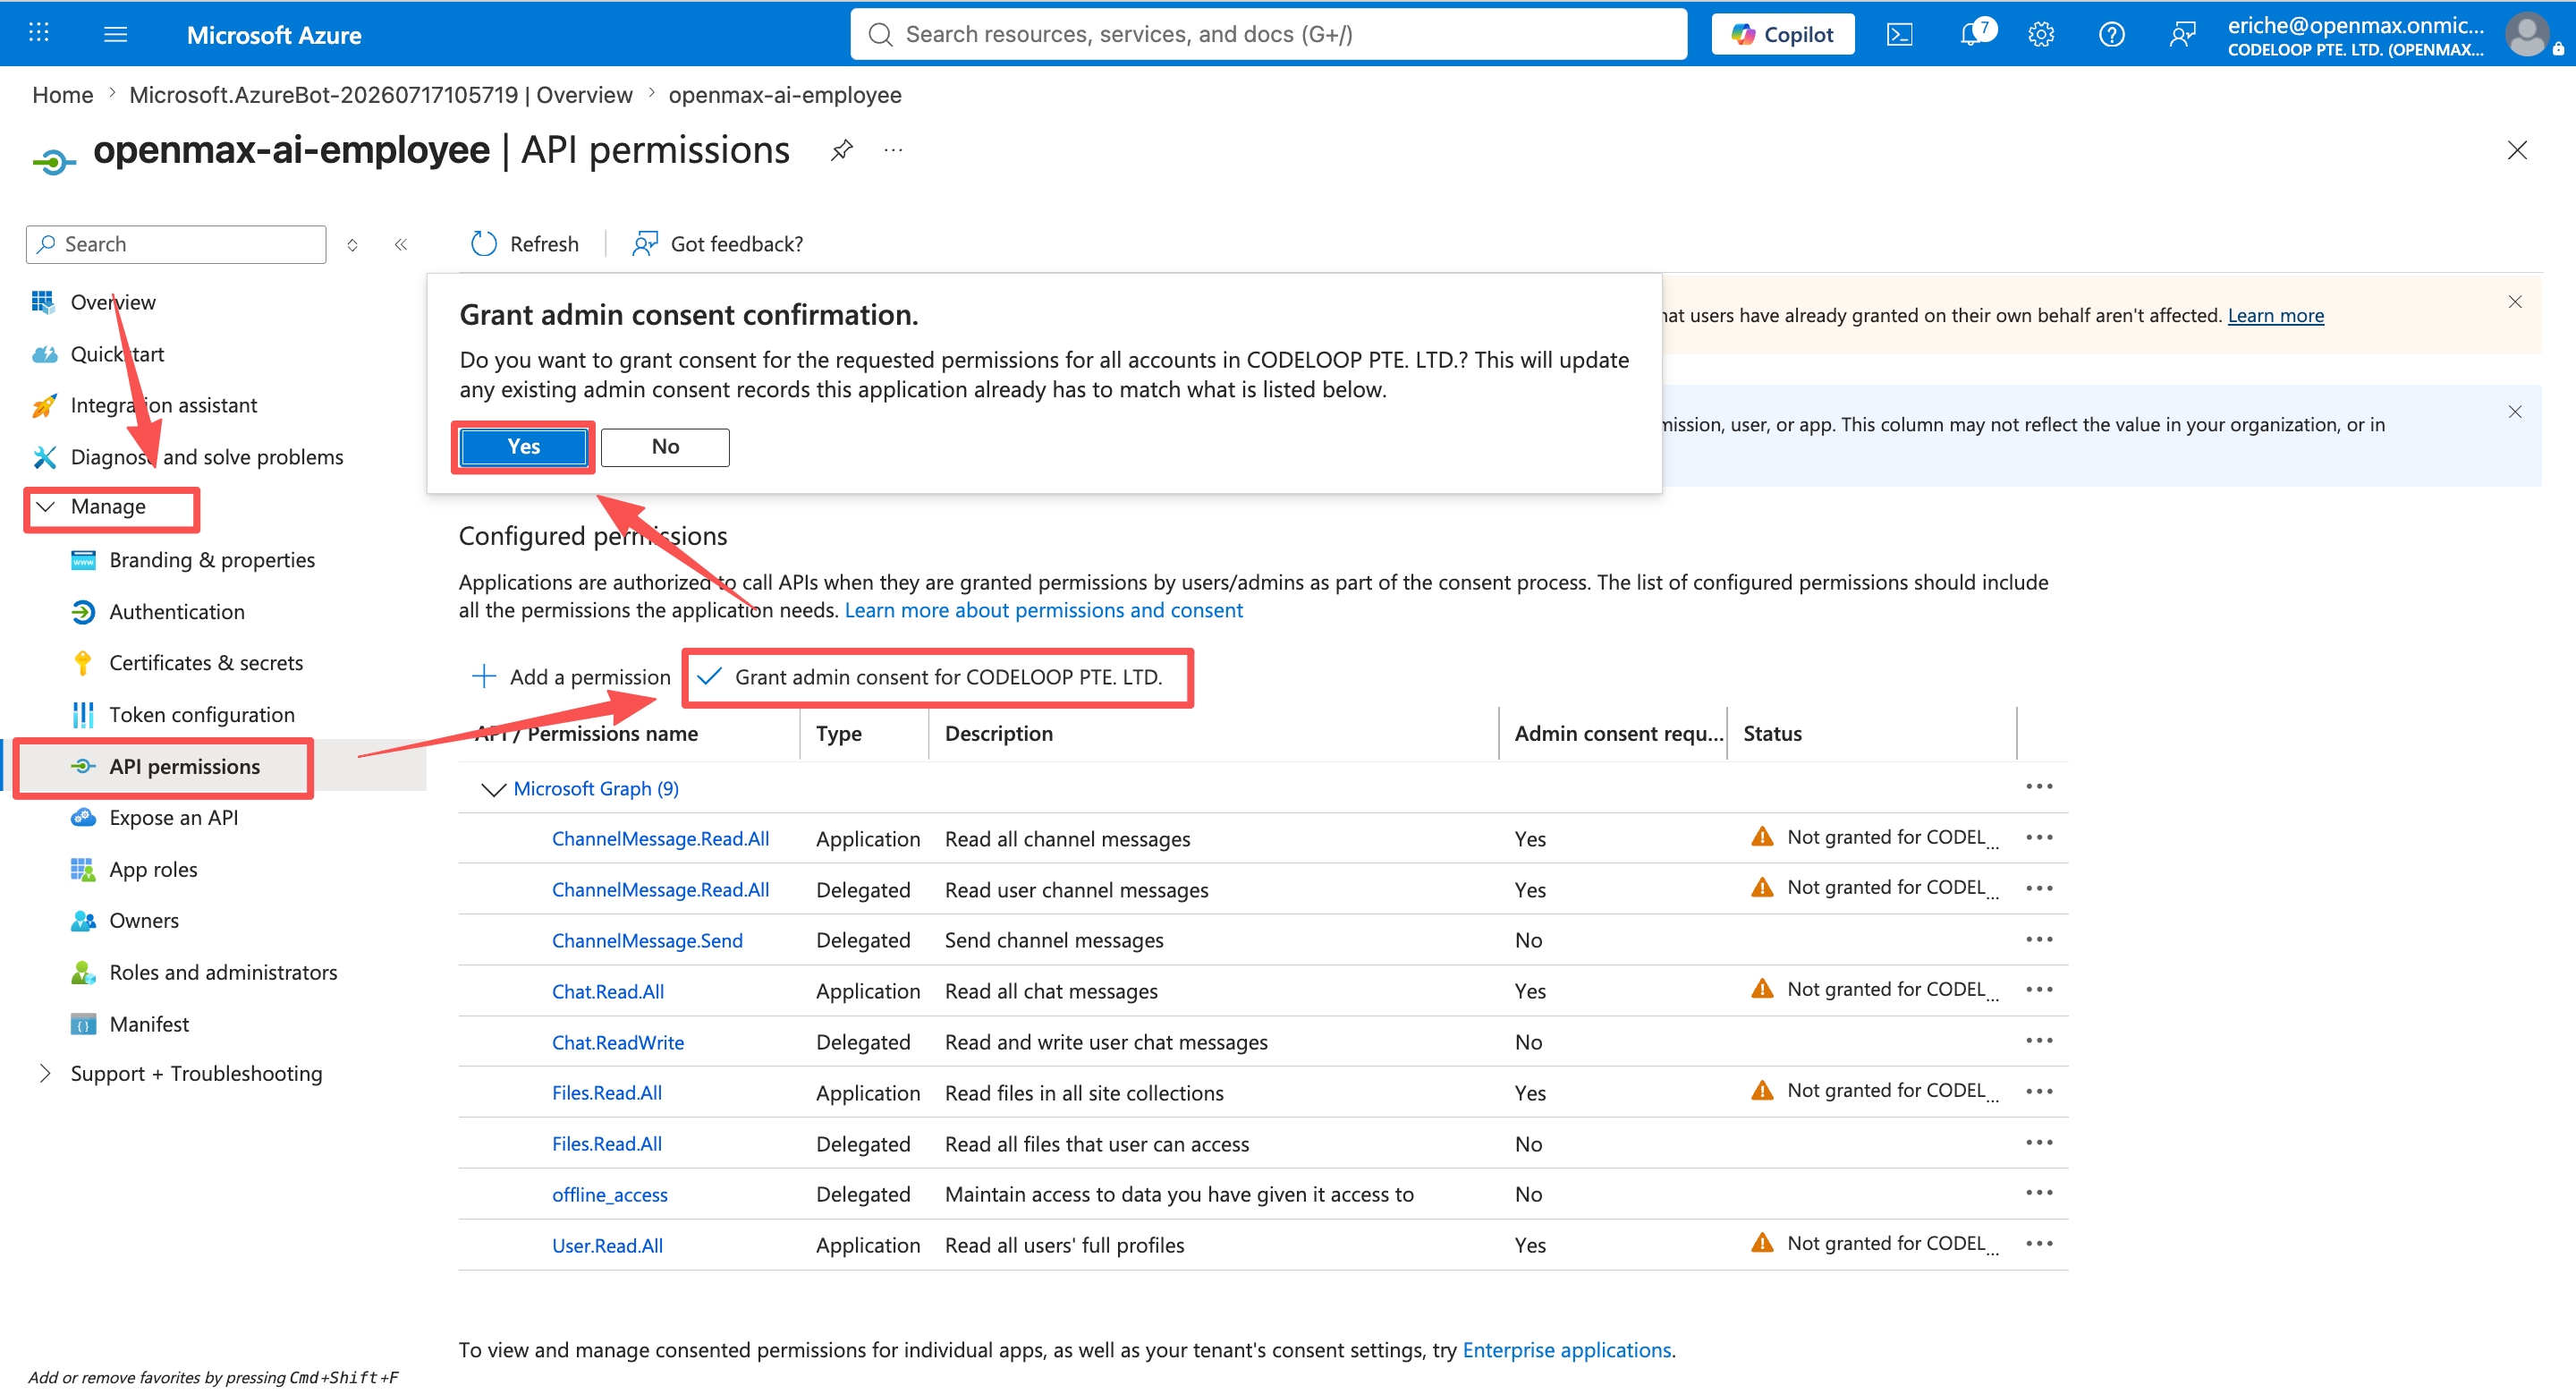
Click Manage → API permissions, then click Grant admin consent for [your organization] and confirm. (This requires a Global Administrator account — see Before You Start.)
After consent is granted, all permission statuses turn green, as shown below.
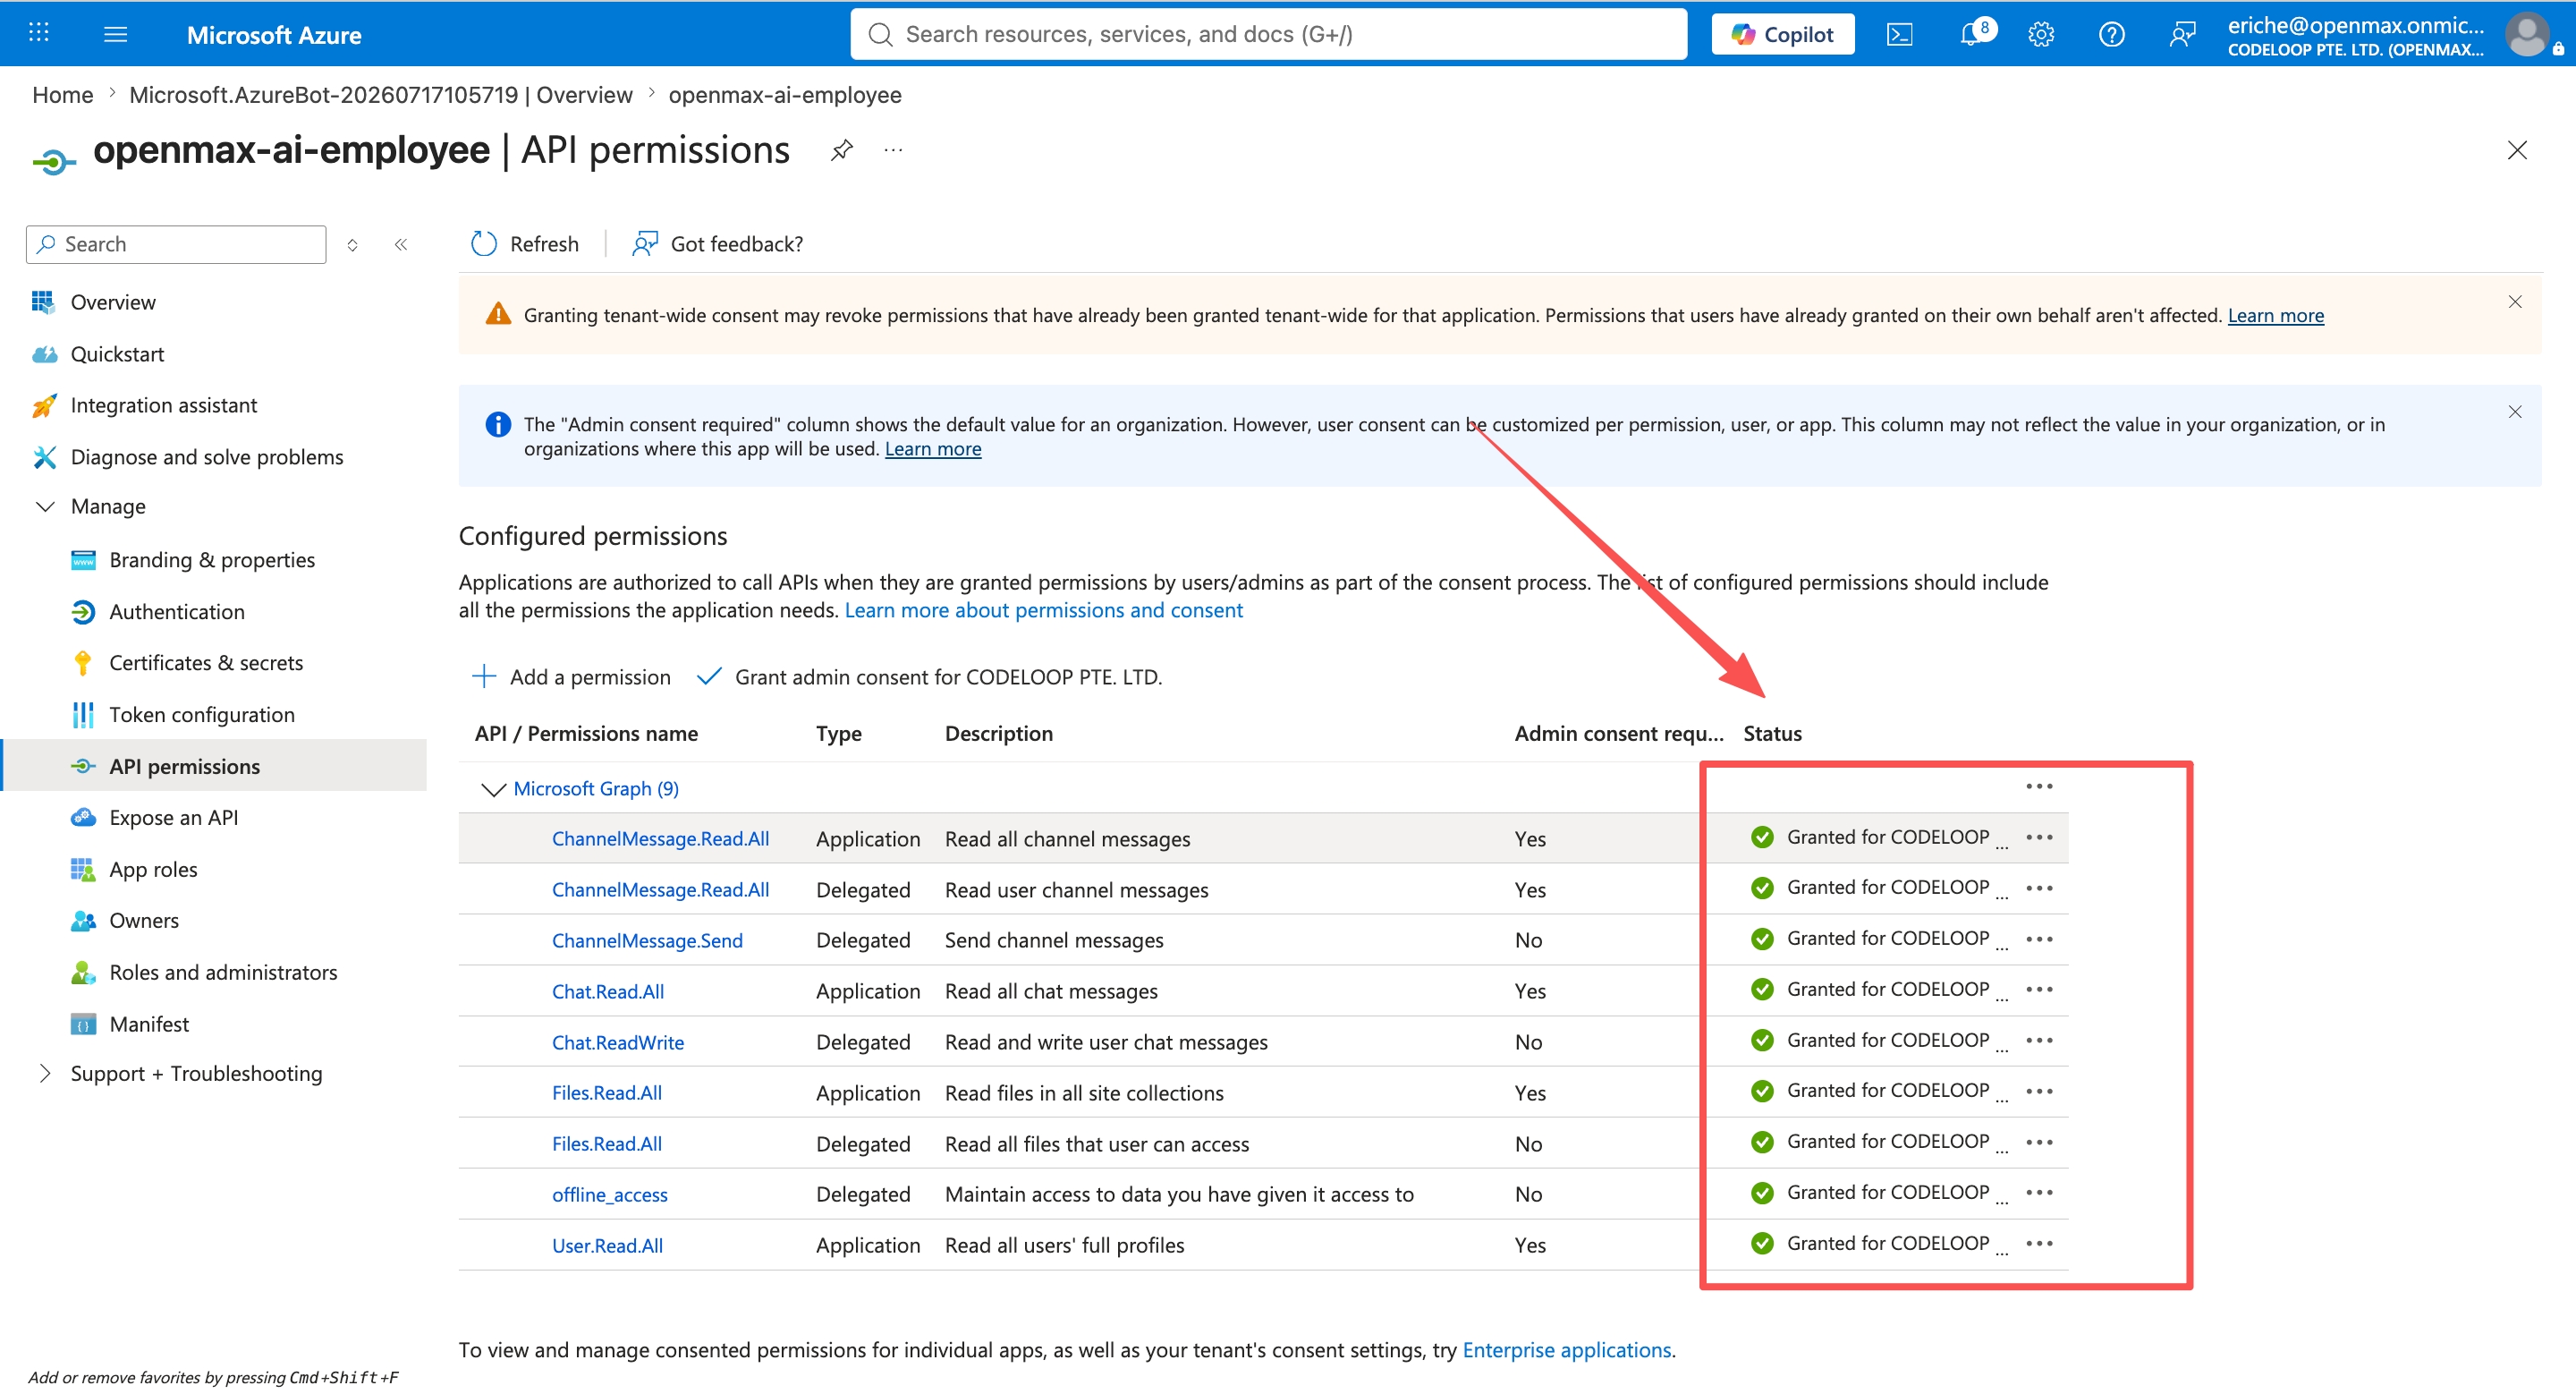
These permissions enable file downloads, chat history, reactions, and smart mode. Without admin consent, those features won't work.
Add a Redirect URI for Reactions
To enable emoji reactions (💬 thinking indicator, 👍, etc.), add a redirect URI:
- In the App Registration page, go to Authentication.
- Click + Add a platform → Web.
- Enter the redirect URI:
https://<your-agent-domain>/ms-teams/auth/callback(use the same domain as your Messaging endpoint in Step 2). - Click Configure.
Step 6: Create the App in Teams Developer Portal
Open the Teams Developer Portal → Apps and click Create a new app.
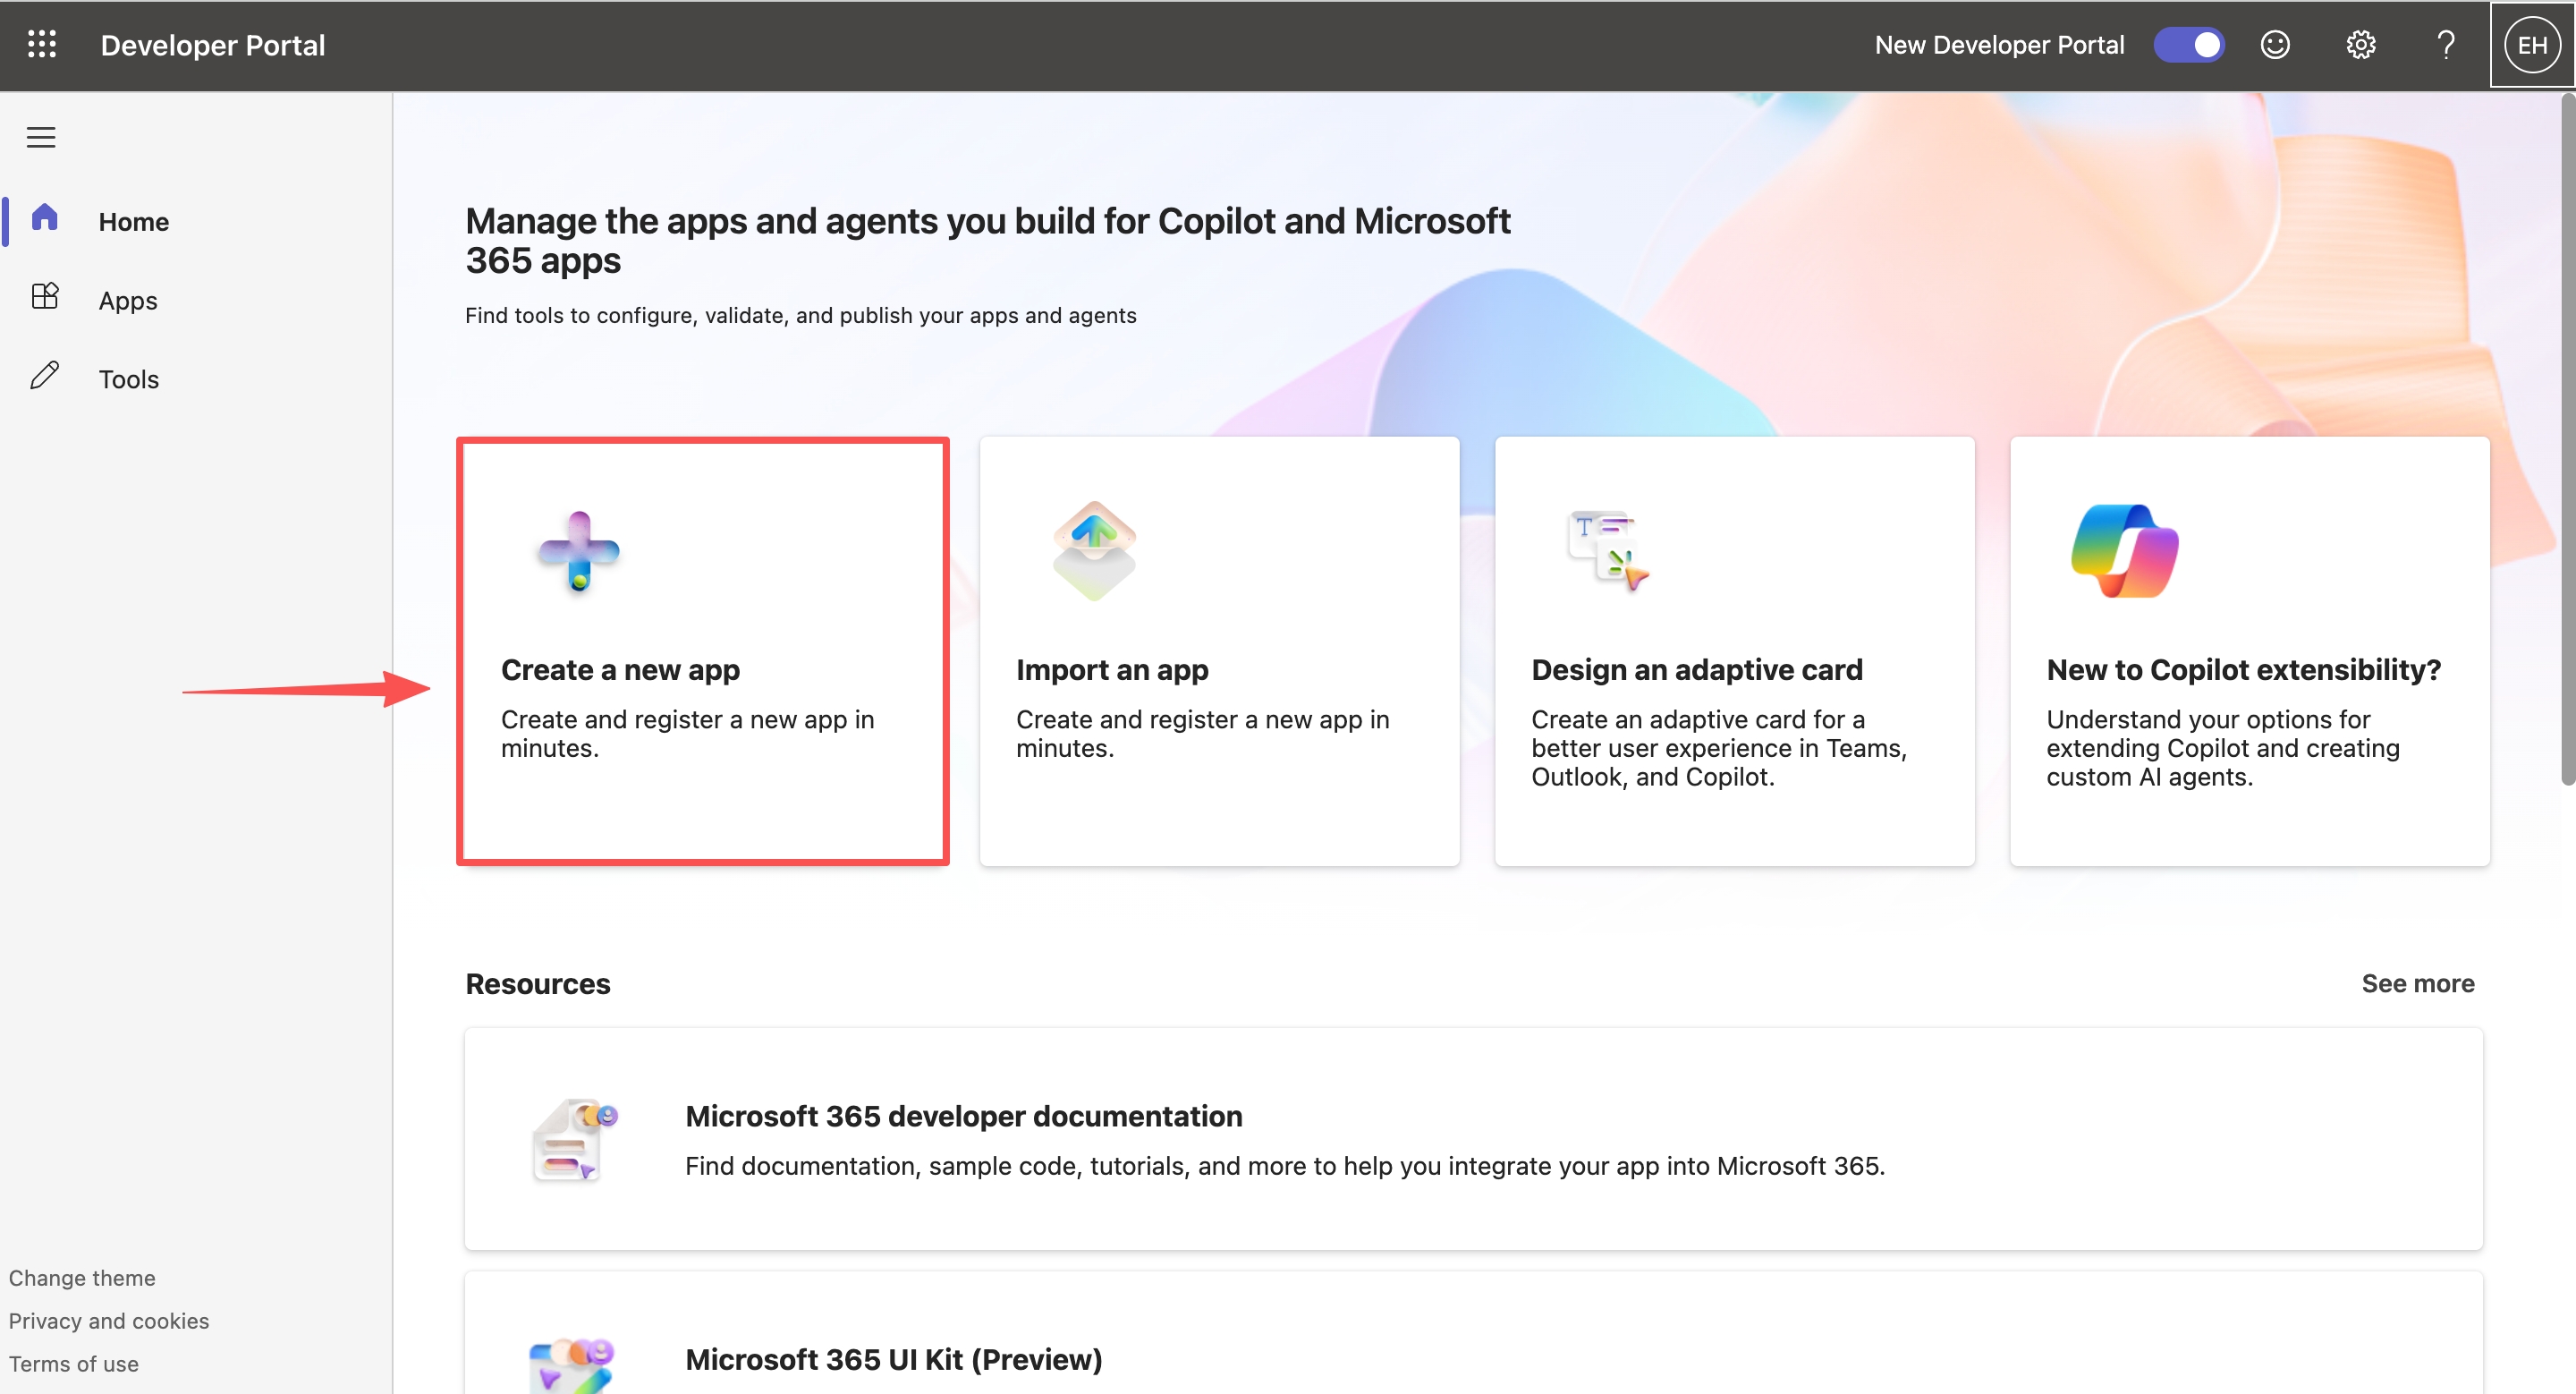
Enter an app name (e.g.
OpenMax AI Employee) and click Create.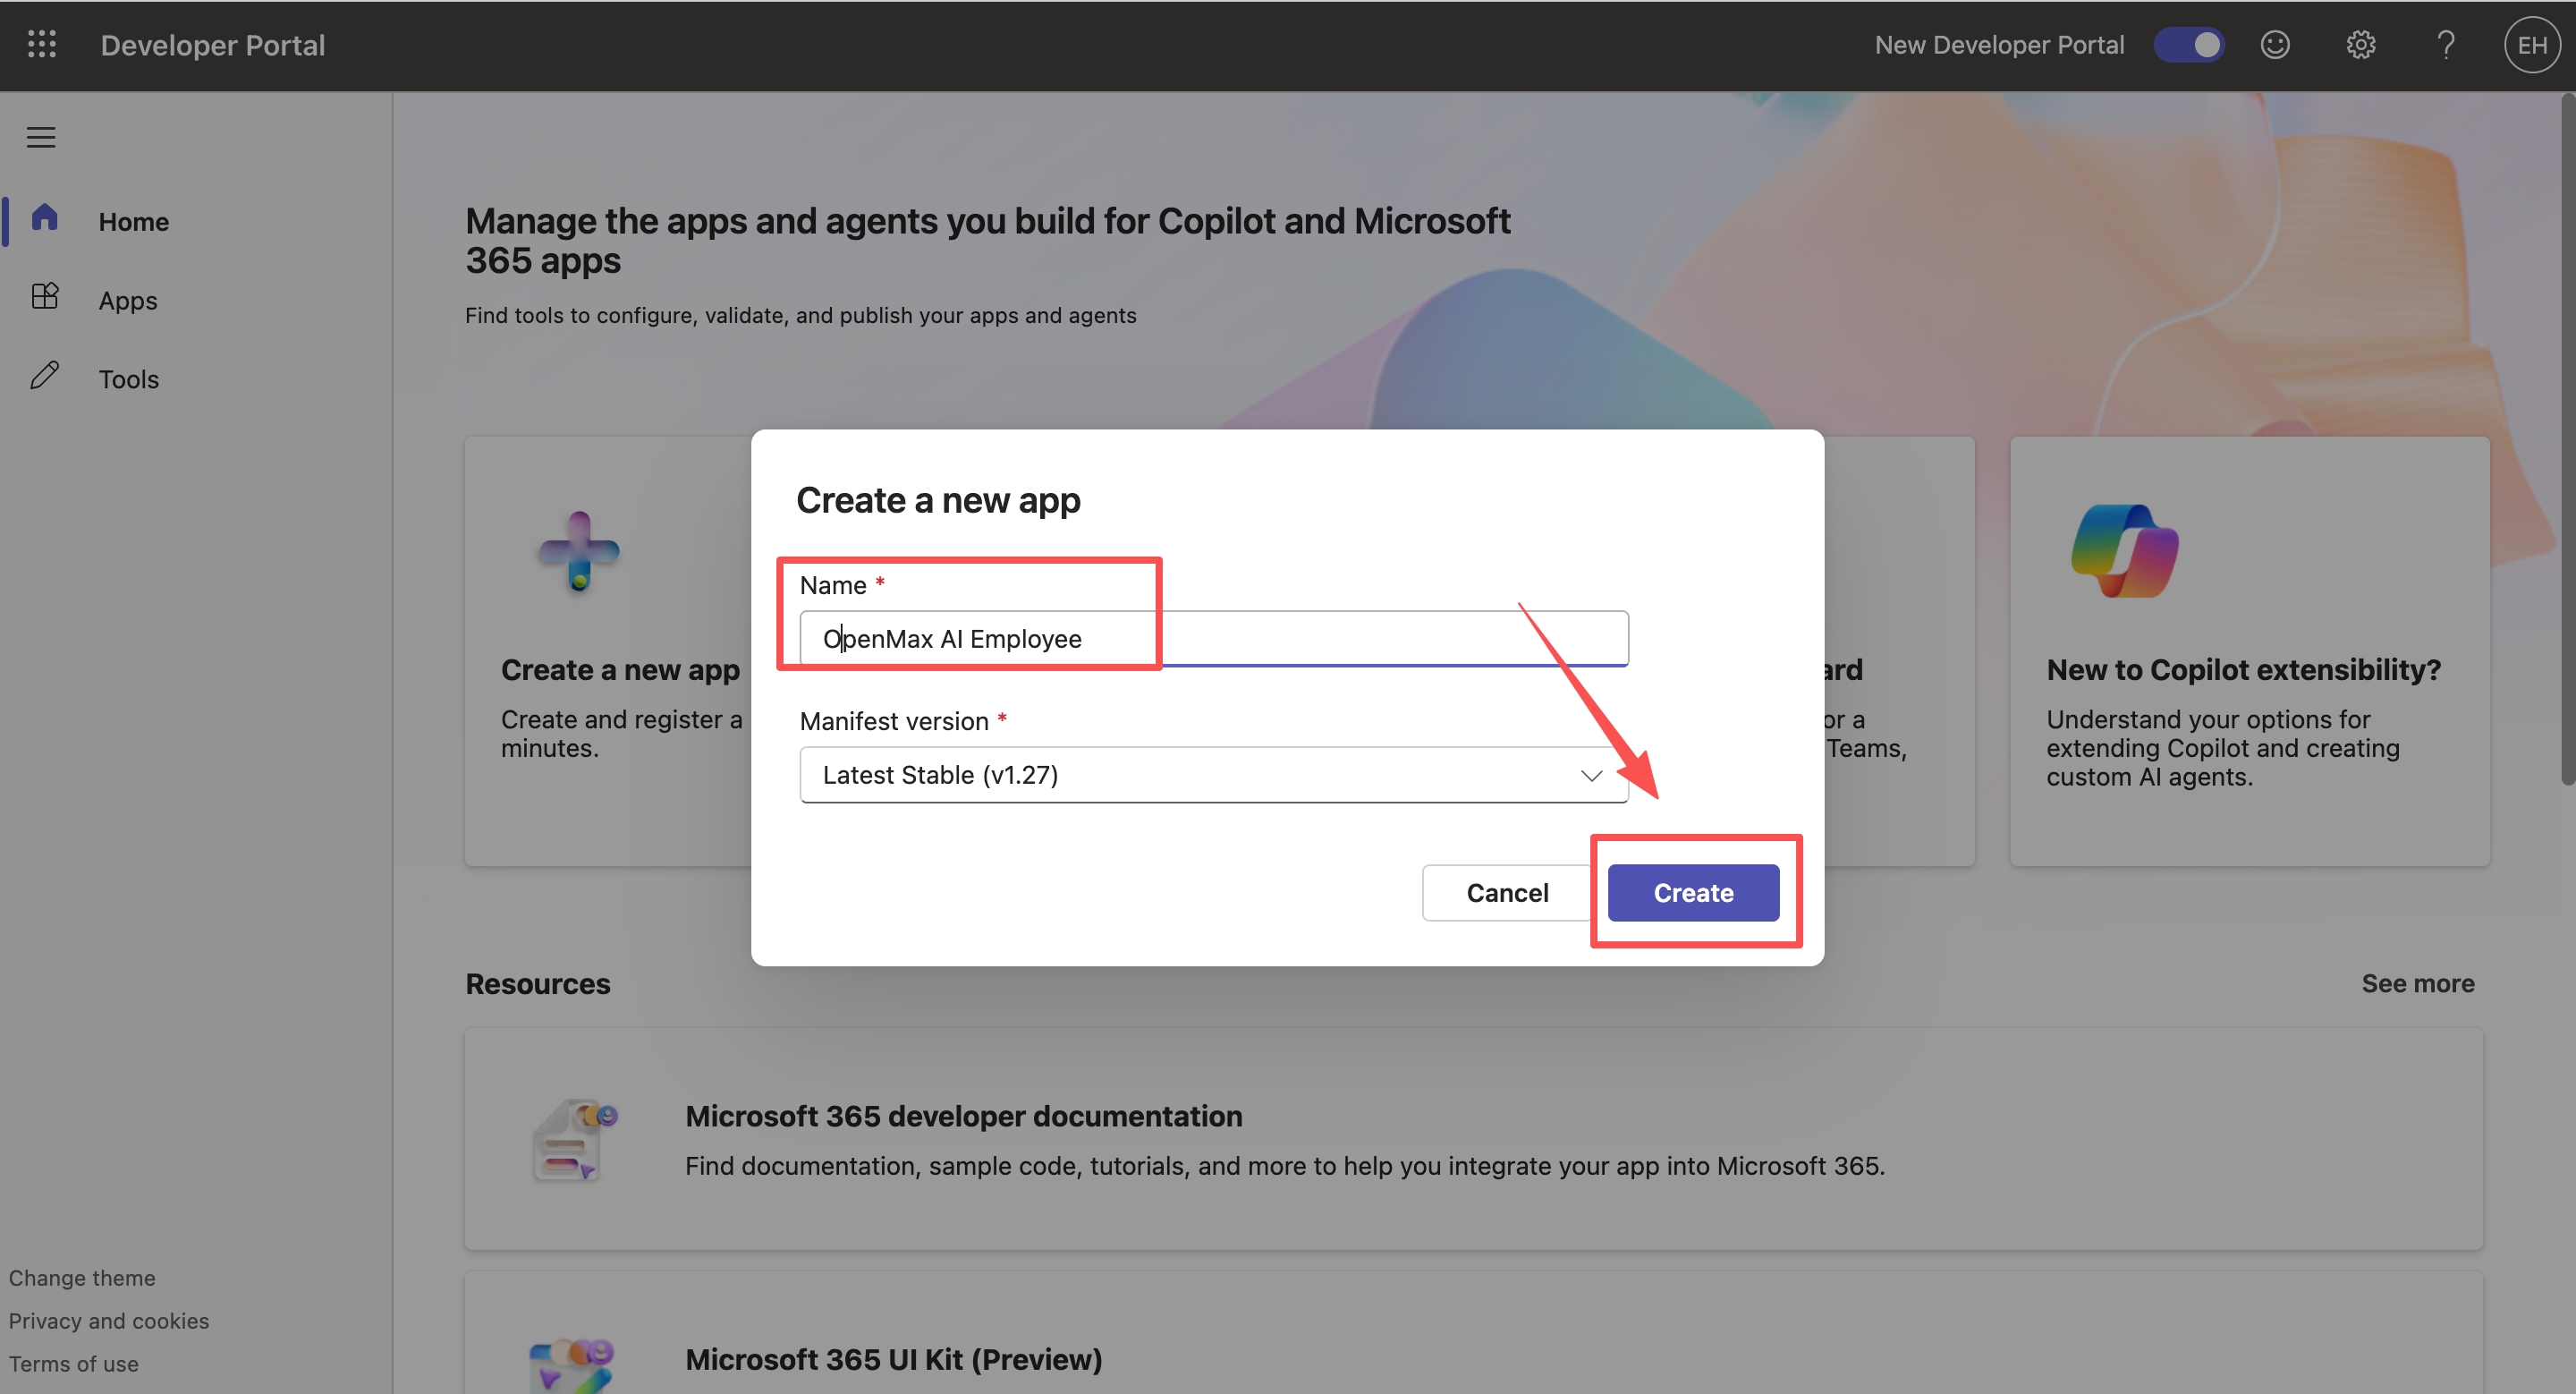
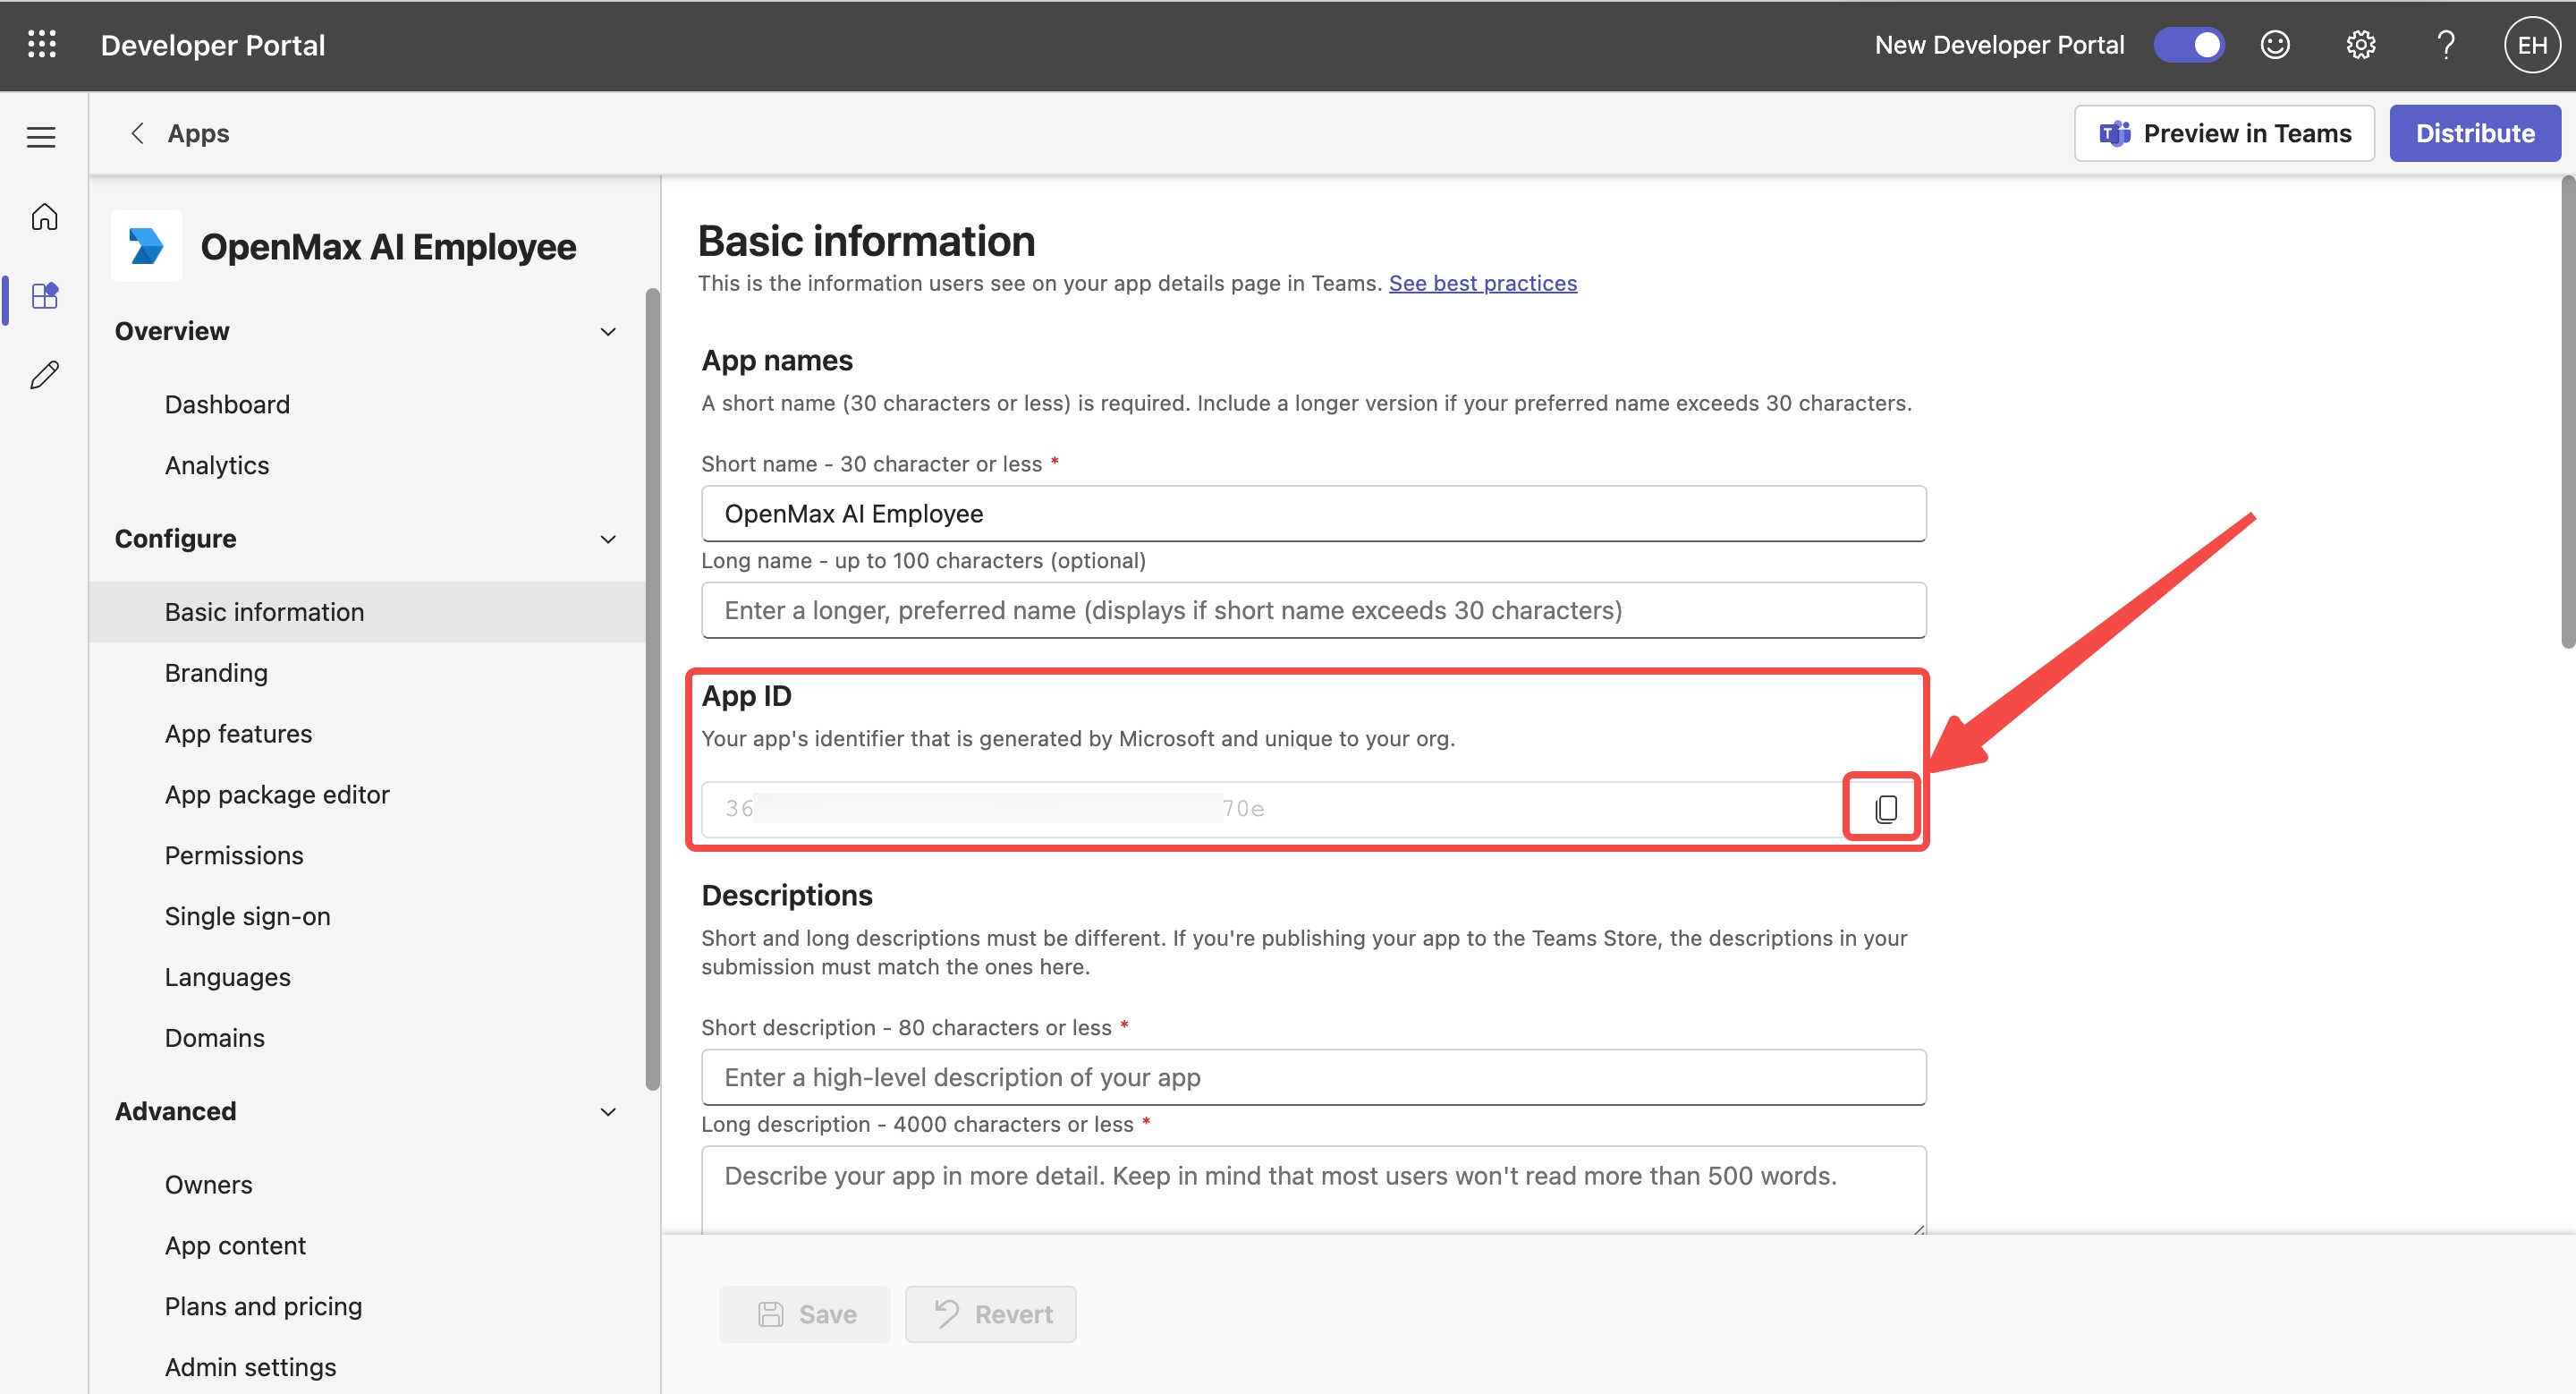
In Basic information, copy and note down the App ID shown at the top — this is your App Catalog ID. Paste it into the App Catalog ID field in the OpenMax Dashboard.
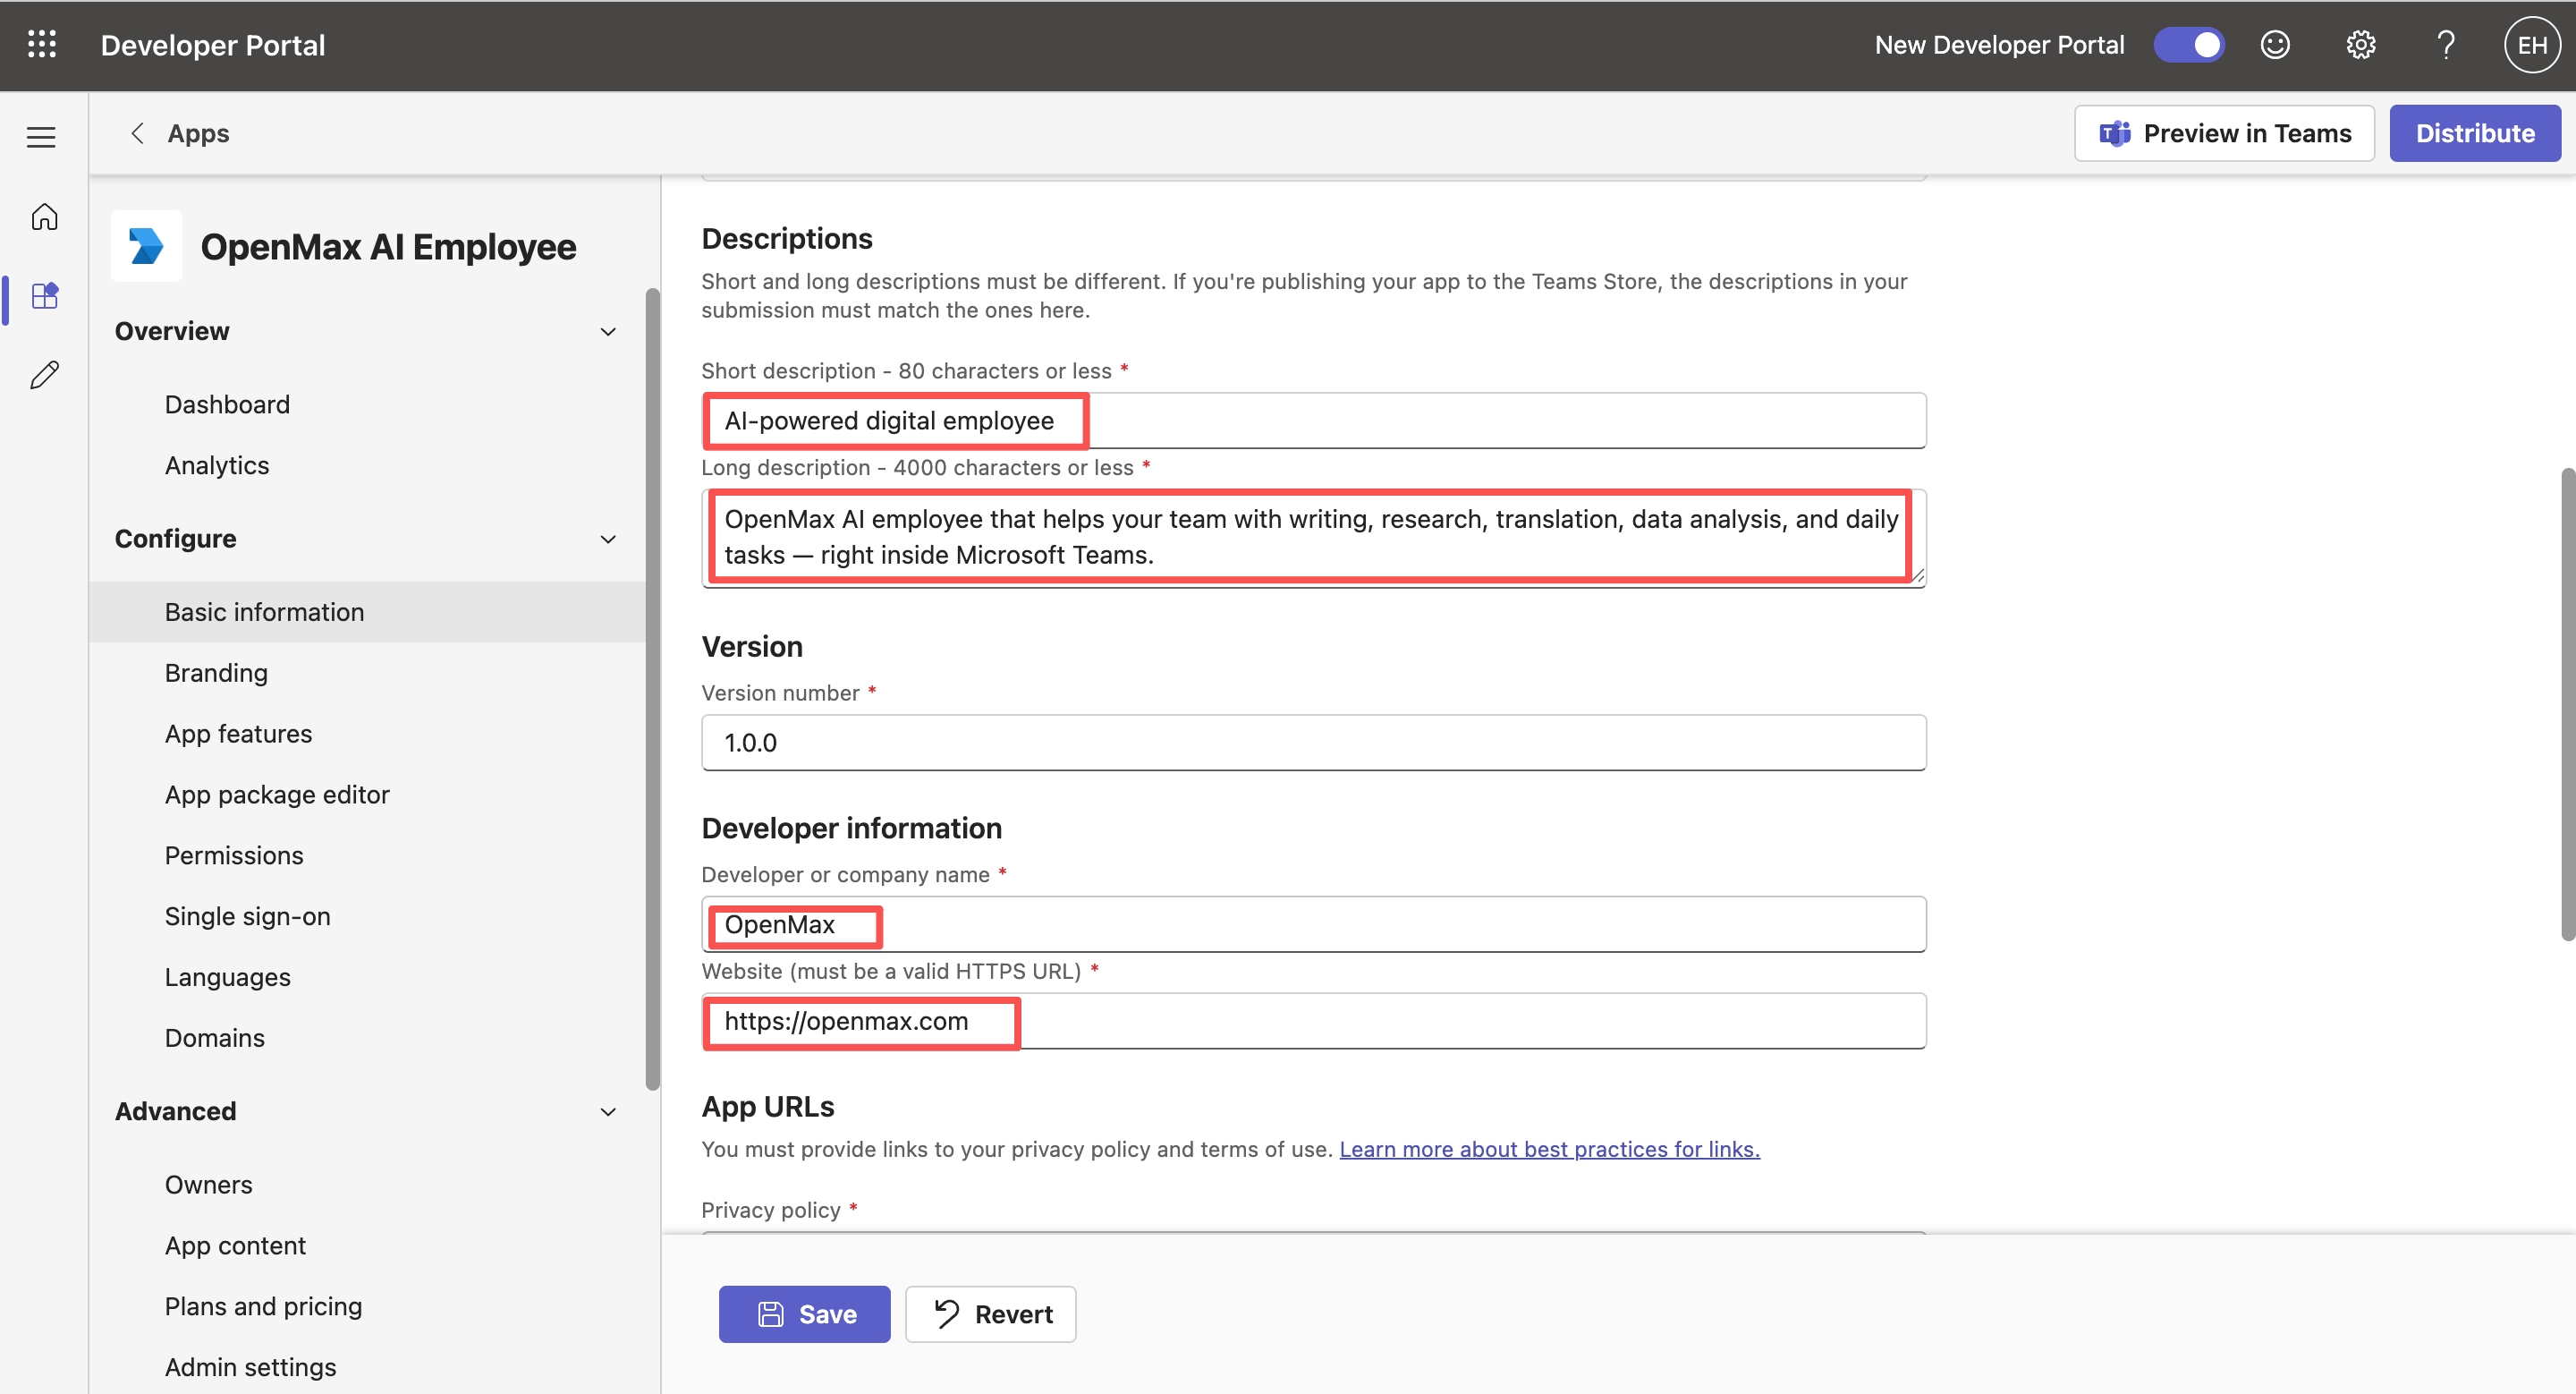
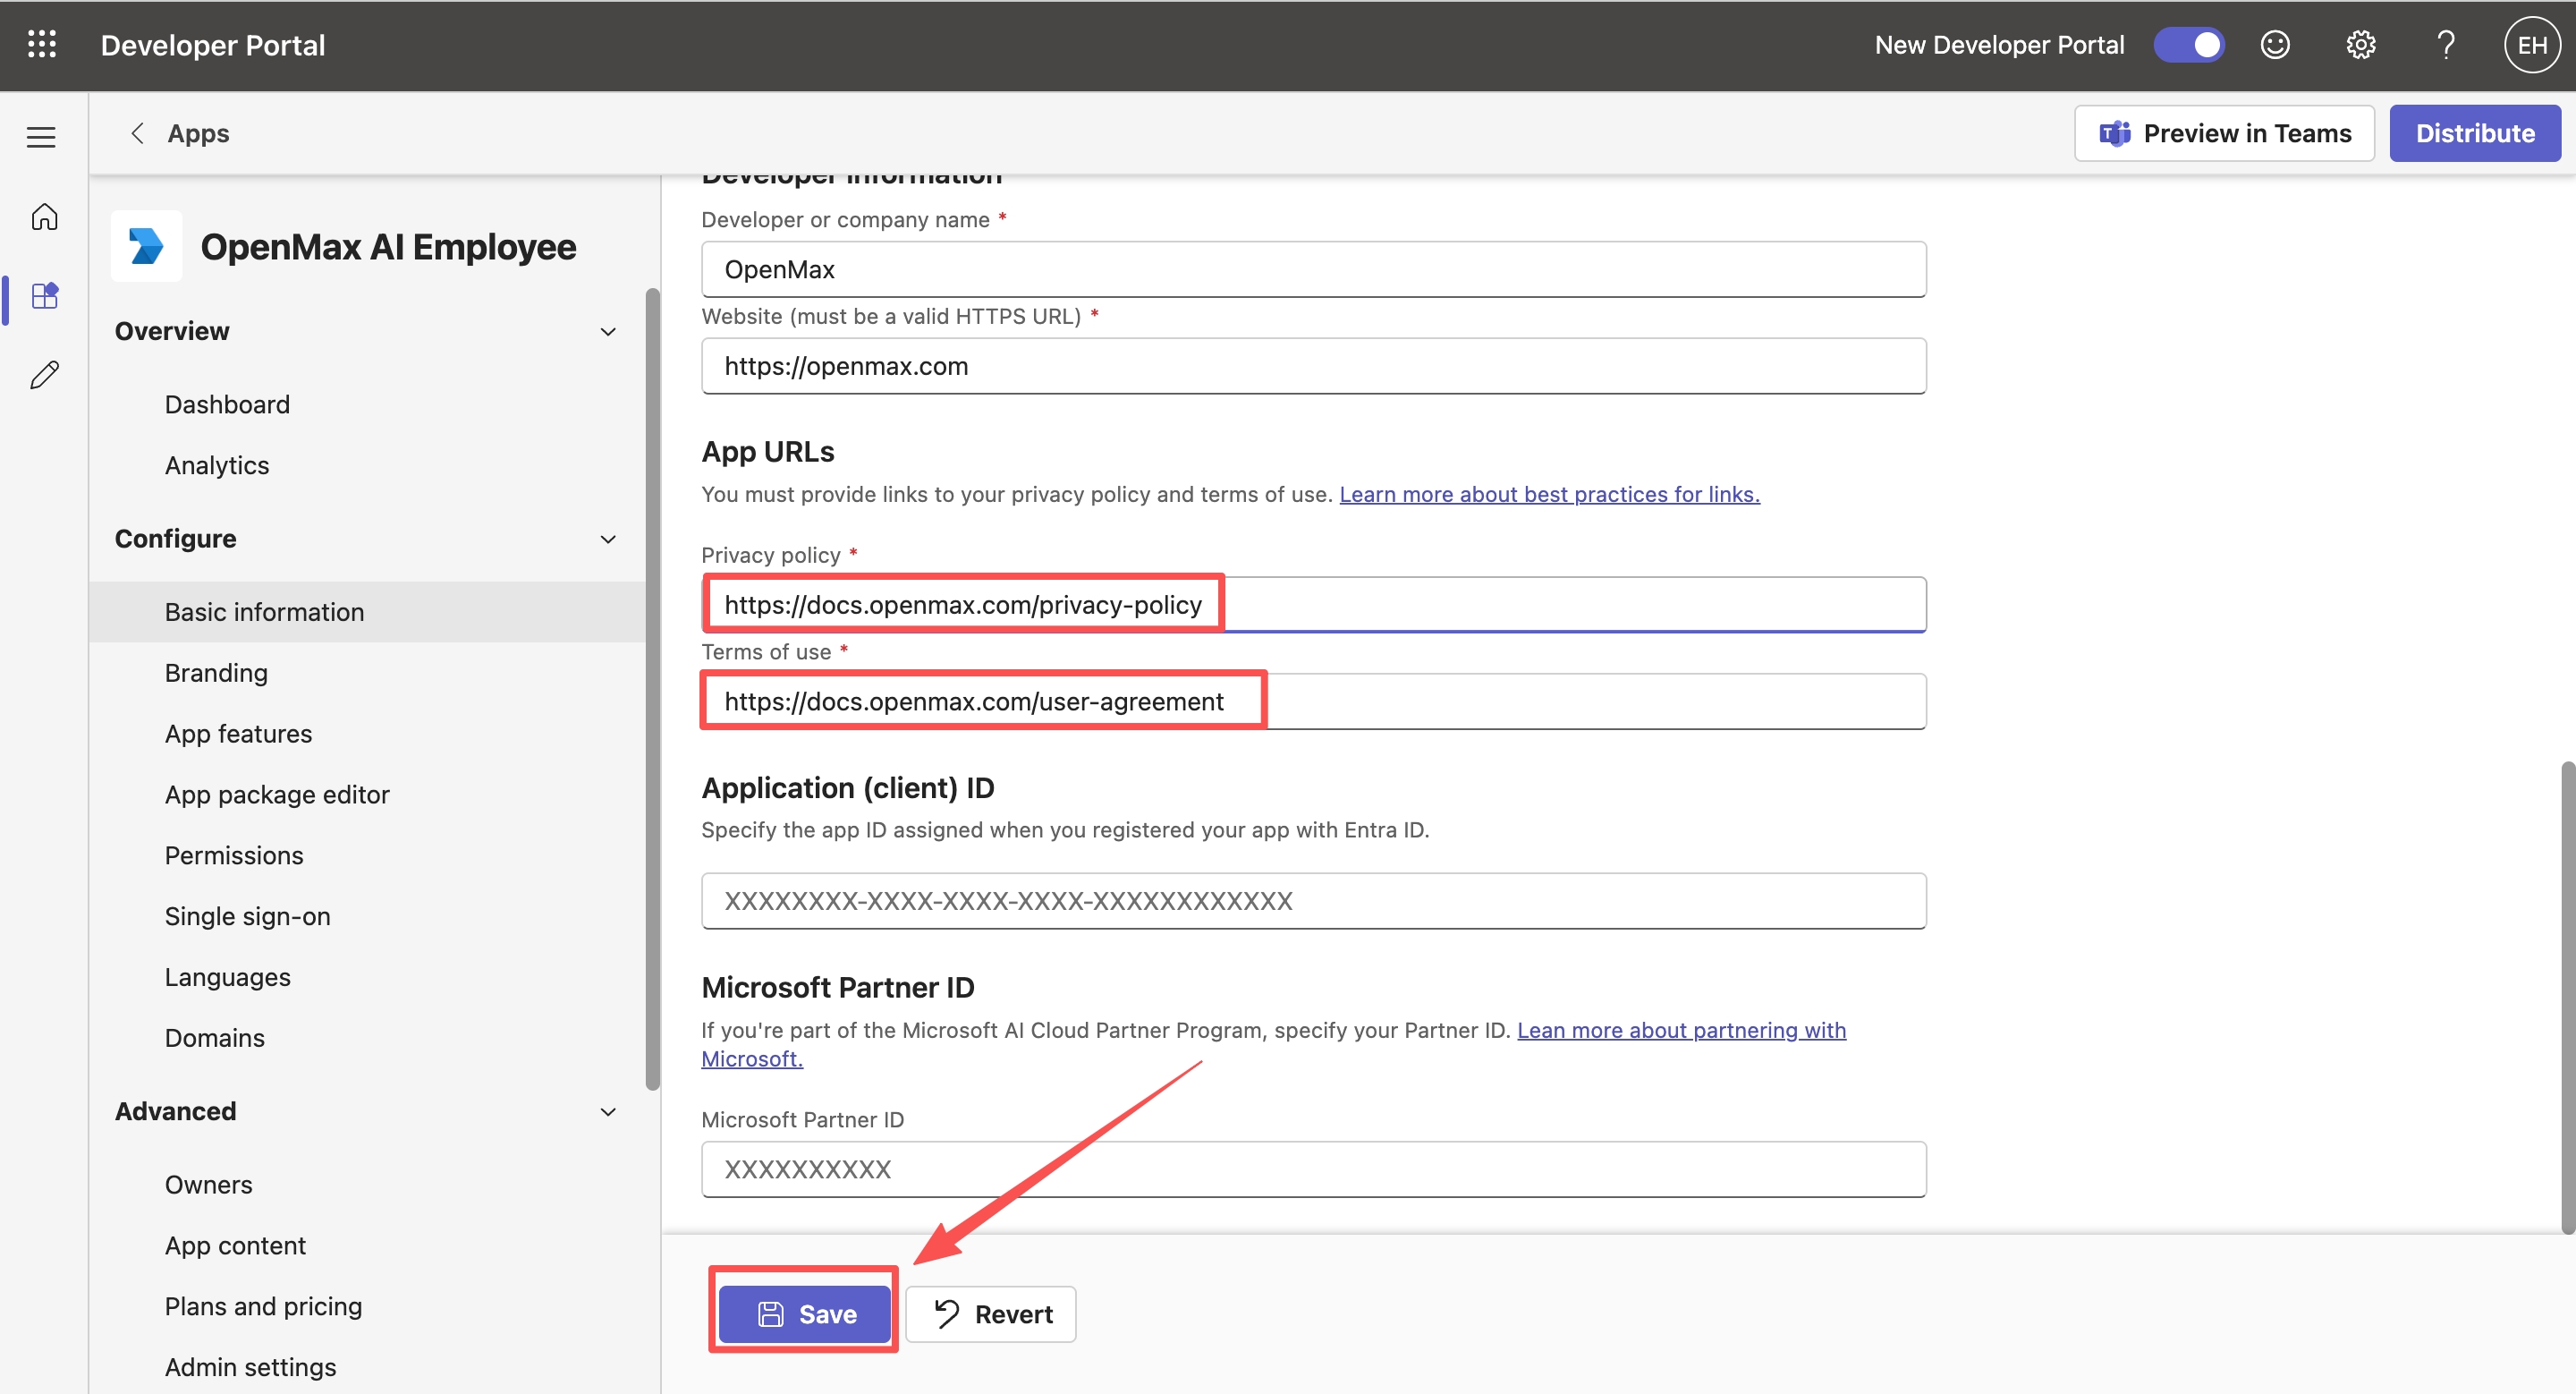
Fill in the required fields:
- Short description:
AI-powered digital employee - Long description:
OpenMax AI employee that helps your team with writing, research, translation, data analysis, and daily tasks — right inside Microsoft Teams. - Developer or company name:
OpenMax - Website:
https://openmax.com - Privacy policy:
https://docs.openmax.com/privacy-policy - Terms of use:
https://docs.openmax.com/user-agreement
Then click Save.
- Short description:
Step 7: Configure the App Manifest
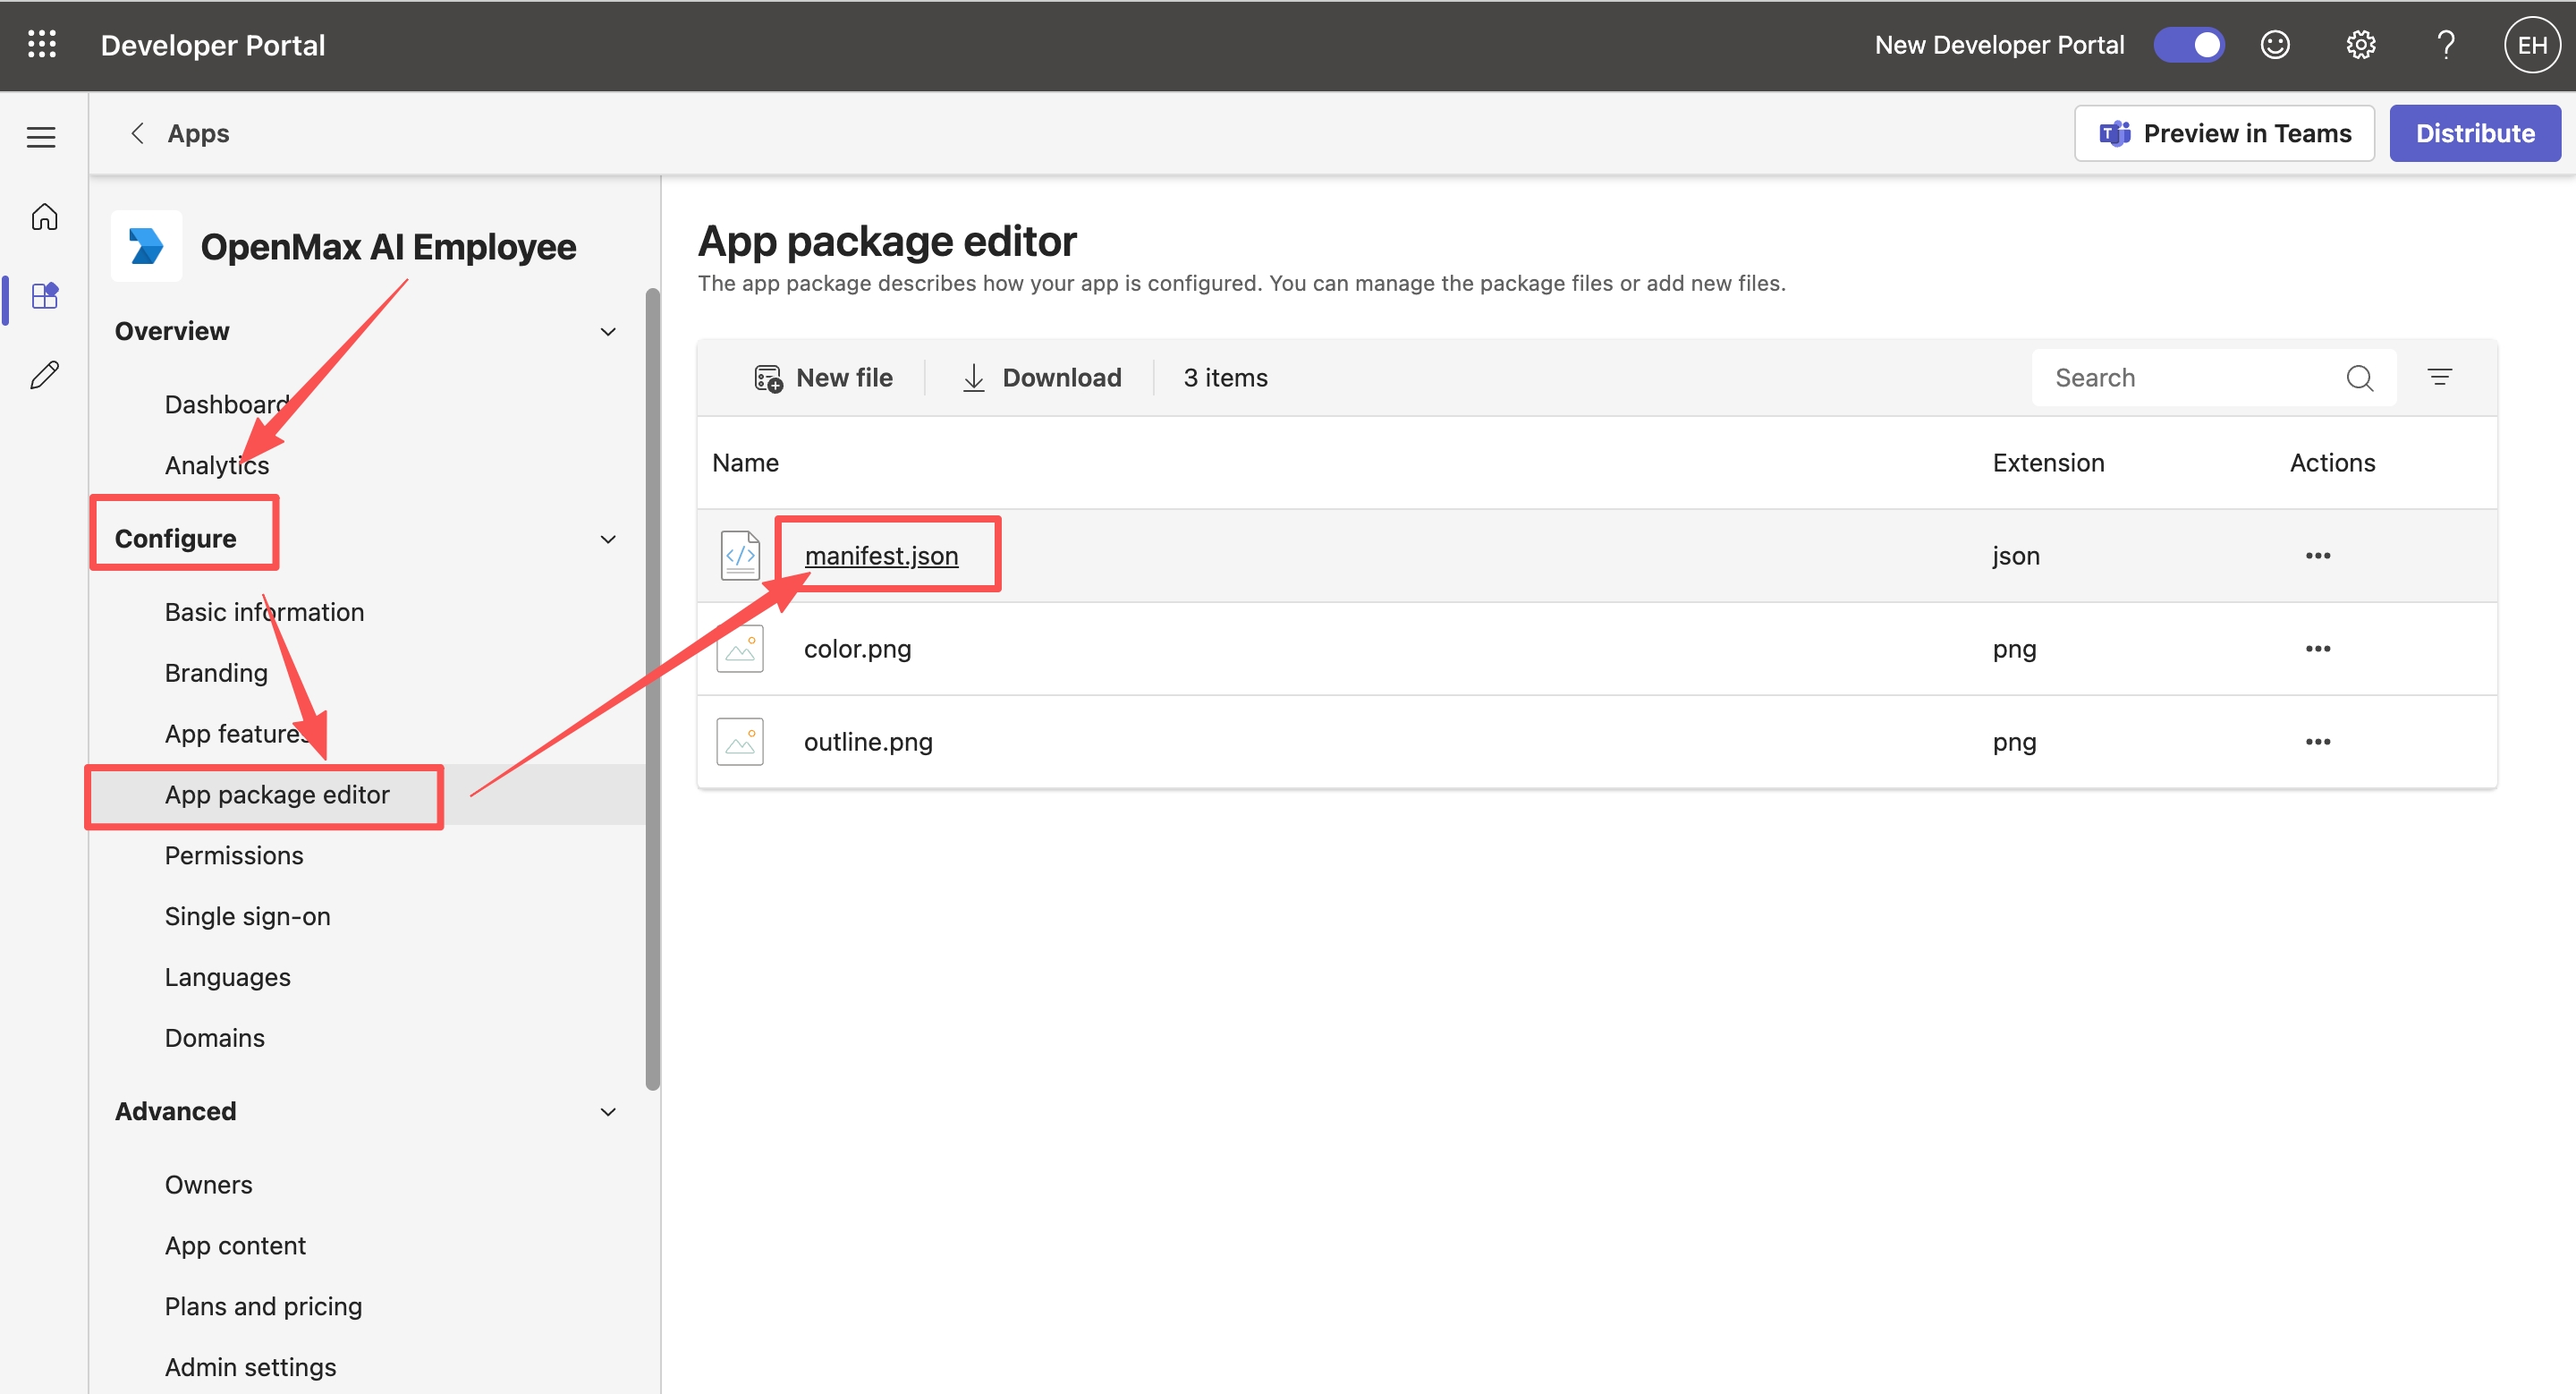
Click Configure → App package editor, then open manifest.json.
Remove everything in the editor, then paste the manifest below:
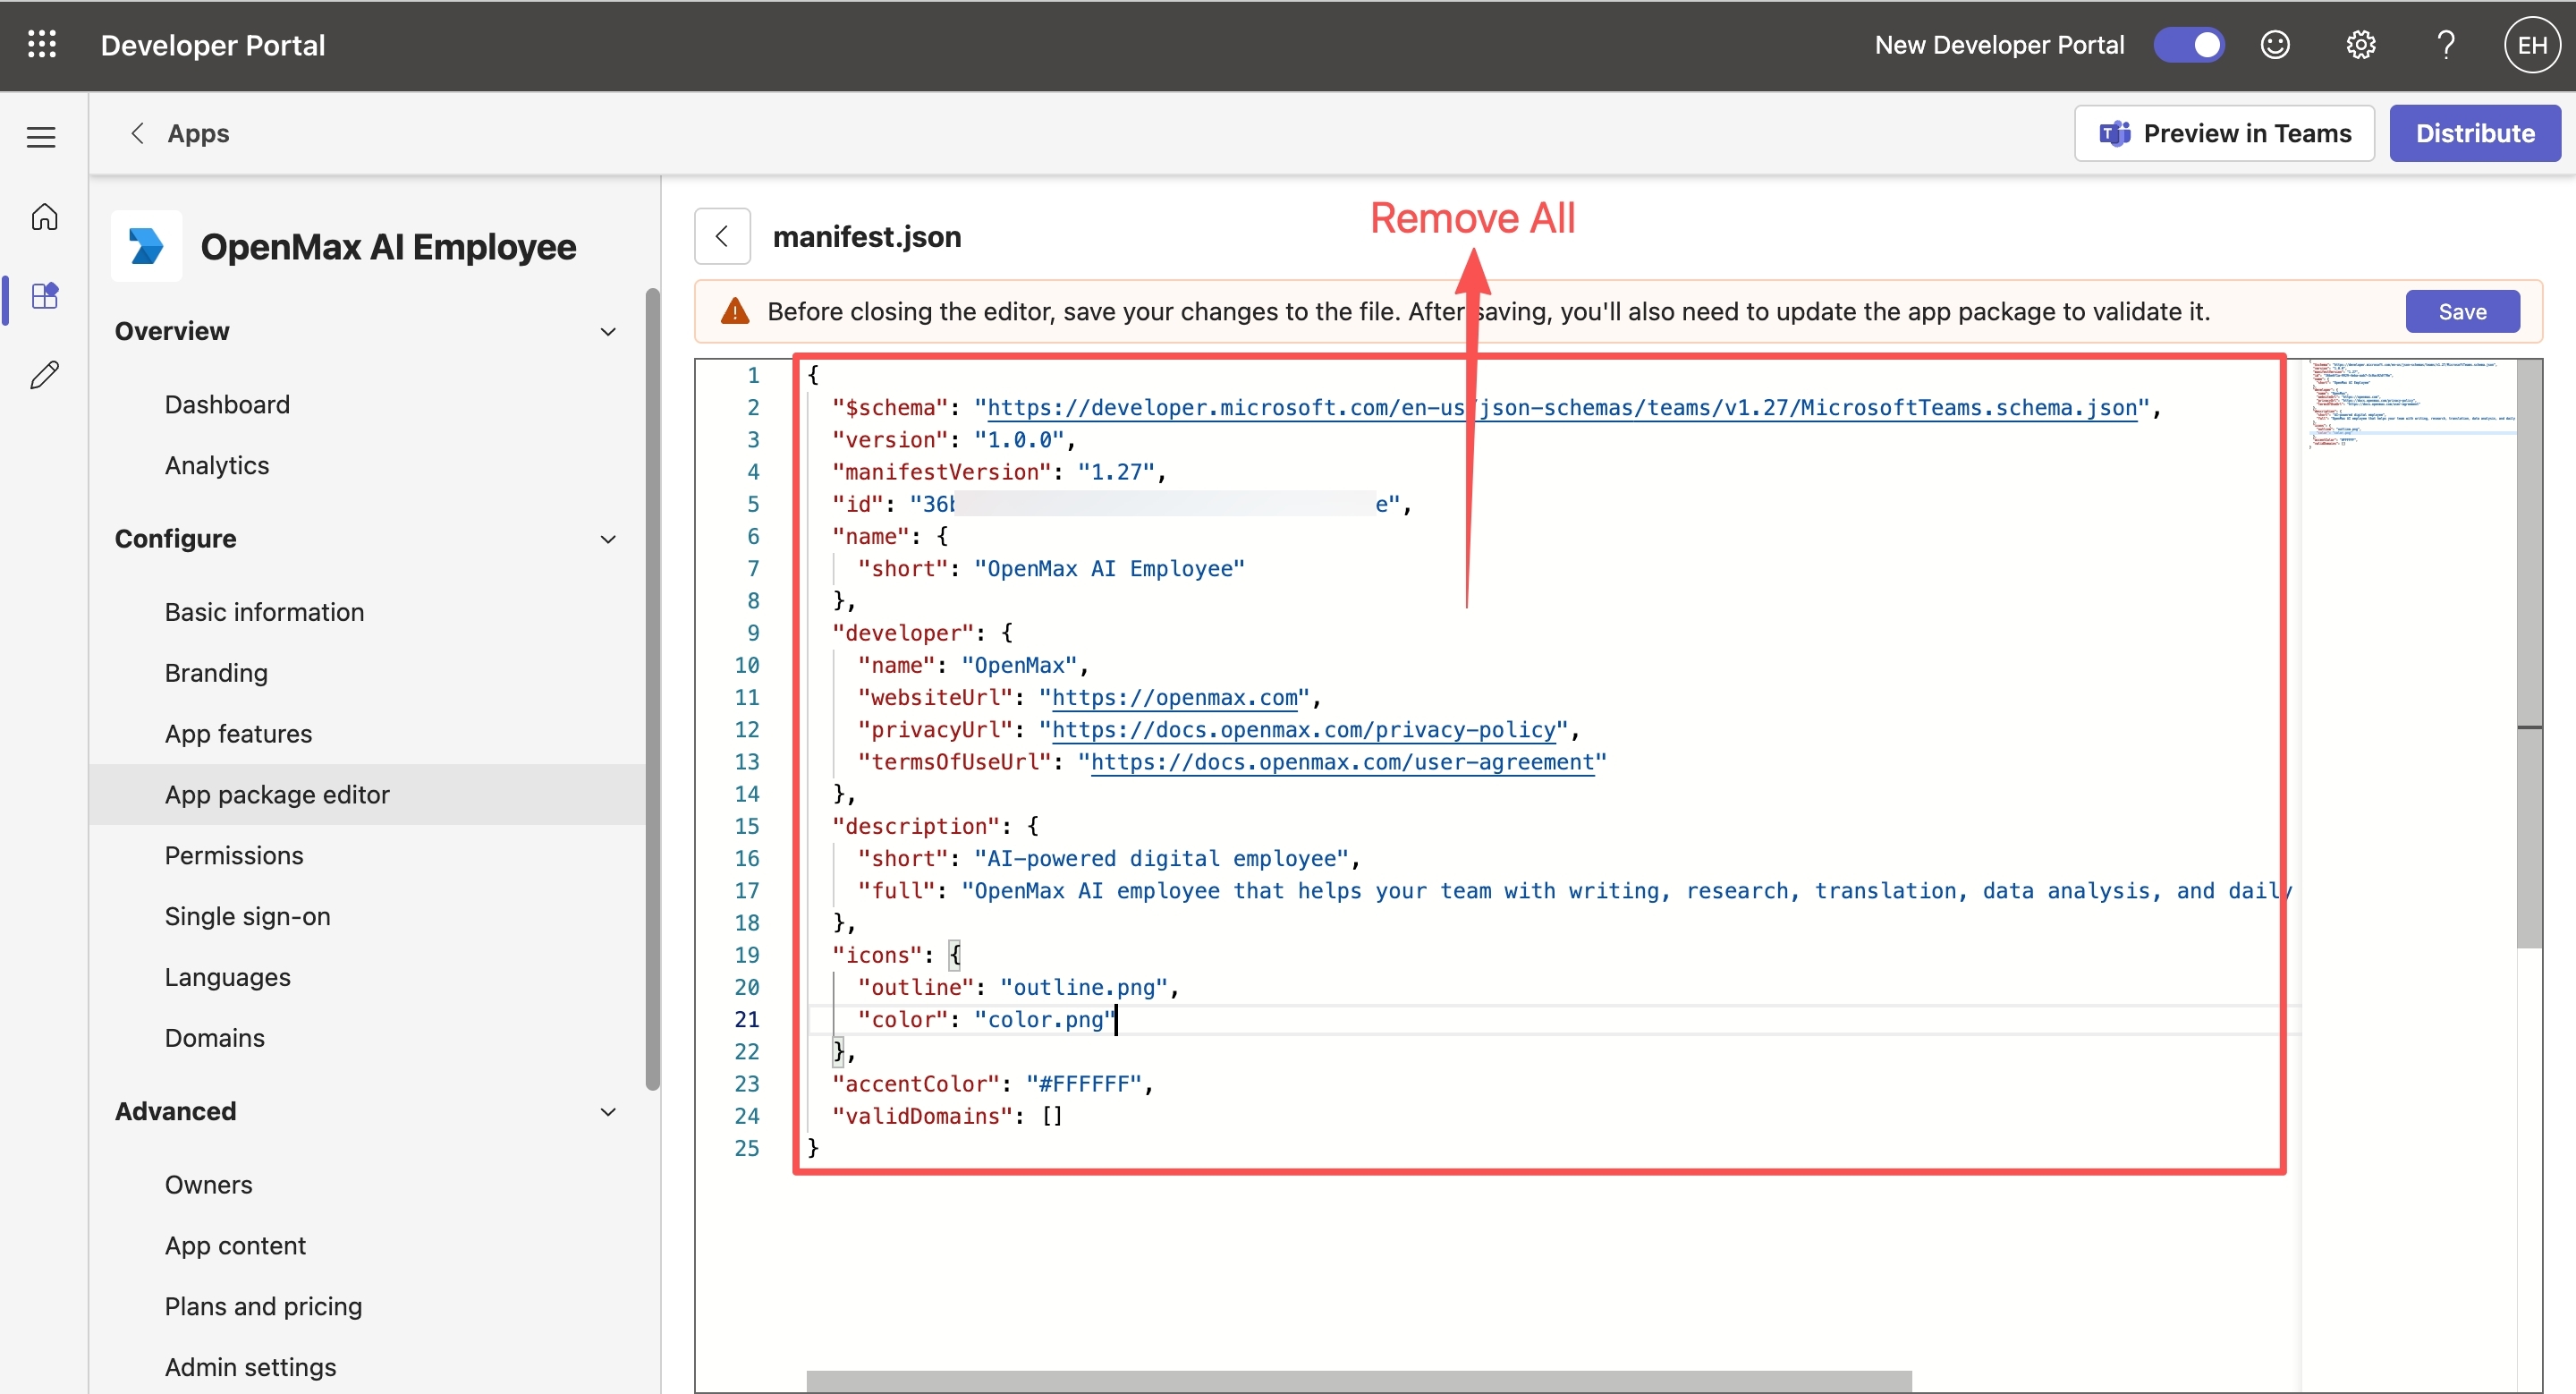
{
  "$schema": "https://developer.microsoft.com/en-us/json-schemas/teams/v1.19/MicrosoftTeams.schema.json",
  "version": "1.0.0",
  "manifestVersion": "1.19",
  "id": "<TEAMS_APP_ID>",
  "name": { "short": "OpenMax AI Employee" },
  "developer": {
    "name": "OpenMax",
    "websiteUrl": "https://openmax.com",
    "privacyUrl": "https://docs.openmax.com/privacy-policy",
    "termsOfUseUrl": "https://docs.openmax.com/user-agreement"
  },
  "description": {
    "short": "AI-powered digital employee",
    "full": "OpenMax AI employee that helps your team with writing, research, translation, data analysis, and daily tasks — right inside Microsoft Teams."
  },
  "icons": { "outline": "outline.png", "color": "color.png" },
  "accentColor": "#FFD646",
  "bots": [{
    "botId": "<AZURE_APP_ID>",
    "scopes": ["personal", "team", "groupChat"],
    "isNotificationOnly": false,
    "supportsCalling": false,
    "supportsVideo": false,
    "supportsFiles": true
  }],
  "permissions": ["messageTeamMembers"],
  "validDomains": [],
  "webApplicationInfo": {
    "id": "<AZURE_APP_ID>",
    "resource": "https://graph.microsoft.com"
  },
  "authorization": {
    "permissions": {
      "resourceSpecific": [
        { "name": "ChatMessage.Read.Chat", "type": "Application" },
        { "name": "ChannelMessage.Read.Group", "type": "Application" }
      ]
    }
  }
}
Replace the placeholders:
<TEAMS_APP_ID>(1 place) → your App Catalog ID<AZURE_APP_ID>(2 places:bots[0].botIdandwebApplicationInfo.id) → your App ID (the Microsoft App ID)
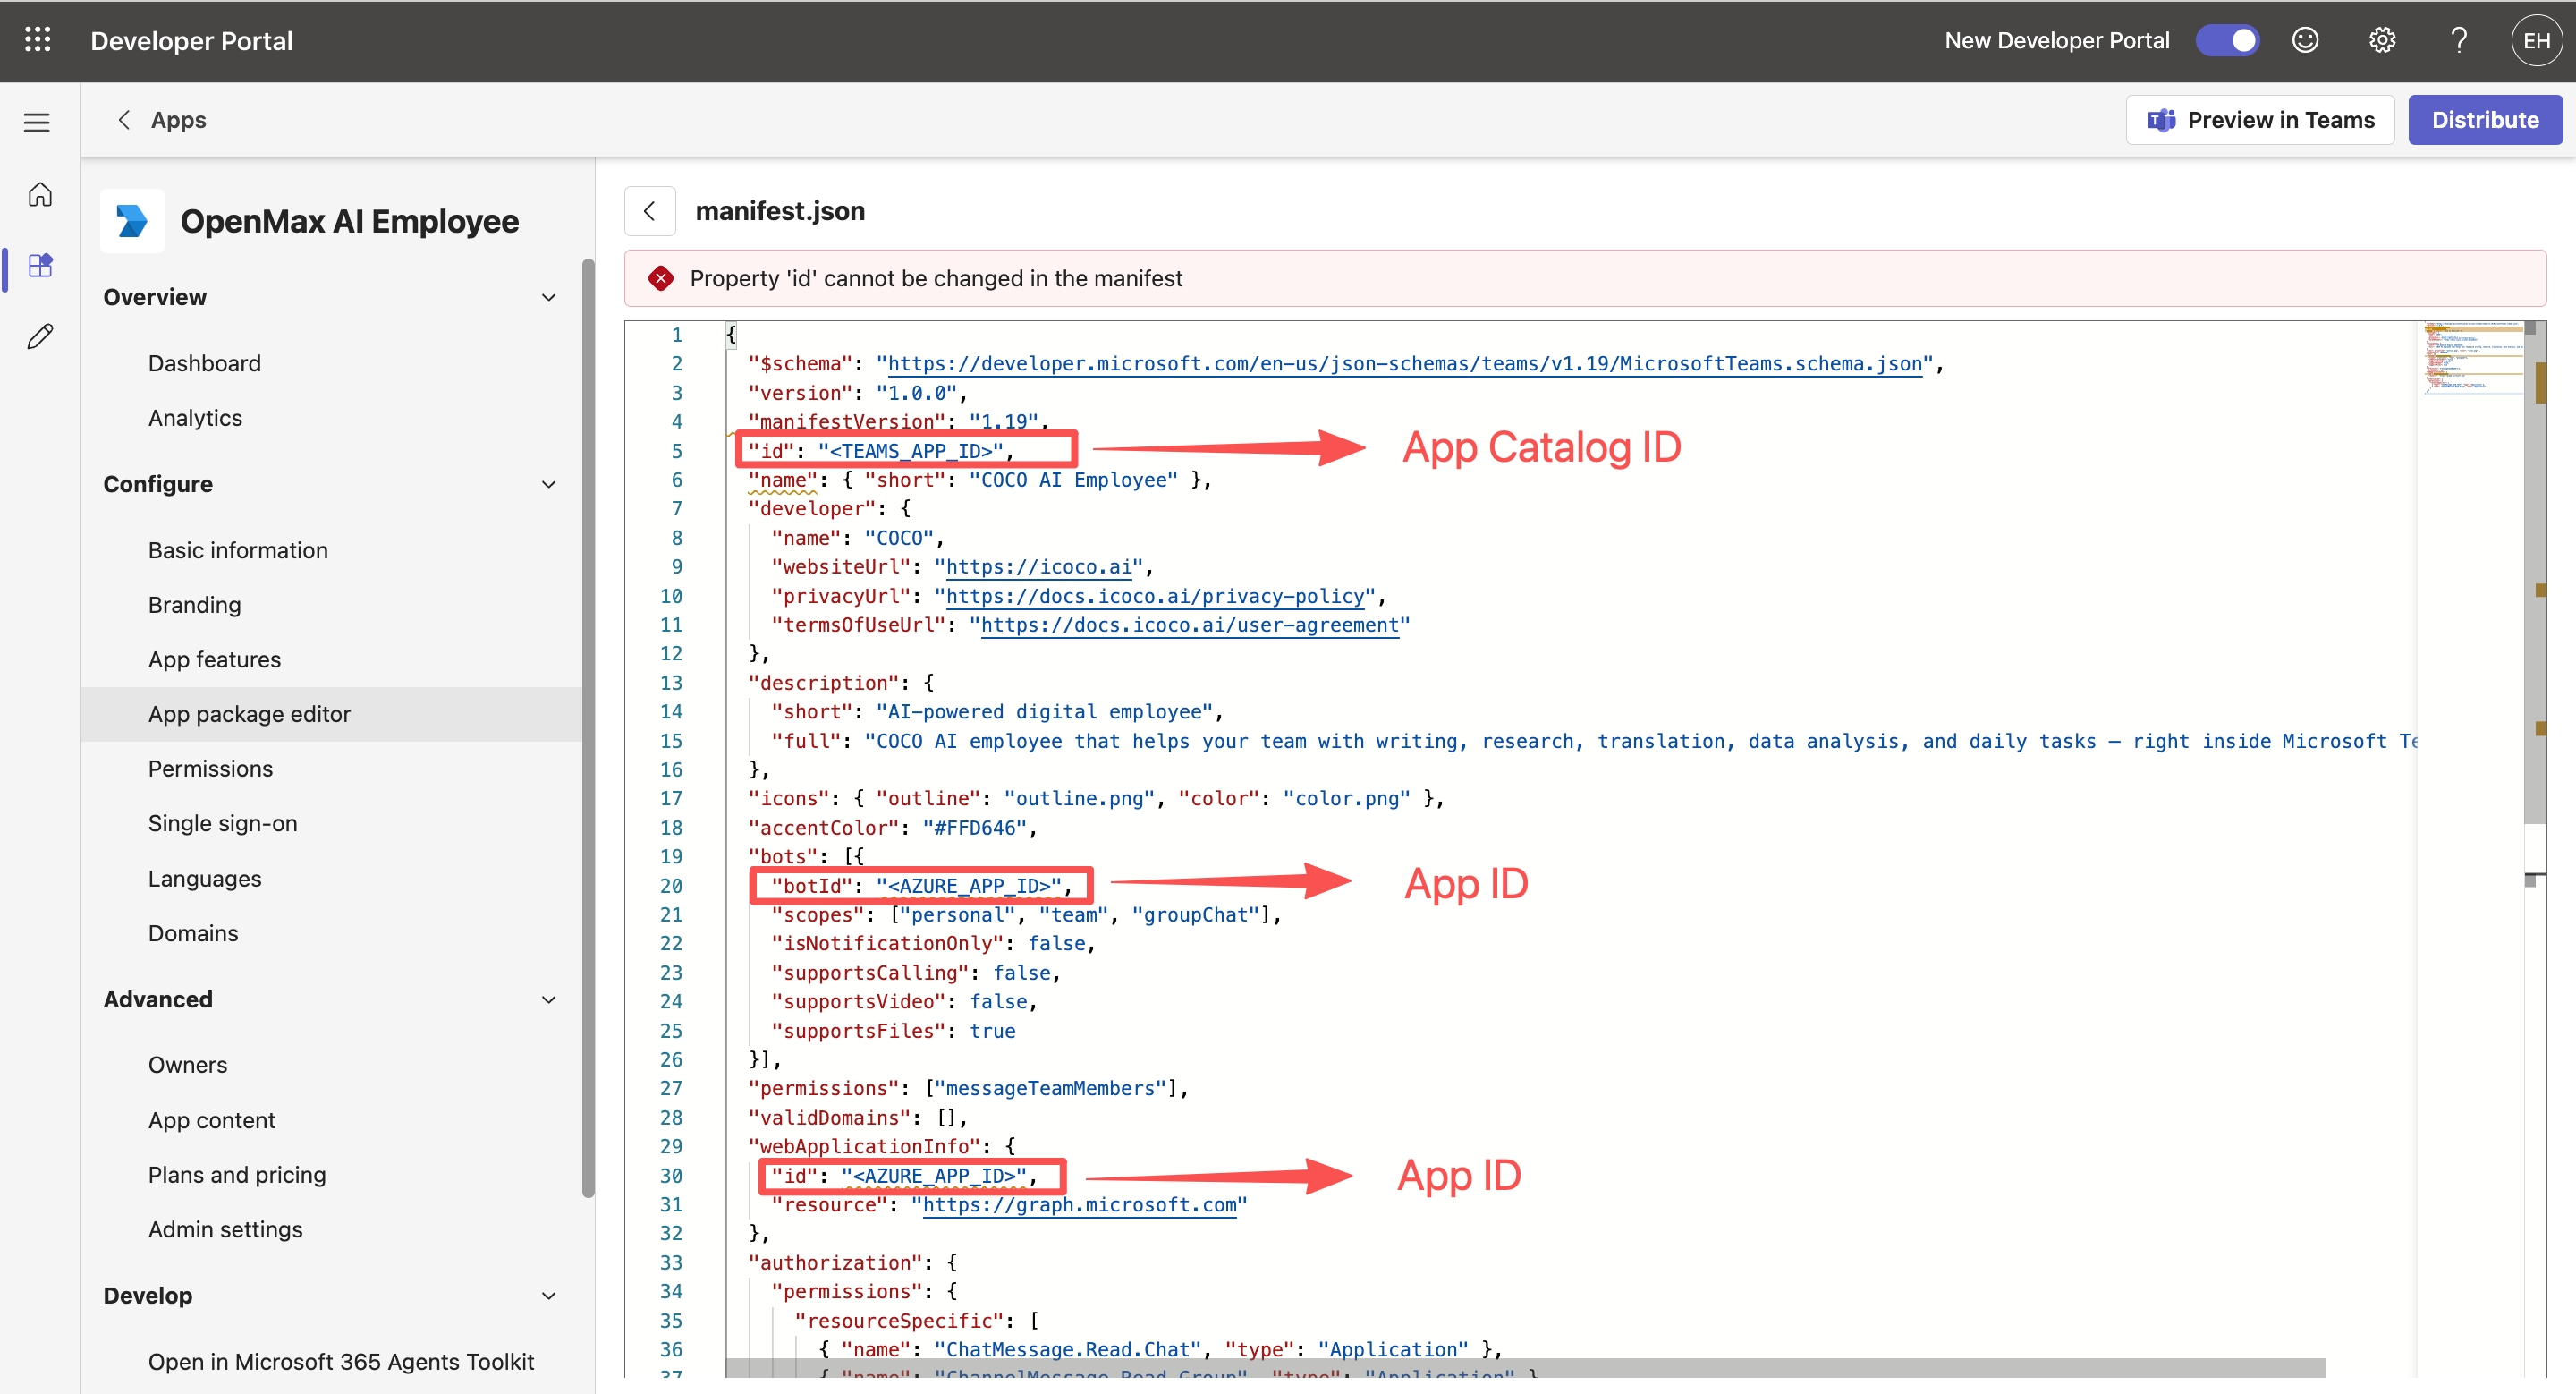
After replacing, click Save, as shown below.
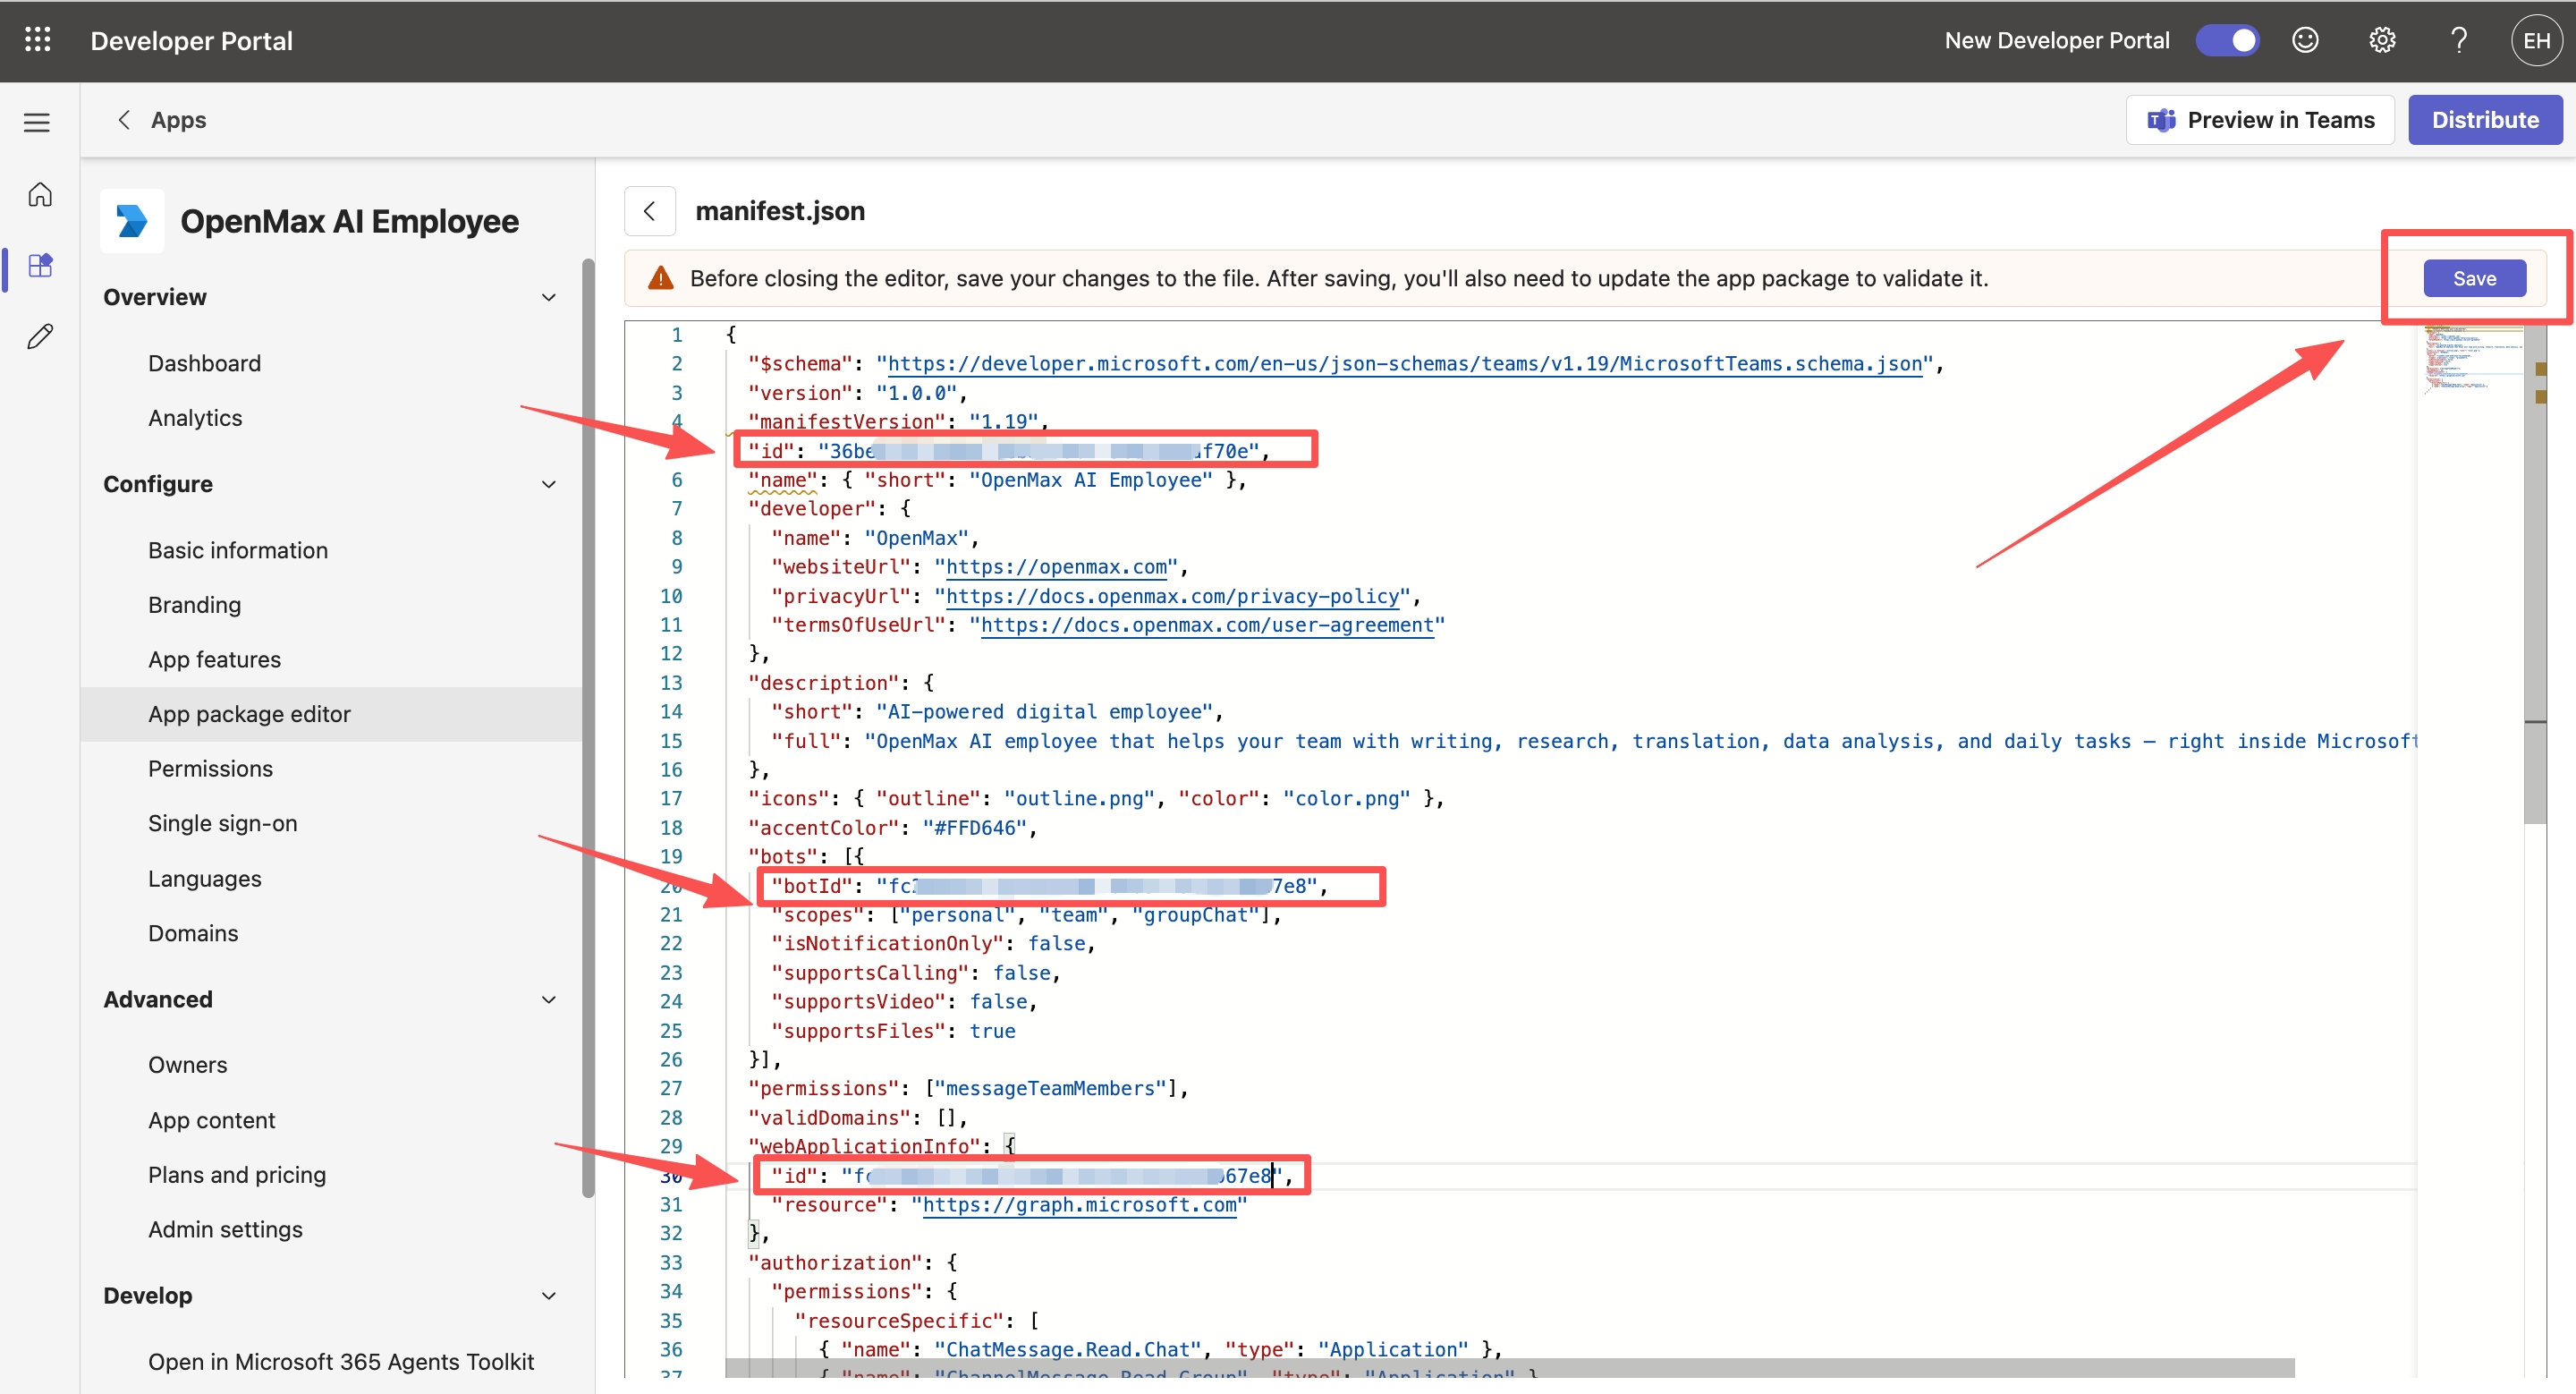
If a red "Property 'id' cannot be changed in the manifest" error appears after pasting, don't worry — it disappears once you replace
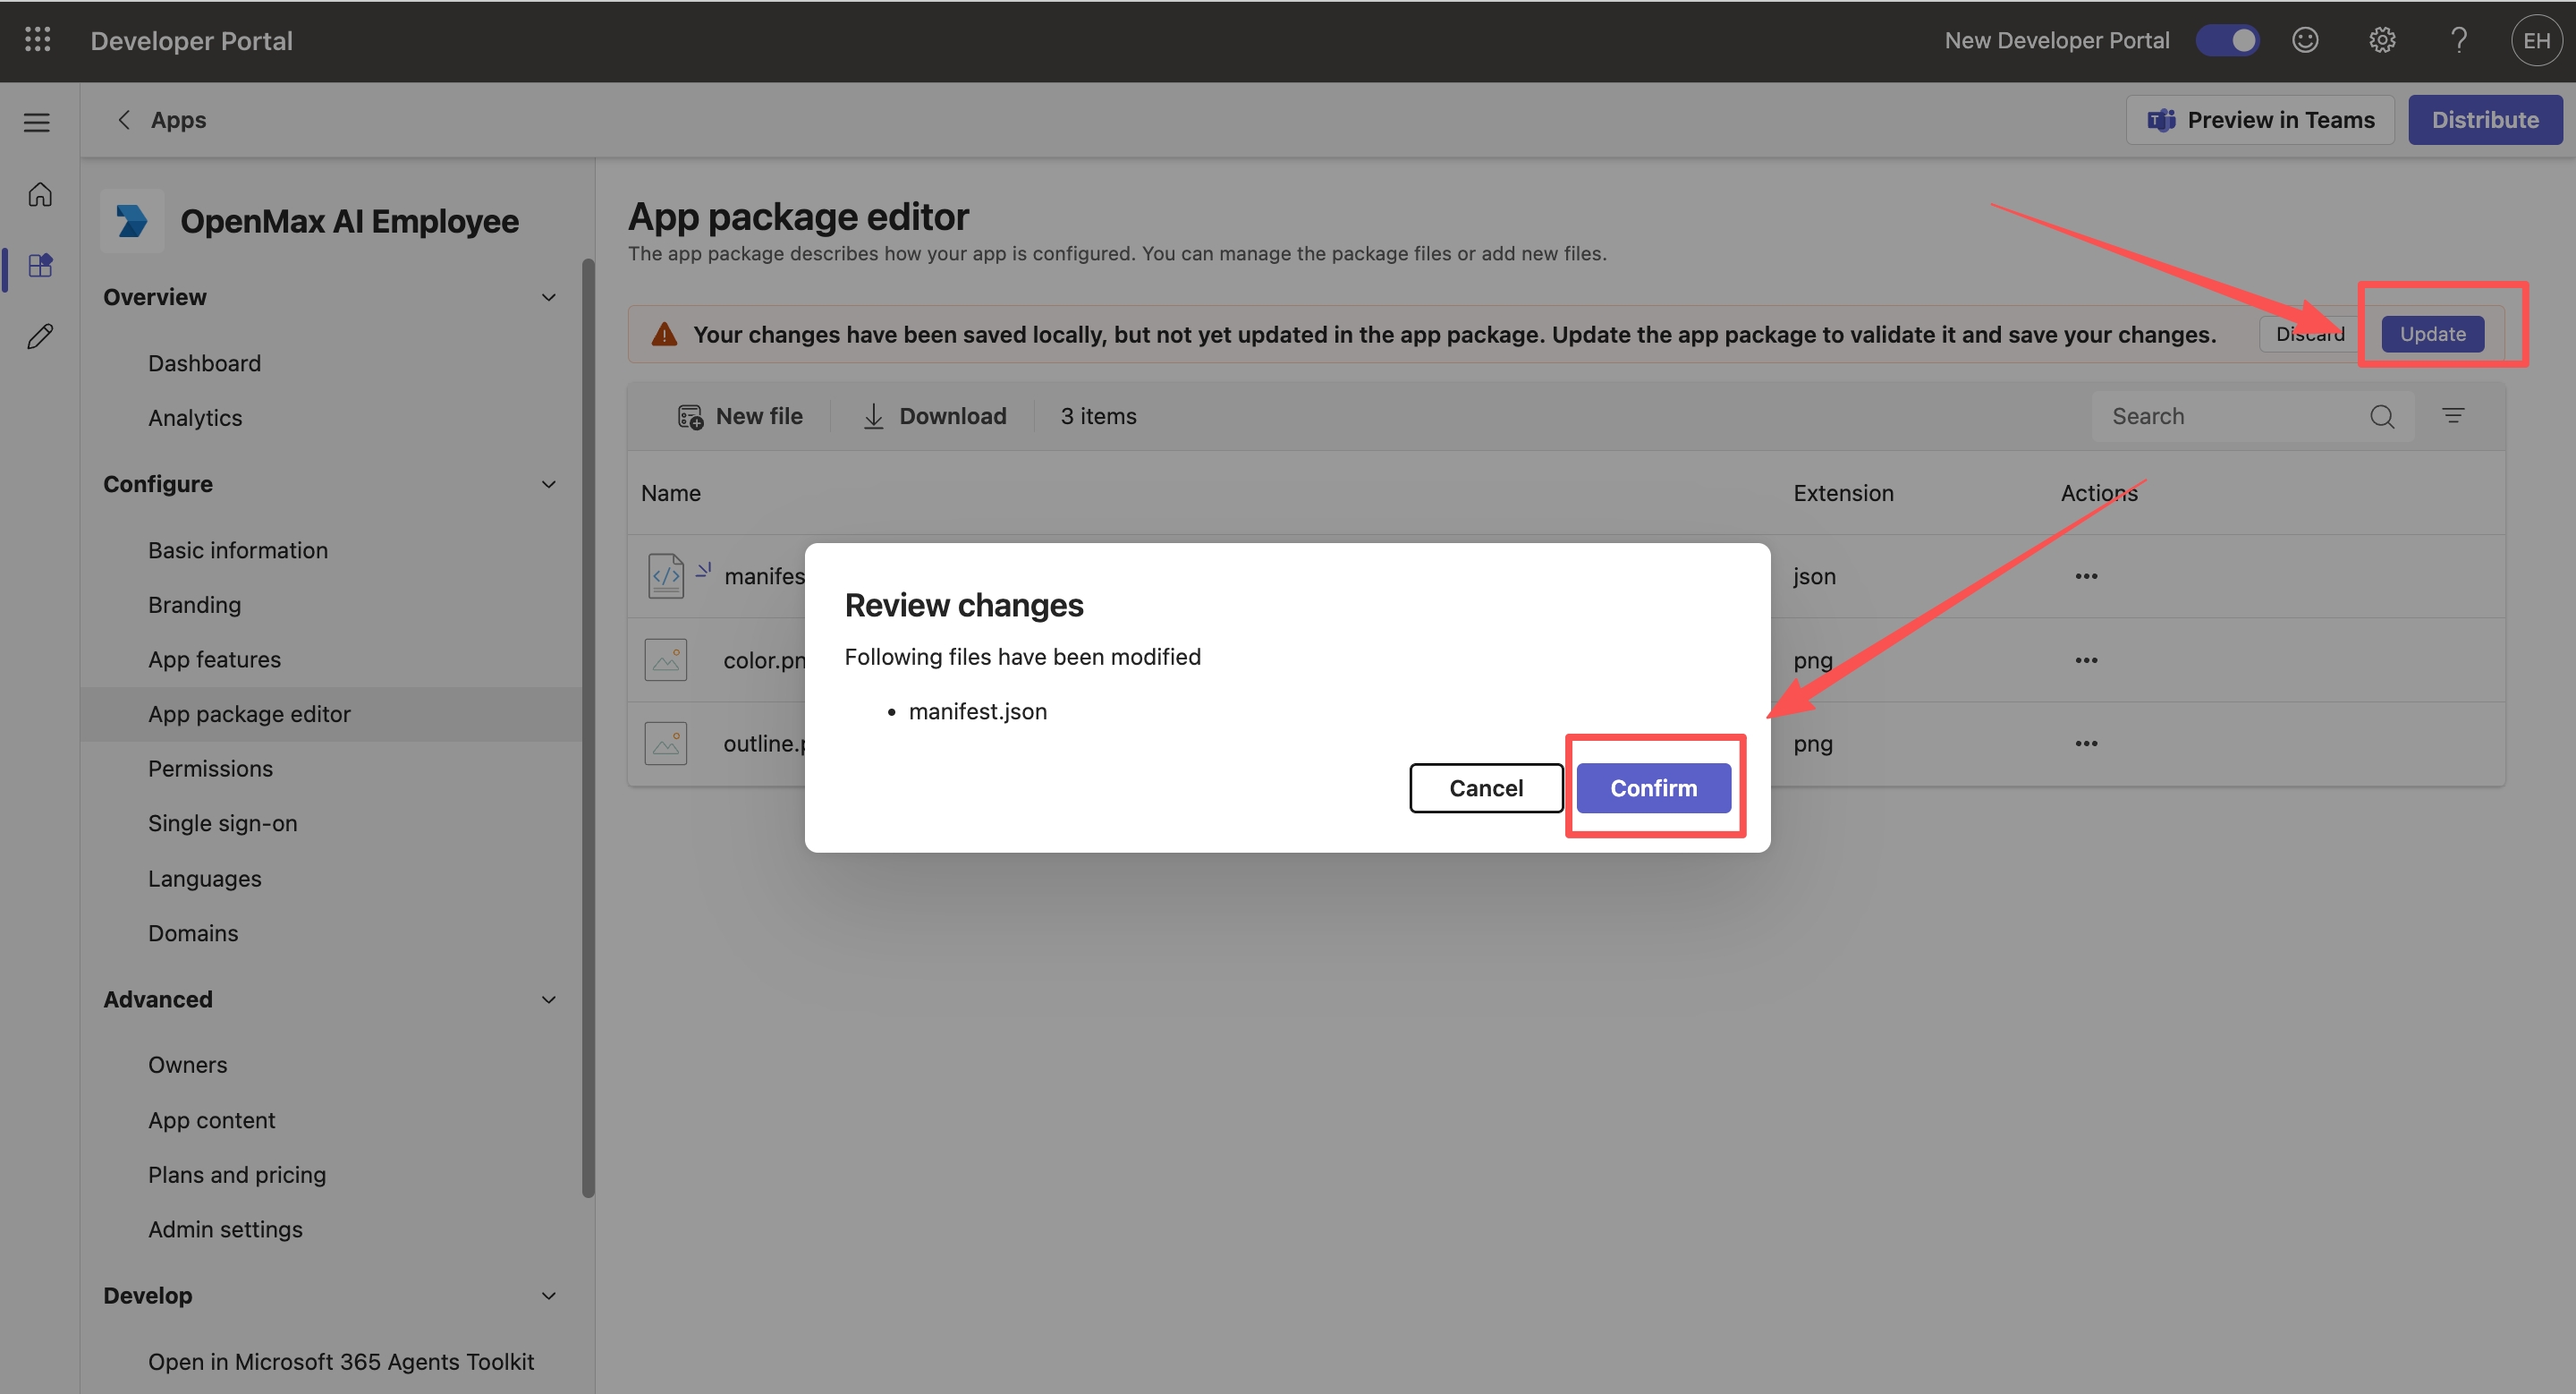
<TEAMS_APP_ID>with your App Catalog ID (theidmust stay your app's own ID).Click Update, then Confirm.
Step 8 (Optional): Branding
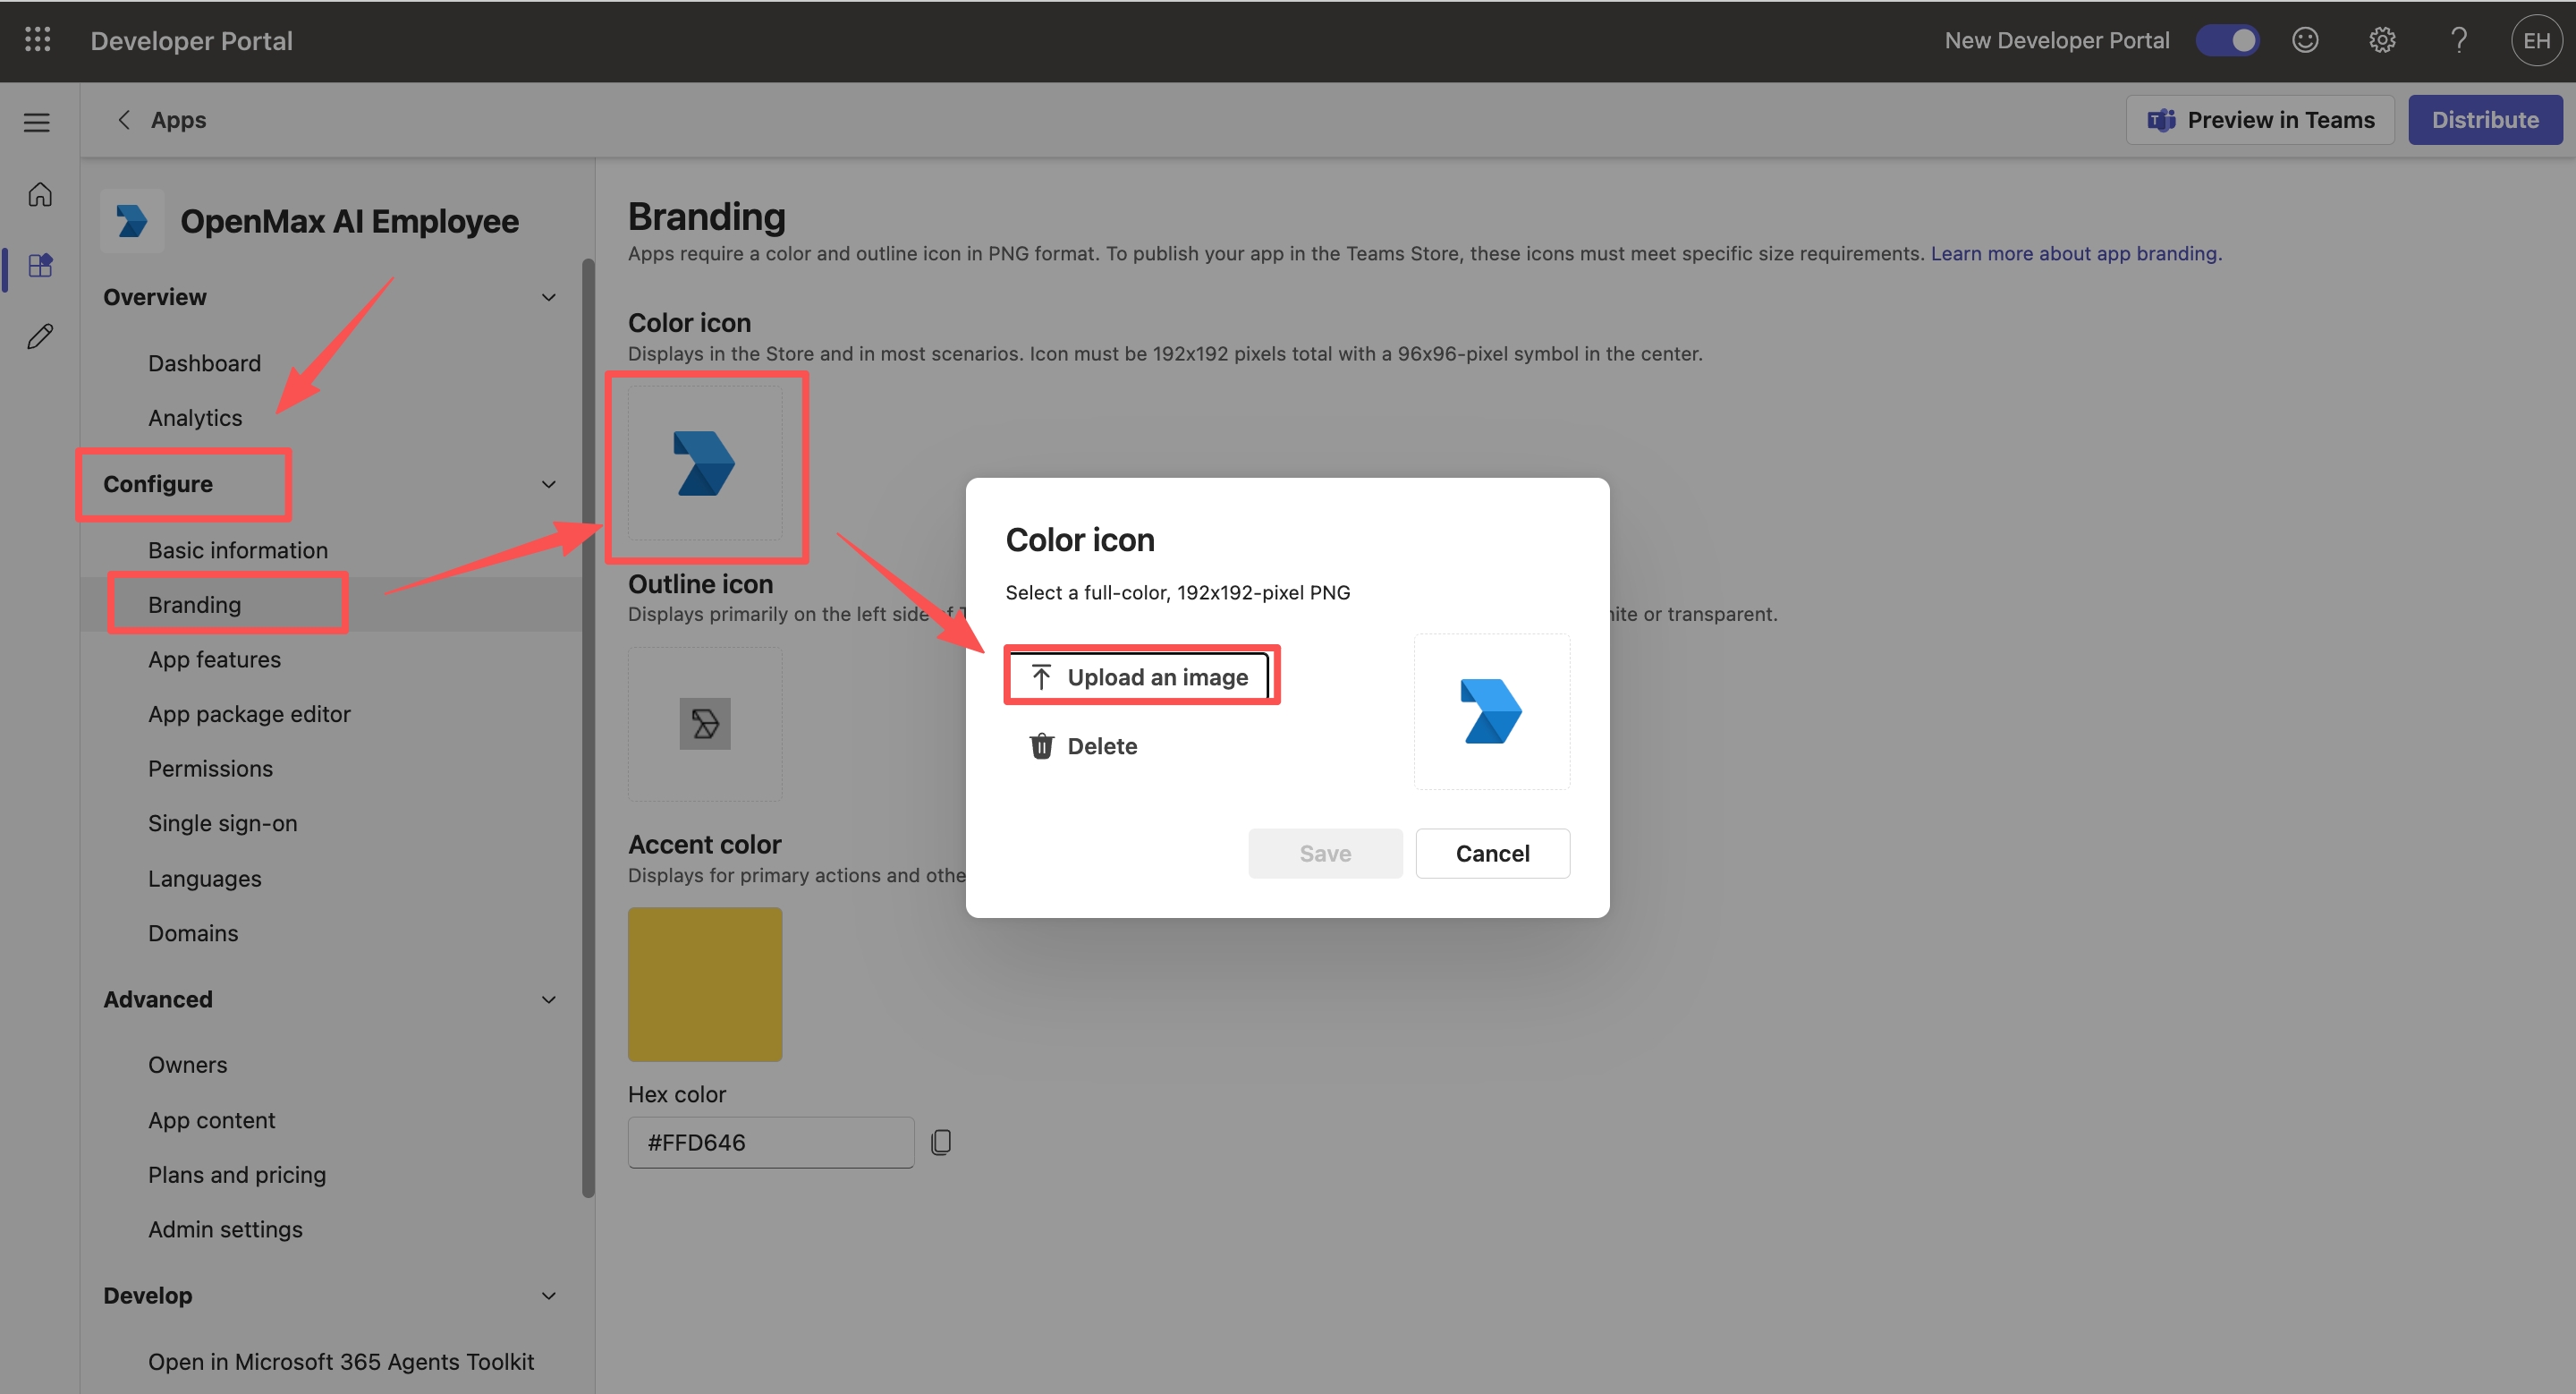
In Configure → Branding you can replace the app icons: a 192×192 full-color PNG and a 32×32 transparent outline PNG. If you skip this, default placeholder icons are used.
Step 9: Publish the App to Your Organization
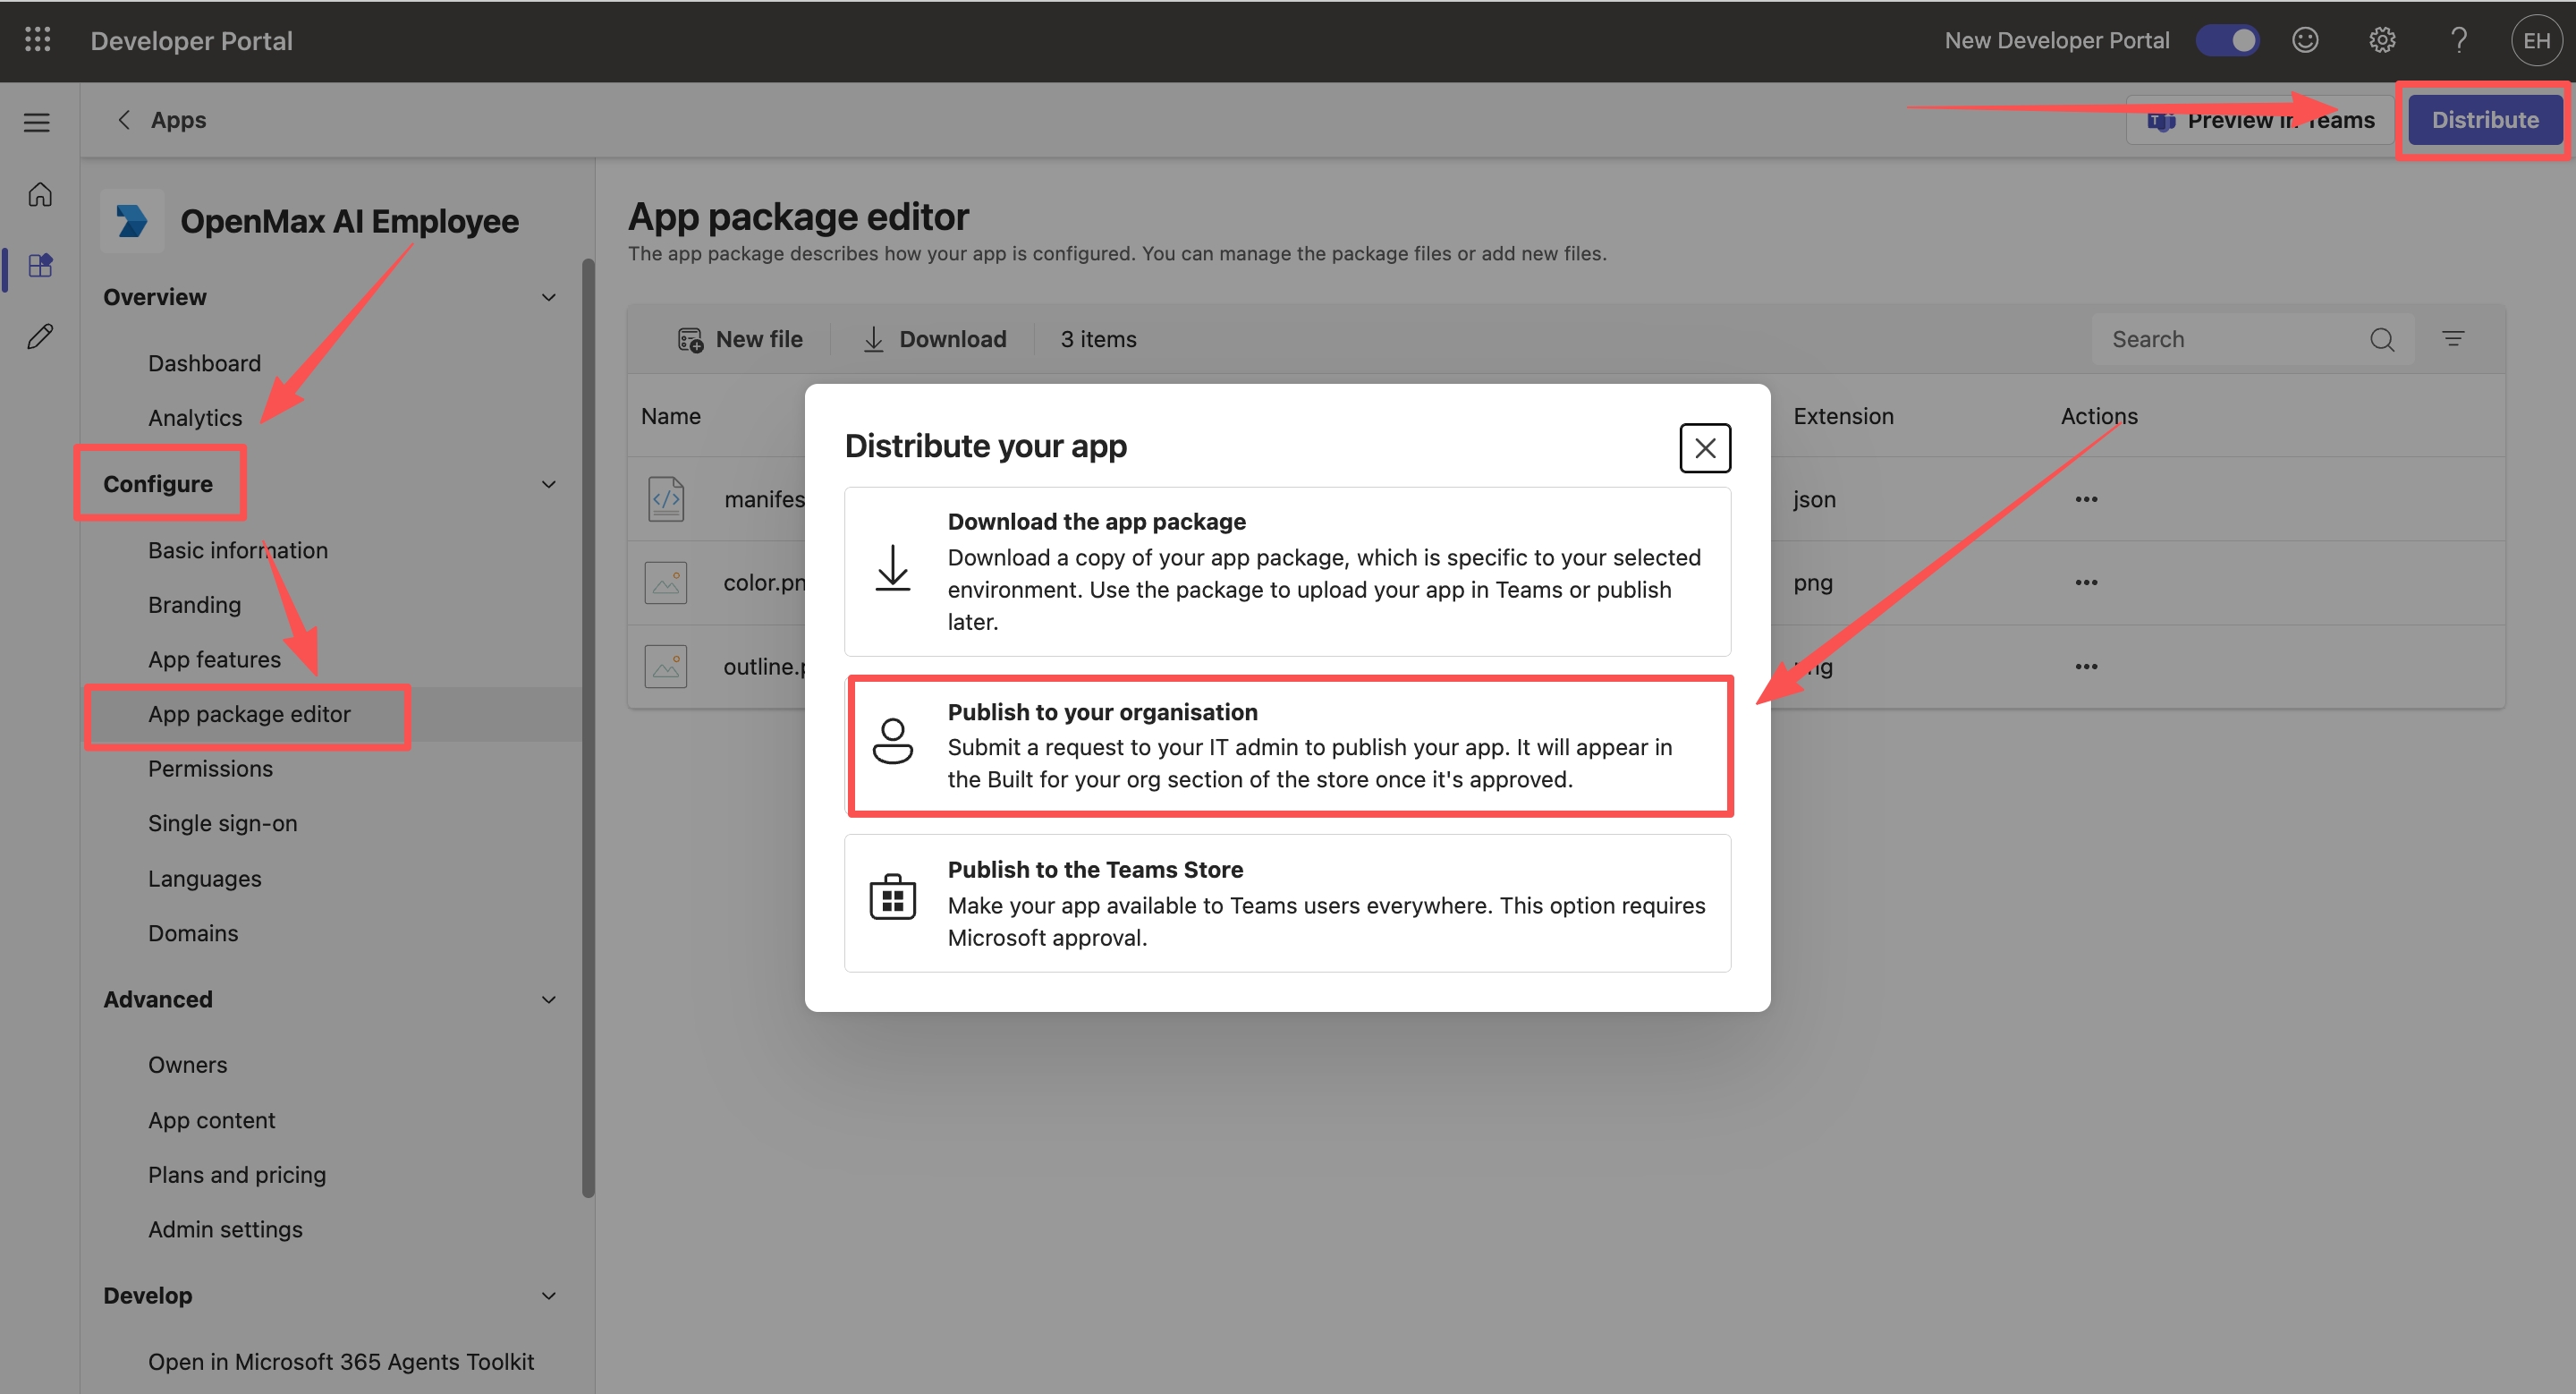
In the App package editor, click Distribute and choose Publish to your organization.
Click Get started. The status then shows Submitted (awaiting admin's approval).
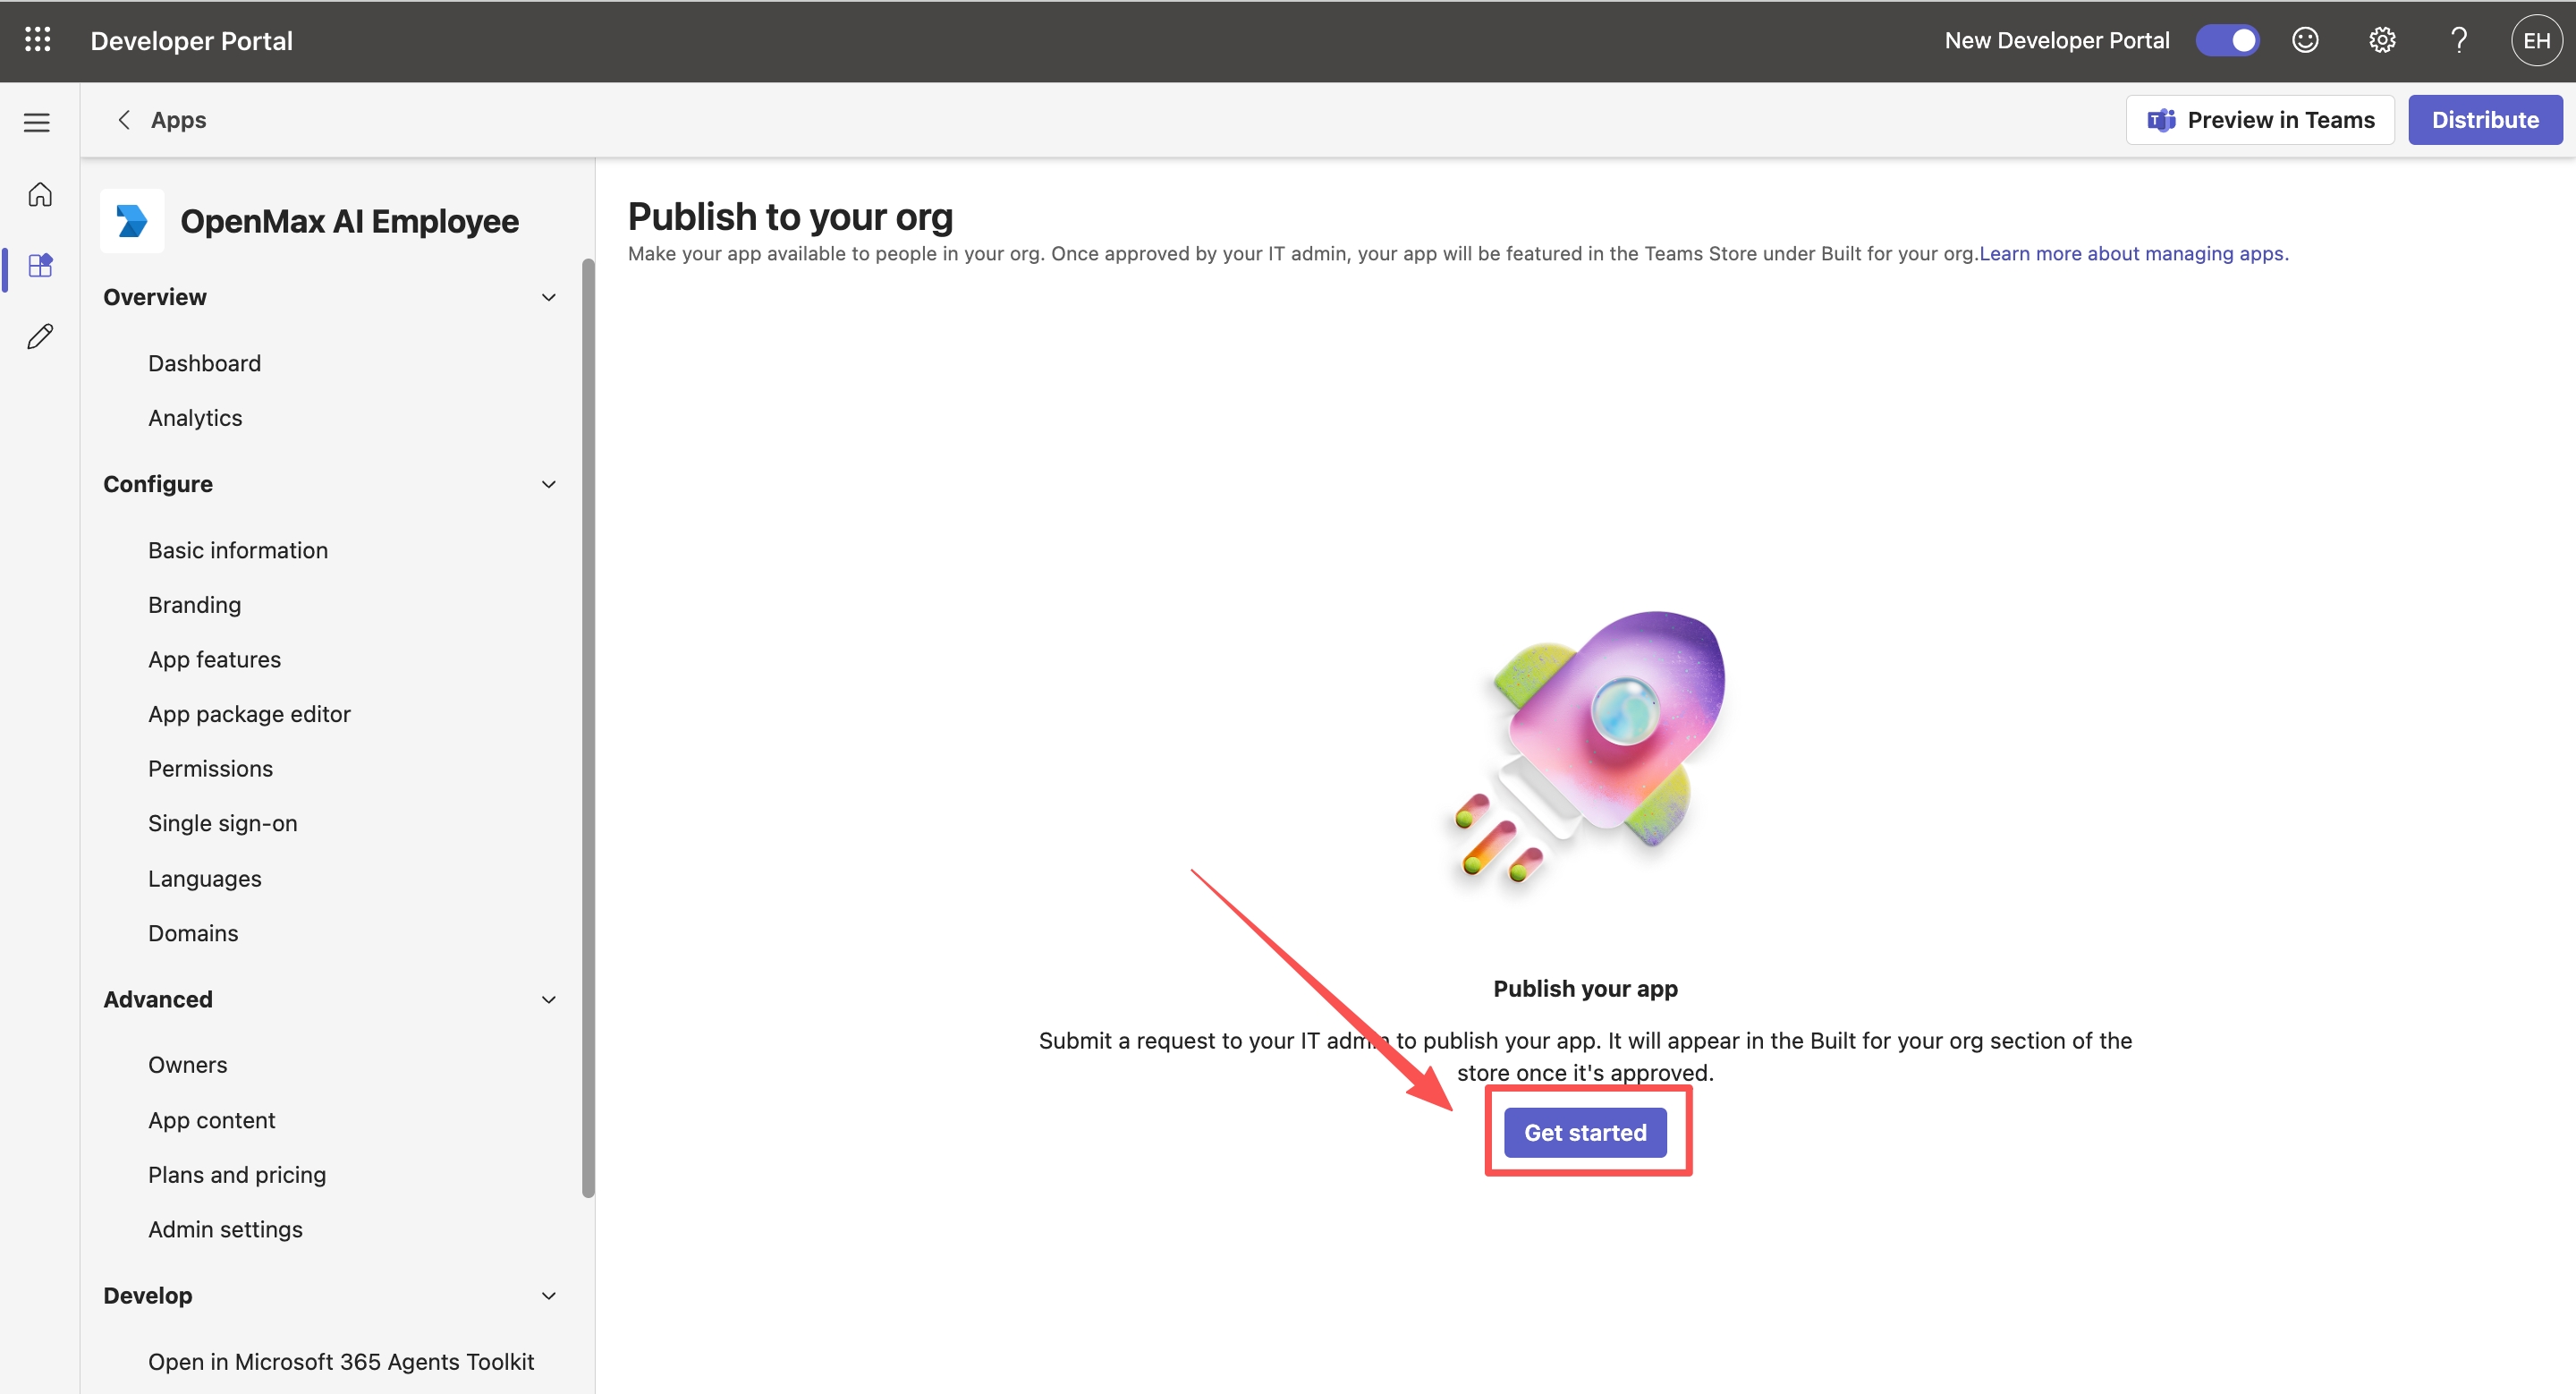
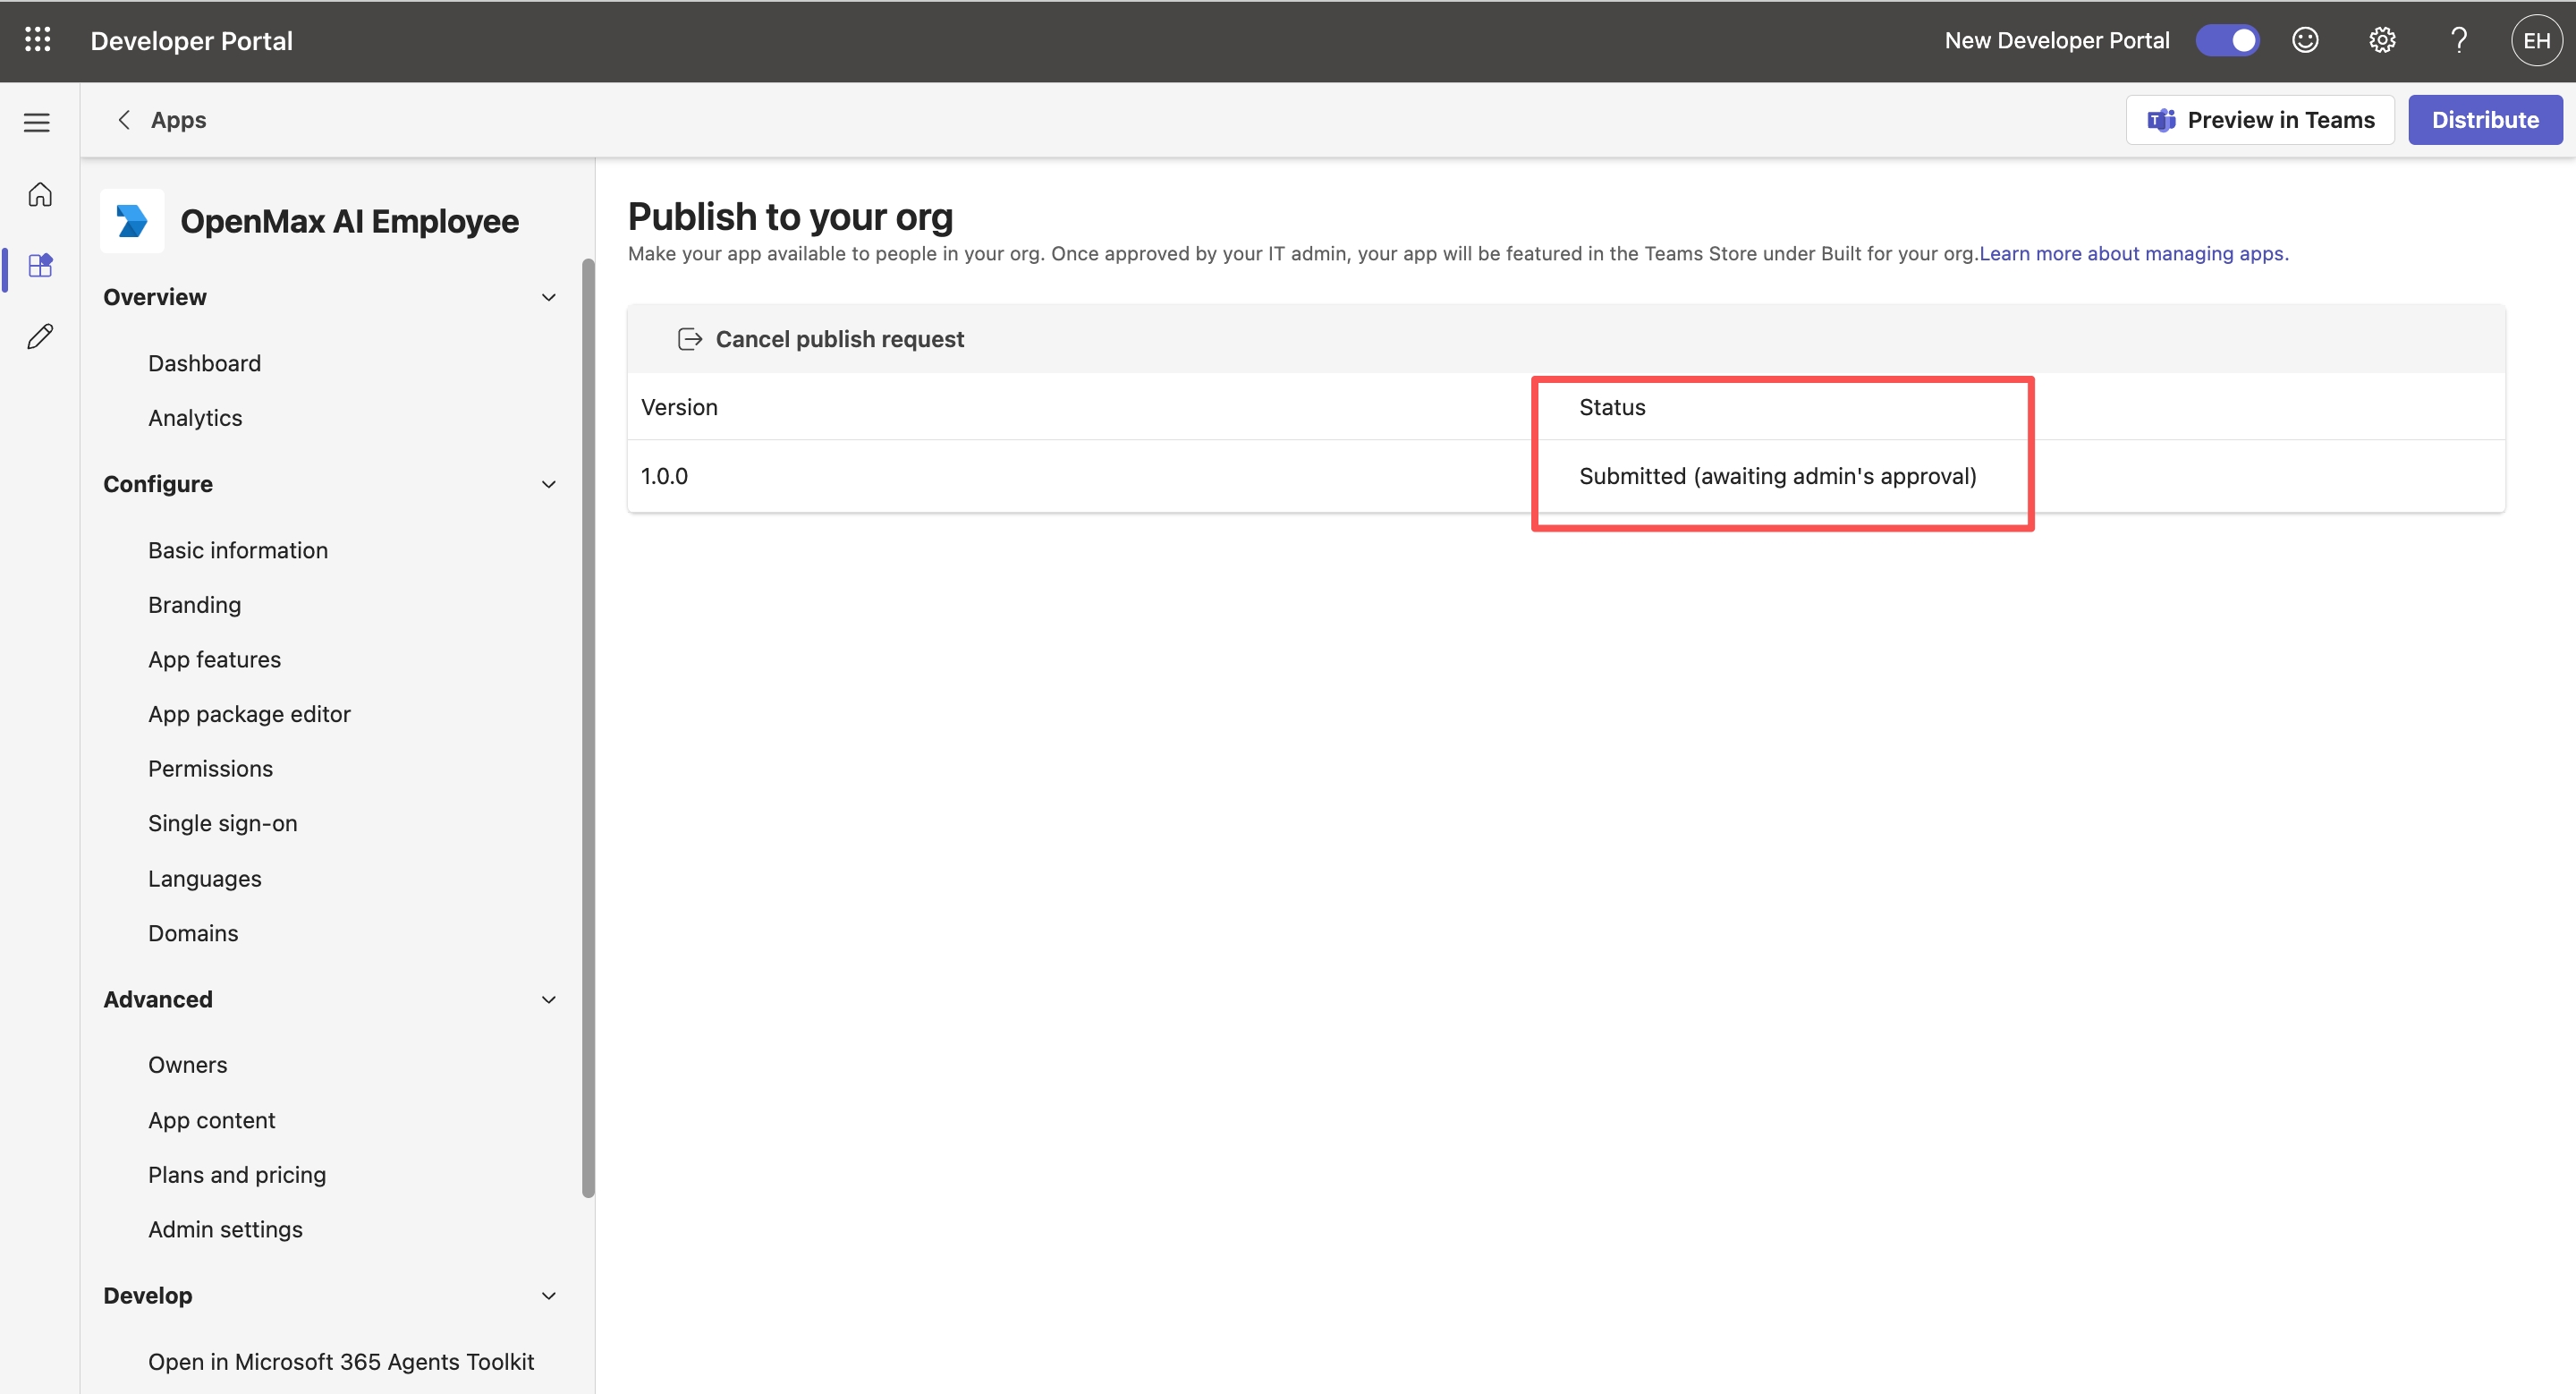
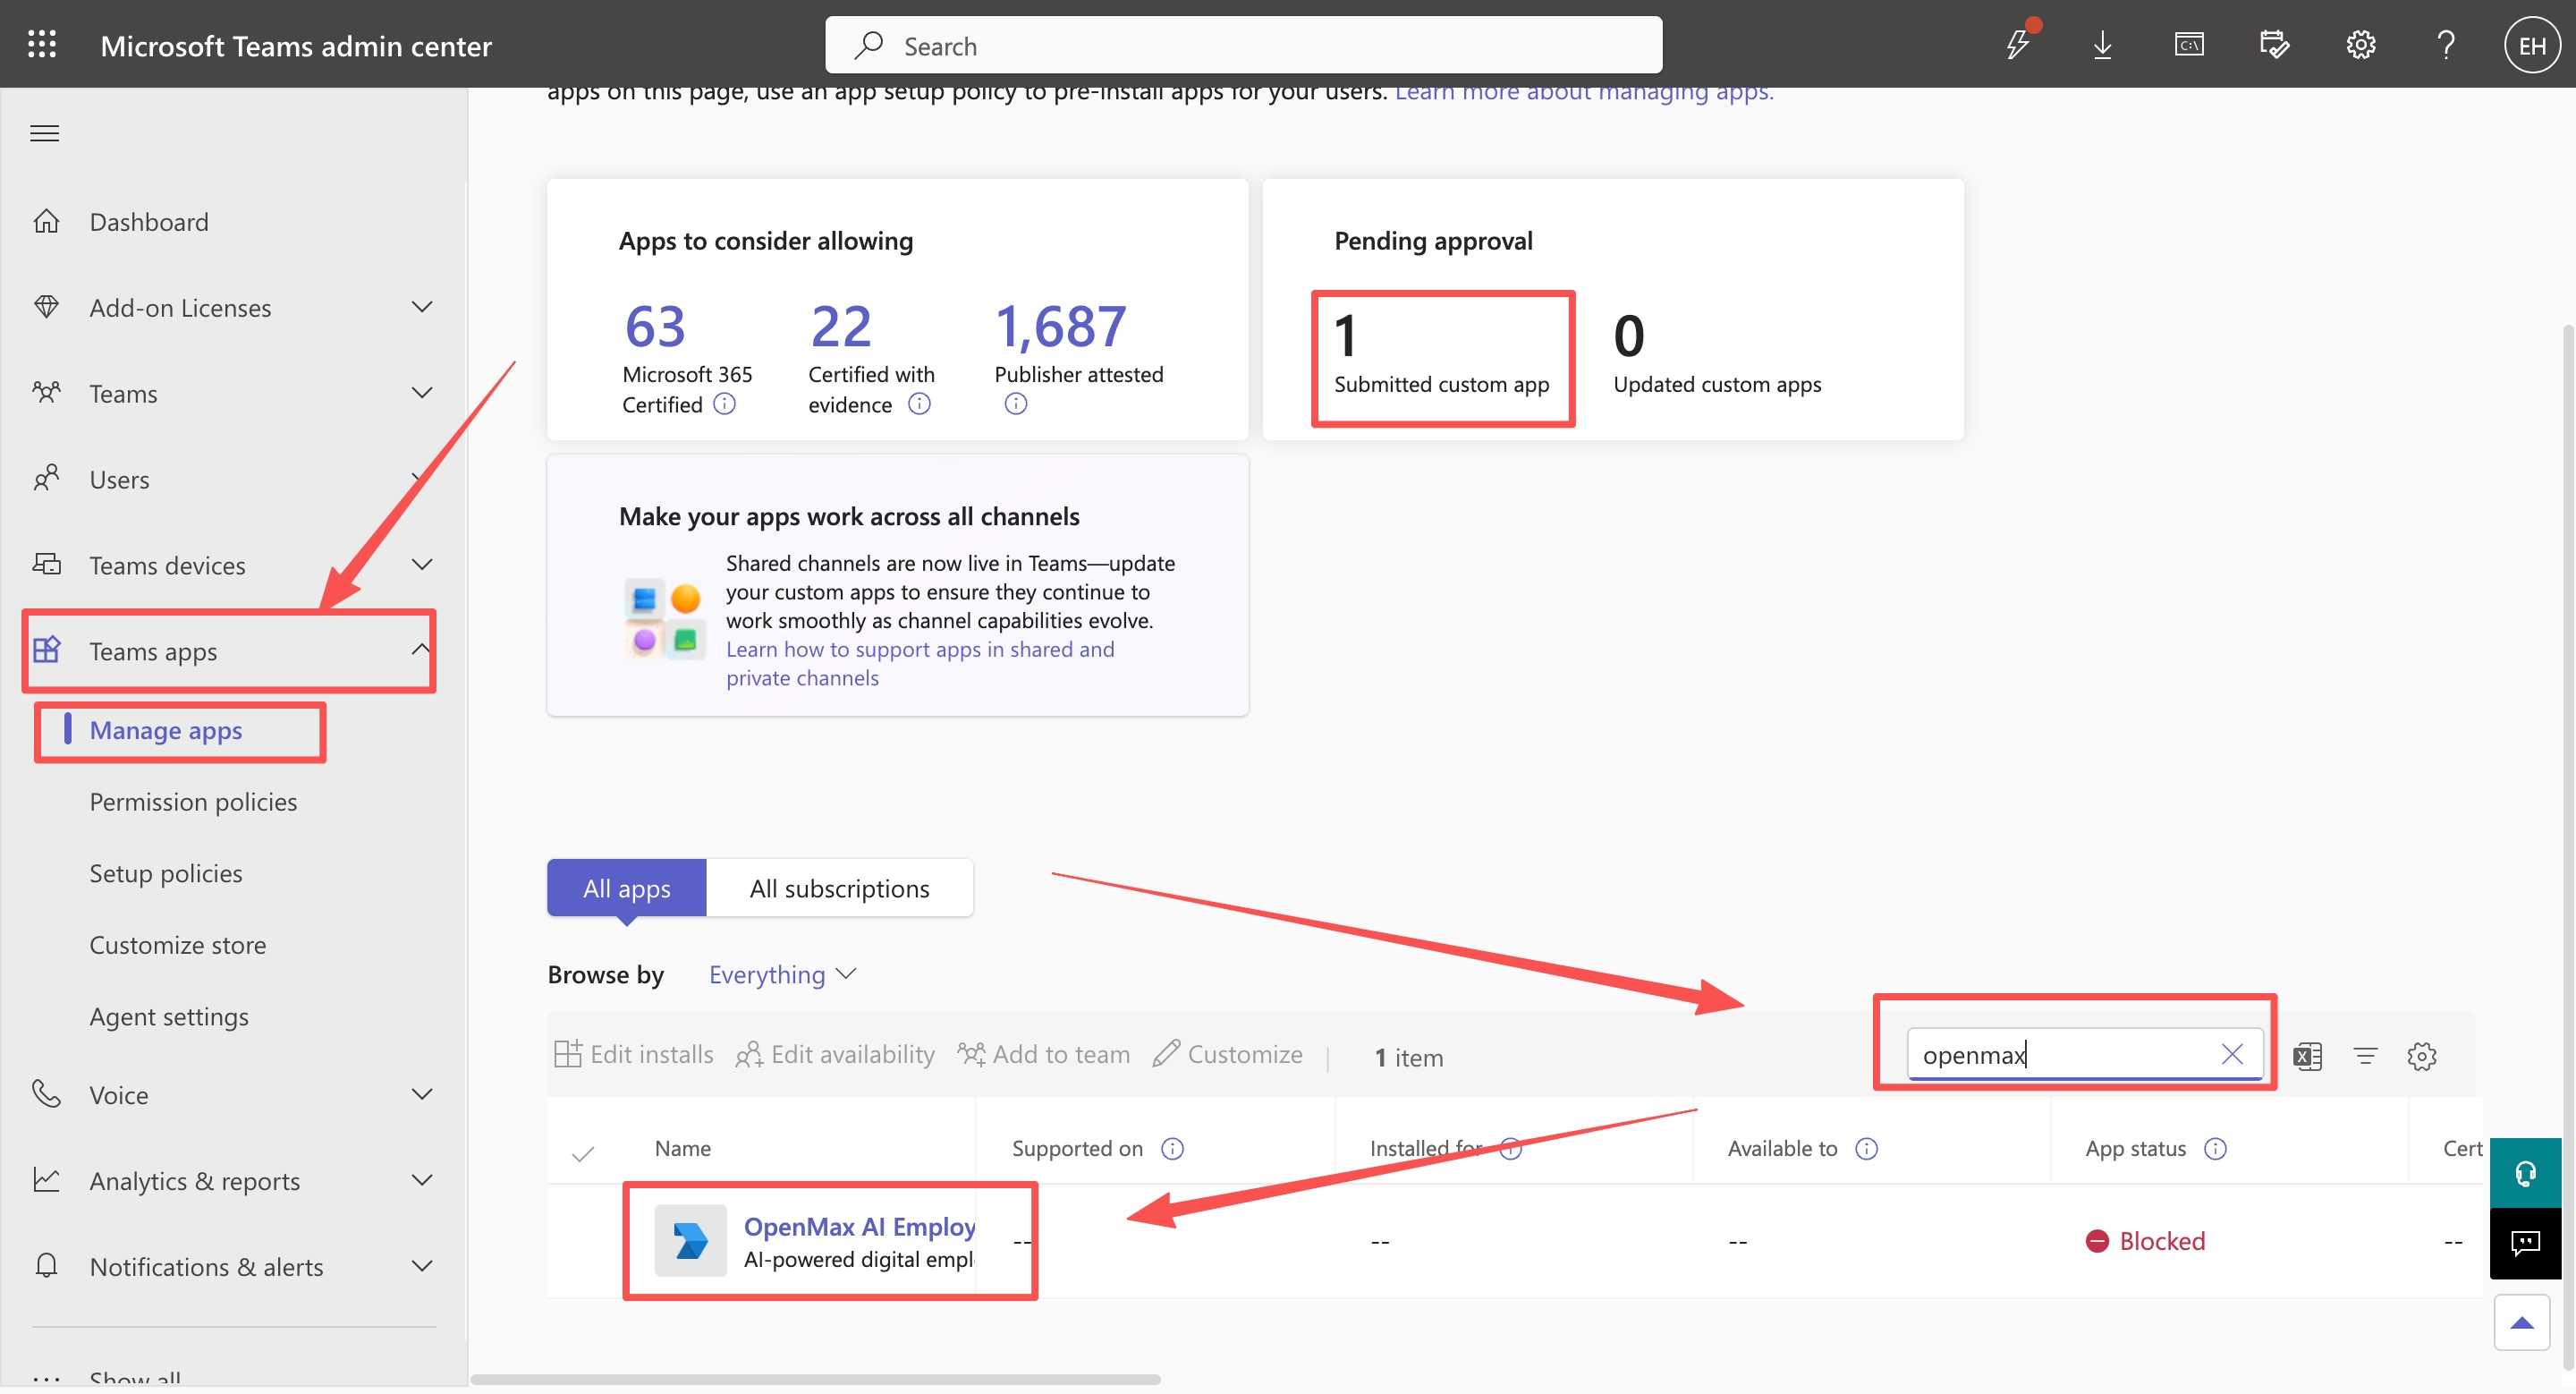
After submission, a Teams administrator must approve the app in the Teams Admin Center → Teams apps → Manage apps (search for your bot's name and open it). The app shows as "Blocked" until it is published — this is the normal pre-approval state.
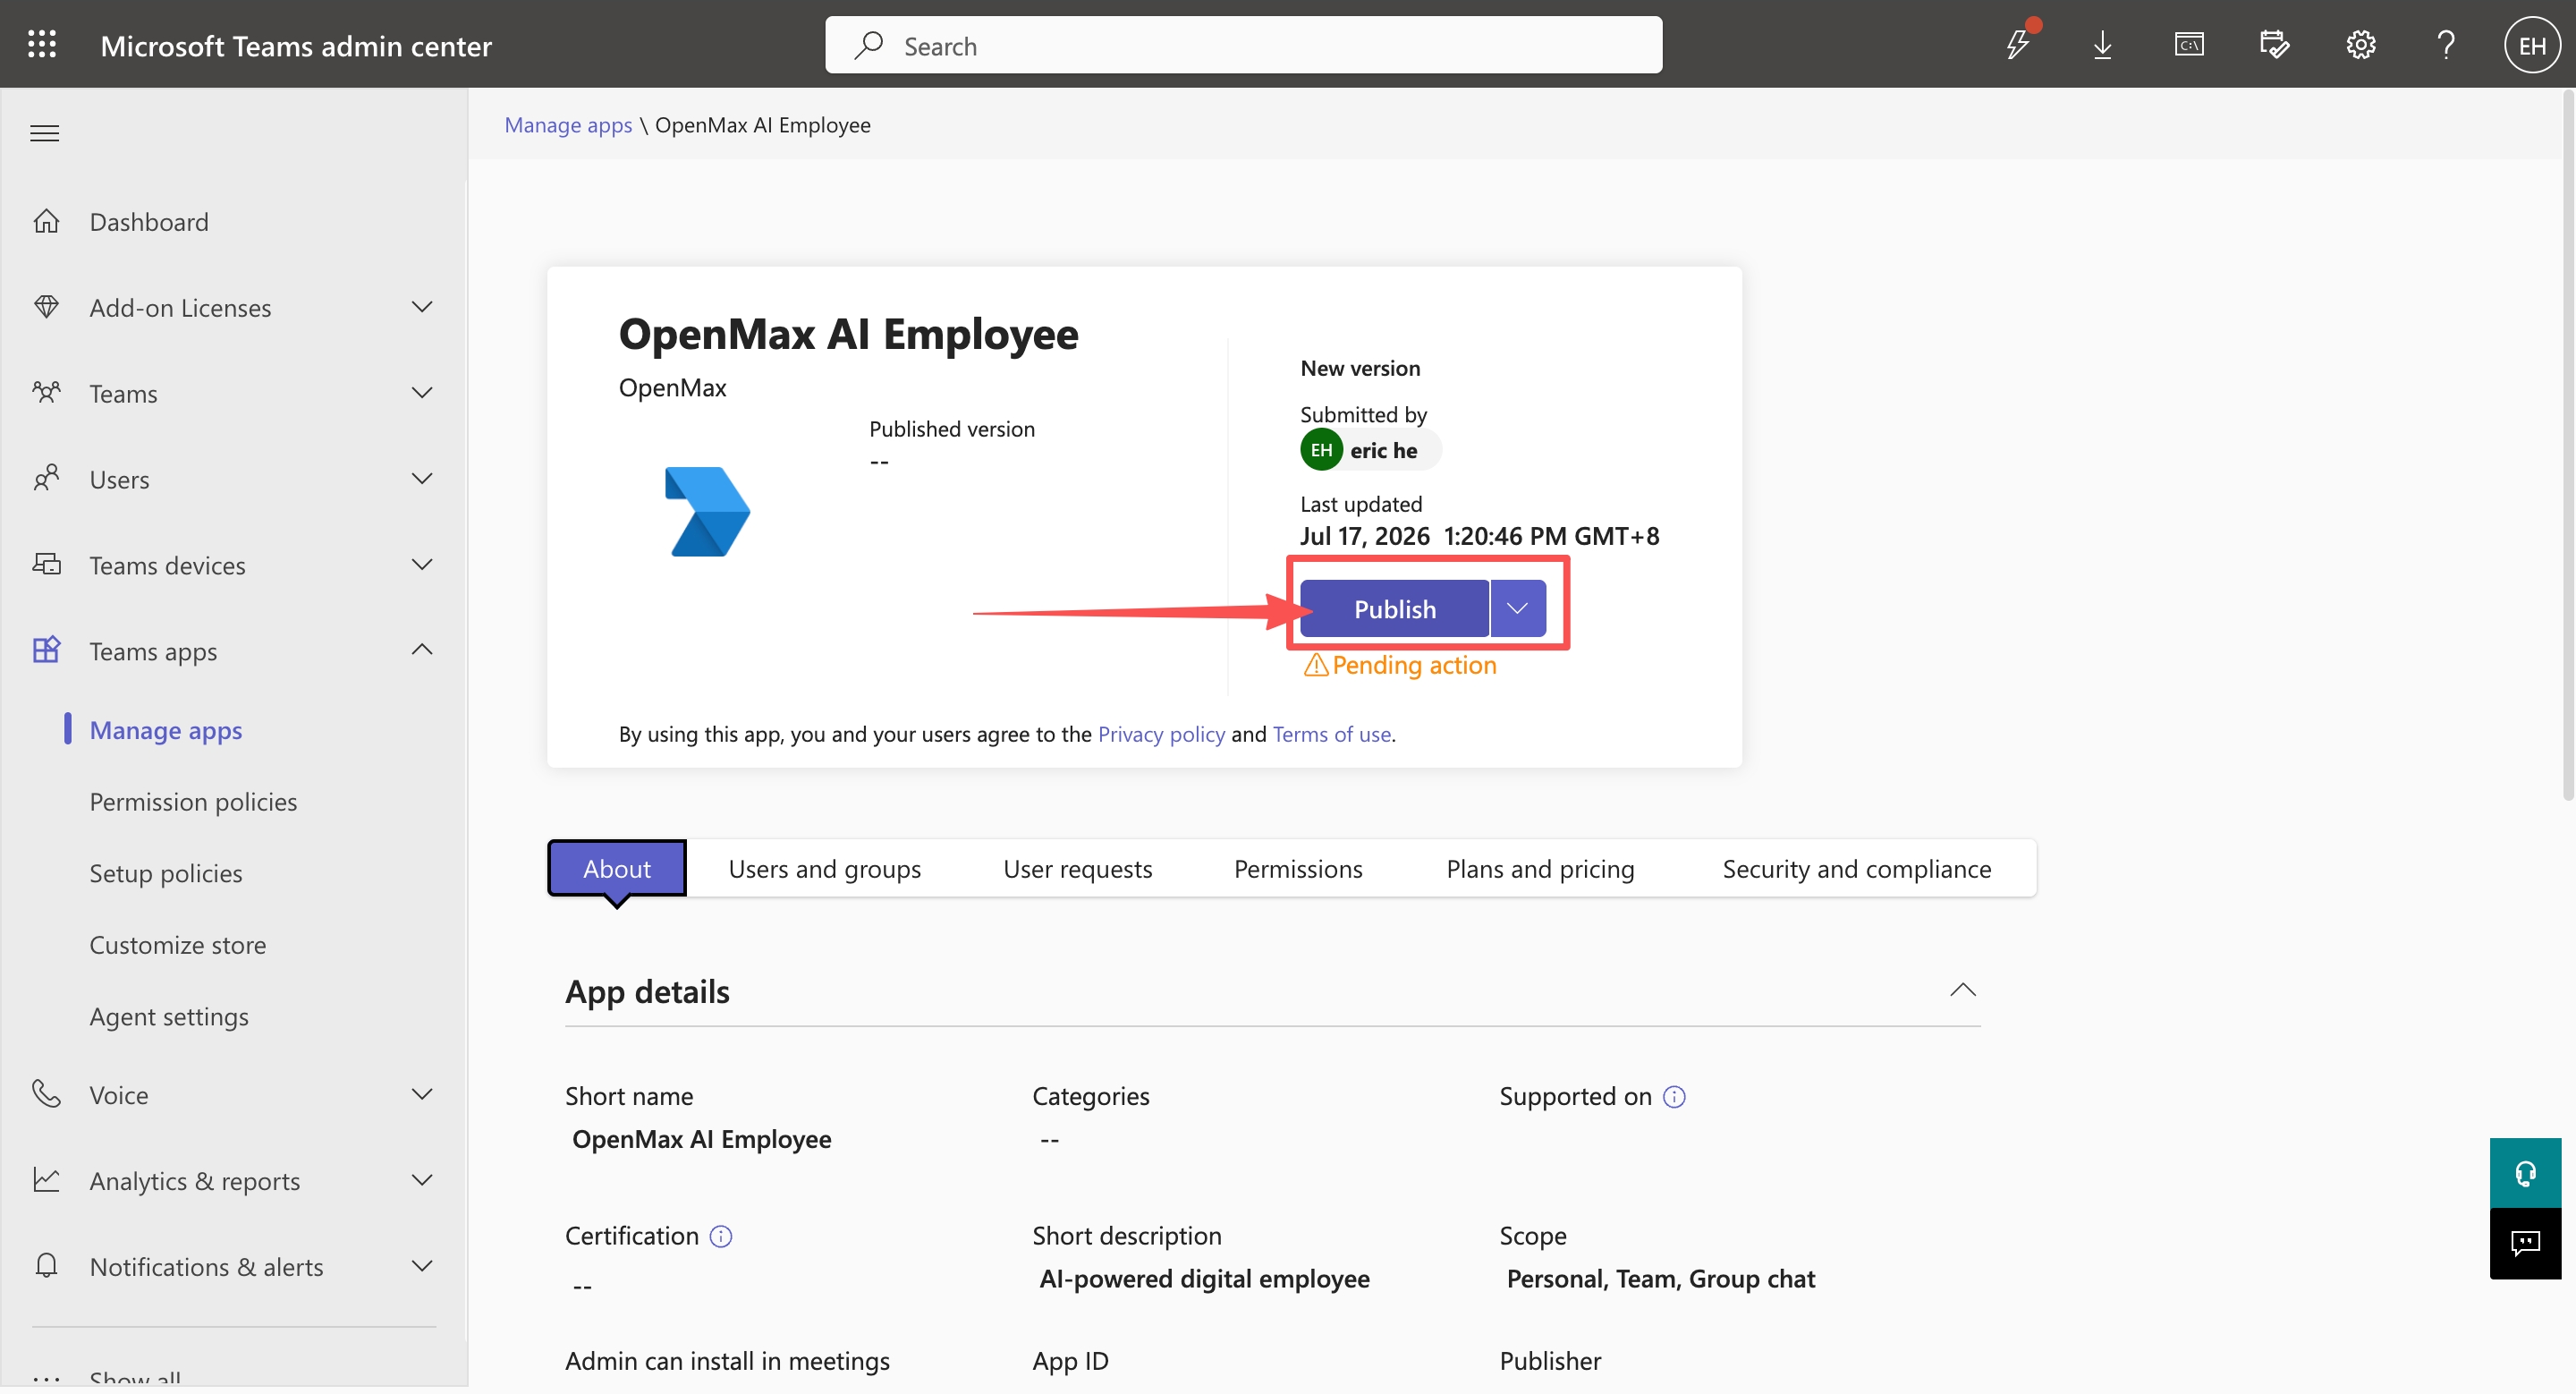
Click Publish.
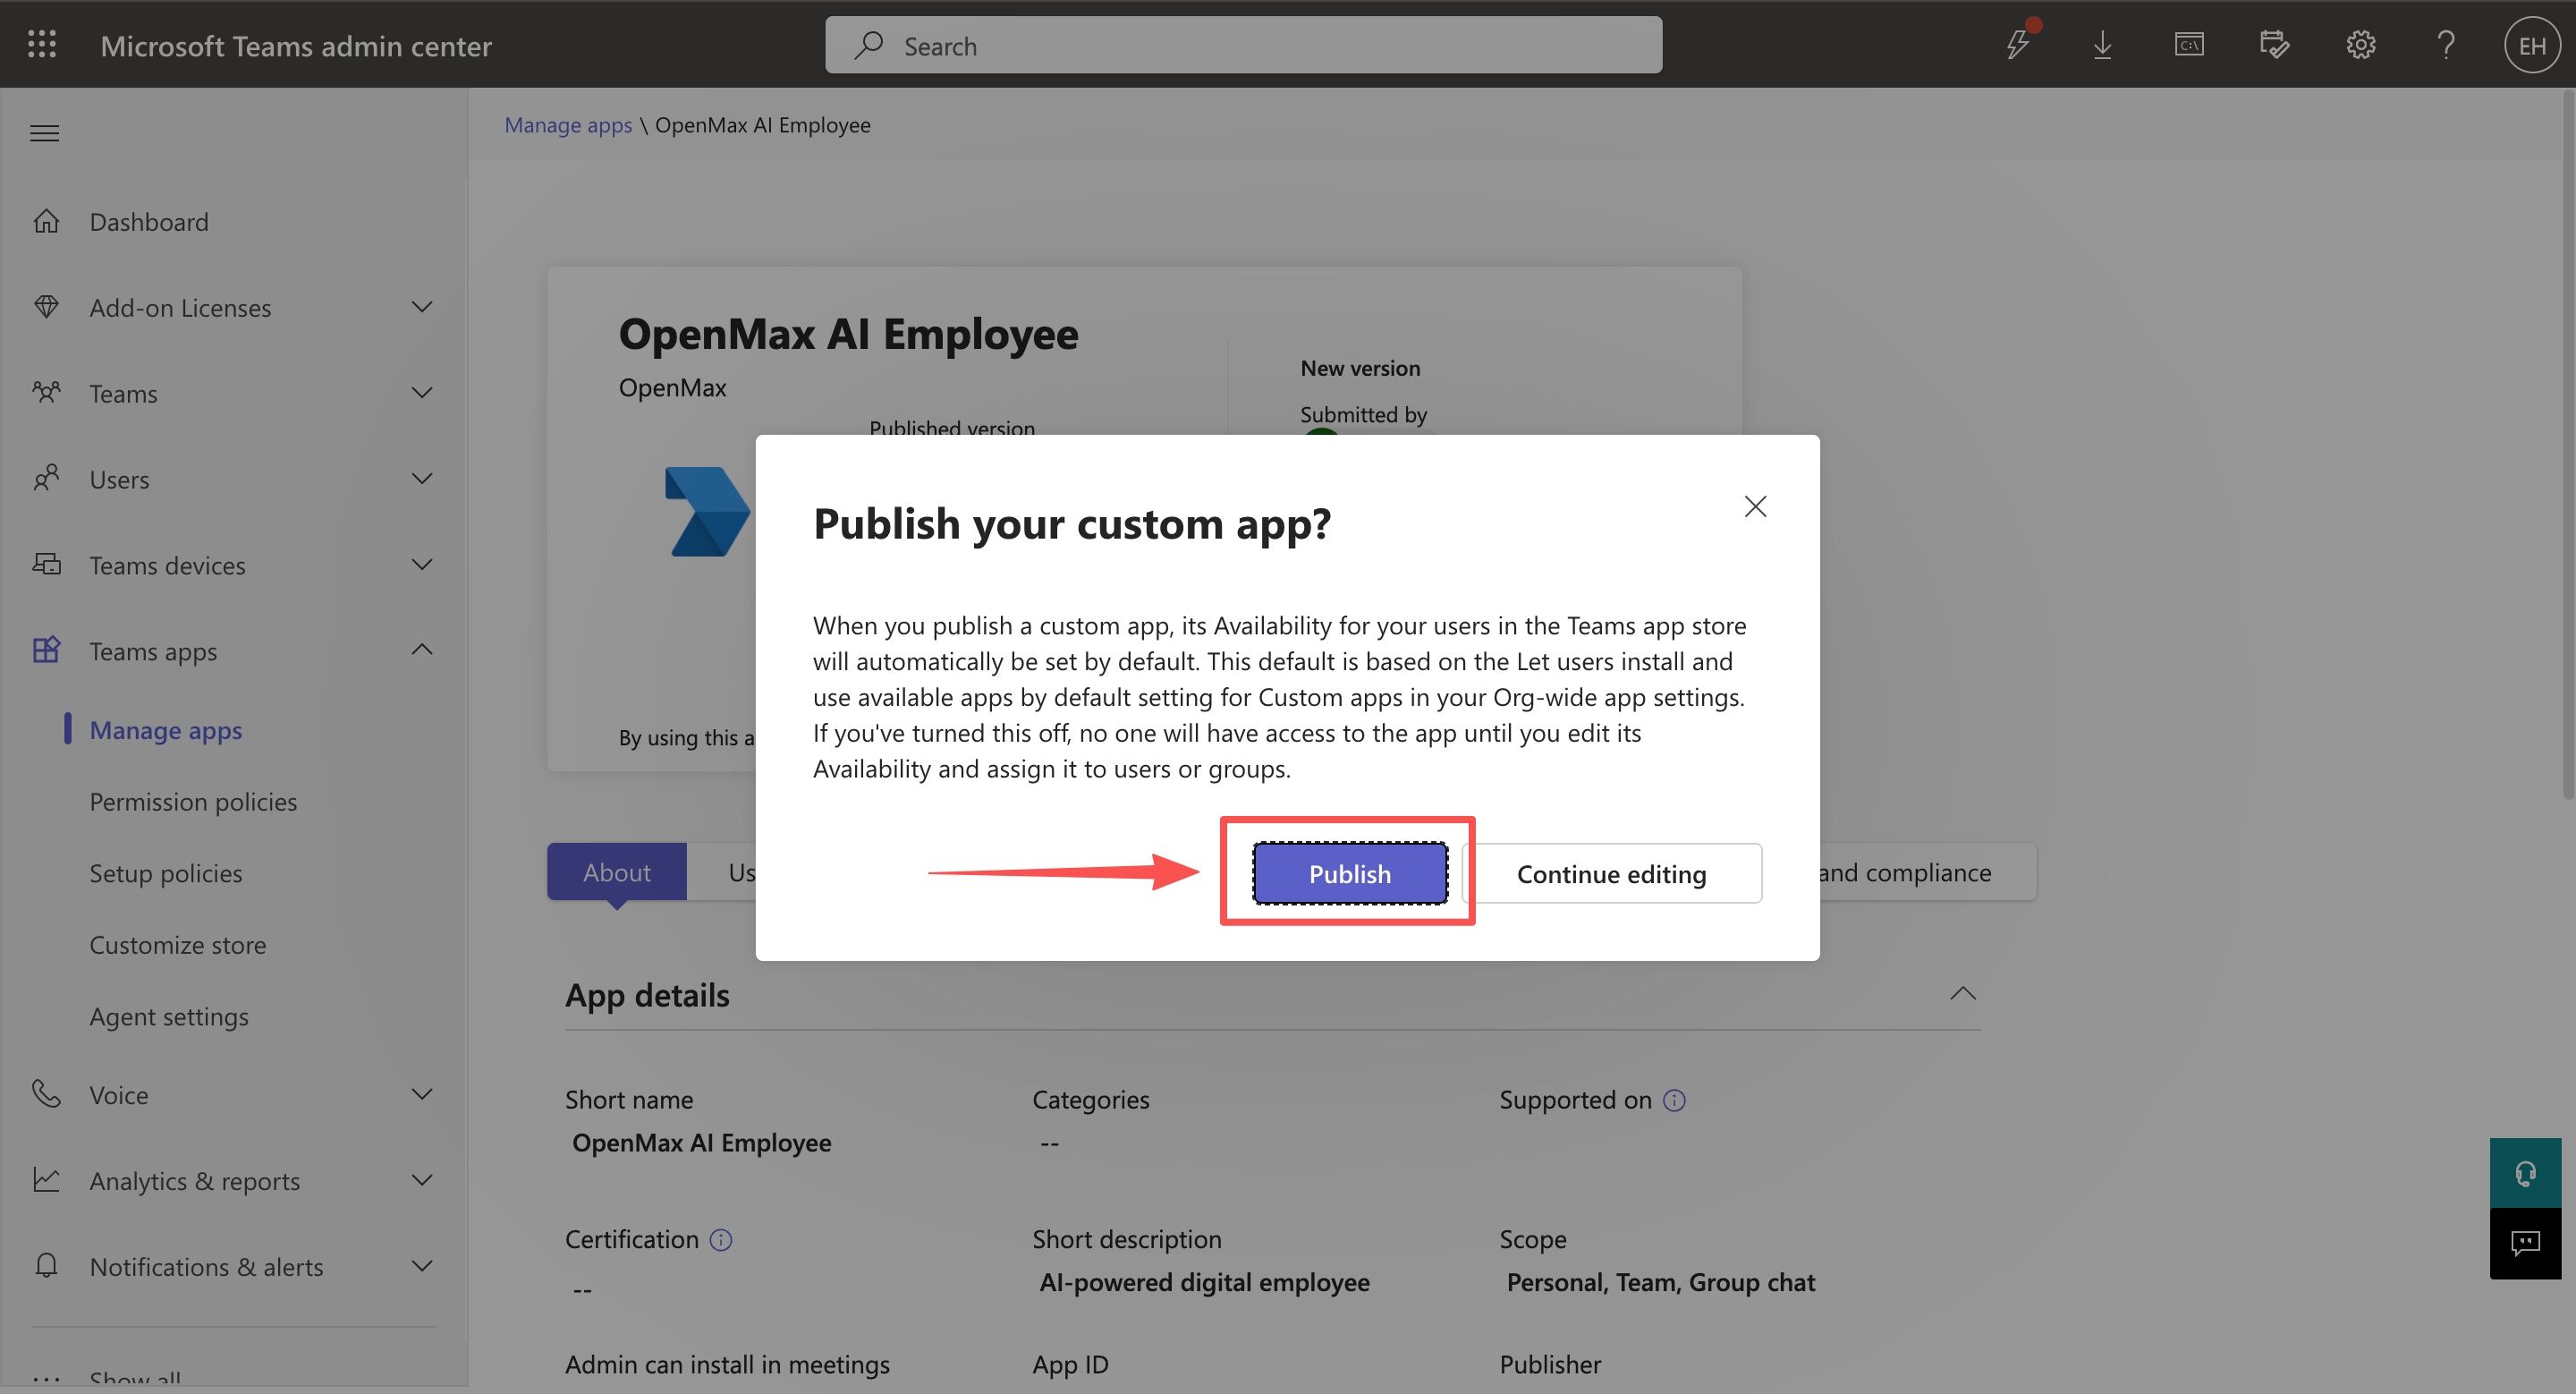
After approval, users need to restart Microsoft Teams to see the new app.
Open the Microsoft Teams desktop app, click Apps, search for your bot's name (e.g.
openmax), and open it.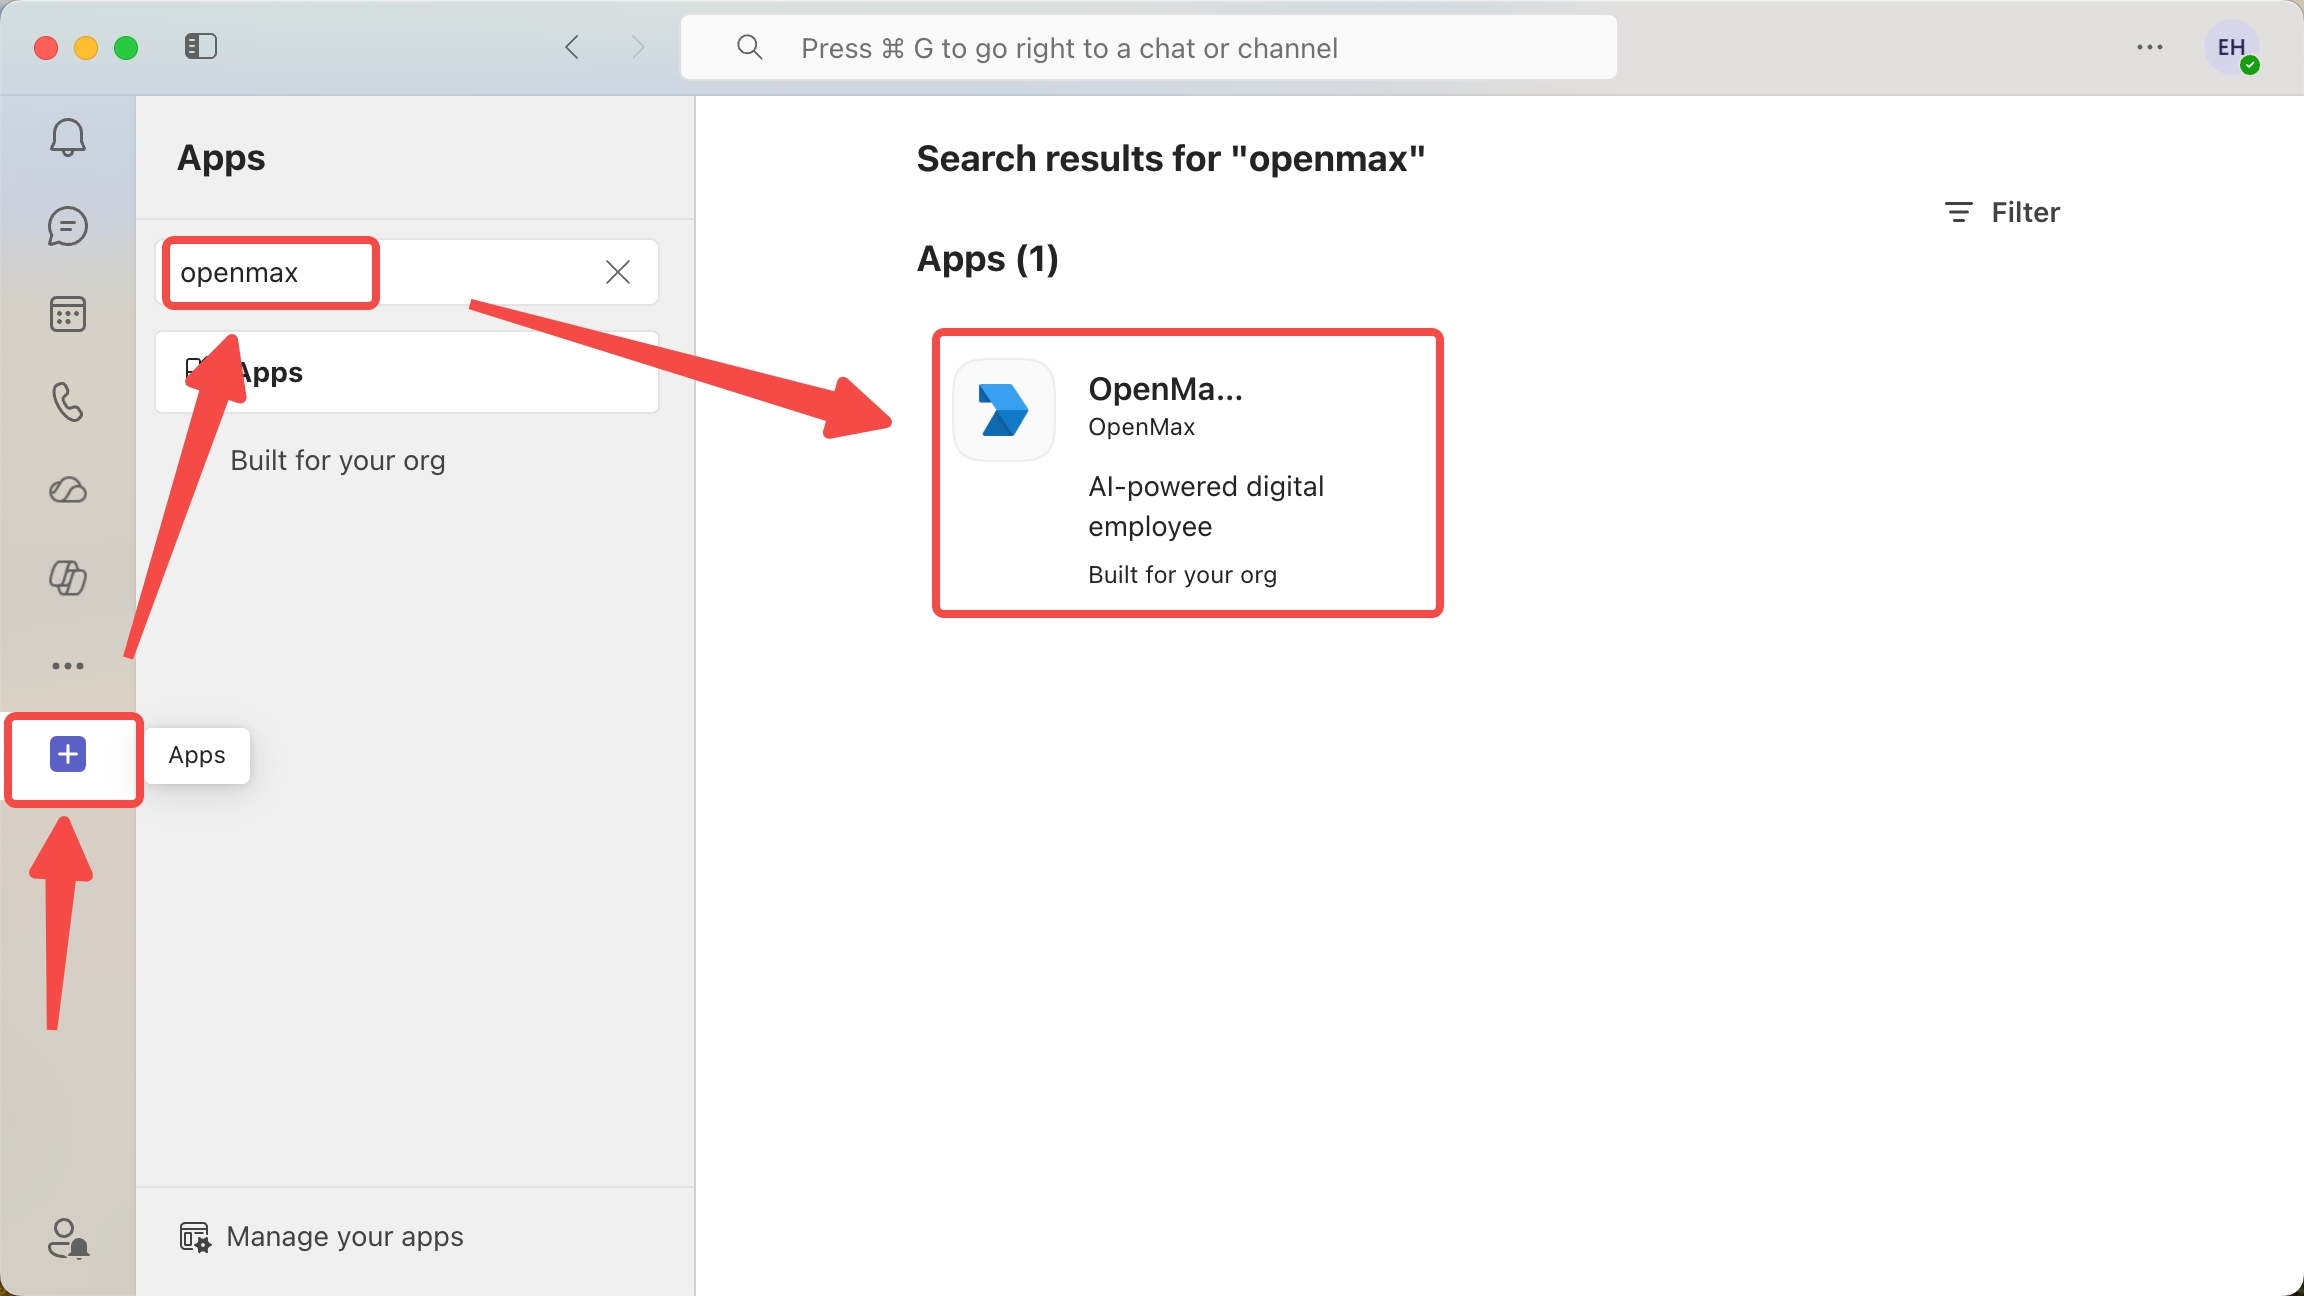
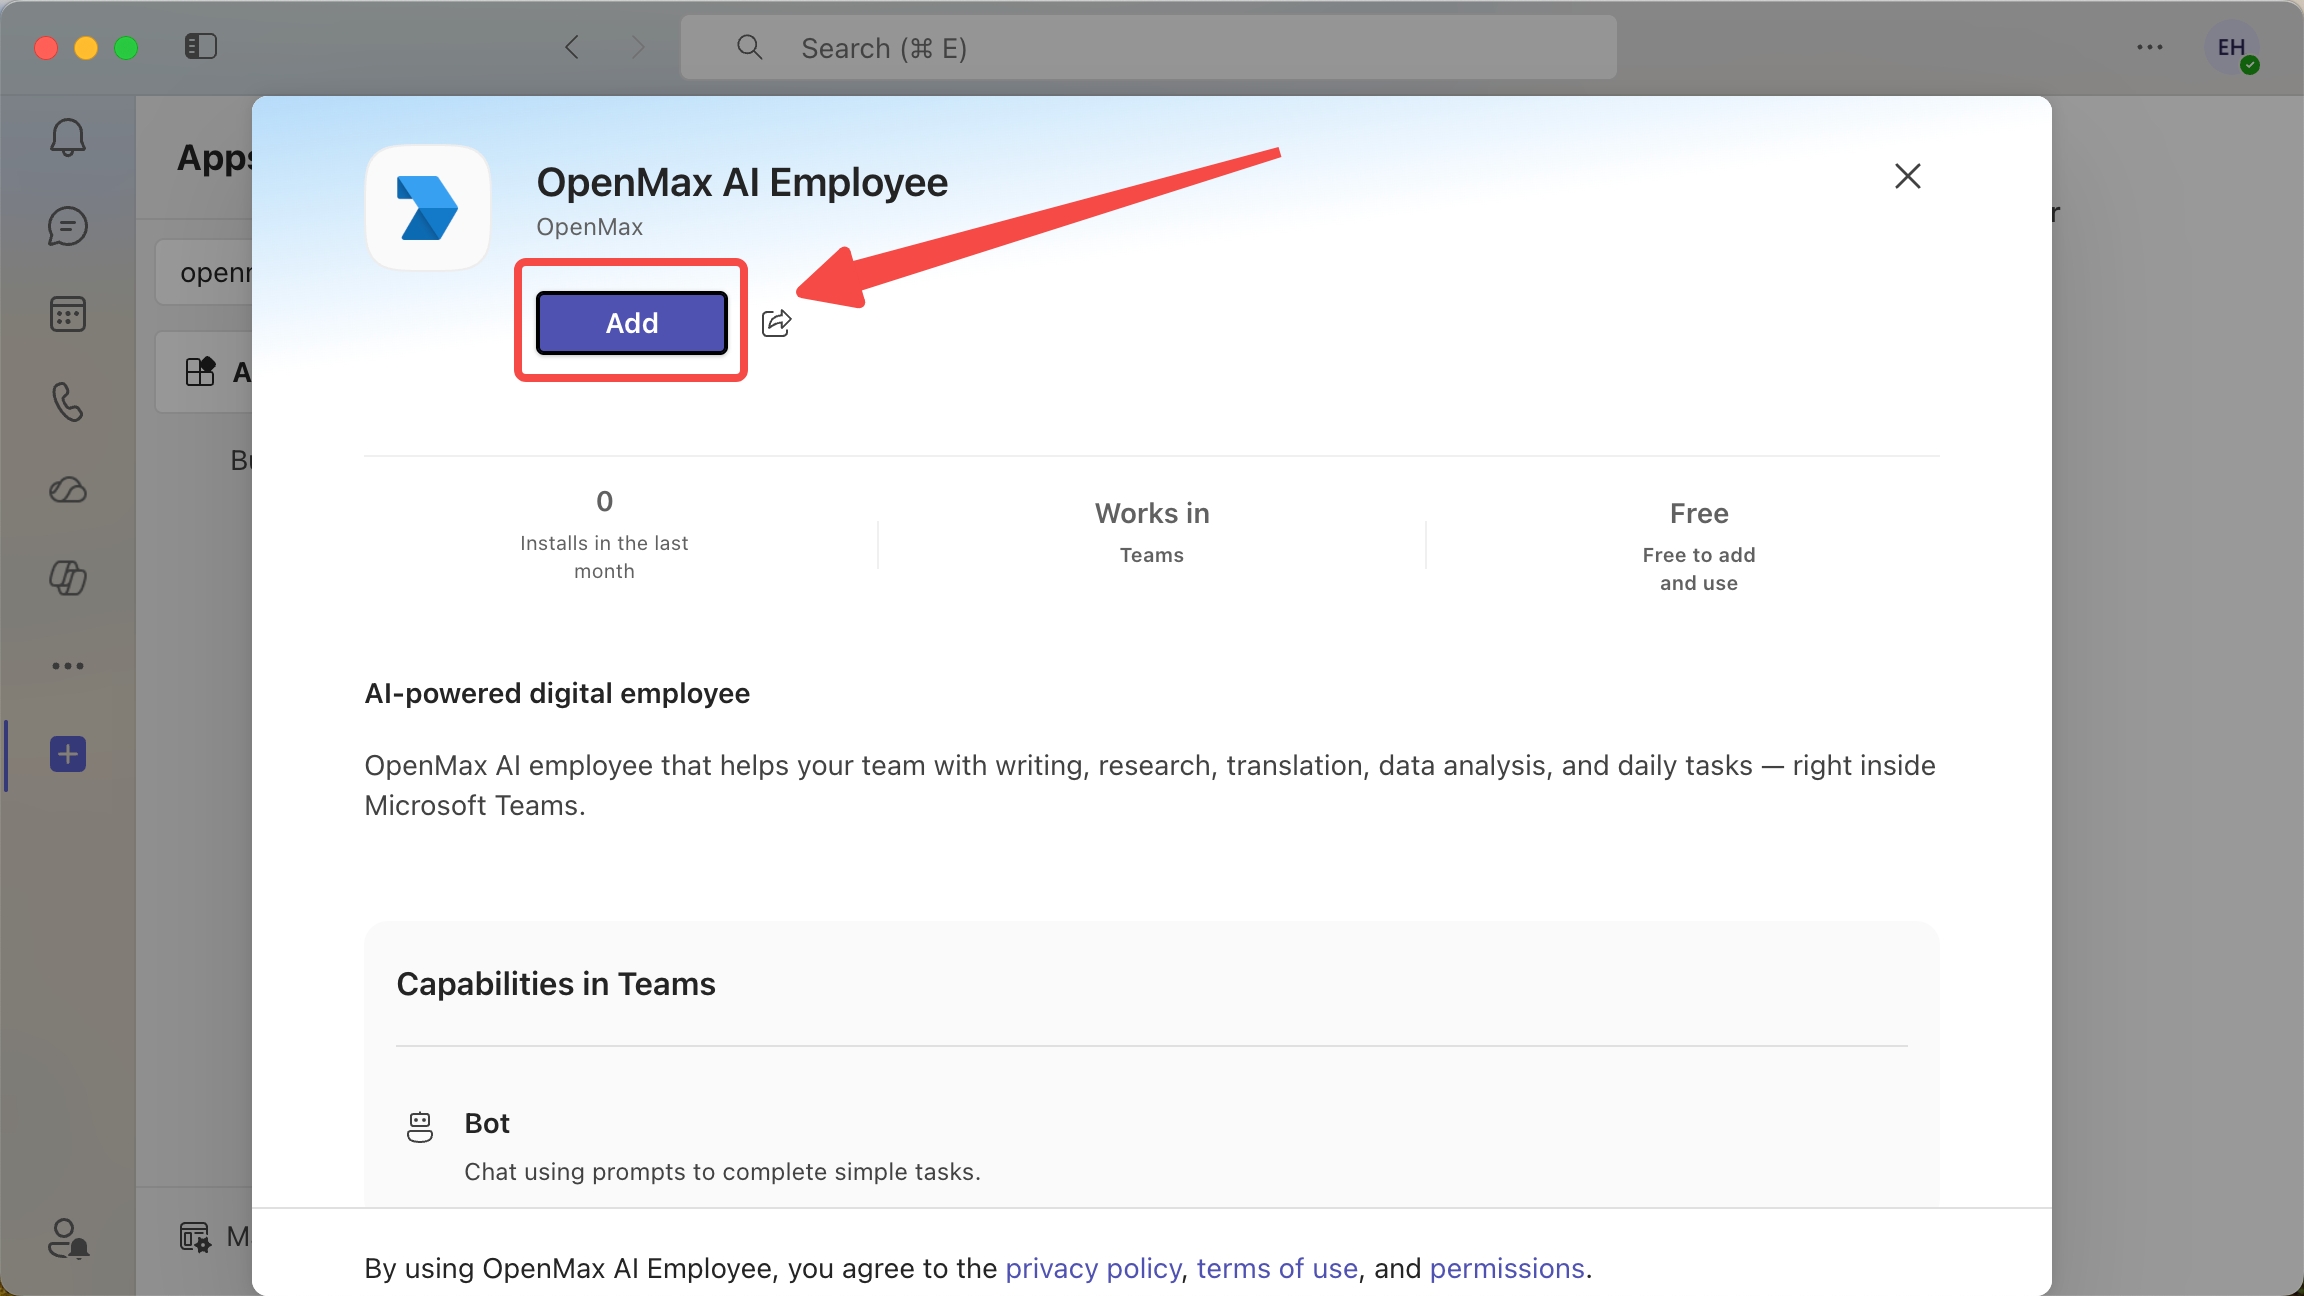
Click Add.
Click Open.
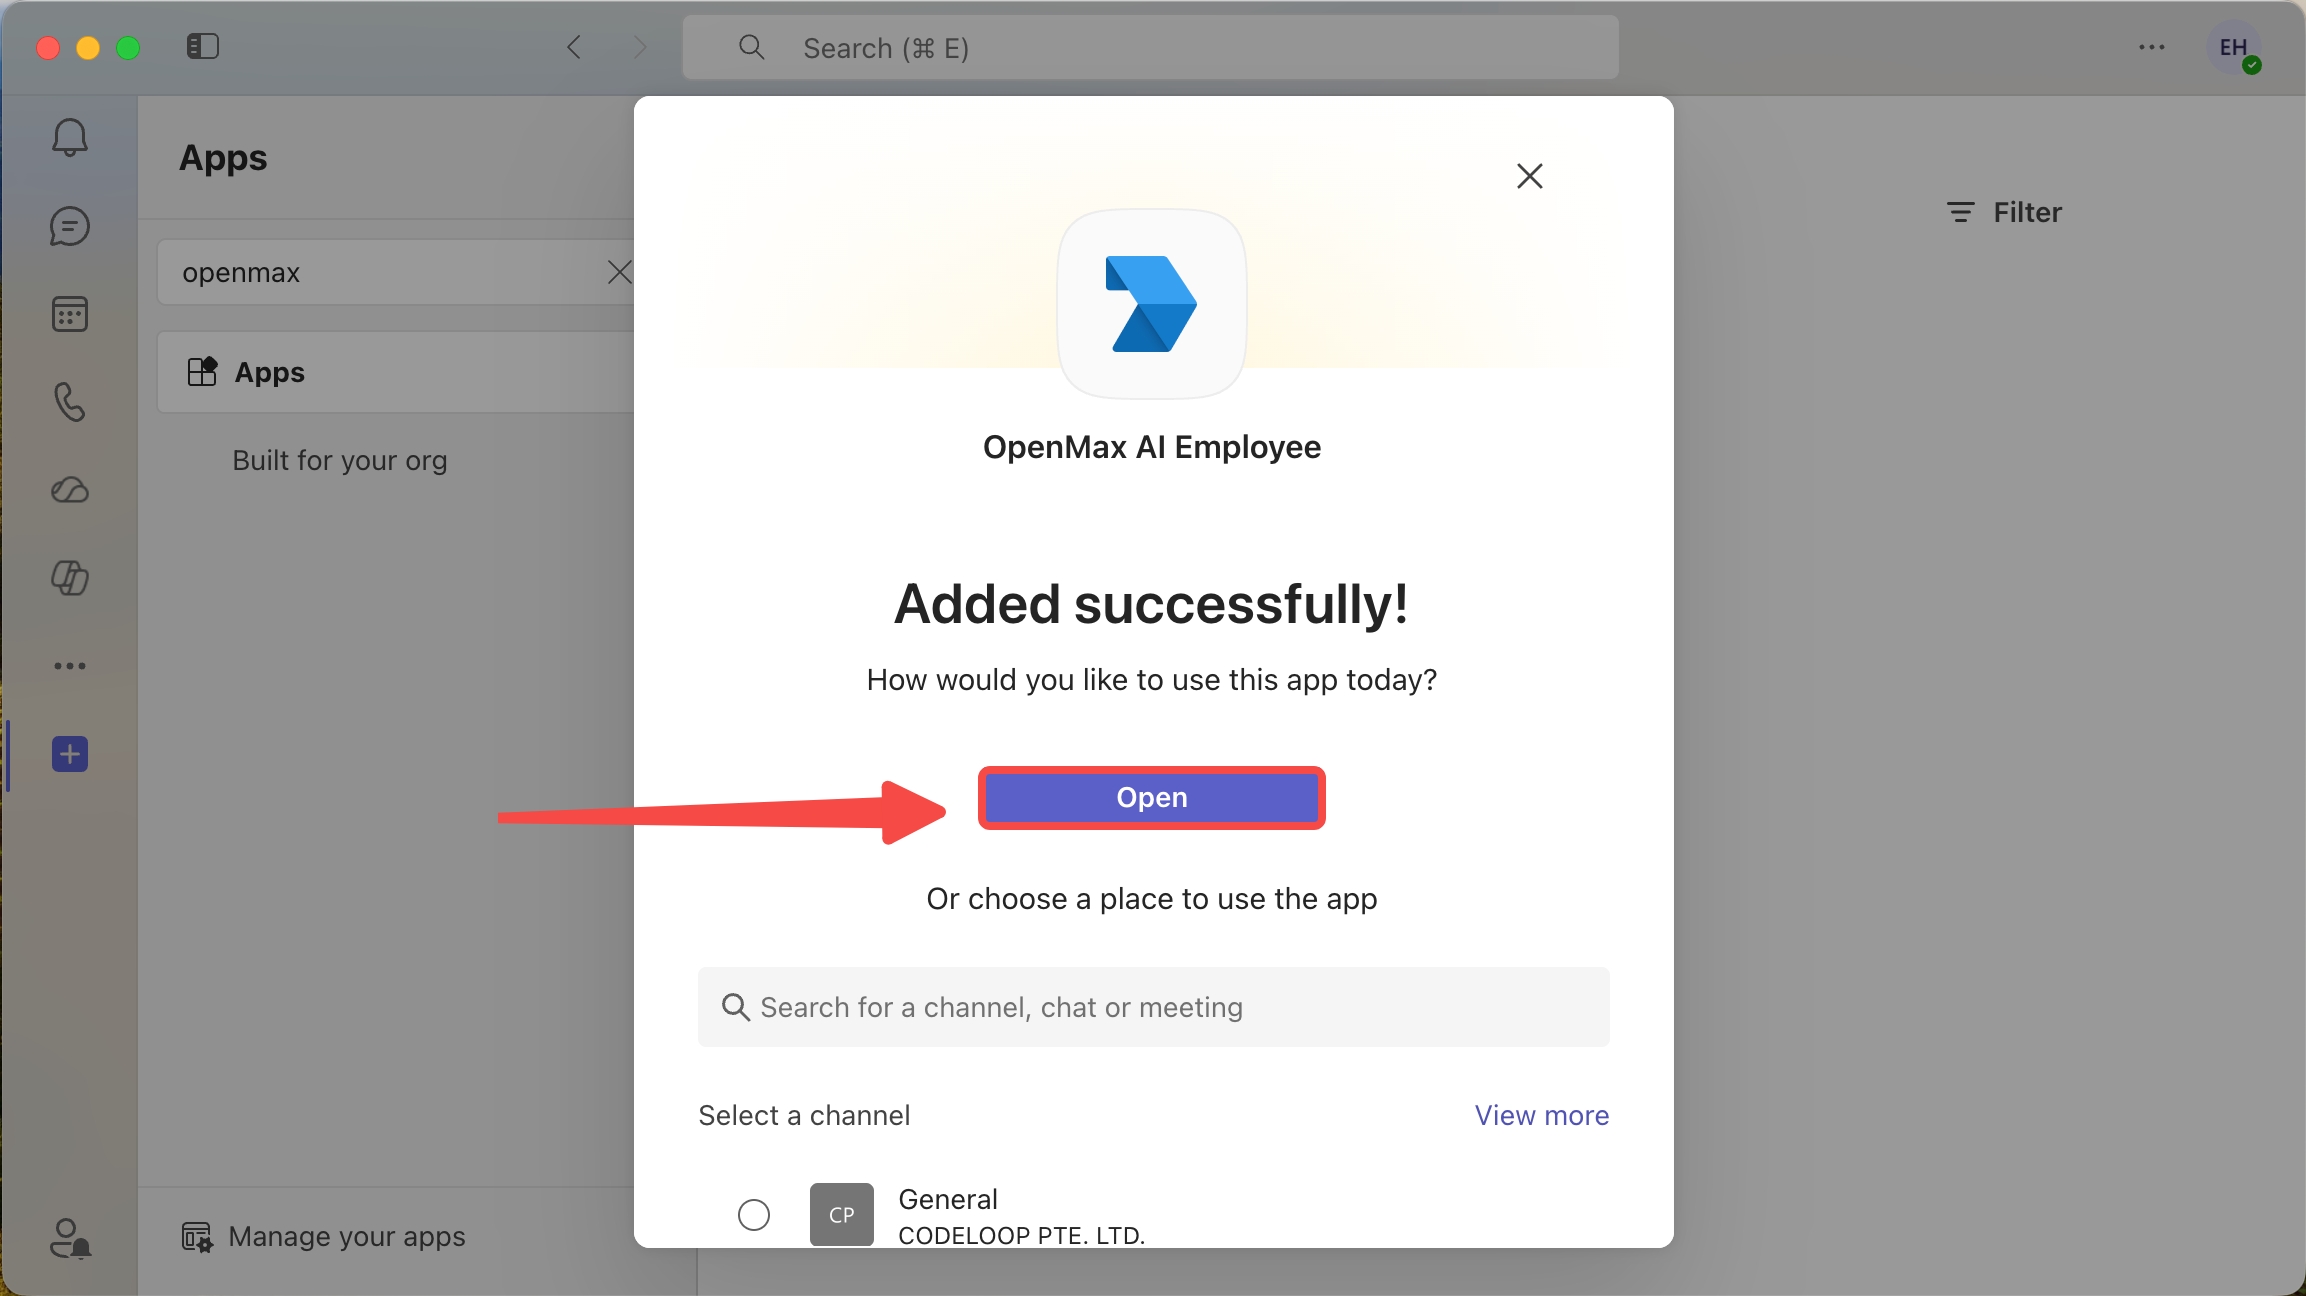
Return to the OpenMax Dashboard to connect.
Alternative (no admin approval): you can also download the app package as a
.zipfrom the App package editor and sideload it via Upload a custom app in Teams, if your organization allows custom app uploads.
Step 10: Connect in the OpenMax Dashboard
Do this step last, after everything above is complete.
Make sure all four credentials are filled in correctly on the Microsoft Teams channel card — App ID, App Password (the secret Value), Tenant ID, and App Catalog ID — then click Connect.
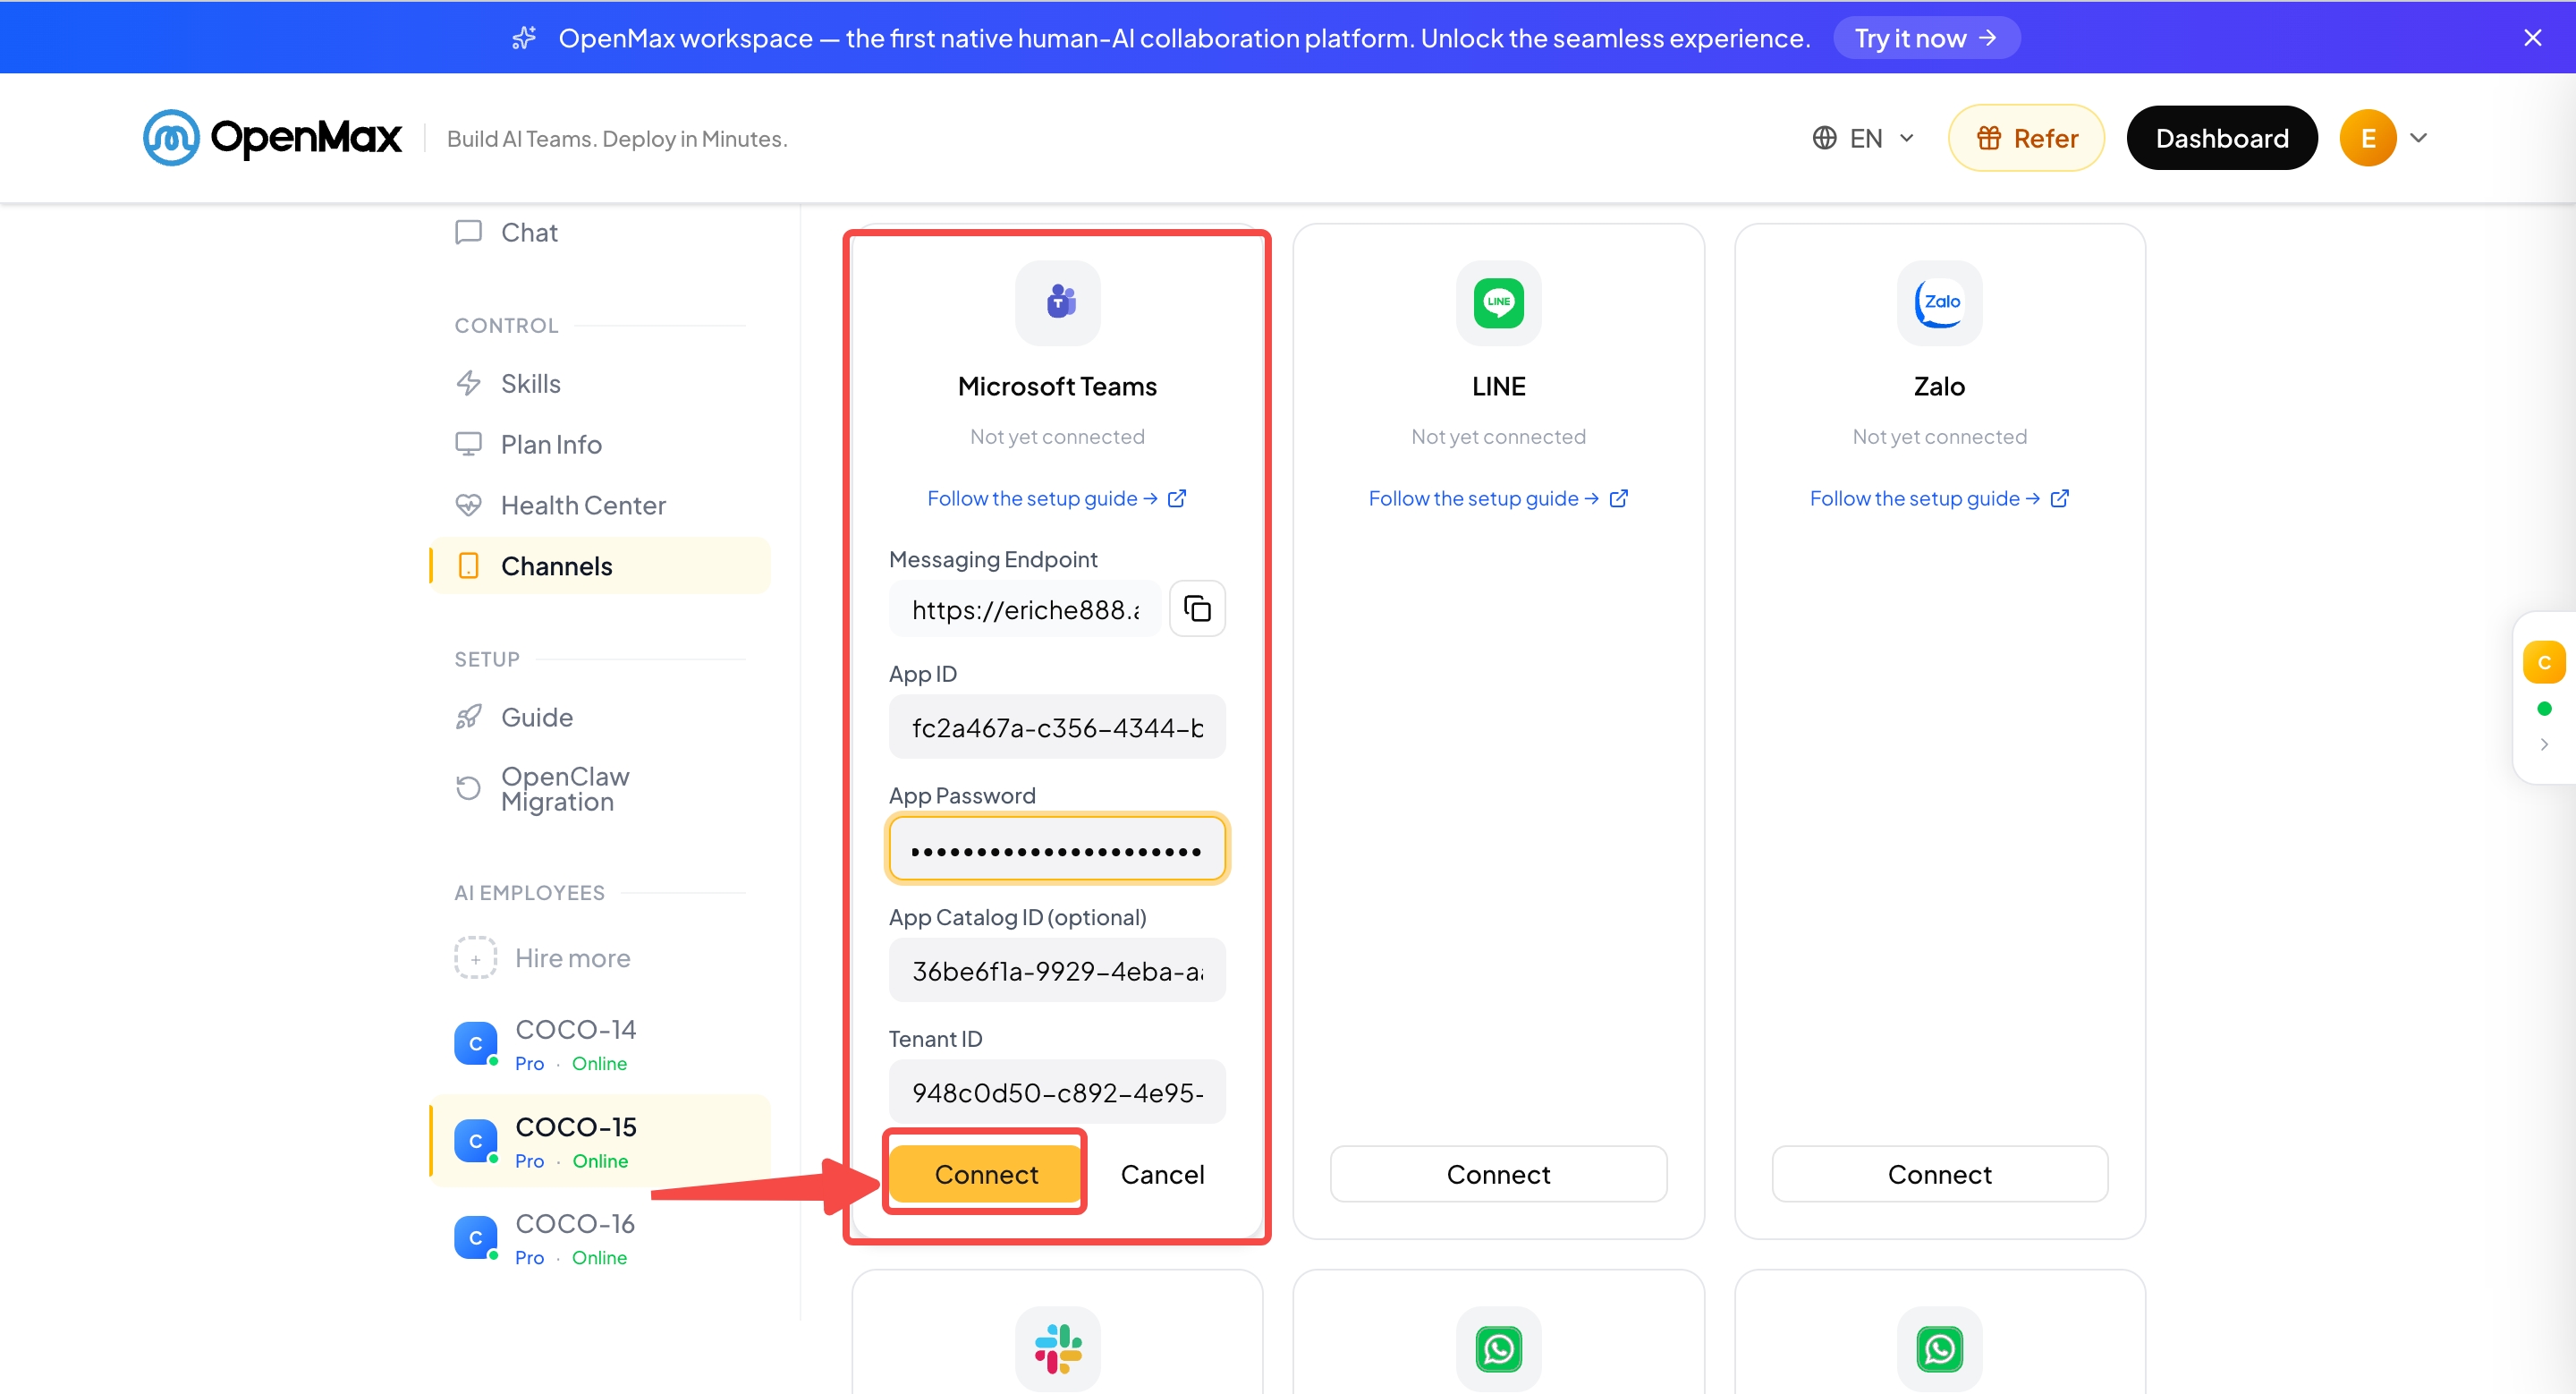
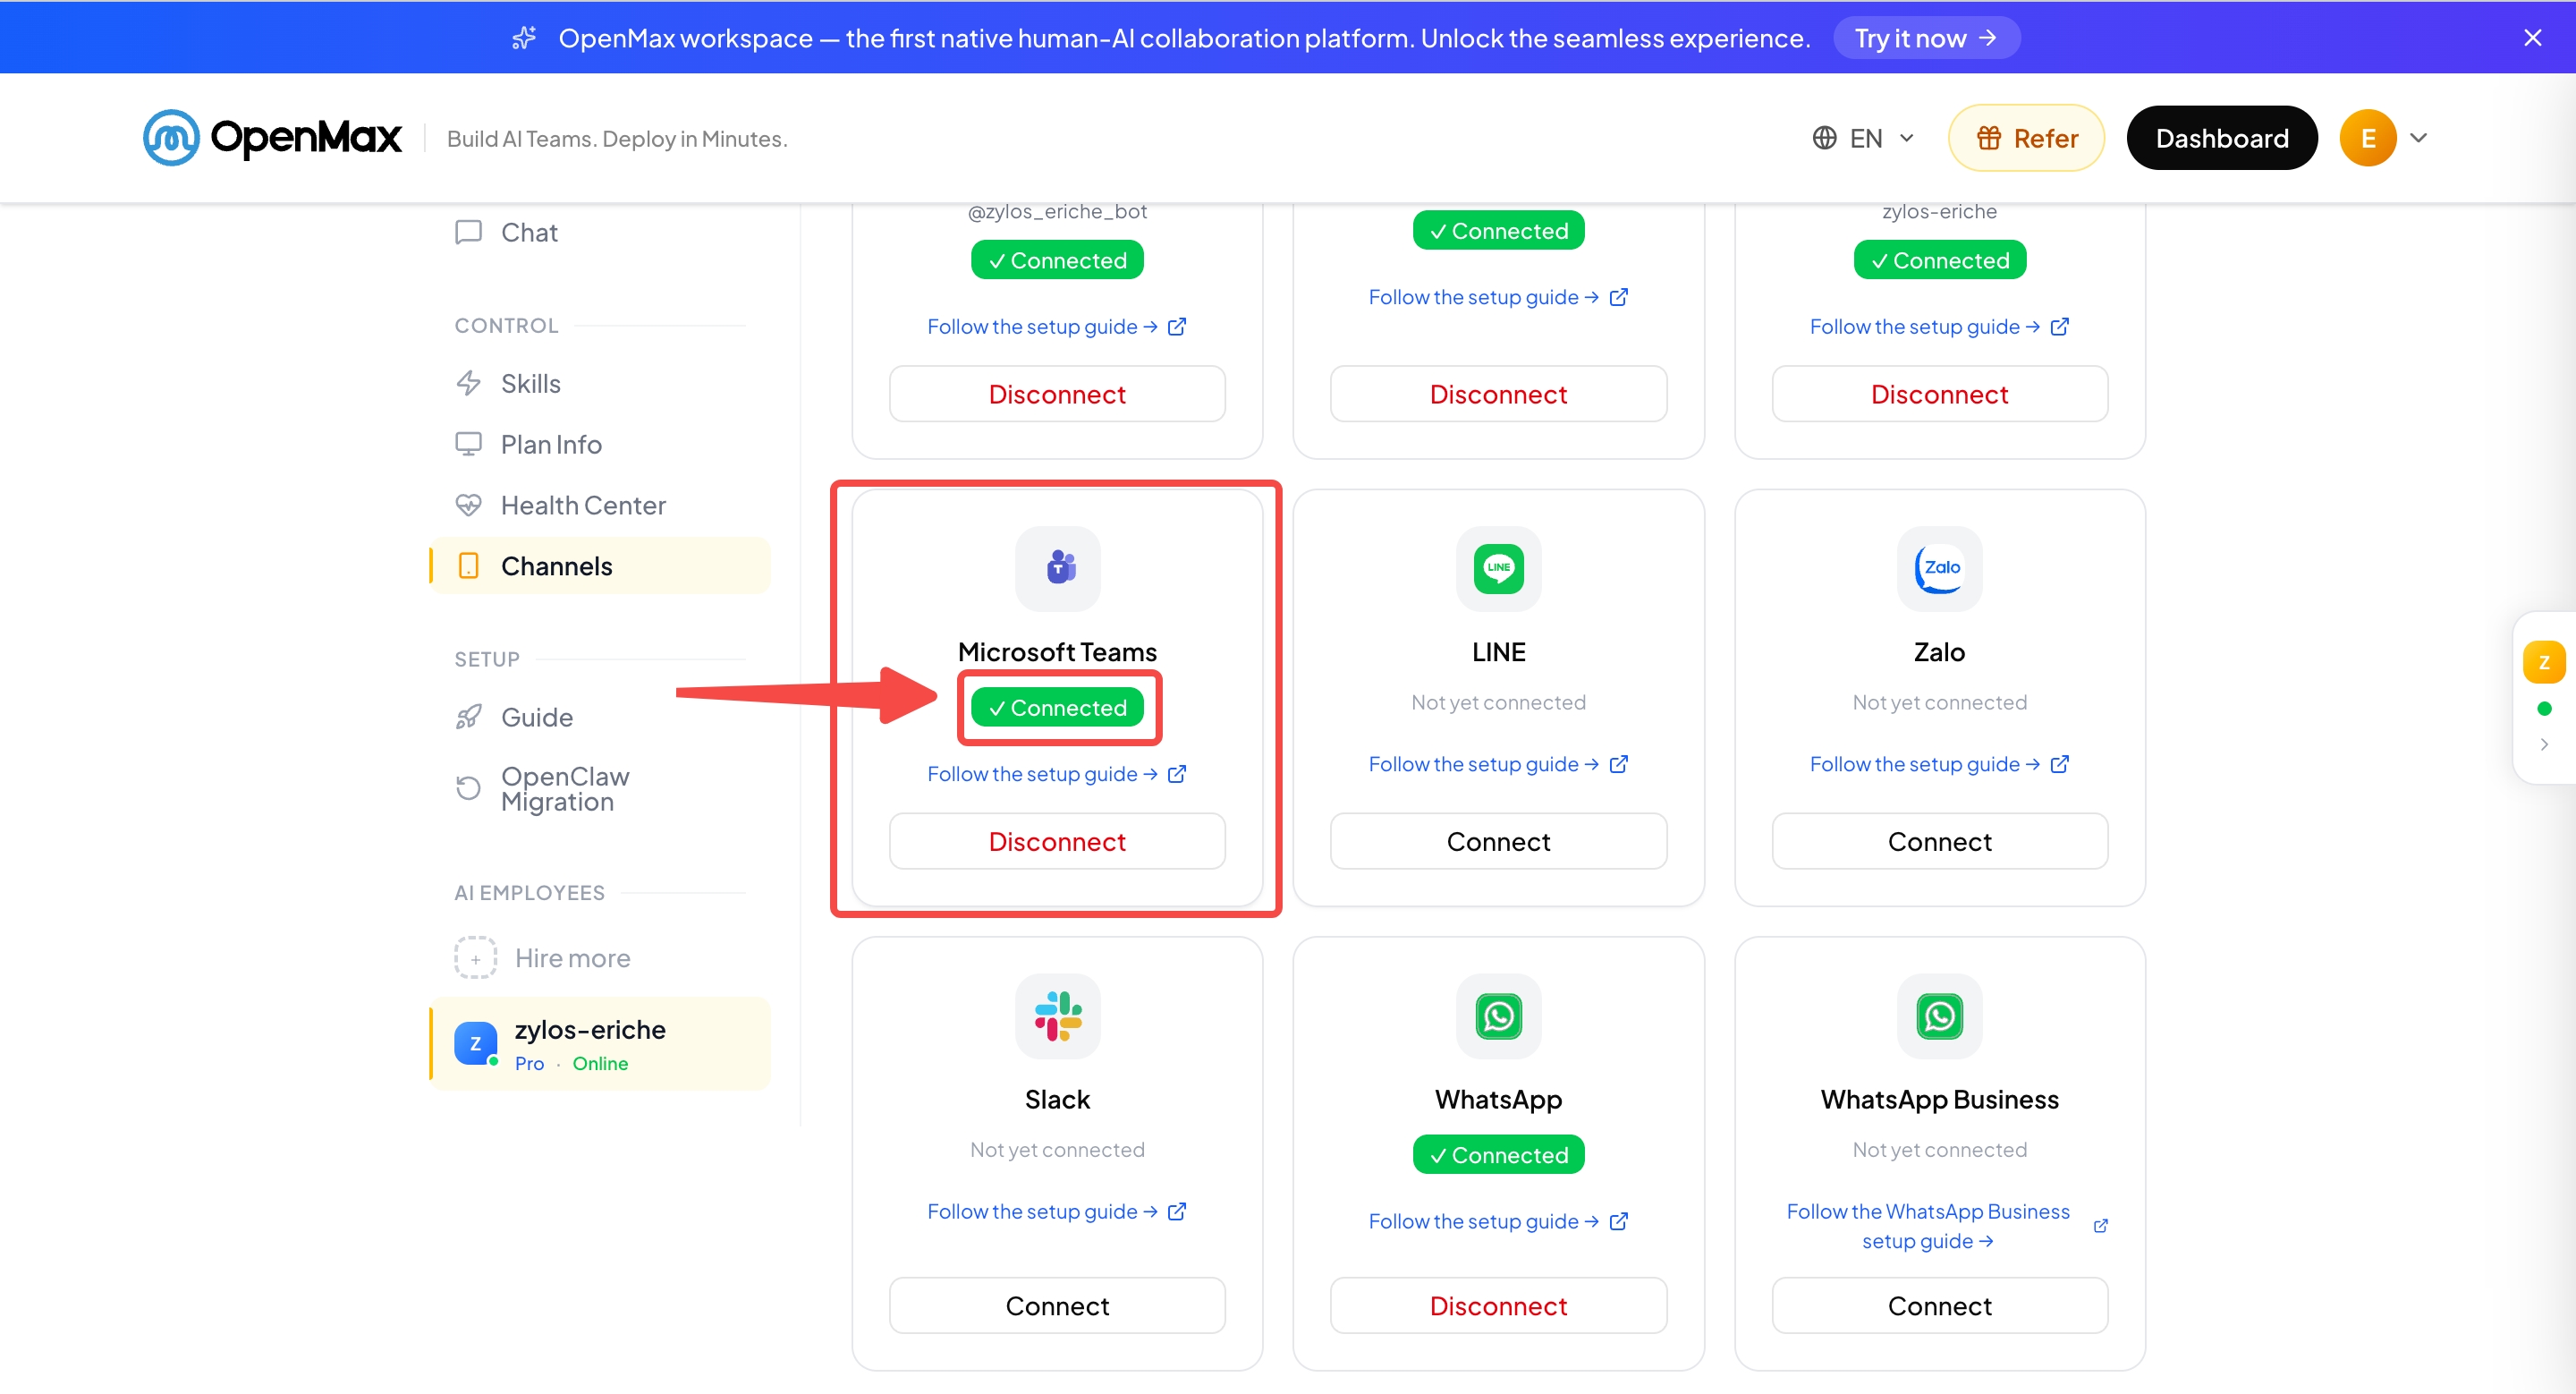
When the connection succeeds, it looks like this:
Step 11: Start Chatting
In Teams, search for your bot's name (e.g.
openmax) in Chat, and open it to start chatting.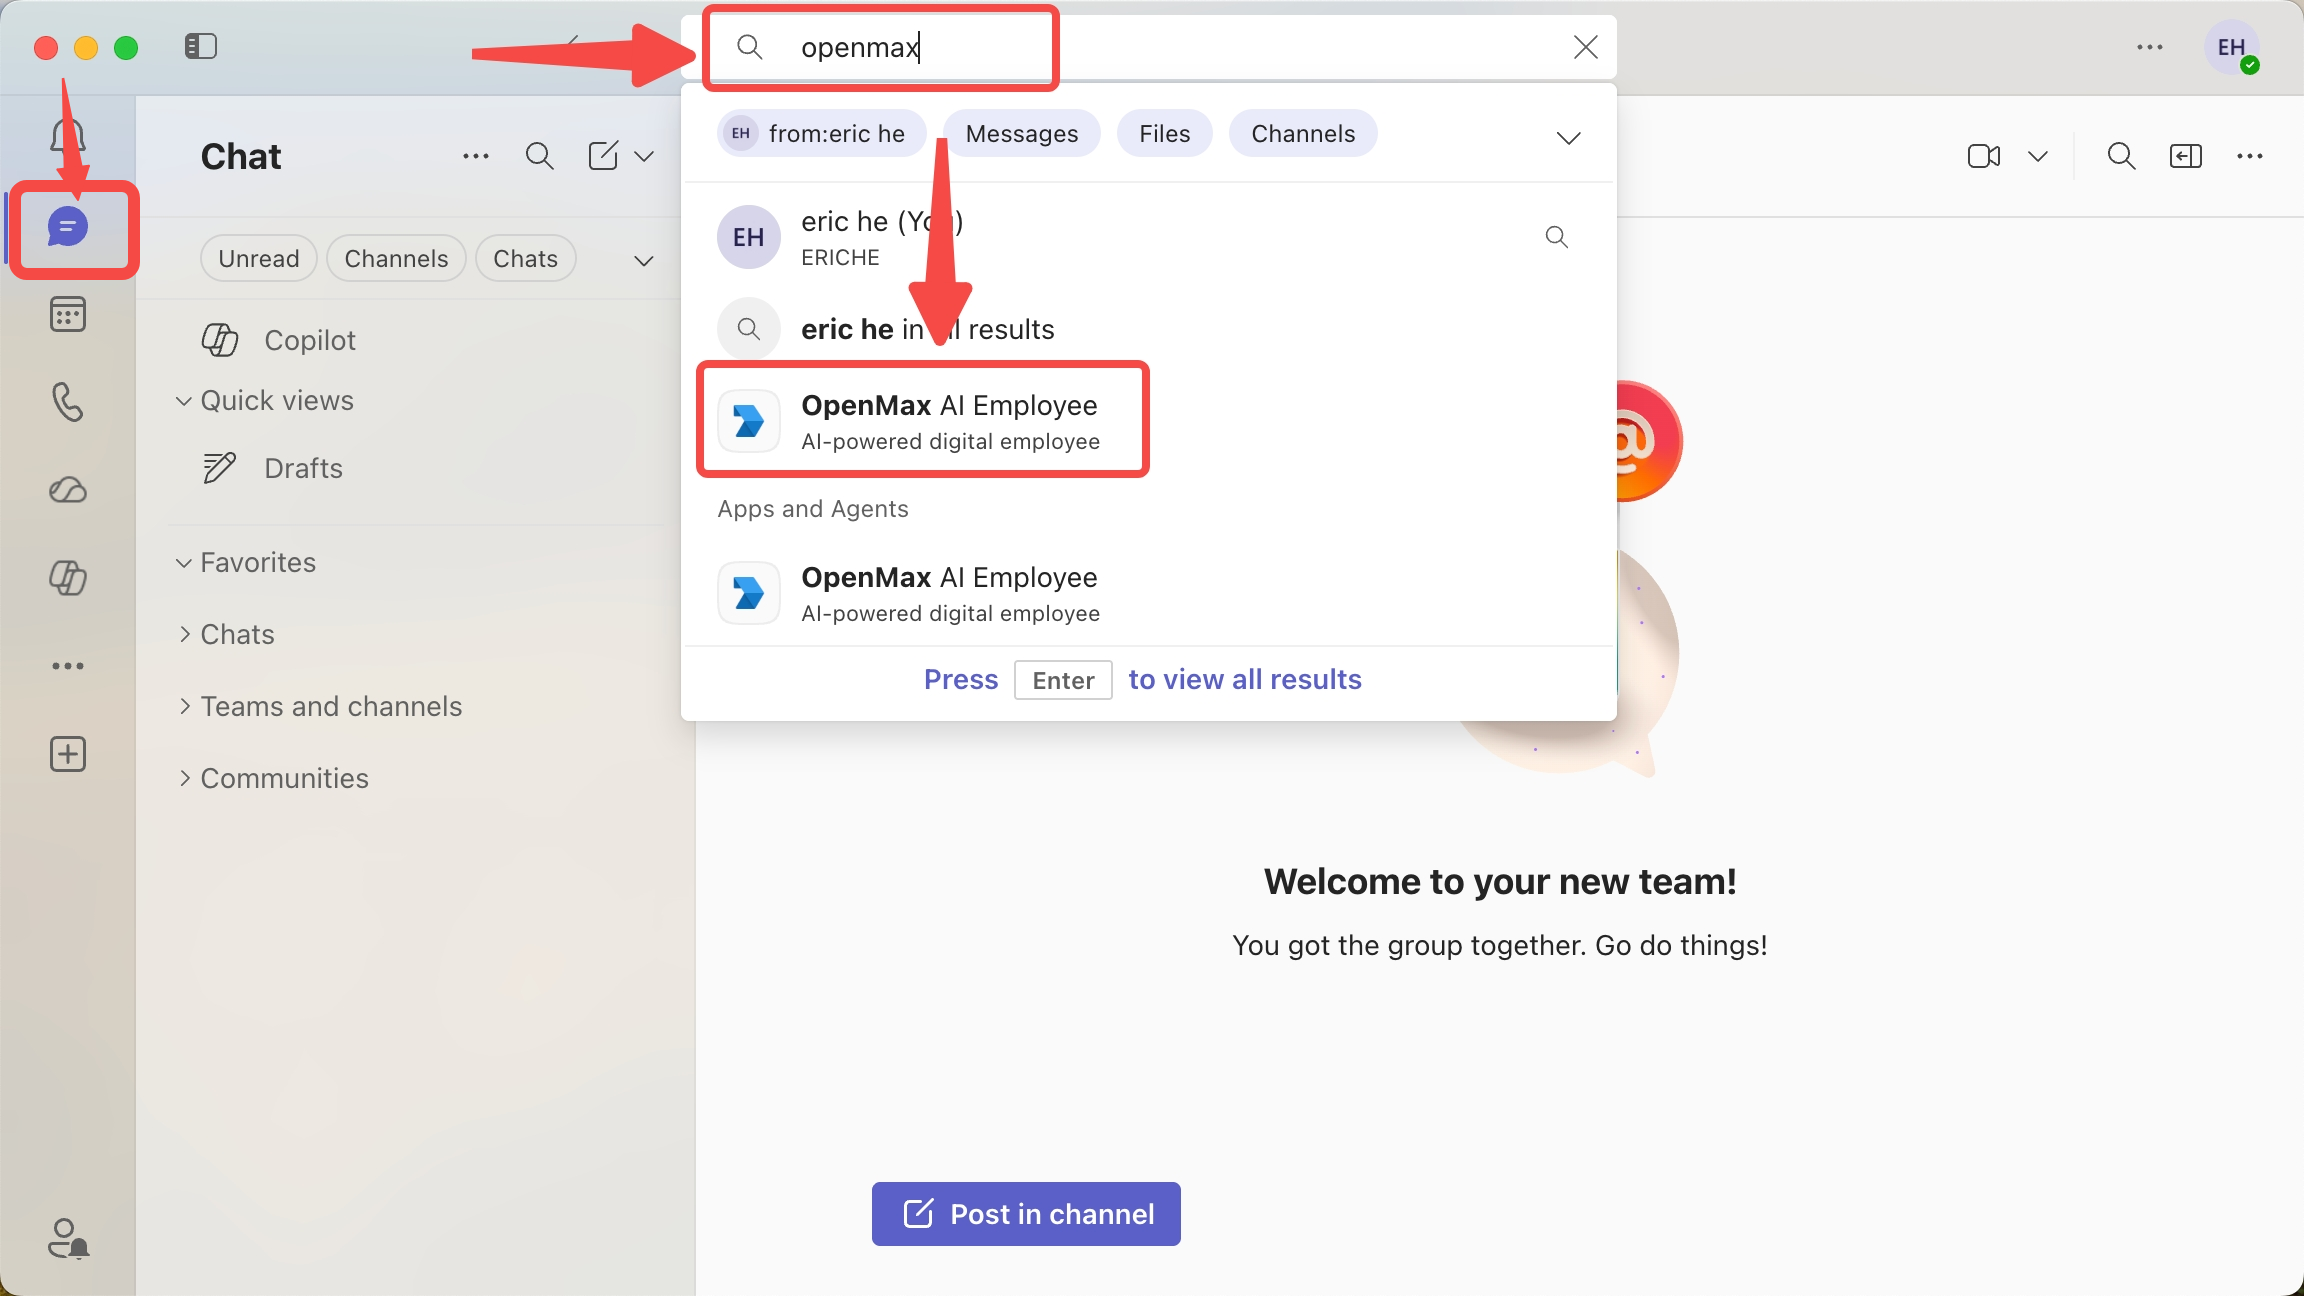
Say hello to your AI employee! For group chats and channels, add the bot and @mention it to talk to it.
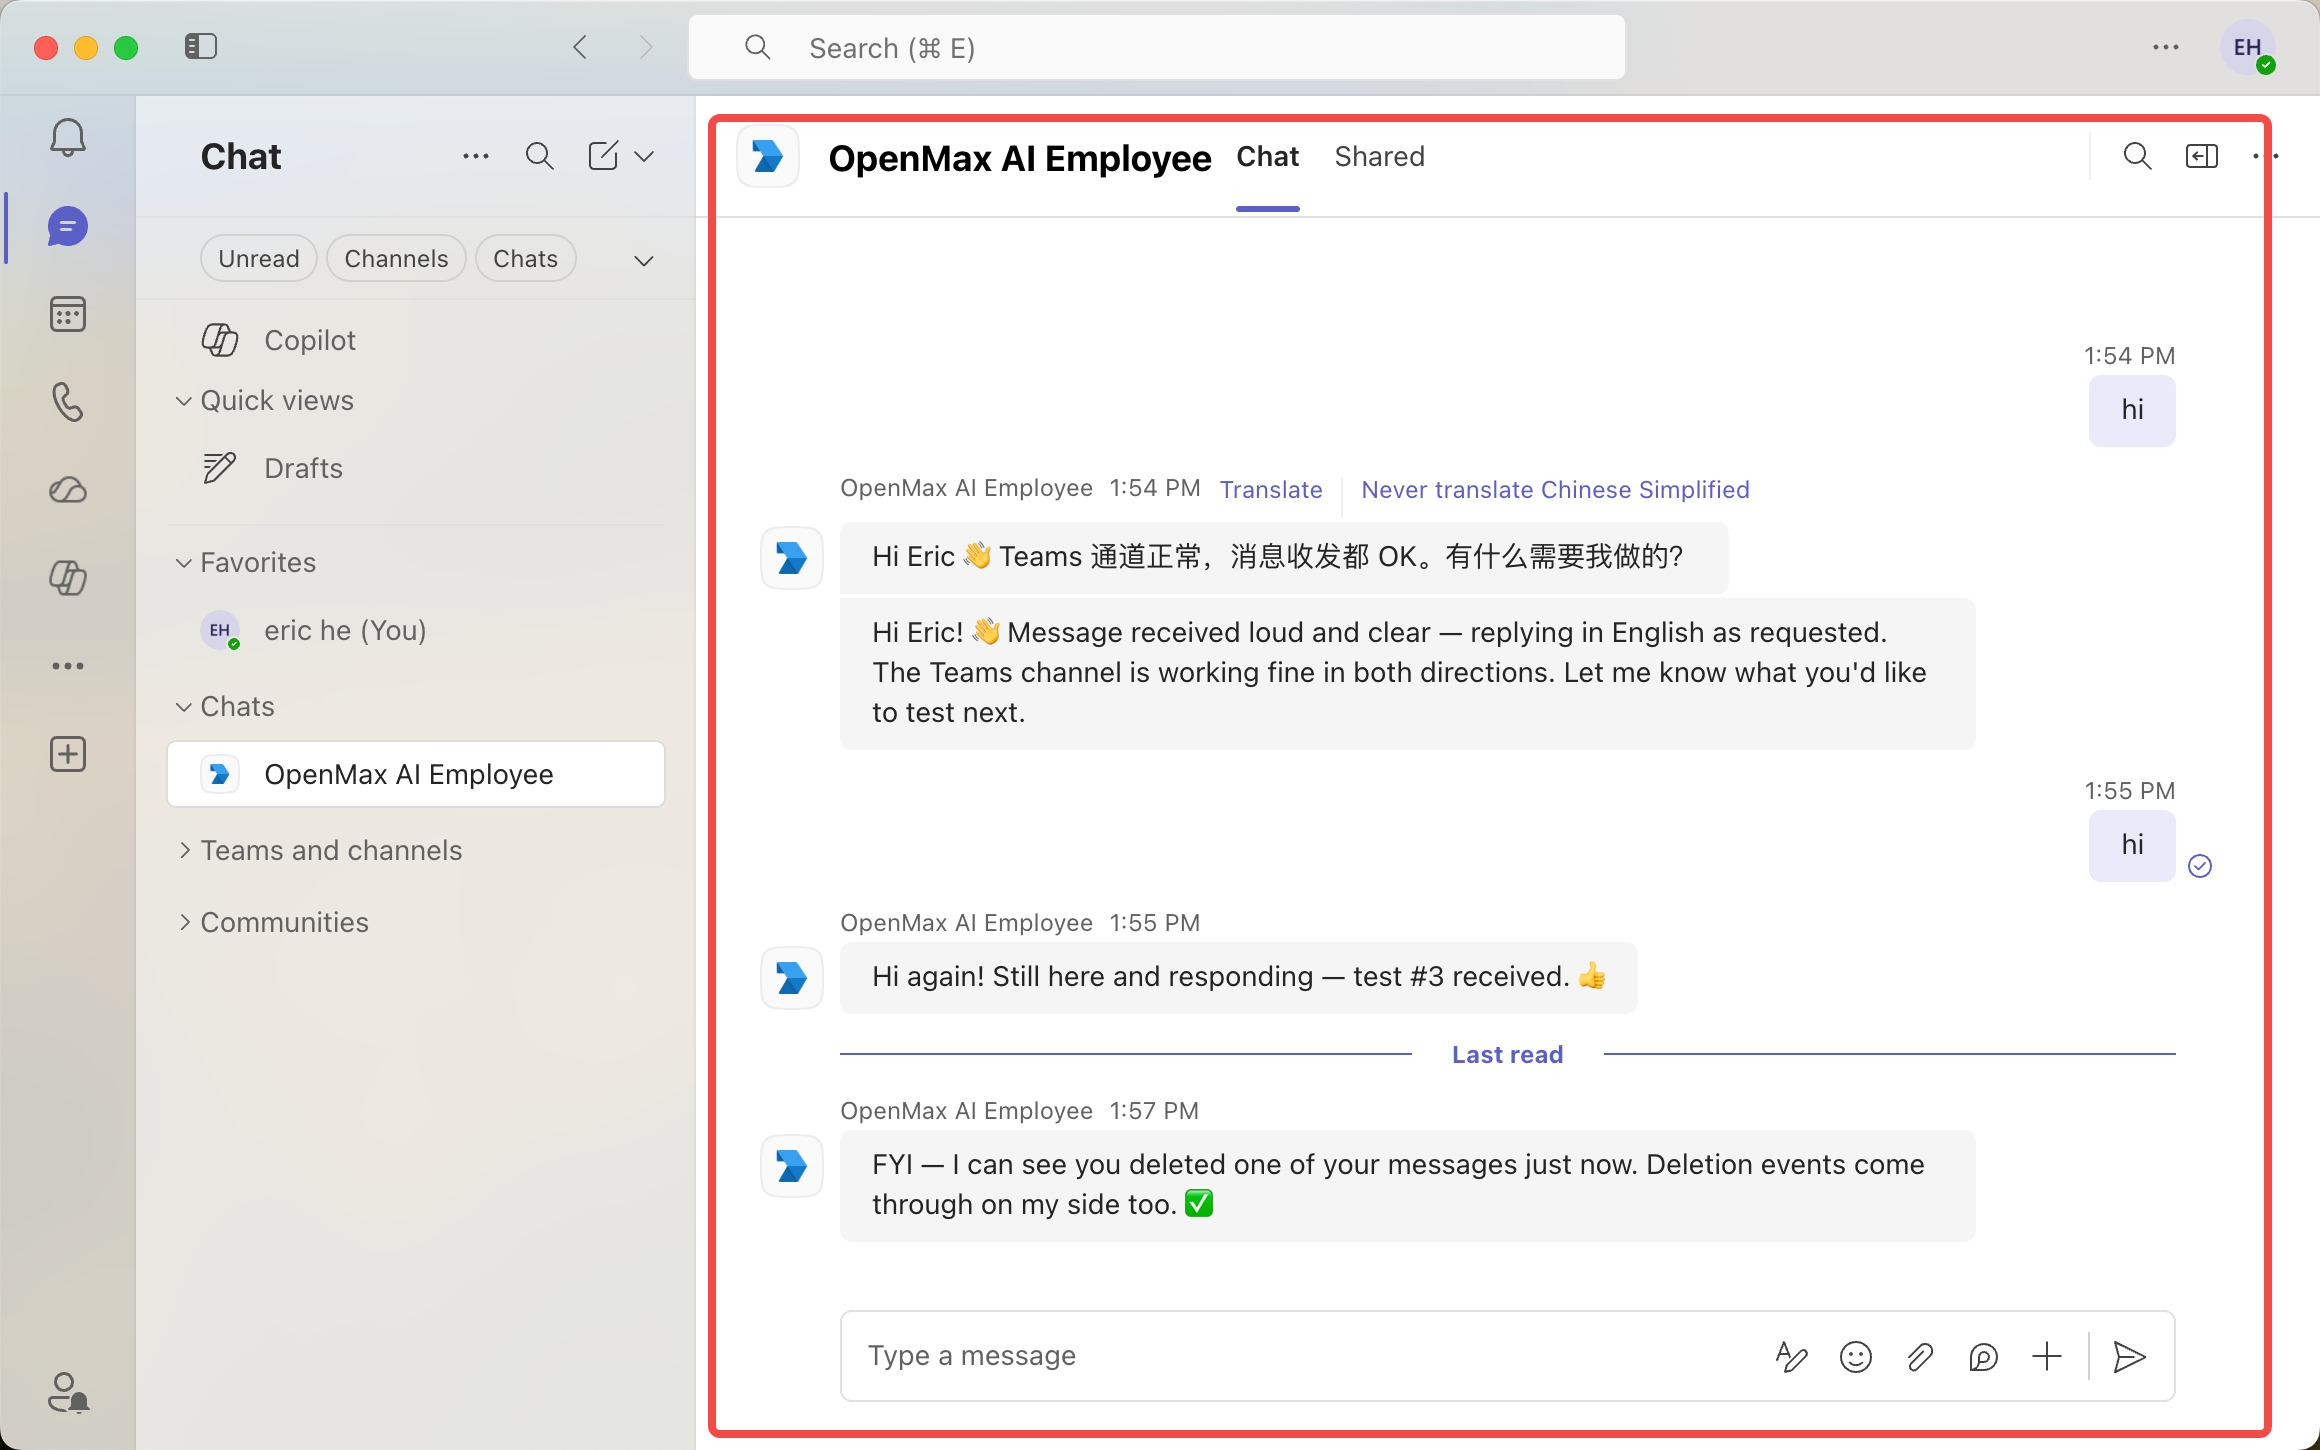
One-time extra (recommended): enable reactions. To activate the 💬 thinking indicator and emoji reactions, open
https://<your-agent-domain>/ms-teams/auth/sign-inin your browser (same domain as your Messaging endpoint), sign in with your Microsoft 365 account, and close the tab after "Signed in successfully" appears. This only needs to be done once — the bot stores the delegated token and uses it automatically from then on.
Microsoft Teams FAQ
| Issue | Solution |
|---|---|
| Bot not responding in Teams | Check the Messaging endpoint in Azure Bot → Configuration, and confirm the App ID and App Password in the OpenMax Dashboard match your Azure Bot |
| Credential validation failed | Make sure you entered the client secret's Value, not the Secret ID, and double-check the Tenant ID |
| Bot not appearing in Teams | The app must be published and approved (Step 9) — or sideloaded — before it appears. Also confirm the <AZURE_APP_ID> in the manifest matches your App Registration |
| App not visible after admin approval | Restart the Teams client — the app list is cached |
| Messages not reaching the bot | The messaging endpoint must be HTTPS and publicly reachable, and the Azure Bot resource must be active |
| File downloads failing | Verify Files.Read.All has admin consent (Step 5) |
| Smart mode not working in channels | Verify ChannelMessage.Read.All has admin consent and the channel is set to smart mode |
| Client secret expired | Create a new client secret in Azure and update the App Password in the OpenMax Dashboard |
| Want to disconnect | Click the Disconnect button on the Microsoft Teams card in the employee detail page |
Option H: Zalo (Official) Deployment
Estimated time: ~5 minutes
Note: Zalo (Official) connects via the official Zalo Bot Platform API. Only a personal Zalo account is required — no Official Account (OA) registration, no servers, and no coding skills needed.
One credential is required:
| Credential | Where to Find | Description |
|---|---|---|
| Bot Token | Zalo Bot Platform → Bot details page | Unique token identifying your bot (format: numeric_id:secret) |
Step 1: Create a Bot on the Zalo Bot Platform
- Visit the Zalo Bot Platform and log in with your Zalo account
- Click Create Bot
- Enter a bot name (e.g.,
OpenMax AI) and description - After creation, you will see your Bot Token (format:
numeric_id:secret) - Copy and save this Token — you'll need it in the next step
Important: The Bot Token is your bot's unique credential. Do not share it with others.
Step 2: Connect in OpenMax Dashboard
- Log into OpenMax Dashboard
- Go to the employee instance detail page
- Find the Zalo (Official) card and click Connect
- Paste the Bot Token from Step 1
- Click Connect — the system will validate the token and complete the connection
Step 3: Start Chatting
- Open Zalo on your phone or desktop
- Search for your bot name
- Send any message — AI employee responds immediately
- Deployment complete!
First message: The first user to send a DM to the bot becomes the Owner. The owner always has full access regardless of policy settings.
Zalo (Official) FAQ
| Issue | Solution |
|---|---|
| Bot not responding | Verify the Bot Token is correct. Check the connection status in OpenMax Dashboard |
| Cannot send images to bot | Ensure the image is under 10 MB. Supported formats: JPG, PNG |
| Bot image not displaying | Outbound images must be hosted on a publicly accessible HTTPS URL |
| Others can't message the bot | By default only the Owner can chat. Enable Allowlist or Open mode to grant access |
| Want to disconnect | Click the Disconnect button on the Zalo (Official) card in the employee detail page |
Option I: Zalo Personal (Unofficial) Deployment
Estimated time: ~2 minutes
Note: Zalo Personal (Unofficial) uses a real Zalo account via QR code scanning — no bot registration, API keys, or developer accounts needed. It connects through zca-js, a reverse-engineered protocol library.
Unofficial Protocol
Zalo Personal (Unofficial) uses an unofficial, reverse-engineered protocol (zca-js) that is not endorsed by Zalo/VNG. Your account could potentially be restricted or banned by Zalo. Use at your own risk. For an official integration, consider Zalo Bot Platform instead.
Use a Dedicated Zalo Account
Please use a separate, dedicated Zalo account for the bot — do not use the same Zalo account that users will use to talk to your OpenMax agent. The connected account becomes the bot's identity, so it must be a different account from any user who will interact with it.
No credentials are required. Authentication is done entirely via QR code:
| Item | Description |
|---|---|
| OpenMax AI Employee | An existing AI employee with at least one channel already connected (e.g., Telegram, Lark, WhatsApp) |
| Dedicated Zalo Account | A phone with Zalo installed and logged in to a separate account — not the same account users will use to message your OpenMax agent |
| ~2 minutes | Time to complete deployment |
Step 1: Ask Your AI Employee to Install Zalo Personal (Unofficial)
Message your AI employee in any connected channel (Telegram, Lark, WhatsApp, etc.):
"Install the Zalo Personal (Unofficial) channel"
Your AI employee will install the Zalo Personal (Unofficial) component and generate a QR code, which it sends back to you in the chat.
Step 2: Scan the QR Code with Your Dedicated Zalo Account
- Open Zalo on the phone logged in to your dedicated bot account (not your personal account)
- Tap the QR code scanner (usually in the top-right corner of the home screen or in the search bar)
- Point your camera at the QR code your AI employee sent you
- Confirm the login on your phone when prompted
Step 3: Connection Confirmed
Your AI employee will confirm the connection is established. Your dedicated Zalo account is now the bot's identity on Zalo.
Step 4: Start Chatting
- Anyone who sends a message to your dedicated bot Zalo account will receive AI-powered responses
- Deployment complete!
First message: The first user to send a DM becomes the Owner (administrator). The owner always has full access regardless of policy settings.
Zalo Personal (Unofficial) FAQ
| Issue | Solution |
|---|---|
| QR code expired before scanning | Ask your AI employee to generate a new QR code (e.g., "Reconnect Zalo Personal (Unofficial)") |
| Connection lost after some time | Zalo may disconnect long-running sessions. Ask your AI employee to reconnect (e.g., "Reconnect Zalo Personal (Unofficial)") |
| Account warning or restriction | This uses an unofficial protocol. If you receive a warning from Zalo, stop using the integration and consider switching to the official Zalo Bot Platform |
| Others can't message the bot | By default only the Owner can chat. Ask your AI employee to enable Allowlist or Open mode to grant access |
| Want to disconnect | Ask your AI employee to disconnect the Zalo Personal (Unofficial) channel (e.g., "Disconnect Zalo Personal (Unofficial)") |
Option J: Discord Deployment
Estimated time: ~8 minutes
Note: Discord connects over the Gateway (WebSocket) — no public callback URL or webhook is required. You only need a Bot Token from the Discord Developer Portal.
One credential is required:
| Credential | Format | Description |
|---|---|---|
| Bot Token | A long opaque token string | Authenticates your bot over the Discord Gateway |
Step 1: Create a Discord Application
- Visit the Discord Developer Portal and log in
- Click New Application in the top-right corner
- Enter a name (e.g.,
OpenMax AI Employee) and click Create
Step 2: Add a Bot & Copy the Token
- In the left sidebar, go to the Bot tab
- Click Reset Token (or Add Bot if prompted), then confirm
- Copy the Bot Token and save it somewhere safe
Important: The Bot Token is shown only once. If you lose it, you'll need to reset it and copy the new one.
Step 3: Enable the Message Content Intent (required)
- Still on the Bot tab, scroll to Privileged Gateway Intents
- Toggle Message Content Intent ON
- Save your changes
Important: Without the Message Content Intent enabled, the bot receives empty message text and cannot read what users send.
Step 4: Invite the Bot to Your Server
- In the left sidebar, go to OAuth2 → URL Generator
- Under Scopes, select
bot - Under Bot Permissions, select:
- View Channels
- Send Messages
- Read Message History
- Attach Files
- Add Reactions
- Copy the generated URL at the bottom and open it in your browser
- Choose the server to add the bot to, then click Authorize
Note: DMs work without a server invite — a server invite is only needed for server/channel use.
Step 5: Connect in OpenMax Dashboard
- Log into OpenMax Dashboard
- Go to the employee instance detail page
- Find the Discord card and click Connect
- Paste the Bot Token from Step 2
- Click Connect — the system will validate the token and complete the connection
Step 6: Start Chatting
- DM the bot directly, or @mention it in a server channel
- Send any message — AI employee responds immediately
- Deployment complete!
First message: The first person to DM the bot becomes the Owner (administrator). The owner always has full access regardless of policy settings.
Discord FAQ
| Issue | Solution |
|---|---|
| Bot offline | Verify the Bot Token is correct and the Message Content Intent is enabled in the Discord Developer Portal |
| No reply in a server channel | Ensure the bot is invited to the server, has permission to view and send messages in the channel, and is @mentioned |
| Bot sees empty or no message text | Enable the Message Content Intent in the Bot tab of the Discord Developer Portal |
| Want to disconnect | Click the Disconnect button on the Discord card in the employee detail page |
Option K: LINE Deployment
Estimated time: 5-10 minutes
LINE connects with two credentials — a Channel Access Token and a Channel Secret — plus a Webhook URL that the Dashboard generates for you. You do not need the numeric Channel ID.
Step 1: Create a LINE Official Account + Messaging API channel
- Go to the LINE Official Account Manager and create (or open) an Official Account.
- Open Settings → Messaging API and click Enable Messaging API, then select or create a provider and agree to the terms.
- This creates a Messaging API channel in the LINE Developers Console.
Step 2: Get your credentials
- In the LINE Developers Console, open your provider → the channel.
- Channel secret — copy it from the Basic settings tab (also shown on the OA Manager Messaging API screen).
- Channel access token (long-lived) — open the Messaging API tab, scroll to Channel access token, click Issue, and copy the token.
Important: Both values are secrets — don't share them. The numeric Channel ID is not required.
Step 3: Connect in OpenMax Dashboard
- Log into OpenMax Dashboard and open the employee instance detail page (or the Channels step in the hire flow).
- Find the LINE card and click Connect.
- Paste the Channel Access Token and Channel Secret from Step 2.
- Click Connect — the system validates the token and deploys your LINE channel.
- Once connected, the card shows a Webhook URL (e.g.
https://<your-subdomain>.icoco.ai/line/webhook). Copy it.
Step 4: Set the webhook in LINE
- Back in the LINE Developers Console → Messaging API tab → Webhook settings.
- Paste the Webhook URL from Step 3 and click Save, then turn Use webhook ON.
- In the LINE Official Account Manager → Settings → Response settings: turn Webhooks ON and turn Auto-response messages OFF — so your AI employee (not LINE's auto-responder) handles messages.
Step 5: Start Chatting
- Add your Official Account as a friend — scan its QR code in OA Manager, or search its Basic ID (e.g.
@xxxxxxx). - Send any message — your AI employee responds immediately.
- Deployment complete!
First message: The first user to DM the account becomes the Owner (administrator), who always has full access regardless of policy settings.
LINE FAQ
| Issue | Solution |
|---|---|
| Bot not responding | Confirm Use webhook is ON, the Webhook URL is saved exactly as shown on the LINE card (including /line/webhook), and Auto-response messages is OFF |
| Connected but no inbound messages | Ensure Webhooks is enabled in OA Manager → Response settings, and that you've added the Official Account as a friend |
| Messages received but no reply | The Channel Access Token may be invalid or reissued — re-paste a fresh long-lived token from the Developers Console and reconnect |
| Sending images / video / voice / files | Supported out of the box — send them in chat and the AI employee reads (and can transcribe voice) them |
| Want to disconnect | Click the Disconnect button on the LINE card in the employee detail page |
Option L: WhatsApp Business (Official API) Deployment
Estimated time: ~5 minutes
Note: This channel uses Meta's official WhatsApp Business Platform (Cloud API). You bring a phone number, verify it with a one-time code right in the Dashboard, and OpenMax handles everything on the Meta side — no Meta developer account, API keys, or QR/phone linking needed. Prefer linking a regular WhatsApp account by QR code instead? See WhatsApp.
No credentials are required. You only need:
| Item | Description |
|---|---|
| OpenMax AI Employee | An existing instance in OpenMax Dashboard |
| Phone Number | A number that can receive an SMS or voice call, and is not currently registered on WhatsApp or another WhatsApp Business account |
| ~5 minutes | Time to complete deployment |
Step 1: Click Connect on the WhatsApp Business Card
- Log into OpenMax Dashboard and open the employee instance detail page
- Find the WhatsApp Business card and click Connect
Step 2: Enter Your Phone Number and Display Name
- Enter the phone number you want to use, in international format (e.g.
+1 555 123 4567) - Enter a display name — this is the business name your customers will see in WhatsApp
- Check the preview carefully before continuing
Important: The display name is reviewed against Meta's display name policy and is hard to change later — choose it carefully.
Step 3: Verify with the One-Time Code
- Meta sends a 6-digit verification code to your number via SMS (a voice call option is available if SMS doesn't arrive)
- Enter the code in the wizard
Mainland China numbers: SMS delivery to +86 numbers can be unreliable — if the code doesn't arrive, use the voice call option.
Step 4: Deploy
- After the code is verified, the system registers your number and deploys the channel automatically — a progress indicator shows each step
- When finished, the WhatsApp Business card shows Connected
Step 5: Start Chatting
- From any phone with WhatsApp, send a message to your business number
- Your AI employee responds immediately — deployment complete!
First message: The first user to DM the business number becomes the Owner (administrator), who always has full access regardless of policy settings.
WhatsApp Business FAQ
| Issue | Solution |
|---|---|
| Verification code never arrives | Wait a moment and retry, or choose the voice call option. SMS to mainland China (+86) numbers is often unreliable |
| "Number already in use" or verification fails | The number must not be registered on the WhatsApp consumer app or another WhatsApp Business account — remove it there first (WhatsApp → Settings → Account → Delete account), then retry |
| Closed the wizard before finishing | Your progress is saved — click Connect on the WhatsApp Business card again to resume where you left off |
| Can't use the bot in group chats | The official Cloud API is 1:1 (DM) only. If you need group chats, use the WhatsApp channel |
| No reply after a long silence | WhatsApp's 24-hour customer-service window has closed — send a new message from the customer side to reopen it; outside the window only pre-approved template messages can be sent |
| Others can't message the bot | By default only the Owner can chat. Enable Allowlist or Open mode to grant access |
| Want to disconnect | Click the Disconnect button on the WhatsApp Business card in the employee detail page |